ES Manual de instrucciones Horno BP831460W BP831462W
www.aeg.com CONTENIDO 1. INFORMACIÓN SOBRE SEGURIDAD....................................................................... 3 2. INSTRUCCIONES DE SEGURIDAD............................................................................4 3. DESCRIPCIÓN DEL PRODUCTO............................................................................... 8 4. PANEL DE MANDOS.................................................................................................. 9 5. ANTES DEL PRIMER USO........................
ESPAÑOL 1. 3 INFORMACIÓN SOBRE SEGURIDAD Antes de instalar y utilizar el aparato, lea atentamente las instrucciones facilitadas. El fabricante no se hace responsable de lesiones o daños producidos como resultado de una instalación o un uso incorrectos: Conserve siempre estas instrucciones en lugar seguro y accesible para futuras consultas. 1.
www.aeg.com • • • • • • • • • necesario mantener alejados a los niños de menos de 8 años salvo que estén bajo supervisión continua. Utilice siempre guantes de horno cuando introduzca o retire accesorios o utensilios refractarios. Antes de realizar tareas de mantenimiento, corte la corriente eléctrica. Asegúrese de que el aparato está desconectado antes de reemplazar la lámpara con el fin de impedir que se produzca una descarga eléctrica. No utilice un limpiador a vapor para limpiar el aparato.
ESPAÑOL • Asegúrese de que el aparato se instala debajo y junto a estructuras seguras. • Los laterales del aparato deben colocarse junto a otros aparatos o muebles de la misma altura. 2.2 Conexión eléctrica ADVERTENCIA! Riesgo de incendios y descargas eléctricas. • Todas las conexiones eléctricas deben realizarlas electricistas cualificados. • El aparato debe conectarse a tierra. • Asegúrese de que las especificaciones eléctricas de la placa coincidan con las del suministro eléctrico de su hogar.
www.aeg.com ADVERTENCIA! Podría dañar el aparato. • Para evitar daños o decoloraciones del esmalte: – no coloque utensilios refractarios ni otros objetos directamente en la parte inferior del aparato. – no coloque papel de aluminio directamente en la parte inferior del aparato. – No ponga agua directamente en el aparato caliente. – No deje platos húmedos ni comida en el aparato una vez finalizada la cocción. – Preste especial atención al desmontar o instalar los accesorios.
ESPAÑOL • • • • – asegurar una correcta ventilación durante y después de cada limpieza pirolítica. – asegurar una correcta ventilación durante y después del primer uso a máxima temperatura. A diferencia de los seres humanos, algunas aves y algunos reptiles pueden ser muy sensibles a los posibles humos emitidos durante la limpieza de todos los hornos pirolíticos.
www.aeg.com 3. DESCRIPCIÓN DEL PRODUCTO 3.1 Descripción general 1 2 3 4 5 5 4 8 3 6 2 1 1 2 3 4 5 6 7 8 Panel de control Programador electrónico Toma de la sonda térmica Resistencia Lámpara Ventilador Carril lateral, extraíble Posiciones de los estantes 7 3.2 Accesorios Parrilla Para bandejas de horno, moldes de pastelería, asados. Bandeja para hornear Para bizcochos y galletas. Bandeja honda Para hornear y asar o como bandeja grasera.
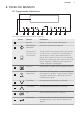
ESPAÑOL 9 4. PANEL DE MANDOS 4.1 Programador electrónico 1 2 3 4 5 6 7 8 9 10 11 Utilice los sensores para accionar el aparato. Sensor 1 2 - Función Comentario Pantalla Muestra los ajustes actuales del aparato. ENCENDIDO / APAGADO Para activar y desactivar el aparato. Funciones De Cocción o Cocción Asistida Toque el sensor una vez para seleccionar una función de cocción o el menú: Cocción Asistida.
www.aeg.com Sensor Función Comentario Funciones adicio- Programar diferentes funciones. Cuando esté en nales y de tiempo marcha una función de cocción, toque el sensor para ajustar el temporizador o las funciones: Tecla De Bloqueo, Favoritos, Calentar Y Mantener, Ajustar + Empezar. También puede cambiar los ajustes de la sonda térmica. 10 Avisador 11 Para ajustar la función: Avisador. 4.2 Pantalla A B C E D A. B. C. D. E.
ESPAÑOL Símbolo 11 Función Peso Automático La pantalla indica que el sistema de peso automático está activo o que el peso puede cambiarse. Calentar Y Mantener La función está activada. 5. ANTES DEL PRIMER USO Coloque los accesorios y carriles laterales extraíbles en su posición inicial. ADVERTENCIA! Consulte los capítulos sobre seguridad. 5.2 Primera conexión 5.1 Limpieza inicial Retire todos los accesorios y carriles de apoyo extraíbles del aparato.
www.aeg.com Símbolo Elemento del menú Aplicación Favoritos Contiene una lista de los programas de cocción favoritos creados por el usuario. Submenú para: Ajustes Básicos Símbolo Submenú Descripción Ajustar la hora Pone en hora el reloj. Indicación Tiempo Si está activado, la pantalla indica la hora actual al apagar el aparato. Calentamiento rápido Cuando está activada, la función reduce el tiempo de calentamiento.
ESPAÑOL 13 6.3 Funciones De Cocción Función de cocción Aplicación Turbo Para hornear en hasta tres posiciones de parrilla a la vez y para secar alimentos.Ajuste la temperatura entre 20 y 40 °C menos que para la función: Bóveda/Calor inferior. Pizza Para hornear alimentos en un nivel, con dorado intenso y base crujiente. Ajuste la temperatura entre 20 y 40 °C menos que para la función: Bóveda/ Calor inferior. Cocina A Baja Tempera- Para preparar asados tiernos y jugosos.
www.aeg.com Función de cocción Aplicación Calor Inferior Para preparar pasteles con bases crujientes y conservar alimentos. Levantar Masa Para levantar de forma controlada la masa antes de hornear. Pan Para hornear pan. Gratinar Para platos como lasañas o patatas gratinadas. También para gratinar y dorar. Conservar Para preparar conservas de verduras como encurtidos.
ESPAÑOL 6.7 Calor residual Al desactivar el aparato la pantalla mostrará el calor residual. El calor puede 15 emplearse para mantener calientes los alimentos. 7. FUNCIONES DEL RELOJ 7.1 Tabla de funciones del reloj Función de reloj Aplicación Avisador Para programar una cuenta atrás (máx. 2 h 30 min). Esta función no influye en el funcionamiento del horno. También puede utilizarlo cuando el aparato está apagado. Use para activar la función. Pulse para ajustar los minutos y pulse empezar.
www.aeg.com Al finalizar el tiempo programado sonará una señal. El aparato se apaga. La pantalla mostrará un mensaje. 5. Pulse cualquier símbolo para desactivar la señal. 5. Pulse para confirmar. Cuando la función termine, sonará una señal. La función permanece activa si se cambian las funciones de cocción. 7.3 Calentar Y Mantener 7.4 Añadir Tiempo Condiciones para que la función se active: La función: Añadir Tiempo hace que la función de cocción continúe tras el final de Duración.
ESPAÑOL 8.3 Cocción Asistida con Peso Automático Esta función calcula automáticamente el tiempo de asado. Si se desea hacer uso de esta función, es necesario introducir el peso de los alimentos. 1. Encienda el aparato. 2. Ajuste el menú: Cocción Asistida. para confirmar. Pulse 3. Seleccione la categoría y el plato. Pulse para confirmar. 4. Seleccione la función: Peso Automático. Pulse confirmar. 5. Toque o 17 Comenzará el programa automático. 6. Puede cambiar el peso en cualquier momento.
www.aeg.com Cuando la carne alcanza la temperatura interna programada, suena una señal. El aparato se apaga automáticamente. 7. Pulse cualquier símbolo para parar la señal. 8. Desenchufe la sonda térmica de la toma y saque la carne del horno. ADVERTENCIA! La sonda térmica está caliente. Corre el riesgo de quemarse. Tenga cuidado al retirar la punta y el enchufe de la sonda térmica. Las pequeñas hendiduras en la parte superior incrementan la seguridad.
ESPAÑOL 19 Parrilla y bandeja honda juntas: Coloque la parrilla y la bandeja honda sobre los carriles telescópicos. Bandeja honda: Coloque la bandeja honda sobre los carriles telescópicos. 10. FUNCIONES ADICIONALES 10.1 Favoritos Puede guardar sus ajustes preferidos, como por ejemplo la duración, la temperatura o la función de cocción. Están disponibles en el menú: Favoritos. Se pueden guardar 20 programas. 9. Repita el paso 7 las veces que sea necesario. 10. Mantenga pulsado para guardar.
www.aeg.com 10.2 Uso del Bloqueo seguridad 1. Encienda el horno. 2. Seleccione una función de cocción. 3. Pulse repetidamente hasta que la pantalla muestre: Duración. 4. Ajuste el tiempo deseado. Cuando está activado el Bloqueo seguridad, no se puede activar el aparato. La puerta se bloquea automáticamente durante la función de pirólisis. Aparecerá un mensaje en la pantalla al pulsar cualquier símbolo. 1. Toque para activar la pantalla. 2.
ESPAÑOL es inferior entre las 22:00 h y las 06:00 h. • Brillo diurno: – con el aparato encendido. – si toca cualquiera de los símbolos durante el brillo nocturno (aparte de ON / OFF), la pantalla vuelve al modo de brillo diurno durante los 10 segundos siguientes. – si el aparato está apagado y se ajusta la función: Avisador. Cuando termina la función, la pantalla vuelve al brillo nocturno. 21 10.
www.aeg.com • Si no encuentra los datos exactos para una receta concreta, siga los de una preparación similar. • El tiempo de cocción puede ampliarse unos 10-15 minutos cuando se hornea repostería en más de una posición. • Los pasteles y los hojaldres que se hornean a niveles diferentes no se doran de manera uniforme al principio. Si ocurre esto, no cambie el ajuste de temperatura. Las diferencias se compensarán durante el horneado.
ESPAÑOL 11.
www.aeg.com Alimento Función Temperatura (°C) Tiempo (min) Posición de la parrilla 1. 2. 1 Pan (pan de Bóveda/Calor centeno): inferior 1. Primera parte del proceso de horneado. 2. Segunda parte del proceso de horneado. 1. 2.
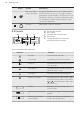
ESPAÑOL Galletas Alimento Función Temperatura (°C) Tiempo (min) Posición de la parrilla Galletas de masa quebrada Turbo 150 - 160 10 - 20 3 Short bread / Pan pequeño / Masa quebrada Turbo 140 20 - 35 3 Short bread / Pan pequeño / Masa quebrada Bóveda/Calor inferior 1601) 20 - 30 3 Galletas de ma- Turbo sa batida de bizcocho 150 - 160 15 - 20 3 Hojaldres con clara de huevo / Merengues 80 - 100 120 - 150 3 Mostachones de Turbo almendra 100 - 120 30 - 50 3 Galletas de masa de l
www.aeg.com Alimento Función Temperatura (°C) Tiempo (min) Posición de la parrilla Lasaña Bóveda/Calor inferior 180 - 200 25 - 40 1 Verduras al gra- Grill + Turbo 160 - 170 15 - 30 1 Barras de pan Turbo cortadas a lo largo y cubiertas de queso fundido 160 - 170 15 - 30 1 Dulces horneados Bóveda/Calor inferior 180 - 200 40 - 60 1 Pescado al horno Bóveda/Calor inferior 180 - 200 30 - 60 1 Verduras rellenas Turbo 160 - 170 30 - 60 1 tén1) 1) Precaliente el horno. 11.
ESPAÑOL Tartas / pastas / pan en bandejas Alimento Temperatura (°C) Tiempo (min) Buñuelos / Bollos rellenos de crema 160 - 1801) Pastel Streusel, seco 150 - 160 Posición de la parrilla 2 posiciones 3 posiciones 25 - 45 1/4 - 30 - 45 1/4 - 1) Precaliente el horno.
www.aeg.com 11.
ESPAÑOL 29 11.
www.aeg.com Cordero Alimento Cantidad (kg) Función Temperatura Tiempo (°C) (min) Posición de la parrilla Pata de cordero / Cordero asado 1 - 1.5 Grill + Turbo 150 - 170 100 - 120 1 Espalda de cordero 1 - 1.
ESPAÑOL 11.12 Grill 31 • Precaliente siempre el horno en vacío con la función de grill durante 5 minutos. • Hornee al grill con el ajuste máximo de temperatura. • Coloque la rejilla en el nivel recomendado en la tabla de uso. • La grasera debe ir siempre en el primer nivel inferior. • Cocine al grill solo trozos de carne o pescado poco gruesos. PRECAUCIÓN! Hornee al grill con la puerta del horno siempre cerrada.
www.aeg.
ESPAÑOL 11.14 Cocina A Baja Temperatura 33 Cocine siempre sin tapar cuando utilice esta función. Utilice esta función para preparar piezas de carne y pescado tiernas y magras con temperaturas internas de 65 °C como máximo. Esta función no es adecuada para estofado o asado de cerdo graso. Puede utilizar la sonda térmica para garantizar que la carne tenga la temperatura interna correcta (consulte en la tabla la sonda térmica).
www.aeg.com Alimento Cantidad Tiempo de Tiempo de descongela- descongelación (min) ción posterior (minutos) Comentarios Mantequilla 250 g 30 - 40 10 - 15 - Nata 2 x 200 g 80 - 100 10 - 15 Monte la nata aunque queden puntos ligeramente congelados. Pasteles 1,4 kg 60 60 - 11.16 Conservar • Utilice únicamente botes de conserva del mismo tamaño disponibles en el mercado. • No utilice botes con cierre hermético (twist-off) o de bayoneta ni latas metálicas.
ESPAÑOL 35 Verduras Alimento Temperatura (°C) Tiempo de cocción Continuar la cochasta que empiecen ción a 100 °C (min) a subir burbujas (min) Zanahorias1) 160 - 170 50 - 60 5 - 10 Pepinos 160 - 170 50 - 60 - Encurtidos variados 160 - 170 50 - 60 5 - 10 Colinabos/Guisantes/Espárragos 160 - 170 50 - 60 15 - 20 1) Deje reposar en el horno después de apagarlo. 11.17 Secar • Cubra las bandejas con papel vegetal o de hornear.
www.aeg.com Alimento Temperatura (°C) Tiempo (min) Posición de la parrilla Pan blanco 180 - 200 40 - 60 2 Baguette 200 - 220 35 - 45 2 Brioche 180 - 200 40 - 60 2 Chapata 200 - 220 35 - 45 2 Pan de centeno 190 - 210 50 - 70 2 Pan negro 180 - 200 50 - 70 2 Pan de semillas 170 - 190 60 - 90 2 11.
ESPAÑOL 37 Caza Alimento Temperatura interna del alimento (°C) Lomo de liebre 70 - 75 Muslos de liebre 70 - 75 Liebre entera 70 - 75 Lomo de corzo/ciervo 70 - 75 Pata de corzo/ciervo 70 - 75 Pescado Alimento Temperatura interna del alimento (°C) Salmón 65 - 70 Trucha 65 - 70 12. MANTENIMIENTO Y LIMPIEZA ADVERTENCIA! Consulte los capítulos sobre seguridad. 12.1 Notas sobre la limpieza • Limpie la parte delantera del horno con un paño suave humedecido en agua templada y jabón neutro.
www.aeg.com Los pasadores de retención de los carriles telescópicos deben estar orientados hacia la parte frontal. 12.3 Pirólisis Intensivo 4. Toque 2 h y 30 min para un nivel de suciedad alto para confirmar. PRECAUCIÓN! Retire todos los accesorios y carriles telescópicos extraíbles. Cuando empiece la limpieza pirolítica, se bloqueará la puerta del aparato y la lámpara no funcionará.
ESPAÑOL 39 pequeño y luego el de mayor tamaño y la puerta. ADVERTENCIA! Asegúrese de que los cristales se introducen en la posición correcta para evitar el sobrecalentamiento de la superficie de la puerta. A A 3. Cierre la puerta del horno hasta la primera posición de apertura (aproximadamente a un ángulo de 70°). 4. Sostenga la puerta con una mano a cada lado y tire de ella hacia arriba y hacia afuera. 5. Ponga la puerta con el lado exterior hacia abajo sobre un paño suave en una superficie nivelada.
www.aeg.com ADVERTENCIA! Hay peligro de electrocución. Desconecte el fusible antes de cambiar la bombilla. La lámpara del horno y la tapa de cristal pueden estar calientes. La bombilla lateral 1. Retire el carril izquierdo para acceder a la bombilla. 2. Utilice un objeto estrecho y sin punta (por ejemplo, una cucharilla) para retirar la tapa de cristal. 1. Apague el aparato. 2. Retire los fusibles de la caja de fusibles o desconecte el disyuntor. La bombilla superior 1.
ESPAÑOL 41 Problema Posible causa Solución El horno no calienta. El apagado automático está activado. Consulte "Desconexión automática". El horno no calienta. El bloqueo de seguridad pa- Consulte "Uso del bloqueo ra niños está activado. para niños". El horno no calienta. La puerta no está bien cerra- Cierre completamente la da. puerta. El horno no calienta. Ha saltado el fusible. Compruebe si el fusible es la causa del fallo de funcionamiento.
www.aeg.com Es conveniente que anote los datos aquí: Número de serie (S.N.) ......................................... 14. EFICACIA ENERGÉTICA 14.1 Ficha de producto e información según EU 65-66/2014 Nombre del proveedor AEG Identificación del modelo BP831460WM BP831462WM Índice de eficiencia energética 81.2 Clase de eficiencia energética A+ Consumo de energía con carga estándar, modo con- 1.09 kWh/ciclo vencional Consumo de energía con carga estándar, modo con ventilador 0.
ESPAÑOL tiempo Duración o Hora De Fin y el tiempo de cocción es superior a 30 minutos, las resistencias se desactivan automáticamente un 10% antes. La bombilla y el ventilador siguen funcionando. Mantener calor Si desea utilizar el calor residual para mantener calientes los alimentos, seleccione el ajuste de temperatura más bajo posible. La pantalla muestra el indicador de calor residual o la temperatura.
867326441-B-462016 www.aeg.