EN User Manual Oven BP8615101 BP8715101
www.aeg.com CONTENTS 1. SAFETY INFORMATION.................................................................................................3 2. SAFETY INSTRUCTIONS................................................................................................ 4 3. PRODUCT DESCRIPTION.............................................................................................. 7 4. CONTROL PANEL...........................................................................................................7 5.
ENGLISH 1. 3 SAFETY INFORMATION Before the installation and use of the appliance, carefully read the supplied instructions. The manufacturer is not responsible if an incorrect installation and use causes injuries and damages. Always keep the instructions with the appliance for future reference. 1.
www.aeg.com • • • • • • • Ensure that the appliance is switched off before replacing the lamp to avoid the possibility of electric shock. Do not use a steam cleaner to clean the appliance. Do not use harsh abrasive cleaners or sharp metal scrapers to clean the glass door since they can scratch the surface, which may result in shattering of the glass.
ENGLISH • The shock protection of live and insulated parts must be fastened in such a way that it cannot be removed without tools. • Connect the mains plug to the mains socket only at the end of the installation. Make sure that there is access to the mains plug after the installation. • If the mains socket is loose, do not connect the mains plug. • Do not pull the mains cable to disconnect the appliance. Always pull the mains plug.
www.aeg.com • • • • • • Contact the Authorised Service Centre. Be careful when you remove the door from the appliance. The door is heavy! Clean regularly the appliance to prevent the deterioration of the surface material. Remaining fat or food in the appliance can cause fire. Clean the appliance with a moist soft cloth. Only use neutral detergents. Do not use abrasive products, abrasive cleaning pads, solvents or metal objects. If you use an oven spray, obey the safety instructions on the packaging.
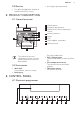
ENGLISH 2.8 Service 7 • Use original spare parts only. • To repair the appliance contact an Authorised Service Centre. 3. PRODUCT DESCRIPTION 3.1 General overview 1 2 3 4 5 5 4 3 2 1 8 1 Control panel 2 Electronic programmer 3 Socket for the core temperature sensor 4 Heating element 5 Lamp 6 Fan 7 Shelf support, removable 8 Shelf positions 6 7 For cakes and biscuits. • Grill- / Roasting pan To bake and roast or as pan to collect fat.
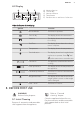
www.aeg.com Use the sensor fields to operate the appliance. Sensor field 1 2 - Function Comment Display Shows the current settings of the appliance. ON / OFF To activate and deactivate the appliance. 3 Heating Functions Touch the sensor field once to choose a heating or Assisted Cook- function or the menu: Assisted Cooking. Touch ing the sensor field again to switch between the menus: Heating Functions, Assisted Cooking. To activate or deactivate the light, touch the field for 3 seconds.
ENGLISH 9 4.2 Display A B C E D A) B) C) D) E) Heating function Time of day Heat-up indicator Temperature Duration time or end time of a function Other indicators of the display: Symbol Function Minute Minder The function operates. Time of day The display shows the current time. Duration The display shows the necessary time for cooking. End Time The display shows when the cooking time is complete. Temperature The display shows the temperature.
www.aeg.com 5.2 First Connection 1. Set the function: Conventional When you connect the appliance to the mains or after the power cut, you have to set the language, the display contrast, the display brightness and the time of the day. Cooking and the maximum temperature. 2. Let the appliance operate for 1 hour. 3. Set the function: True Fan Cooking 1. Press or 2. Press to confirm. to set the value. 5.3 Preheating Preheat the empty appliance to burn off the remaining grease.
ENGLISH Symbol 11 Submenu Description Set + Go When ON, in the Select Options window you can choose the function: Set + Go. Heat + Hold When ON, in the Select Options window you can choose the function: Heat + Hold. Extra Time Activates and deactivates the time extension function. Display Contrast Adjusts the display contrast by degrees. Display Brightness Adjusts the display brightness by degrees. Set Language Sets the language for the display.
www.aeg.com Heating function Application Conventional Cooking To bake and roast food on 1 shelf position. Frozen Foods To make your convenience food like e.g. French Fries, Wedges, spring rolls crispy. Turbo Grilling To roast larger meat joints or poultry with bones on 1 shelf position. Also to make gratins and to brown. Fast Grilling To grill flat food in large quantities and to toast bread. Grilling To grill flat food and to toast bread. Keep Warm To keep food warm.
ENGLISH Heating function ECO Roasting Application The ECO functions let you optimize the energy consumption during cooking. It is necessary to set the cooking time first. To get more information about the recommended settings, refer to the cooking tables with the equivalent function. 6.4 Activating a heating function 1. Activate the appliance. 2. Select the menu: Heating Functions. 3. Press to confirm. 4. Set a heating function. 5. Press to confirm. 6. Set the temperature. 7. Press 13 to confirm. 6.
www.aeg.com If you use the clock functions: Duration, End Time, the appliance deactivates the heating elements after 90 % of the set time. The appliance uses the residual heat to continue the cooking process until the time ends (3 - 20 minutes). 7.2 Setting the clock functions • Before you use the functions: Duration, End Time, you must set a heating function and temperature first. The appliance deactivates automatically.
ENGLISH • Meat programmes with the function: Weight Automatic (menu: Assisted Cooking) — This function automatically calculates the roasting time. To use it you need to input food weight. • Meat programmes with the function: CT Sensor Automatic (menu: Assisted Cooking) — This function automatically calculates the roasting time. To use it you need to input core temperature. When the programme ends an acoustic signal sounds.
www.aeg.com 9. USING THE ACCESSORIES WARNING! Refer to Safety chapters. 9.1 Core temperature sensor There are two temperatures to be set: the oven temperature and the core temperature. The core temperature sensor measures the core temperature of the meat. When the meat is at the set temperature, the appliance deactivates. CAUTION! Only use the core temperature sensor supplied or the correct replacement parts. The core temperature sensor must stay in the meat and in the socket during the cooking. 1.
ENGLISH 17 °C °C 2. Put the wire shelf on the telescopic runners and carefully push them into the appliance. Make sure you push back the telescopic runners fully in the appliance before you close the oven door. 10. ADDITIONAL FUNCTIONS 10.1 Favourite Programme You can save your favourite settings, such as duration, temperature or heating function. They are available in the menu: Favourite Programme. You can save 20 programmes. Saving a programme press to overwrite an existing programme.
www.aeg.com Press a sensor field (except for ) to start the function: Set + Go. The set heating function starts. If the Pyrolysis function operates, the door locks automatically. A message comes on in the display when you touch a sensor field. When the heating function ends, an acoustic signal sounds. 1. Activate the appliance. 2. Touch and at the same time until the display shows a message. To deactivate the Child Lock function repeat step 2. 10.
ENGLISH the display goes back to the night brightness. 10.7 Cooling fan When the appliance operates, the cooling fan activates automatically to keep the surfaces of the appliance cool. If you deactivate the appliance, the cooling fan can continue to operate until the appliance cools down. 19 10.8 Safety thermostat Incorrect operation of the appliance or defective components can cause dangerous overheating. To prevent this, the oven has a safety thermostat which interrupts the power supply.
www.aeg.com 11.
ENGLISH Food Conventional Cooking True Fan Cooking 21 Time (min) Comments Temperature (°C) Shelf posi- Temperation ture (°C) Shelf position Biscuits / pastry stripes one level 140 3 140 - 150 3 30 - 35 In a baking tray Biscuits / pastry stripes two levels - - 140 - 150 2 and 4 35 - 40 In a baking tray Biscuits / pastry stripes three levels - 140 - 150 1, 3 and 5 35 - 45 In a baking tray Meringues - one level 3 120 3 80 - 100 In a baking tray - 120 2 and 4 80 - 100 In a
www.aeg.
ENGLISH Food Conventional Cooking True Fan Cooking 23 Time (min) Comments Temperature (°C) Shelf posi- Temperation ture (°C) Shelf position Pork 180 2 180 2 90 - 120 On a wire shelf Veal 190 2 175 2 90 - 120 On a wire shelf English roast beef, rare 210 2 200 2 50 - 60 On a wire shelf English roast beef, medium 210 2 200 2 60 - 70 On a wire shelf English roast beef, well done 210 2 200 2 70 - 75 On a wire shelf Shoulder of pork 180 2 170 2 120 - 150 With rind
www.aeg.com 11.6 Grilling Preheat the empty oven for 3 minutes before cooking. Food Quantity Pieces (g) 4 800 Beef steaks 4 Sausages Temperature (°C) Time (min) Shelf position 1st side 2nd side max. 12 - 15 12 - 14 4 600 max. 10 - 12 6-8 4 - max. 12 - 15 10 - 12 4 Pork chops 4 600 max. 12 - 16 12 - 14 4 Chicken (cut in 2) 2 1000 max. 30 - 35 25 - 30 4 Kebabs 4 - max. 10 - 15 10 - 12 4 Breast of chicken 4 400 max.
ENGLISH 25 Pork Food Quantity (kg) Temperature (°C) Time (min) Shelf position Shoulder, neck, ham joint 1 - 1.5 160 - 180 90 - 120 1 or 2 Chop, spare rib 1 - 1.5 170 - 180 60 - 90 1 or 2 Meat loaf 0.75 - 1 160 - 170 50 - 60 1 or 2 Pork knuckle (precooked) 0.75 - 1 150 - 170 90 - 120 1 or 2 Food Quantity (kg) Temperature (°C) Time (min) Shelf position Roast veal 1 160 - 180 90 - 120 1 or 2 Knuckle of veal 1.
www.aeg.com 11.8 Moist Fan Baking During cooking, open the appliance door only when necessary.
ENGLISH 27 11.10 Defrost Food Quantity (g) Defrosting time (min) Further defrosting time (min) Comments Chicken 1000 100 - 140 20 - 30 Place the chicken on an upturned saucer placed on a large plate. Turn halfway through. Meat 1000 100 - 140 20 - 30 Turn halfway through. Meat 500 90 - 120 20 - 30 Turn halfway through.
www.aeg.com Vegetables Food Temperature (°C) Cooking time until simmering (min) Continue to cook at 100 °C (min) Carrots1) 160 - 170 50 - 60 5 - 10 Cucumbers 160 - 170 50 - 60 - Mixed pickles 160 - 170 50 - 60 5 - 10 Kohlrabi / Peas / Asparagus 160 - 170 50 - 60 15 - 20 1) Leave standing in the oven after it is deactivated. 11.12 Drying • Cover trays with grease proof paper or baking parchment.
ENGLISH Food Food core temperature (°C) Veal knuckle 85 - 90 English roast beef, rare 45 - 50 English roast beef, medium 60 - 65 English roast beef, well done 70 - 75 Shoulder of pork 80 - 82 Shin of pork 75 - 80 Lamb 70 - 75 Chicken 98 Hare 70 - 75 Trout / Sea bream 65 - 70 Tuna fish / Salmon 65 - 70 12. CARE AND CLEANING WARNING! Refer to Safety chapters. 12.1 Notes on cleaning • Clean the front of the appliance with a soft cloth with warm water and a cleaning agent.
www.aeg.com 1. Clean the inner side of the door with hot water, so that the residues do not burn from the hot air. 2. Activate the appliance and select from the main menu the function: Pyrolysis. Press to confirm. 3. Set the duration of the cleaning procedure: 2. Pull the rear end of the shelf support away from the side wall and remove it. 1 2 Option Description Quick 1 h for a low degree of dirt Normal 1 h 30 min for a usual degree of dirt Intense 2 h 30 min for a high degree of dirt 4.
ENGLISH CAUTION! Do not use the appliance without the glass panels. The direction in which you open the door depends on your oven model. You open the door from the right side in some models and from the left side in others. 1. Press the buttons at the sides of the door trim (A) on the upper cover and pull it upwards to remove it. cleaning agents because they can damage the surface. When the oven door is clean, install the glass panels in the opposite sequence.
www.aeg.com The back lamp 1. Turn the lamp glass cover counterclockwise to remove it. 2. Clean the glass cover. 3. Replace the lamp with a suitable 300 °C heat-resistant lamp. 4. Install the glass cover. 13. TROUBLESHOOTING WARNING! Refer to Safety chapters. 13.1 What to do if... Problem Possible cause Remedy The oven does not heat up. The oven is deactivated. Activate the oven. The oven does not heat up. The clock is not set. Set the clock. The oven does not heat up.
ENGLISH Problem Possible cause 33 Remedy Steam and condensation You left the dish in the oven settle on the food and in the for too long. cavity of the oven. Do not leave the dishes in the oven for longer than 15 20 minutes after the cooking process ends. The appliance is activated and does not heat up. The fan does not operate. The display shows "Demo". 1. Deactivate the appliance. 2. Touch and hold until the appliance activates and deactivates. 3. Touch and hold The demo mode is activated.
www.aeg.com 14.1 Building In A B 548 21 558 min. 550 114 16 20 600 min. 560 589 594 573 14.3 Electrical installation 594 The manufacturer is not responsible if you do not follow the safety precautions from the Safety chapters. 5 3 This appliance is supplied with a main plug and a main cable. 14.4 Cable 548 21 min. 550 20 590 558 16 114 min. 560 589 594 573 594 5 3 14.2 Securing the appliance to the cabinet 1. Open the appliance door. 2. Fasten the appliance to the cabinet. 3.
ENGLISH Energy efficiency class A Energy consumption with a standard load, conventional mode 0.93 kWh/cycle 35 Energy consumption with a standard load, fan-forced 0.75 kWh/cycle mode Number of cavities 1 Heat source Electricity Volume 72 l Type of oven Built-In Oven Mass EN 60350-1 - Household electric cooking appliances - Part 1: Ranges, ovens, steam ovens and grills - Methods for measuring performance. 15.
www.aeg.com 16. ENVIRONMENT CONCERNS Recycle the materials with the symbol . Put the packaging in applicable containers to recycle it. Help protect the environment and human health and to recycle waste of electrical and electronic appliances. Do not dispose appliances * marked with the symbol with the household waste. Return the product to your local recycling facility or contact your municipal office.
ENGLISH 37
www.aeg.
ENGLISH 39
867304557-C-372014 www.aeg.