BP9314001 BP931400C BP931400N BP931400P BP9314151 DE Benutzerinformation
www.aeg.com INHALT 1. 2. 3. 4. 5. 6. 7. 8. 9. 10. 11. 12. 13. 14. SICHERHEITSINFORMATIONEN . . . . . . . . . . . . . . . . . . . . . . . . . . . . . . . . . . . . . . . . . . . . . . . 3 SICHERHEITSHINWEISE . . . . . . . . . . . . . . . . . . . . . . . . . . . . . . . . . . . . . . . . . . . . . . . . . . . . . . 4 GERÄTEBESCHREIBUNG . . . . . . . . . . . . . . . . . . . . . . . . . . . . . . . . . . . . . . . . . . . . . . . . . . . . . 8 VOR DER ERSTEN INBETRIEBNAHME . . . . . . . . . . . . . . . . .
DEUTSCH 3 1. SICHERHEITSINFORMATIONEN Lesen Sie vor der Montage und Verwendung des Geräts sorgfältig die mitgelieferte Anleitung. Der Hersteller haftet nicht für Verletzungen oder Schäden, die durch eine fehlerhafte Montage entstehen. Bewahren Sie die Anleitung zum Nachschlagen auf. 1.1 Sicherheit von Kindern und schutzbedürftigen Personen WARNUNG! Es besteht Erstickungsgefahr, das Risiko von Verletzungen oder permanenten Behinderungen.
www.aeg.com • Der Geräteinnenraum wird während des Betriebs heiß. Berühren Sie nicht die Heizelemente im Geräteinnern. Verwenden Sie zum Anfassen des Zubehörs und der Töpfe wärmeisolierende Handschuhe. • Benutzen Sie zum Reinigen des Geräts keinen Dampfreiniger. • Trennen Sie vor Wartungsarbeiten das Gerät von der Stromversorgung. • Benutzen Sie keine Scheuermittel oder Metallschwämmchen zum Reinigen der Ofenglastür; sie können die Glasfläche verkratzen und zum Zersplittern der Scheibe führen.
DEUTSCH 2.1 Montage WARNUNG! Nur eine qualifizierte Fachkraft darf den Elektroanschluss des Geräts vornehmen. • Entfernen Sie das Verpackungsmaterial. • Stellen Sie ein beschädigtes Gerät nicht auf und benutzen Sie es nicht. • Halten Sie sich an die mitgelieferte Montageanleitung. • Seien Sie beim Umsetzen des Geräts vorsichtig, denn es ist schwer. Tragen Sie stets Sicherheitshandschuhe. • Ziehen Sie das Gerät nicht am Türgriff. • Die Mindestabstände zu anderen Geräten und Küchenmöbeln sind einzuhalten.
www.aeg.com • Üben Sie keinen Druck auf die geöffnete Gerätetür aus. • Benutzen Sie das Gerät nicht als Arbeits- oder Abstellfläche. • Halten Sie die Tür immer geschlossen, wenn das Gerät in Betrieb ist. • Öffnen Sie die Gerätetür vorsichtig. Bei der Verwendung von Zutaten, die Alkohol enthalten, kann ein AlkoholLuftgemisch entstehen. • Achten Sie beim Öffnen der Tür darauf, dass keine Funken oder offenen Flammen in das Geräts gelangen.
DEUTSCH • • • • sehr heiß und aus den vorderen Kühlungsöffnungen tritt heiße Luft aus. Die pyrolytische Reinigung erfolgt bei sehr hoher Temperatur und kann Dämpfe von Lebensmittelrückständen und Gerätematerialen freisetzen. Beachten Sie unbedingt Folgendes: – Sorgen Sie während des ersten Gebrauchs bei Verwendung der Höchsttemperatur für eine gute Belüftung. – Sorgen Sie während und nach der Pyrolyse für eine gute Belüftung.
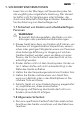
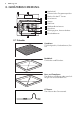
www.aeg.com 3. GERÄTEBESCHREIBUNG 1 1 Bedienfeld 2 2 Elektronischer Programmspeicher 3 4 5 5 4 10 3 6 2 1 7 8 3 Buchse für den KT Sensor 4 Heizelement 5 Lampe 6 Ventilator 7 Rückwandheizelement 8 Unterhitze 9 Einhängegitter, herausnehmbar 10 Einschubebenen 9 3.1 Zubehör Kombirost Für Kochgeschirr, Kuchenformen, Braten. Backblech Für Kuchen und Plätzchen. Brat- und Fettpfanne Zum Backen und Braten oder zum Auffangen von austretendem Fett. KT Sensor Zum Messen des Garzustands.
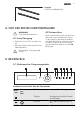
DEUTSCH 9 Auszüge Für Roste und Backbleche. 4. VOR DER ERSTEN INBETRIEBNAHME WARNUNG! Siehe Sicherheitshinweise. 4.2 Erstanschluss 4.1 Erste Reinigung • Entfernen Sie alle Teile aus dem Gerät. • Reinigen Sie das Gerät vor der ersten Inbetriebnahme. Beim Anschluss des Geräts an das Netz oder nach einem Stromausfall müssen Sie die Sprache, den Kontrast und die Helligkeit des Displays sowie die Uhrzeit einstellen. Nehmen Sie die Einstellungen mit dem Drehschalter vor. Mit OK bestätigen.
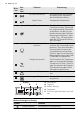
www.aeg.com Nummer Sensorfeld Funktion Bemerkung OK und Drehschalter 3 Bestätigung der Auswahl oder Einstellung. Zum Auswählen den Drehschalter drehen. Home-Taste 4 Anzeige des Hauptmenüs. Zeit- und Zusatzfunktionen Zum Einstellen verschiedener Funktionen. Dieses Sensorfeld bei eingeschalteter Ofenfunktion berühren, um die Uhr, die Kindersicherung, den Speicher Bevorzugtes Programm , Heat + Hold , Set + Go einzustellen oder die KT-Sensor-Einstellungen zu ändern.
DEUTSCH Symbol 11 Funktion Zeit Zeigt die aktuelle Uhrzeit an. Dauer Zeigt die für die Garfunktion benötigte Zeit an. Ende Zeigt an, wann die Garfunktion endet. Zeitanzeige Zeigt die verbleibende Zeit bis zum Ende der Ofenfunktion an. Aufheiz-Anzeige Anzeige der Temperatur im Backofeninnenraum. Sie wird auch noch angezeigt, nachdem Sie das Gerät ausgeschaltet haben und der Innenraum noch warm ist. Anzeige für die Schnellaufheizung Die Funktion ist eingeschaltet. Sie verringert die Aufheizzeit.
www.aeg.com Untermenü von: Einstellungen Symbol Untermenü Anwendung Tageszeit einstellen Einstellen der aktuellen Uhrzeit. Zeitanzeige Steht diese Funktion auf AN, wird die aktuelle Uhrzeit angezeigt, sobald das Gerät ausgeschaltet wird. SET + GO Steht diese Funktion auf AN, können Sie diese Funktion wählen, wenn Sie eine Ofenfunktion einschalten. Heat + Hold Steht diese Funktion auf AN, können Sie diese Funktion wählen, wenn Sie eine Ofenfunktion einschalten.
DEUTSCH 13 6.3 Ofenfunktionen Untermenü von: Ofenfunktionen Ofenfunktion Anwendung Heißluft mit Ringheizkörper Zum Backen auf bis zu 3 Ebenen gleichzeitig und zum Dörren von Lebensmitteln. Stellen Sie eine 20 - 40 °C niedrigere Backofentemperatur als bei Ober-/Unterhitze ein. Pizzastufe Zum Backen auf einer Ebene für Gerichte mit einer intensiveren Bräunung und einem knusprigen Boden. Stellen Sie eine 20 - 40 °C niedrigere Backofentemperatur als bei Ober-/Unterhitze ein.
www.aeg.com Ofenfunktion Anwendung Überbacken Für Speisen wie Lasagne oder Kartoffelgratin. Auch zum Bräunen. Einkochen Zum Einkochen von Gemüse, wie Gurken. Dörren Zum Dörren von Obst und Gemüse in Scheiben, z. B. Äpfeln, Pflaumen, Pfirsichen sowie Tomaten, Zucchini und Pilzen. Teller wärmen Zum Vorwärmen der Teller vor dem Servieren. ÖKO Braten Mit den ÖKO-Funktionen optimieren Sie den Energieverbrauch während des Garvorgangs. Sie müssen jedoch zuerst die Gardauer festlegen.
DEUTSCH ofenbeleuchtung während des Garvorgangs auszuschalten. • Wenn Sie die Funktion Feuchte Heißluft verwenden, erlischt die Backofenlampe nach 30 Sekunden. Die Backofenlampe wird wieder eingeschaltet, 15 3 Sekunden lang berühwenn Sie ren oder die Gerätetür öffnen. • Öko-Funktionen - siehe Abschnitt „Ofenfunktionen“ (nur ausgewählte Modelle). 7. UHRFUNKTIONEN Symbol Funktion Beschreibung Zum Einstellen eines Countdowns (max. 2 Std. 30 Min.).
www.aeg.com – Die eingestellte Temperatur beträgt mehr als 80 °C. – Die Funktion Dauer ist eingestellt. Einschalten der Funktion 1. Schalten Sie das Gerät ein. 2. Wählen Sie die Ofenfunktion. 3. Stellen Sie eine höhere Temperatur als 80 °C ein. 4. Drücken Sie wiederholt, bis im Display Heat+Hold angezeigt wird. Mit OK bestätigen. Nach Ablauf der Funktion ertönt ein akustisches Signal. Die Funktion Heat+Hold bleibt eingeschaltet, wenn Sie zu anderen Ofenfunktionen wechseln.
DEUTSCH Gerichte mit KT Sensor Automatik Fisch, ganz 8.2 Koch-Assistent mit Rezeptautomatik Mit dem Gerät wird eine Reihe von Rezepten zur Verfügung gestellt, die Sie verwenden können. Die Rezepte sind fest einprogrammiert und können nicht geändert werden. Einschalten der Funktion: 1. Schalten Sie das Gerät ein. 2. Wählen Sie das Menü Koch-Assistent . Mit OK bestätigen. 3. Wählen Sie die Kategorie und das Gericht. Mit OK bestätigen. 4. Wählen Sie Rezeptautomatik . Mit OK bestätigen.
www.aeg.com stellter Backofentemperatur (mindestens 120 °C) und ausgewählter Funktion. Das voraussichtliche Ende wird nach ca. 30 Minuten berechnet. Im Display wird das Symbol für den KT Sensor angezeigt. 4. Drehen Sie den Drehschalter innerhalb von weniger als 5 Sekunden, um die Kerntemperatur einzustellen. 5. Stellen Sie die Backofenfunktion ein und, falls notwendig, die Backofentemperatur. Das Gerät berechnet das voraussichtliche Ende.
DEUTSCH • Alle Zubehörteile besitzen kleine Kerben oben auf der rechten und linken Kante, um die Sicherheit zu erhöhen. Diese Einkerbungen dienen auch als Kippsicherung. 19 • Durch den umlaufend erhöhten Rahmen des Rostes ist das Kochgeschirr zusätzlich gegen Abrutschen gesichert. 9.3 Auszüge - Einsetzen des Backofenzubehörs Setzen Sie das Backblech oder die Bratund Fettpfanne auf die Auszüge. Setzen Sie den Kombirost so auf die Auszüge, dass die Füße nach unten zeigen.
www.aeg.com 3. 4. 5. 6. 7. Berühren Sie wiederholt, bis das Display „ SPEICHERN “ anzeigt. Mit OK bestätigen. Im Display wird der erste freie Speicherplatz angezeigt. Mit OK bestätigen. Geben Sie den Namen für das Programm ein. Der erste Buchstabe blinkt. Benutzen Sie den Drehschalter, um den Buchstaben zu ändern. Mit OK bestätigen. Benutzen Sie den Drehschalter, um den Cursor nach rechts oder links zu bewegen. Mit OK bestätigen. Der nächste Buchstabe blinkt. Wiederholen Sie ggf.
DEUTSCH Nach Ablauf der Ofenfunktion ertönt ein akustisches Signal. Nützliche Informationen: • Während die Ofenfunktion in Betrieb ist, ist die Tastensperre eingeschaltet. • Sie können die Funktion SET + GO im Menü Einstellungen ein- und ausschalten. 10.5 Abschaltautomatik Das Gerät wird aus Sicherheitsgründen nach einiger Zeit automatisch ausgeschaltet, wenn: • Eine Ofenfunktion in Betrieb ist. • Sie die Backofentemperatur nicht ändern. Temperatur Abschaltzeit 30 °C - 115 °C 12,5 Std.
www.aeg.com Gärstufe Diese Automatikfunktion kann für alle Rezepte mit einem Hefeteig verwendet werden. Das Programm sorgt für eine gute Umgebungstemperatur, um den Teig gehen zu lassen. Teig zum Gehen lassen in eine ausreichend große Form legen und mit einem feuchten Handtuch oder einer Plastikfolie abdecken. Schieben Sie den Kombirost in Einschubebene 1 ein und stellen Sie die Form darauf. Schließen Sie die Tür und stellen Sie die Funktion „Gärstufe“ ein. Stellen Sie die benötigte Zeit ein. 11.
DEUTSCH Backergebnis 23 Mögliche Ursache Abhilfe Die Backzeit ist zu lang. Stellen Sie beim nächsten Kuchen eine kürzere Backzeit ein. Der Kuchen ist unregelmäßig gebräunt. Die Backofentemperatur ist zu hoch und die Backzeit zu kurz. Stellen Sie eine niedrigere Backofentemperatur und eine längere Backzeit ein. Der Kuchen ist unregelmäßig gebräunt. Die Mischung ist ungleich verteilt. Verteilen Sie die Mischung gleichmäßig auf dem Backblech.
www.aeg.com Backware Ofenfunktion Einschubebene Temperatur (°C) Dauer (Min.) Apple pie/Apfelkuchen (2 Formen Ø 20 cm, diagonal versetzt) Ober-/Unterhitze 1 180 70 - 90 Käsekuchen Ober-/Unterhitze 1 170 - 190 60 - 90 1) Backofen vorheizen. Kuchen/Gebäck/Brot auf Backblechen Backware Ofenfunktion Einschubebene Temperatur (°C) Dauer (Min.) Hefezopf/Hefekranz Ober-/Unterhitze 3 170 - 190 30 - 40 Christstollen Ober-/Unterhitze 2 160 - 180 1) 50 - 70 Brot (Roggenbrot): 1.
DEUTSCH 25 Backware Ofenfunktion Einschubebene Temperatur (°C) Dauer (Min.) Obstkuchen mit Mürbeteig Heißluft mit Ringheizkörper 3 160 - 170 40 - 80 Ober-/Unterhitze 3 160 - 180 1) 40 - 80 Ofenfunktion Einschubebene Temperatur (°C) Dauer (Min.
www.aeg.com Ofenfunktion Einschubebene Temperatur (°C) Dauer (Min.) Brötchen Ober-/Unterhitze 3 190 - 2101) 10 - 25 Small cakes / Törtchen (20 Stück pro Backblech) Heißluft mit Ringheizkörper 3 1501) 20 - 35 Small cakes / Törtchen (20 Stück pro Backblech) Ober-/Unterhitze 3 1701) 20 - 30 Ofenfunktion Einschubebene Temperatur (°C) Dauer (Min.
DEUTSCH Lebensmittel 27 Einschubebene Temperatur (°C) Zeit (Min.) Süßer Auflauf 2 180 - 200 45 - 60 Gugelhupf oder Brioche 1 160 - 170 50 - 70 Hefezopf/Hefekranz 2 170 - 190 40 - 50 Streuselkuchen (trocken) 3 160 - 170 20 - 40 Hefekleingebäck 2 160 - 170 20 - 40 11.6 Backen auf mehreren Ebenen Kuchen/Gebäck/Brot auf Backblechen Heißluft mit Ringheizkörper Backware Einschubebene Temperatur (°C) Dauer (Min.
www.aeg.com Heißluft mit Ringheizkörper Backware Einschubebene 2 Ebenen 3 Ebenen 1/4 - Small cakes/ Törtchen (20 Stück pro Blech) Temperatur (°C) Dauer (Min.) 1501) 25 - 40 1) Backofen vorheizen. Wenn Sie diese Funktion verwenden, benutzen Sie keinen Deckel. 11.7 Bio-Garen Benutzen Sie diese Funktion zum Garen magerer, zarter Fleisch- und Fischstücke bei Kerntemperaturen bis zu 65 °C. BioGaren ist nicht für Schmorbraten oder fetten Schweinebraten geeignet.
DEUTSCH Einschubebene Temperatur in °C Zeit (Min.) Apfelkuchen, gedeckt Backware 1 150 - 170 50 - 60 Gemüsekuchen 1 160 - 180 50 - 60 Ungesäuertes Brot 2 230 - 2501) 10 - 20 Blätterteigquiche 2 160 - 180 1) 45 - 55 Flammkuchen (Pizza-ähnliches Gericht aus dem Elsass) 2 230 - 2501) 12 - 20 Piroggen (Russische Version der Calzone) 2 180 - 200 1) 15 - 25 29 1) Backofen vorheizen. 2) Tiefes Blech benutzen. 11.
www.aeg.com Menge Backofenfunktion Einschubebene je cm Dicke Heißluftgrillen 1 Menge Backofenfunktion Schulter/Nacken/Schinkenstück 1 - 1,5 kg Kotelett/Spare Ribs Fleischart Roastbeef oder Filet: Durch Temperatur in °C 170 - 180 Zeit (Min.) 1) 8 - 10 Einschubebene Temperatur in °C Zeit (Min.
DEUTSCH 31 Fleischart Menge Backofenfunktion Einschubebene Temperatur in °C Zeit (Min.) Rehrücken, Hirschrücken 1,5 - 2 kg Ober-/Unterhitze 1 210 - 220 35 - 40 Reh-/ Hirschkeule 1,5 - 2 kg Ober-/Unterhitze 1 180 - 200 60 - 90 Menge Backofenfunktion Einschubebene Temperatur in °C Zeit (Min.
www.aeg.com Grillstufe 1 Grillgut Einschubebene Temperatur Rinderbraten 2 Rinderfilet 3 Schweinerücken Zeit (Min.) Erste Seite Zweite Seite 210 - 230 30 - 40 30 - 40 230 20 - 30 20 - 30 2 210 - 230 30 - 40 30 - 40 Kalbsrücken 2 210 - 230 30 - 40 30 - 40 Lammrücken 3 210 - 230 25 - 35 20 - 25 Fisch, ganz, 500 - 1000 g 3/4 210 - 230 15 - 30 15 - 30 Grillstufe 2 Grillgut Einschubebene Burgers/Frikadellen Zeit (Min.
DEUTSCH Convenience-Lebensmittel (Fertiggerichte) Einschubebene Temperatur (°C) Zeit (Min.) Kroketten 3 220 - 230 20 - 35 Rösti 3 210 - 230 20 - 30 Lasagne/Cannelloni, frisch 2 170 - 190 35 - 45 Lasagne/Cannelloni, gefr. 2 160 - 180 40 - 60 Ofengebackener Käse 3 170 - 190 20 - 30 Hähnchenflügel 2 190 - 210 20 - 30 33 Gefrorene Fertiggerichte Backofenfunktionen Einschubebene Temperatur (°C) Zeit (Min.
www.aeg.com Auftauzeit (Min.) Zusätzliche Auftauzeit (Min.) Fleisch, 1000 g 100 - 140 20 - 30 Nach der Hälfte der Zeit wenden. Fleisch, 500 g 90 - 120 20 - 30 Nach der Hälfte der Zeit wenden. Forelle, 150 g 25 - 35 10 - 15 - Erdbeeren, 300 g 30 - 40 10 - 20 - Butter, 250 g 30 - 40 10 - 15 - 80 - 100 10 - 15 Sahne lässt sich auch mit noch leicht gefrorenen Stellen gut aufschlagen. 60 60 Speise Sahne, 2 x 200 g Torte, 1400 g 11.
DEUTSCH Temperatur in °C Einkochen bis Perlbeginn (Min.) Gurken 160 - 170 50 - 60 - Mixed Pickles 160 - 170 50 - 60 5 - 10 Kohlrabi/Erbsen/ Spargel 160 - 170 50 - 60 15 - 20 Einkochen 35 Weiterkochen bei 100 °C (Min.) 1) Nach dem Ausschalten im Backofen stehen lassen. Öffnen Sie die Gerätetür und lassen Sie das Gerät abkühlen. Danach das Dörrgut fertig dörren. 11.15 Dörren Backbleche mit Backpapier abdecken. Für ein optimales Ergebnis, schalten Sie das Gerät nach der Hälfte der Zeit aus.
www.aeg.com Art des Gebäcks Backofenfunktion Einschubebene Temperatur °C Zeit (Min.) Brot 2 170 - 190 60 - 90 Vollkornbrot 11.
DEUTSCH Speise 37 Speisekerntemperatur °C Forellen 65 - 70 12. REINIGUNG UND PFLEGE WARNUNG! Siehe Sicherheitshinweise. Hinweise zur Reinigung: • Feuchten Sie ein weiches Tuch mit warmem Wasser und etwas Reinigungsmittel an, und reinigen Sie damit die Vorderseite des Geräts. • Reinigen Sie die Metalloberflächen mit einem handelsüblichen Reinigungsmittel. • Reinigen Sie den Geräteinnenraum nach jedem Gebrauch. So lassen sich Verschmutzungen leichter entfernen und es kann nichts einbrennen.
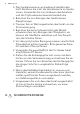
www.aeg.com 12.2 Einhängegitter Abnehmen der Einhängegitter Die Einhängegitter können zur Reinigung der Seitenwände entfernt werden. 1. Ziehen Sie das Einhängegitter vorne von der Seitenwand weg. 2. Ziehen Sie das Einhängegitter hinten von der Seitenwand weg und nehmen Sie es heraus. 2 1 Einsetzen der Einhängegitter Führen Sie zum Einsetzen der Einhängegitter die obigen Schritte in umgekehrter Reihenfolge durch. Gilt für Auszüge: Die Haltestifte der Auszüge müssen nach vorne zeigen. 12.
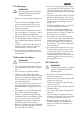
DEUTSCH 2. Benutzen Sie einen schmalen, stumpfen Gegenstand (z. B. einen Teelöffel), um die Glasabdeckung abzunehmen. Reinigen Sie die Glasabdeckung. 39 3. Tauschen Sie die Lampe gegen eine geeignete, bis 300 °C hitzebeständige Lampe aus. 4. Bringen Sie die Glasabdeckung wieder an. 5. Setzen Sie das linke Einhängegitter wieder ein. 12.4 Reinigen der Backofentür Aushängen der Backofentür und der Glasscheiben Die Backofentür und die inneren Glasscheiben können zur Reinigung ausgebaut werden.
www.aeg.com 6. 2 7. B Fassen Sie die Türabdeckung (B) an der Türoberkante an beiden Seiten an und drücken Sie sie nach innen, um den Kippverschluss zu lösen. Ziehen Sie die Türabdeckung nach vorne, um sie abzunehmen. 1 8. 9. Einbauen der Backofentür und der Glasscheiben Nach der Reinigung müssen die Backofentür und die Glasscheiben wieder Fassen Sie die Glasscheiben der Tür nacheinander am oberen Rand an und ziehen Sie sie nach oben aus der Führung.
DEUTSCH Problem Mögliche Ursache 41 Abhilfe Im Display erscheint Der Stecker des KT Sensor Stecken Sie den Stecker F111. ist nicht richtig an die Buch- des Kerntemperatursensors se angeschlossen. so weit wie möglich in die Buchse ein. Die Lampe funktioniert nicht. Die Lampe ist defekt. Wenn Sie das Problem nicht selbst lösen können, wenden Sie sich an Ihren Fachhändler oder Kundendienst. Die vom Kundendienst benötigten Daten finden Sie auf dem Typenschild. Das Tauschen Sie die Lampe aus.
www.aeg.
DEUTSCH 43
892961833-A-372013 www.aeg.