BPB331021B BPB331021M BPB331021W USER MANUAL EN User Manual Oven
www.aeg.com CONTENTS 1. SAFETY INFORMATION............................................................................................. 2 2. SAFETY INSTRUCTIONS.............................................................................................4 3. PRODUCT DESCRIPTION...........................................................................................7 4. CONTROL PANEL....................................................................................................... 7 5.
ENGLISH 3 manufacturer is not responsible for any injuries or damages that are the result of incorrect installation or usage. Always keep the instructions in a safe and accessible location for future reference. 1.
www.aeg.com • • • • • • Ensure that the appliance is switched off before replacing the lamp to avoid the possibility of electric shock. Do not use a steam cleaner to clean the appliance. Do not use harsh abrasive cleaners or sharp metal scrapers to clean the glass door since they can scratch the surface, which may result in shattering of the glass.
ENGLISH • • • • • • • such a way that it cannot be removed without tools. Connect the mains plug to the mains socket only at the end of the installation. Make sure that there is access to the mains plug after the installation. If the mains socket is loose, do not connect the mains plug. Do not pull the mains cable to disconnect the appliance. Always pull the mains plug.
www.aeg.com 2.4 Care and cleaning WARNING! Risk of injury, fire, or damage to the appliance. • Before maintenance, deactivate the appliance and disconnect the mains plug from the mains socket. • Make sure the appliance is cold. There is the risk that the glass panels can break. • Replace immediately the door glass panels when they are damaged. Contact the Authorised Service Centre. • Be careful when you remove the door from the appliance.
ENGLISH 2.7 Service • To repair the appliance contact an Authorised Service Centre. • Use original spare parts only. 2.8 Disposal WARNING! Risk of injury or suffocation. • Disconnect the appliance from the mains supply. • Cut off the mains electrical cable close to the appliance and dispose of it. • Remove the door catch to prevent children or pets from becoming trapped in the appliance. 3. PRODUCT DESCRIPTION 3.
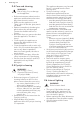
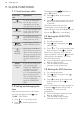
www.aeg.com 4.2 Display A G F E B D C A. Timer / Temperature B. Heat-up and residual heat indicator C. Core temperature sensor (selected models only) D. Door lock (selected models only) E. Hours / minutes F. Demo mode (selected models only) G. Clock functions 5. BEFORE FIRST USE 5.2 Preheating WARNING! Refer to Safety chapters. Preheat the empty oven before first use. To set the Time of day refer to "Clock functions" chapter. 1. Set the function .Set the maximum temperature. 2.
ENGLISH Oven function Application Oven function Application To bake and roast food on one shelf position. Conventional Cooking (Top / Bottom Heat) Pizza Setting To bake pizza. To make intensive browning and a crispy bottom. To prepare very tender and juicy roasts. This function is designed to save energy during Moist Fan Bak- cooking. For the cooking instructions refer to ing "Hints and tips" chapter, Moist Fan Baking.
www.aeg.com 7. CLOCK FUNCTIONS 7.1 Clock functions table Clock function Application The display shows hour. "00" flashes. 3. Press or minutes. To show or change the TIME OF DAY time of day. You can change the time of day only when the oven is off. and the set to set the current 4. Press to confirm or the set time of day will be saved automatically after 5 seconds. The display shows the new time.
ENGLISH 11 7.5 Setting the TIME DELAY function again and again until 1. Press starts to flash. 1. Set a heating function. 2. Press or to set the seconds and than the minutes. When the time you set is longer than 2. Press again and again until starts to flash. 3. Press or to set the minutes and then the hours for DURATION time. Press to confirm. The display shows flashing . 4. Press or to set the hours and then the minutes for END time. Press to confirm. The display shows and the set temperature.
www.aeg.com Wire shelf and deep pan together: Push the deep pan between the guide bars of the shelf support and the wire shelf on the guide bars above. Small indentation at the top increase safety. The indentations are also anti-tip devices. The high rim around the shelf prevents cookware from slipping of the shelf. 9. ADDITIONAL FUNCTIONS 9.1 Using the Child Lock When the Child Lock is on the oven cannot be turned on accidentally. 1. Ensure the knob for the oven functions is in the off position. 2.
ENGLISH 13 10. HINTS AND TIPS The function Conventional Cooking (Top / Bottom Heat) at the default temperature is ideal for bread baking. WARNING! Refer to Safety chapters. Cooking meat and fish Use a deep pan for very fatty food to prevent the oven from stains that can be permanent. The temperature and baking times in the tables are guidelines only. They depend on the recipes and the quality and quantity of the ingredients used.
www.aeg.
ENGLISH Food Top / Bottom Heat True Fan Cooking 15 Time (min) Comments Temperature (°C) Shelf posi- Temperation ture (°C) Shelf position - - 140 - 150 2 and 4 35 - 40 In a baking tray Biscuits / pastry stripes three levels - 140 - 150 1, 3 and 5 35 - 45 In a baking tray Meringues - one level 120 3 120 3 80 - 100 In a baking tray Meringues - two lev- - - 120 2 and 4 80 - 100 In a baking tray Buns1) 190 3 190 3 12 - 20 In a baking tray Eclairs one level 190 3 170
www.aeg.com Food Top / Bottom Heat True Fan Cooking Time (min) Comments Temperature (°C) Shelf posi- Temperation ture (°C) Shelf position Rye bread 190 1 180 1 30 - 45 In a bread tin Bread 190 2 180 2 (2 and 4) 25 - 40 6 - 8 rolls in a baking tray Pizza1) 230 - 250 1 230 - 250 1 10 - 20 In a baking tray or a deep pan Scones1) 200 3 190 3 10 - 20 In a baking tray rolls1) 1) Preheat the oven for 10 minutes.
ENGLISH Food Top / Bottom Heat True Fan Cooking 17 Time (min) Comments Temperature (°C) Shelf posi- Temperation ture (°C) Shelf position English roast beef, rare 210 2 200 2 50 - 60 On a wire shelf English roast beef, medium 210 2 200 2 60 - 70 On a wire shelf English roast beef, well done 210 2 200 2 70 - 75 On a wire shelf Shoulder of pork 180 2 170 2 120 - 150 With rind Shin of pork 180 2 160 2 100 - 120 2 pieces Lamb 190 2 175 2 110 - 130 Leg Chicken 2
www.aeg.com Food Quantity Time (min) Pieces Quantity (kg) 1st side 2nd side Fillet steaks 4 0.8 12 - 15 12 - 14 Beef steaks 4 0.6 10 - 12 6-8 Sausages 8 - 12 - 15 10 - 12 Pork chops 4 0.6 12 - 16 12 - 14 Chicken (cut in 2) 2 1 30 - 35 25 - 30 Kebabs 4 - 10 - 15 10 - 12 Breast of chicken 4 0.4 12 - 15 12 - 14 Hamburger 6 0.6 20 - 30 - Fish fillet 4 0.4 12 - 14 10 - 12 Toasted sandwiches 4-6 - 5-7 - Toast 4-6 - 2-4 2-3 10.
ENGLISH Lamb Food Temperature (°C) Time (min) Food Temperature (°C) Time (min) Leg of lamb, roast lamb, 1 - 1.5 kg 150 - 170 100 - 120 Duck, 1.5 - 2 kg 180 - 200 80 - 100 160 - 180 120 - 180 Saddle of lamb, 1 - 1.5 kg 160 - 180 Goose, 3.5 5 kg Turkey, 2.5 3.5 kg 160 - 180 120 - 150 Turkey, 4 - 6 kg 140 - 160 150 - 240 Temperature (°C) Time (min) 40 - 60 Poultry Food Temperature (°C) Time (min) 200 - 220 30 - 50 Food Chicken, half, 190 - 210 0.4 - 0.
www.aeg.com Food Accessories Temperature (°C) Shelf position Time (min) Poached fish, 0.3 kg baking tray or dripping pan 180 3 20 - 25 Whole fish, 0.2 kg baking tray or dripping pan 180 3 25 - 35 Fish fillet, 0.3 kg pizza pan on wire shelf 180 3 25 - 30 Pouched meat, 0.25 kg baking tray or dripping pan 200 3 35 - 45 Shashlik, 0.
ENGLISH 21 Food Quantity (kg) Defrosting time (min) Further defrosting time (min) Comments Meat 0.5 90 - 120 20 - 30 Turn halfway through. Trout 0.15 25 - 35 10 - 15 - Strawberries 0.3 30 - 40 10 - 20 - Butter 0.25 30 - 40 10 - 15 - Cream 2 x 0.2 80 - 100 10 - 15 Cream can also be whipped when still slightly frozen in places. Gateau 1.4 60 60 - 10.8 Drying - True Fan Cooking Cover trays with grease proof paper or baking parchment.
www.aeg.com Food Function Small cake Accessories Shelf position Temperature (°C) Time (min) Comments Convention- Baking al Cooking tray 3 170 20 - 30 Put 20 small cakes per one baking tray. Small cake True Fan Baking Cooking / tray Fan Cooking 3 150 160 20 - 35 Put 20 small cakes per one baking tray. Small cake True Fan Baking Cooking / tray Fan Cooking 2 and 4 150 160 20 - 35 Put 20 small cakes per one baking tray.
ENGLISH Food Function Accessories Toast 4-6 pieces Grilling Beef burger 6 pieces, 0.6 kg Grilling Shelf position 23 Temperature (°C) Time (min) Comments Wire shelf 4 max. 2 - 3 minutes first side; 2 - 3 minutes second side Preheat the oven for 3 minutes. Wire shelf 4 and dripping pan max. 20 - 30 Put the wire shelf on the fourth level and the dripping pan on the third level of the oven. Turn the food halfway through the cooking time. Preheat the oven for 3 minutes. 11.
www.aeg.com 2. Pull the rear end of the shelf support away from the side wall and remove it. 1 2 Description P1 Light cleaning. Duration: 1 h. P2 Normal cleaning. Duration: 1 h 30 min. or turn the knob for the Press temperature to start the pyrolysis. You can use the END function to delay the start of the cleaning. During the pyrolysis the oven lamp is off. 5. When the oven is at the set temperature, the door locks. The and the bars of the display shows heat indicator until the door unlocks.
ENGLISH 25 The oven door may close if you try to remove the glass panels before you remove the oven door. CAUTION! Do not use the oven without the glass panels. 1. Open the door fully and hold both hinges. 4. Put the door on a soft cloth on a stable surface. 5. Hold the door trim (B) on the top edge of the door at the two sides and push inwards to release the clip seal. 2 2. Lift and turn the levers fully on both hinges. B 1 6. Pull the door trim to the front to remove it. 7.
www.aeg.com Make sure that you put the glass panels (A and B) back in the correct sequence. Check for the symbol / printing on the side of the glass panel, each of the glass panels looks different to make the disassembly and assembly easier. When installed correctly the door trim clicks. A B 11.7 Replacing the lamp WARNING! Risk of electric shock. The lamp can be hot. 1. Turn off the oven. Wait until the oven is cooled down. 2. Disconnect the oven from the mains. 3.
ENGLISH 27 Problem Possible cause Remedy The oven does not heat up. The automatic switch-off is activated. Refer to "Automatic switchoff". The oven does not heat up. The Child Lock is on. Refer to "Using the Child Lock". The oven does not heat up. The door is not closed correctly. Fully close the door. The oven does not heat up. The fuse is blown. Make sure that the fuse is the cause of the malfunction. If the fuse is blown again and again, contact a qualified electrician.
www.aeg.com Problem Possible cause Remedy The appliance is activated and does not heat up. The fan does not operate. The display shows "Demo". The demo mode is activated. 1. 2. 3. 4. Deactivate the oven. Press and hold the button . The first digit on the display and Demo indicator start to blink. Enter the code 2468 by pressing the buttons or 5. 6. The display shows "12.00". There was a power cut. 12.
ENGLISH 29 13.1 Building In 548 21 min. 550 80 60 520 600 114 18 20 589 594 min. 560 595+-1 198 60 5 3 523 20 548 70 60 21 min. 550 20 520 18 590 114 min. 560 589 594 198 60 595+-1 5 3 523 20 13.2 Securing the appliance to the cabinet A B 13.3 Electrical installation The manufacturer is not responsible if you do not follow the safety precautions from the Safety chapters. This appliance is supplied with a main plug and a main cable. 13.
www.aeg.com For the section of the cable refer to the total power on the rating plate. You can also refer to the table: Total power (W) Section of the cable (mm²) maximum 1380 3 x 0.75 maximum 2300 3x1 Total power (W) Section of the cable (mm²) maximum 3680 3 x 1.5 The earth cord (green / yellow cable) must be 2 cm longer than phase and neutral cables (blue and brown cables). 14. ENERGY EFFICIENCY 14.
ENGLISH When the cooking duration is longer than 30 minutes, reduce the oven temperature to minimum 3 - 10 minutes before the end of the cooking time, depending on the duration of the cooking. The residual heat inside the oven will continue to cook. Use the residual heat to warm up other dishes. Keep breaks between baking as short as possible when you prepare few dishes at one time. Cooking with fan When possible, use the cooking functions with fan to save energy.
867347829-B-132019 www.aeg.