BPE531120M BPK531120M USER MANUAL ES Manual de instrucciones Horno
www.aeg.com CONTENIDO 1. INFORMACIÓN SOBRE SEGURIDAD....................................................................... 2 2. INSTRUCCIONES DE SEGURIDAD............................................................................4 3. DESCRIPCIÓN DEL PRODUCTO............................................................................... 7 4. ANTES DEL PRIMER USO........................................................................................... 8 5. USO DIARIO....................................
ESPAÑOL 3 responsable de lesiones o daños producidos como resultado de una instalación o un uso incorrectos: Conserve siempre estas instrucciones en lugar seguro y accesible para futuras consultas. 1.
www.aeg.com • • • • • • • Antes de realizar tareas de mantenimiento, desenchufe el aparato de la red eléctrica. Asegúrese de que el aparato está desconectado antes de reemplazar la lámpara con el fin de impedir que se produzca una descarga eléctrica. No utilice un limpiador a vapor para limpiar el aparato. No utilice limpiadores abrasivos ásperos ni rascadores de metal afilado para limpiar la puerta de cristal si no quiere arañar su superficie, lo que podría hacer que el cristal se hiciese añicos.
ESPAÑOL • Todas las conexiones eléctricas deben realizarlas electricistas cualificados. • El aparato debe conectarse a tierra. • Asegúrese de que los parámetros de la placa de características son compatibles con los valores eléctricos del suministro eléctrico. • Utilice siempre una toma con aislamiento de conexión a tierra correctamente instalada. • No utilice adaptadores de enchufes múltiples ni cables prolongadores. • Asegúrese de no provocar daños en el enchufe ni en el cable de red.
www.aeg.com • • • • • – Preste especial atención al desmontar o instalar los accesorios. La pérdida de color del esmalte o el acero inoxidable no afecta al rendimiento del aparato. Utilice una bandeja honda para pasteles húmedos. Los jugos de las frutas podrían ocasionar manchas permanentes. Este aparato está diseñado exclusivamente para cocinar. No debe utilizarse para otros fines, por ejemplo, como calefacción. Cocine siempre con la puerta del horno cerrada.
ESPAÑOL y use primero la temperatura máxima para una zona bien ventilada. • Las mascotas de pequeño tamaño también pueden ser muy sensibles a los cambios de temperatura localizados cerca de los hornos mientras se realiza el programa de autolimpieza pirolítica. • Las superficies antiadherentes de recipientes, sartenes, bandejas, utensilios, etc., pueden dañarse por las altas temperaturas de la limpieza pirolítica y también pueden ser fuente de humos dañinos de baja intensidad.
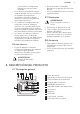
www.aeg.com 3.2 Accesorios Parrilla Para bizcochos y galletas. Para hornear y asar o como bandeja grasera. Carriles telescópicos Para bandejas de horno, pastel en molde, asados. Para parrillas y bandejas. Bandeja combi 4. ANTES DEL PRIMER USO ADVERTENCIA! Consulte los capítulos sobre seguridad. Para ajustar la hora actual, consulte el capítulo "Funciones del reloj". 4.1 Limpieza inicial Retire todos los accesorios y carriles de apoyo extraíbles del aparato. 5.
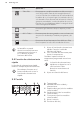
ESPAÑOL 5.2 Encendido y apagado del aparato Depende del modelo si su aparato tiene pilotos, símbolos del mando o indicadores: • El indicador se enciende cuando el aparato está funcionando. • El símbolo muestra si el mando controla las funciones del horno o la temperatura. • El indicador se enciende cuando el horno se calienta. 1. Gire el mando del horno hasta la función deseada. 2. Gire el mando del termostato para seleccionar una temperatura. 3.
www.aeg.com Función del horno Aplicación Turbo Plus Para preparar comida horneada en moldes en una posición de la parrilla. Para ahorrar energía durante la cocción. Esta función se debe usar de conformidad con las tablas de cocción para lograr los resultados de cocción deseados. Para obtener más información sobre los ajustes recomendados, consulte las tablas de cocción. Esta función se utilizaba para definir la categoría de eficiencia energética EN 60350-1.
ESPAÑOL 11 5.6 Botones Botón Función Descripción RELOJ Para ajustar una función de reloj. MENOS Para ajustar el tiempo. AVISADOR Para ajustar el AVISADOR. Mantenga pulsado el botón durante más de 3 segundos para activar o desactivar la bombilla del horno. MÁS Para ajustar el tiempo. TEMPERATURA Para comprobar la temperatura del horno o de la sonda térmica (si procede). Utilícelo únicamente cuando esté en uso una función del horno. 5.
www.aeg.com Función de reloj 00:00 Aplicación TIEMPO DE COCCIÓN Si no ajusta otra función del reloj, TIEMPO DE COCCIÓN supervisa automáticamente el tiempo que funciona el aparato. Se enciende inmediatamente cuando el horno empieza a calentarse. El Tiempo de cocción no se puede utilizar con las funciones: DURACIÓN, FIN. 6.2 Ajuste y modificación de la hora 5. Gire el mando de las funciones del horno hasta la posición de apagado.
ESPAÑOL la hora parpadean en la pantalla. El aparato se apaga. 5. Pulse cualquier botón o abra la puerta del horno para detener la señal acústica. 6. Gire el mando de las funciones del horno hasta la posición de apagado. 6.6 Ajuste del minutero AVISADOR 1. Pulse . y "00" parpadean en la pantalla. 2. Pulse o para ajustar AVISADOR. En primer lugar ajuste los segundos y después los minutos. Cuando el tiempo ajustado es mayor que 60 minutos, pantalla. 3. Ajuste las horas. 4.
www.aeg.com Las pequeñas hendiduras en la parte superior incrementan la seguridad. Las hendiduras también son dispositivos anti-vuelco. El borde elevado que rodea la bandeja evita que los utensilios de cocina resbalen de la parrilla. 7.2 Carriles telescópicos: colocación de los accesorios del horno Bandeja honda: Coloque la bandeja honda sobre los carriles telescópicos. Con los carriles telescópicos es más fácil colocar y quitar las bandejas.
ESPAÑOL 2. Mantenga pulsado y al mismo tiempo durante 2 segundos. Suena una señal acústica. SAFE y se encienden en la pantalla. Para desactivar el bloqueo de seguridad para niños, repita el paso 2. 8.2 Uso de la Tecla de Bloqueo Puede activar la tecla de bloqueo únicamente cuando el aparato esté funcionando. La Tecla de Bloqueo impide un cambio accidental de la temperatura y los ajustes de tiempo de una función del horno en curso. 1.
www.aeg.com La temperatura y los tiempos de cocción de las tablas son meramente orientativos; dependen de la receta, la calidad y la cantidad de los ingredientes utilizados en cada caso. 9.1 Cara interior de la puerta En algunos modelos, la cara interior de la puerta contiene: • los números de las posiciones de la parrilla. • información sobre las funciones del horno, posiciones recomendadas de las parrillas y temperatura apropiada para algunos platos. 9.
ESPAÑOL 17 Resultado Posible causa Solución El pastel se dora irregularmente. La temperatura del horno es demasiado alta y el tiempo de cocción demasiado corto. Seleccione una temperatura más baja y un tiempo de cocción más largo. El pastel se dora irregularmente. La mezcla está distribuida irregularmente. Distribuya la masa uniformemente en la bandeja. El pastel no está listo en el tiempo indicado. La temperatura del horno es demasiado baja.
www.aeg.
ESPAÑOL Alimento Función Temperatura (°C) Tiempo (min) Posición de la parrilla Rollitos Turbo 1601) 10 - 25 3 Rollitos Bóveda/Calor Inferior 190 - 2101) 10 - 25 3 19 1) Precaliente el horno. 9.
www.aeg.com Alimento Temperatura (°C) Tiempo (min) Posición de la parrilla Moussaka 170 - 190 70 - 95 3 Lasaña 180 - 200 75 - 90 3 Canelones 180 - 200 70 - 85 3 Pudding de pan 190 - 200 55 - 70 3 Pudding de arroz 170 - 190 45 - 60 3 Tarta de manzana, hecha con mezc- 160 - 170 la de bizcocho (molde redondo) 70 - 80 3 Pan blanco 55 - 70 3 190 - 200 9.7 Horneado en varios niveles Utilice la función Turbo.
ESPAÑOL Alimento Temperatura (°C) Tiempo (min) Pastas de hojaldre 170 - 1801) Rollitos 180 21 Posición de la parrilla 2 posiciones 3 posiciones 30 - 50 1/4 - 20 - 30 1/4 - 1) Precaliente el horno. 9.
www.aeg.com • Todas las carnes que deban quedar crujientes o doradas en el exterior se pueden asar en la fuente de asado sin tapar. • Gire el asado cuando sea necesario, al cabo de 1/2 - 2/3 del tiempo de cocción. • Para mantener la carne más jugosa: – prepare las carnes magras en una fuente de asado tapada o use una bolsa para asar. – utilice trozos de carne y pescado con un peso mínimo de 1 kg. – durante la cocción, los asados grandes y las aves se deberían regar repetidamente con el jugo de asado.
ESPAÑOL Ternera Alimento Cantidad (kg) Función Temperatura Tiempo (°C) (min) Posición de la parrilla Ternera asada 1 Grill + Turbo 160 - 180 90 - 120 1 Codillo de ternera 1.5 - 2 Grill + Turbo 160 - 180 120 - 150 1 Alimento Cantidad (kg) Función Temperatura Tiempo (°C) (min) Posición de la parrilla Pata de cordero / Cordero asado 1 - 1.5 Grill + Turbo 150 - 170 100 - 120 1 Espalda de cordero 1 - 1.
www.aeg.com Pescado (al vapor) Alimento Cantidad (kg) Función Pescado entero 1 - 1.5 Bóveda/ 210 - 220 Calor inferior 9.11 Grill • Hornee al grill con el ajuste máximo de temperatura. • Coloque la rejilla en el nivel recomendado en la tabla de uso. • La grasera debe ir siempre en el primer nivel inferior. • Cocine al grill solo trozos de carne o pescado poco gruesos.
ESPAÑOL 25 Alimento Temperatura (°C) Tiempo (min) Posición de la parrilla Patatas fritas finas 200 - 220 20 - 30 3 Patatas fritas gruesas 200 - 220 25 - 35 3 Porciones/Croquetas 220 - 230 20 - 35 3 Patatas Asadas Con Cebolla 210 - 230 20 - 30 3 Lasaña / Canelones frescos 170 - 190 35 - 45 2 Lasaña / Canelones congelados 160 - 180 40 - 60 2 Queso gratinado al horno 170 - 190 20 - 30 3 Alitas De Pollo 190 - 210 20 - 30 2 9.
www.aeg.com Alimento Cantidad (kg) Tiempo de Tiempo de descongela- descongelación (min) ción posterior (minutos) Comentarios Nata 2 x 0,2 80 - 100 10 - 15 Monte la nata aunque queden puntos ligeramente congelados. Pasteles 1.4 60 60 - 9.14 Conservar - Calor inferior • Utilice únicamente botes de conserva del mismo tamaño disponibles en el mercado. • No utilice botes con cierre hermético (twist-off) o de bayoneta ni latas metálicas. • Utilice el nivel de parrilla más bajo para esta función.
ESPAÑOL 27 Alimento Temperatura (°C) Tiempo de cocción Continuar la cochasta que empiecen ción a 100 °C (min) a subir burbujas (min) Pepinos 160 - 170 50 - 60 - Encurtidos variados 160 - 170 50 - 60 5 - 10 Colinabos/Guisantes/Espárragos 160 - 170 50 - 60 15 - 20 1) Deje reposar en el horno después de apagarlo. 9.15 Secar - Turbo • Cubra las bandejas con papel vegetal o de hornear.
www.aeg.com Horneado en un solo nivel. Alimentos en moldes.
ESPAÑOL Alimento Small cakes / Pastelillos (20 unidades por bandeja) Función Temperatura (°C) Turbo. Tiempo (min) 23 - 40 1501) 29 Posición de la parrilla 2 posiciones 3 posiciones 1/4 - 1) Precaliente el horno. Grill Alimento Función Temperatura (°C) Tiempo (min) Posición de la parrilla Toast / Tostada Grill máx 1 - 31) 5 Beef Steak / Bistec de vaca Grill máx 24 - 301)2) 4 1) Precaliente el horno 5 minutos. 2) Dele la vuelta a media cocción. 10.
www.aeg.com Coloque los carriles laterales en el orden inverso. P2 Los pasadores de retención de los carriles telescópicos deben estar orientados hacia la parte frontal. Si no puede eliminar la suciedad fácilmente. Duración del procedimiento: 3 h. 10.3 Pirólisis PRECAUCIÓN! Retire todos los accesorios y carriles laterales extraíbles. No empiece la Pirólisis si no ha cerrado completamente la puerta del horno. En algunos modelos, la pantalla muestra "C3" cuando se produce este error.
ESPAÑOL 10.5 Extracción e instalación de la puerta Retire la puerta y los paneles internos de cristal para limpiarlos. El número de paneles de cristal es diferente según el modelo. ADVERTENCIA! Tenga cuidado al desmontar la puerta del aparato. Tenga en cuenta que la puerta pesa mucho. 1. Abra la puerta completamente. 2. Levante al máximo las palancas de bloqueo (A) de ambas bisagras de la puerta.
www.aeg.com coincidir con el triángulo del marco de la puerta, y el símbolo cuadrado debe coincidir con el cuadrado. Después de eso, inserte los otros dos paneles de cristal. ADVERTENCIA! Hay peligro de electrocución. Desconecte el fusible antes de cambiar la bombilla. La lámpara del horno y la tapa de cristal pueden estar calientes. ABC 1. Apague el aparato. 2. Retire los fusibles de la caja de fusibles o desconecte el disyuntor. La bombilla superior 1.
ESPAÑOL 33 Problema Posible causa Solución El horno no calienta. La desconexión automática está activada. Consulte el apartado "Desconexión automática". El horno no calienta. El bloqueo de seguridad pa- Consulte "Uso del bloqueo ra niños está activado. de seguridad". El horno no calienta. Ha saltado el fusible. Compruebe si el fusible es la causa del fallo de funcionamiento. Si el fusible se funde repetidamente, consulte a un electricista cualificado. La bombilla no funciona.
www.aeg.com Problema Posible causa Solución El aparato está activado pero no se calienta. El ventilador no funciona. La pantalla muestra "Demo". El modo de demostración está activado. 1. 2. 3. 4. Apague el horno. Mantenga pulsada la tecla . El primer dígito de la pantalla y el indicador Demo empiezan a parpadear. Introduzca el código 2468 presionando las teclas o para cambiar los valores y 5. 6. 11.
ESPAÑOL Clase de eficiencia energética 35 A+ Consumo de energía con carga estándar, modo con- 1.09 kWh/ciclo vencional Consumo de energía con carga estándar, modo con ventilador 0.69 kWh/ciclo Número de cavidades 1 Fuente de calor Electricidad Volumen 71 l Tipo de horno Horno empotrado Masa EN 60350-1 - Aparatos electrodomésticos - Parte 1: Placas, hornos, hornos de vapor y parrillas Métodos para medir el rendimiento. 12.
www.aeg.com 13. ASPECTOS MEDIOAMBIENTALES Recicle los materiales con el símbolo . Coloque el material de embalaje en los contenedores adecuados para su reciclaje. Ayude a proteger el medio ambiente y la salud pública, así como a reciclar residuos de aparatos eléctricos y * electrónicos. No deseche los aparatos marcados con el símbolo junto con los residuos domésticos. Lleve el producto a su centro de reciclaje local o póngase en contacto con su oficina municipal.
ESPAÑOL 37
www.aeg.
ESPAÑOL 39
867335488-B-312017 www.aeg.