BPK35102YM USER MANUAL EN User Manual Oven
www.aeg.com CONTENTS 1. SAFETY INFORMATION............................................................................................. 2 2. SAFETY INSTRUCTIONS.............................................................................................4 3. PRODUCT DESCRIPTION...........................................................................................7 4. BEFORE FIRST USE..................................................................................................... 7 5. DAILY USE...
ENGLISH 3 damages that are the result of incorrect installation or usage. Always keep the instructions in a safe and accessible location for future reference. 1.
www.aeg.com • • • • • • Ensure that the appliance is switched off before replacing the lamp to avoid the possibility of electric shock. Do not use a steam cleaner to clean the appliance. Do not use harsh abrasive cleaners or sharp metal scrapers to clean the glass door since they can scratch the surface, which may result in shattering of the glass.
ENGLISH • • • • • • such a way that it cannot be removed without tools. Connect the mains plug to the mains socket only at the end of the installation. Make sure that there is access to the mains plug after the installation. If the mains socket is loose, do not connect the mains plug. Do not pull the mains cable to disconnect the appliance. Always pull the mains plug.
www.aeg.com • Before maintenance, deactivate the appliance and disconnect the mains plug from the mains socket. • Make sure the appliance is cold. There is the risk that the glass panels can break. • Replace immediately the door glass panels when they are damaged. Contact the Authorised Service Centre. • Be careful when you remove the door from the appliance. The door is heavy! • Clean regularly the appliance to prevent the deterioration of the surface material.
ENGLISH 2.7 Disposal WARNING! Risk of injury or suffocation. • Disconnect the appliance from the mains supply. • Cut off the mains electrical cable close to the appliance and dispose of it. 7 • Remove the door catch to prevent children or pets from becoming trapped in the appliance. 2.8 Service • To repair the appliance contact an Authorised Service Centre. • Use original spare parts only. 3. PRODUCT DESCRIPTION 3.1 General overview 1 13 2 3 4 5 6 7 5 4 3 2 1 8 9 10 11 12 3.
www.aeg.com 4.1 Initial Cleaning Remove all accessories and removable shelf supports from the oven. Refer to "Care and cleaning" chapter. Clean the oven and the accessories before first use. Put the accessories and the removable shelf supports back to their initial position. 5. DAILY USE WARNING! Refer to Safety chapters. 5.1 Retractable knobs To use the appliance, press the control knob. The control knob comes out. 1. Turn the knob for the oven functions to select an oven function. 2.
ENGLISH Oven function 9 Application Pizza Setting To bake food on one shelf position for a more intensive browning and a crispy bottom. Set the temperature 20 - 40 °C lower than for Top / Bottom Heat. Conventional Cooking (Top / Bottom Heat) To bake and roast food on one shelf position. Bottom Heat To bake cakes with crispy bottom and to preserve food. Defrost This function can be used for defrosting frozen foods, such as vegetables and fruits.
www.aeg.com 3. Put food in the appliance and close the oven door. 4. Set the True Fan Cooking PLUS function: . . 5. Press the Plus Steam button The Plus Steam button works only with the True Fan Cooking PLUS function. The indicator turns on. 6. Turn the knob for the temperature to select a temperature. 7. To deactivate the appliance, press the Plus Steam button , turn the knobs for the oven functions and temperature to the off position. The indicator of the Plus Steam button turns off. 8.
ENGLISH 11 6. CLOCK FUNCTIONS 6.1 Clock functions table Clock function 00:00 Application TIME OF DAY To show or change the time of day. You can change the time of day only when the appliance is off. DURATION To set how long the appliance operates. Use only when an oven function is set. END To set when the appliance deactivates. Use only when an oven function is set. TIME DELAY Combination of DURATION and END function. MINUTE MINDER Use to set a countdown time.
www.aeg.com 3. Press or to set the hours and then the minutes for END time. Press to confirm. At the set time an acoustic signal sounds for 2 minutes. and time setting flash in the display. The appliance deactivates automatically. 4. Press any button or open the oven door to stop the acoustic signal. 5. Turn the knob for the oven functions to the off position. 6.5 Setting the TIME DELAY function 1. Set an oven function. again and again until 2. Press starts to flash. 3.
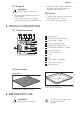
ENGLISH Wire shelf and deep pan together: Push the deep pan between the guide bars of the shelf support and the wire shelf on the guide bars above. 13 Small indentation at the top increase safety. The indentations are also anti-tip devices. The high rim around the shelf prevents cookware from slipping of the shelf. 8. ADDITIONAL FUNCTIONS 8.1 Using the Child Lock When the Child Lock is on the oven cannot be turned on accidentally. 1. Ensure the knob for the oven functions is in the off position. 2.
www.aeg.com Temperature (°C) Switch-off time (h) 30 - 115 12.5 120 - 195 8.5 200 - 245 5.5 250 - maximum 1.5 The Automatic switch-off does not work with the functions: Light, Duration, End. 8.5 Cooling fan After an automatic switch-off, press any button to operate the appliance again. When the oven operates, the cooling fan turns on automatically to keep the surfaces of the oven cool. If you turn off the oven, the cooling fan can continue to operate until the oven cools down. 9.
ENGLISH Food Water in the cavi- Temperature ty embossment (°C) (ml) Time (min) Shelf position Pizza frozen 200 200 - 210 10 - 20 21) Frozen lasagna 200 180 - 200 35 - 50 21) Frozen croissant 200 170 - 180 15 - 25 21) 15 1) Preheat in an empty oven for 10 minutes before cooking.
www.aeg.com differences equalize during the baking procedure. • Trays in the oven can twist during baking. When the trays become cold again, the distortions disappear. 9.3 Tips on baking Baking results Possible cause Remedy The bottom of the cake is not browned sufficiently. The shelf position is incorrect. Put the cake on a lower shelf. The cake sinks and becomes The oven temperature is too The next time you bake, set soggy, lumpy or streaky. high. a slightly lower oven temperature.
ENGLISH Food Function Temperature (°C) Time (min) Shelf position Flan base sponge mixture True Fan Cooking 150 - 170 20 - 25 2 Cheesecake Top / Bottom Heat 170 - 190 60 - 90 1 17 1) Preheat the oven. Cakes / pastries / breads on baking trays Food Function Plaited bread / Bread crown Christmas stollen Temperature (°C) Time (min) Shelf position Top / Bottom Heat 170 - 190 30 - 40 3 Top / Bottom Heat 160 - 1801) 50 - 70 2 Bread (rye bread): Top / Bottom Heat 1. 1.
www.aeg.
ENGLISH Food Function Temperature (°C) Time (min) Shelf position Stuffed vegetables True Fan Cooking 160 - 170 30 - 60 1 19 1) Preheat the oven. 9.6 Moist Fan Baking For best results follow the baking times listed in the table below.
www.aeg.com 9.7 Multilevel Baking Use the function True Fan Cooking. Cakes / pastries / breads on baking trays Food Temperature (°C) Time (min) Cream puffs / Eclairs 160 - 1801) Dry streusel cake 150 - 160 Shelf position 2 positions 3 positions 25 - 45 1/4 - 30 - 45 1/4 - 1) Preheat the oven.
ENGLISH Food Temperature (°C) Time (min) Shelf position Quiche Lorraine 170 - 190 45 - 55 1 Swiss Flan 170 - 190 45 - 55 1 Cheesecake 140 - 160 60 - 90 1 Apple cake, covered 150 - 170 50 - 60 1 Vegetable pie 160 - 180 50 - 60 1 Unleavened bread 230 - 2501) 10 - 20 2 Puff pastry flan 160 - 1801) 45 - 55 2 Flammekuchen (Pizza-like dish from Alsace) 230 - 2501) 12 - 20 2 Piroggen (Russian version of calzone) 180 - 2001) 15 - 25 2 21 1) Preheat the oven.
www.aeg.com Food Quantity Roast beef or fil- per cm of let: well done thickness Function Temperature (°C) Time (min) Shelf position Turbo Grilling 170 - 1801) 8 - 10 1 1) Preheat the oven. Pork Food Quantity (kg) Function Temperature (°C) Time (min) Shelf position Shoulder / Neck / Ham joint 1 - 1.5 Turbo Grilling 160 - 180 90 - 120 1 Chop / Spare rib 1 - 1.5 Turbo Grilling 170 - 180 60 - 90 1 Meatloaf 0.
ENGLISH Food Quantity (kg) Function Temperature Time (min) (°C) Haunch of venison 1.5 - 2 Top / Bottom 180 - 200 Heat 23 Shelf position 60 - 90 1 1) Preheat the oven. Poultry Food Quantity (kg) Function Temperature Time (min) (°C) Shelf position Poultry portions 0.2 - 0.25 each Turbo Grilling 200 - 220 30 - 50 1 Half chicken 0.4 - 0.5 each Turbo Grilling 190 - 210 35 - 50 1 Chicken, poulard 1 - 1.5 Turbo Grilling 190 - 210 50 - 70 1 Duck 1.
www.aeg.
ENGLISH Food Temperature (°C) Time (min) Shelf position Lasagne / Cannelloni, frozen 160 - 180 40 - 60 2 Oven baked cheese 170 - 190 20 - 30 3 Chicken Wings 190 - 210 20 - 30 2 9.13 Defrost • Remove the food packaging and put the food on a plate. • Use the first shelf position from the bottom. • Do not cover the food with a bowl or a plate, as this can extend the defrost time. 25 • For large portions of food place an upturned empty plate on the bottom of the oven cavity.
www.aeg.
ENGLISH Fruit Food Temperature (°C) Time (h) Plums 60 - 70 Apricots Shelf position 1 position 2 positions 8 - 10 3 1/4 60 - 70 8 - 10 3 1/4 Apple slices 60 - 70 6-8 3 1/4 Pears 60 - 70 6-9 3 1/4 9.16 Information for test institutes Tests according to EN 60350-1:2013 and IEC 60350-1:2011. Baking on one level.
www.aeg.com Multilevel Baking. Biscuits / small cakes / small cakes / pastries / rolls Food Function Temperature (°C) Time (min) Shelf position Short bread / Short True Fan Cooking. bread / Pastry Stripes 140 25 - 45 1/4 1/3/ 5 Small cakes / Small cakes (20 per tray) 1501) 23 - 40 1/4 - True Fan Cooking. 2 po- 3 positions sitions 1) Preheat the oven.
ENGLISH 1 Option Description P1 If the oven is not very dirty. Time of the procedure: 1 h 30 min. P2 If you cannot easily remove the dirt. Time of the procedure: 3 h. 2 Install the removed accessories in the opposite sequence. 10.3 Pyrolysis CAUTION! Do not start the Pyrolysis if the Plus Steam button is pressed in. You can use the End function to delay the start of the cleaning procedure. During the Pyrolysis the oven lamp is off. 5.
www.aeg.com number of glass panels is different for different models. WARNING! Be careful when you remove the door from the appliance. The door is heavy. 1. Open the door fully. 2. Fully lift up the clamping levers (A) on the two door hinges. CAUTION! Rough handling of the glass, especially around the edges of the front panel, can cause the glass to break. 7. Pull the door trim to the front to remove it. 8. Hold the door glass panels on their top edge one by one and pull them up out of the guide.
ENGLISH 31 1. Deactivate the appliance. 2. Remove the fuses from the fuse box or deactivate the circuit breaker. ABC The top lamp 1. Turn the lamp glass cover counterclockwise to remove it. 10.6 Replacing the lamp 2. Clean the glass cover. 3. Replace the lamp with a suitable 300 °C heat-resistant lamp. 4. Install the glass cover. Put a cloth on the bottom of the interior of the appliance. It prevents damage to the lamp glass cover and the cavity.
www.aeg.com Problem Possible cause Remedy The oven does not heat up. The automatic switch-off is activated. Refer to "Automatic switchoff". The oven does not heat up. The Child Lock is on. Refer to "Using the Child Lock". The oven does not heat up. The fuse is blown. Make sure that the fuse is the cause of the malfunction. If the fuse is blown again and again, contact a qualified electrician. The lamp does not operate. The lamp is defective. Replace the lamp.
ENGLISH 33 Problem Possible cause Remedy There is no good cooking performance using the True Fan Cooking PLUS function. You did not activate correct- Refer to "Activating the True ly the True Fan Cooking Fan Cooking PLUS funcPLUS function with the Plus tion". Steam button. There is no good cooking performance using the True Fan Cooking PLUS function. You did not fill the cavity embossment with water. Refer to "Activating the True Fan Cooking PLUS function".
www.aeg.com 11.2 Service data If you cannot find a solution to the problem yourself, contact your dealer or an Authorised Service Centre. on the front frame of the appliance cavity. Do not remove the rating plate from the appliance cavity. The necessary data for the service centre is on the rating plate. The rating plate is We recommend that you write the data here: Model (MOD.) ......................................... Product number (PNC) .........................................
ENGLISH When the cooking duration is longer than 30 minutes, reduce the oven temperature to minimum 3 - 10 minutes before the end of the cooking time, depending on the duration of the cooking. The residual heat inside the oven will continue to cook. Use the residual heat to warm up other dishes. Keep breaks between baking as short as possible when you prepare few dishes at one time. Cooking with fan When possible, use the cooking functions with fan to save energy.
867335129-D-242017 www.aeg.