
Operation Manual


• Clean all accessories after each use
and let them dry. Use a soft cloth with
warm water and a cleaning agent.
• If you have nonstick accessories, do
not clean them using aggressive
agents, sharp-edged objects or a
dishwasher. It can cause damage to
the nonstick coating.
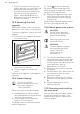
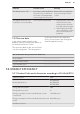
12.2 Removing the shelf
supports
Before maintenance, make sure that the
appliance is cool. There is a risk of burns.
To clean the appliance, remove the shelf
supports.
1. Pull carefully the supports up and out
of the front catch.
2
3
1
2. Pull the front end of the shelf support
away from the side wall.
3. Pull the supports out of the rear
catch.
Install the shelf supports in the opposite
sequence.
12.3 Steam cleaning
You can use the End
function to delay the start of
the cleaning. Refer to
"Setting the END".
Remove the worst of the dirt manually.
1. Put approximately 250 ml of water
and 3 tablespoons of vinegar directly
into the steam generator.
2. Set the Steam Cleaning function.
Refer to "Oven functions".
The display shows the duration and the
default temperature.
3. Touch to start the cleaning.
An acoustic signal sounds when the
steam cleaning is completed. Touch a
sensor field to stop the signal.
4. Wipe out the appliance with a soft
cloth. Remove the water from the
steam generator with the sponge
and rub it dry.
Keep the door open for approximately 1
hour to let the appliance dry fully.
12.4 Steam generation system
CAUTION!
Dry the steam generator
after each use. Remove the
water with the sponge.
Remove the limescale with
water and vinegar.
CAUTION!
Chemical de-scaling agents
can cause damage to the
enamel. Follow the
instructions of the
manufacturer.
1. To clean the water drawer and the
steam generator, put the water and
vinegar mixture (approximately 250
ml) through the water drawer into the
steam generator. Wait for
approximately 10 minutes.
2. Remove the water and vinegar with
the sponge.
3. Put clean water (100 - 200 ml) into the
water drawer to flush the steam
generation system.
4. Remove the water from the steam
generator with the sponge and rub it
dry.
5. Keep the door open to let the
appliance dry fully.
12.5 Removing and installing
the oven door
You can remove the oven door and the
internal glass panels to clean it. The
number of glass panels is different for
different models.
www.aeg.com
42