BS7314421M CS TROUBA NÁVOD K POUŽITÍ
PRO DOKONALÉ VÝSLEDKY Děkujeme vám, že jste si zvolili výrobek značky AEG. Aby vám bezchybně sloužil mnoho let, vyrobili jsme jej s pomocí inovativních technologií, které usnadňují život, a vybavili jsme jej funkcemi, které u obyčejných spotřebičů nenajdete. Stačí věnovat pár minut čtení a zjistíte, jak z něho získat co nejvíce. PŘÍSLUŠENSTVÍ A SPOTŘEBNÍ MATERIÁL V e-shopu společnosti AEG naleznete vše, co potřebujte k udržování všech vašich spotřebičů AEG v perfektním stavu.
Obsah 3 OBSAH 4 5 8 10 11 13 16 18 20 22 25 29 30 30 Bezpečnostní informace Bezpečnostní pokyny Popis spotřebiče Před prvním použitím Ovládací panel Denní používání Funkce hodin Automatické programy Použití příslušenství Doplňkové funkce Čištění a údržba Co dělat, když... Technické údaje Poznámky k ochraně životního prostředí V tomto návodu pro uživatele se používají následující symboly: Důležité informace týkající se Vaší bezpečnosti a informace o ochraně spotřebiče před poškozením.
Bezpečnostní informace BEZPEČNOSTNÍ INFORMACE Tento návod si pečlivě přečtěte ještě před instalací spotřebiče a jeho prvním použitím. Výrobce nezodpovídá za škody a zranění způsobená nesprávnou instalací či chybným používáním. Návod k použití vždy uchovávejte spolu se spotřebičem pro jeho budoucí použití. Bezpečnost dětí a postižených osob UPOZORNĚNÍ Hrozí nebezpečí udušení, úrazu nebo jiných trvalých následků.
Bezpečnostní pokyny 5 • K odstranění drážek na rošty nejprve odtáhněte přední a poté zadní konec drážek na rošty od stěny trouby. Drážky na rošty instalujte stejným postupem v opačném pořadí. BEZPEČNOSTNÍ POKYNY Instalace UPOZORNĚNÍ Tento spotřebič smí instalovat jen kvalifikovaná osoba. • • • • • • • • Odstraňte veškerý obalový materiál. Poškozený spotřebič neinstalujte ani nepoužívejte. Řiďte se pokyny k instalaci dodanými spolu s tímto spotřebičem.
Bezpečnostní pokyny • Používejte pouze správná izolační zařízení: ochranné vypínače vedení, pojistky (pojistky šroubového typu se musí odstranit z držáku), ochranné zemnicí jističe a stykače. • Je nutné instalovat vhodný vypínač nebo izolační zařízení k řádnému odpojení všech na‐ pájecích vodičů spotřebiče. Toto izolační zařízení musí mít mezeru mezi kontakty ale‐ spoň 3 mm širokou. Použití spotřebiče UPOZORNĚNÍ Hrozí nebezpečí zranění, popálení, úrazu elektrickým proudem či výbuchu.
Bezpečnostní pokyny 7 Vaření v páře UPOZORNĚNÍ Hrozí nebezpečí poranění nebo poškození spotřebiče. • Během vaření v páře neotvírejte dvířka spotřebiče. Může dojít k úniku páry. Čištění a údržba UPOZORNĚNÍ Hrozí nebezpečí poranění, požáru nebo poškození spotřebiče. • Před čištěním nebo údržbou spotřebič vždy vypněte a vytáhněte síťovou zástrčku ze zá‐ suvky. • Přesvědčte se, že spotřebič už vychladl. Mohlo by dojít k prasknutí skleněných panelů. • Poškozené skleněné panely okamžitě vyměňte.
Popis spotřebiče POPIS SPOTŘEBIČE Celkový pohled 1 2 3 4 5 6 5 4 11 3 7 2 8 1 9 10 1 2 3 4 5 6 7 8 9 10 11 Ovládací panel Elektronický programátor Zásobník na vodu Zásuvka pečicí sondy Topný článek Osvětlení trouby Ventilátor Zadní topný článek Odpařovač Drážky na rošty, vyjímatelné Polohy roštů
Popis spotřebiče Příslušenství trouby • Drátěný rošt Pro nádoby na pečení, dortové a koláčové formy, pečeně. • Plech na pečení Na koláče a sušenky. • Pekáč Pro pečení moučných jídel a masa, nebo k zachycování tuku. • Pečicí sonda Používá se k měření stupně propečenosti masa.
Před prvním použitím • Vysunovací kolejničky Pro rošty a plechy na pečení. • Sada pro vaření v páře Jedna neděrovaná a jedna děrovaná nádoba na potraviny. Parní sada odvádí kondenzovanou vodu z jí‐ dla během jeho přípravy v páře. Používejte ji k přípravě jídel, která by neměla být připra‐ vována ve vodě (např. zelenina, kusy ryb, kuřecí prsa). Tato sada není vhodná pro jí‐ dla, která je zapotřebí namáčet ve vodě (např. rýže, polenta, těstoviny). • Houbička Nasává zbytkovou vodu z generátoru páry.
Ovládací panel 11 První nastavení denního času Poté, co zhasne verze software, se na displeji zobrazí „h“ a „12:00“. Nastavení denního času: nebo nastavte čas. 1. Pomocí nebo . 2. Stiskněte nebo nastavte minuty. 3. Pomocí nebo . 4. Stiskněte Displej teploty / času zobrazí nově nastavený čas. Změna denního času Denní čas lze změnit pouze, když je spotřebič vypnutý. Stiskněte . Na bliká . Nový denní čas nastavíte výše uvedeným postupem.
Ovládací panel Senzorové tla‐ čítko Funkce Popis 6 NAHORU, DOLŮ Slouží k výběru funkce trouby a funkce hodin a k nastavení funkce minutky, teploty nebo denního času. 7 OK K potvrzení výběru nebo nastavení. 8 OSVĚTLENÍ TROUBY Zapne nebo vypne osvětlení trouby. 9 HODINY Nastavení funkce hodin. 10 MINUTKA Nastavení funkce minutky.
Denní používání Symboly Jméno / 13 Popis h/min Je spuštěna funkce hodin. Teplota / rychloohřev Funkce je spuštěna. Teplota Můžete zkontrolovat nebo změnit teplotu. Pečicí sonda Pečicí sonda je zasunutá v zásuvce. Osvětlení trouby Osvětlení je vypnuté. Minutka Je spuštěná funkce minutky. Ukazatel ohřevu Jestliže zapnete funkci trouby, stavové čárky na displeji se budou postupně rozsvěcovat. Tyto stavové čárky zobrazují zvyšování či klesání teploty ve spotřebiči.
Denní používání Funkce trouby Použití 7 Příprava pizzy Pro pečení jídel, která vyžadují intenzivnější zhnědnutí a křupavější spodek, na jedné úrovni. Snižuje teplotu trouby (o 20—40 °C) v porovnání s tradičním pečením. 8 Nízkoteplotní pe‐ čení Příprava velmi libové a měkké pečeně. 9 Konvenční ohřev K tradičnímu pečení moučných jídel a masa na jedné úrovni trouby. 10 Mražené potraviny K přípravě polotovarů jako např. hranolek, amerických bram‐ bor, křupavých jarních závitků.
Denní používání 15 Kontrola teploty trouby Teplotu uvnitř trouby lze kontrolovat při spuštěných funkcích nebo programech. . 1. Stiskněte Displej teploty / času zobrazí teplotu uvnitř spotřebiče. Chcete-li teplotu uvnitř spotřebiče změnit, stiskněte . 2. Zpět na nastavenou teplotu přejděte stisknutím na displeji automaticky. ještě jednou a použijte nebo nebo se po pěti sekundách zobrazí Funkce rychlého zahřátí Funkce rychlého zahřátí snižuje čas potřebný k rozehřátí trouby.
Funkce hodin Nechte spotřebič zcela vychladnout s otevřenými dvířky. Úspora energie Tento spotřebič je vybaven funkcemi, které vám pomohou ušetřit energii při každodenním vaření: • Zbytkové teplo: – je spuštěná funkce nebo program trouby: topné články se vypnou o 10 % dříve (osvě‐ tlení a ventilátor budou dále pracovat). Podmínka: doba pečení je delší než 30 minut nebo jsou použity funkce (Trvání, Ukončení, Odložený start). – trouba je vypnutá: teplo můžete využít k udržení teploty jídla.
Funkce hodin 2. 3. 4. 5. 17 Opakovaně stiskněte , dokud se na displeji neobjeví . Na displeji bliká . nebo nastavte minuty Pomocí funkce TRVÁNÍ. . Nastavení potvrďte pomocí nebo nastavte hodiny funkce TRVÁNÍ. Pomocí Pokud se během nastavování hodin funkce TRVÁNÍ dotknete tlačítek nebo , spotřebič přejde k nastavení funkce UKONČENÍ. 6. Po uplynutí nastaveného času zazní na dvě minuty zvukový signál. Na displeji bliká symbol a nastavení času. Spotřebič se vypne.
Automatické programy 5. Stisknutím jakéhokoliv senzorového tlačítka (kromě tlačítka ZAP/VYP) spustíte funkci NASTAVIT A SPUSTIT. Funkci NASTAVIT A SPUSTIT můžete použít pouze, pokud je nastavena funkce TRVÁNÍ. Nastavení funkce MINUTKA Pomocí funkce MINUTKA nastavíte odpočet (maximálně 23 hodin a 59 minut). Tato funkce nemá žádný vliv na provoz trouby. Funkci MINUTKA můžete zapnout kdykoliv; i u vypnuté‐ ho spotřebiče. 1. Stiskněte . Na displeji bliká a „00“. nebo nastavte funkci MI‐ 2. Pomocí NUTKA.
Automatické programy 19 Automatické recepty Nastavení automatických receptů: 1. Dvakrát stiskněte , dokud se na displeji nezobrazí . Na displeji se objeví symbol a číslo automatického programu. nebo . 2. K nastavení receptu použijte nebo se automatický recept po pěti sekundách spustí automaticky. 3. Stiskněte 4. Po uplynutí nastaveného času zazní na dvě minuty zvukový signál. Symbol bliká. Spotřebič se vypne. 5.
Použití příslušenství POUŽITÍ PŘÍSLUŠENSTVÍ UPOZORNĚNÍ Viz kapitola „Bezpečnostní informace“. Pečicí sonda Pečicí sonda měří teplotu středu masa. Jakmile teplota masa dosáhne nastavené teploty, spotřebiče se vypne. Je nutné nastavit dvě teploty: • Teplota trouby: viz „Recepty“ a tabulka pečení masa. • Teplota středu masa: viz „Recepty“ a tabulka pro pečicí sondu. Používejte pouze dodávanou pečicí sondu nebo originální náhradní díly. 1. 2. 3. 4. 5. Zapněte spotřebič.
Použití příslušenství 7. 8. 21 Když teplota středu masa dosáhne nastavené teploty, začne blikat teplota středu masa . Na dvě minuty zazní zvukový signál. a Signál vypnete stisknutím jakéhokoliv senzorového tlačítka. Zástrčku pečicí sondy vytáhněte ze zásuvky a maso vyjměte ze spotřebiče. UPOZORNĚNÍ Při vytahování pečicí sondy buďte opatrní. Je horká. Hrozí nebezpečí popálení. 9. Vypněte spotřebič. Když zasunete pečicí sondu do zásuvky, zrušíte nastavení funkce hodin.
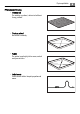
Doplňkové funkce Vysunovací drážky - vložení příslušenství trouby Vložte mělký nebo hluboký plech na pečení do vy‐ sunovacích drážek. Zasuňte drátěný rošt do vysunovacích drážek tak, aby nožičky směřovaly dolů. Zvýšený okraj drátěného roštu je dalším zajiště‐ ním proti sklouznutí nádoby na pečení. Společné vložení drátěného roštu a hlubokého plechu Drátěný rošt položte na hluboký plech. Drátěný rošt a hluboký plech na pečení umístěte na vysu‐ novací drážky.
Doplňkové funkce 23 Během spuštěné funkce lze měnit dobu přípravy jídla a teplotu. Dětská bezpečnostní pojistka Funkce dětské bezpečnostní pojistky brání náhodnému použití spotřebiče. Zapnutí či vypnutí funkce dětské bezpečnostní pojistky: 1. Pomocí spotřebič vypněte. Nenastavujte žádnou funkci trouby. . Zazní zvukový signál. 2. Na dvě sekundy se současně dotkněte a podržte a Na displeji se zobrazí či zmizí SAFE. Pokud je trouba vybavena funkcí pyrolytického čištění, dvířka jsou zamčená.
Doplňkové funkce Číslo nabídky nastavení Popis Hodnota SET71) PRODLOUŽENÍ DOBY PEČE‐ NÍ ON/OFF 1) Pouze u vybraných modelů Nabídku nastavení můžete upravit pouze u vypnutého spotřebiče. Zapnutí nabídky nastavení: 1. V případě potřeby vypněte spotřebič . 2. Stiskněte a na tři sekundy podržte . Na displeji se objeví „SET1“ a začne blikat „1“. / zvolte nastavení. 3. Pomocí . 4. Stiskněte / změňte hodnotu nastavení. 5. Pomocí . 6.
Čištění a údržba 25 Chladicí ventilátor Když je spotřebič v provozu, chladicí ventilátor se automaticky zapne, aby udržoval povrch spotřebiče chladný. Jestliže spotřebič vypnete, bude chladicí ventilátor pokračovat v chlaze‐ ní až do úplného ochlazení spotřebiče. Mechanický zámek dvířek Při zakoupení spotřebiče není zámek dveří aktivován. Aktivace zámku dveří: Vytáhněte zámek dveří dopředu, dokud se nezablokuje. Deaktivace zámku dveří: Zatlačte zámek dveří zpět do panelu. Otevření dvířek spotřebiče: 1.
Čištění a údržba • Máte-li nepřilnavé příslušenství, nečistěte je agresivními čisticími prostředky, ostrými předměty, ani je nemyjte v myčce. Mohlo by dojít k poškození nepřilnavého povrchu. Čistění párou 1. 2. 3. 4. 5. Nejhorší nečistoty odstraňte ručně. Přímo do systému generátoru páry nalijte cca 250 ml vody a tři polévkové lžíce octa. Nastavte funkci Čištění párou. Viz „Funkce trouby“. Na displeji se zobrazí délka (15 minut) a výchozí teplota. Dotykem OK spustíte čištění.
Čištění a údržba 3. 27 Drážky vytáhněte ze zadního úchytu. Instalace drážek na rošty Drážky instalujte stejným postupem v opačném pořadí. Systém tvoření páry POZOR Po každém použití odpařovač vysušte. Pomocí houbičky odsajte vodu. Případný vodní kámen odstraníte octovou vodou. POZOR Chemické odstraňovače vodního kamene mohou poškodit smalt trouby. Řiďte se pokyny vý‐ robce. Čištění zásobníku na vodu a generátoru páry: 1. Přes zásobník na vodu do generátoru páry nalijte roztok vody s octem (cca 250 ml).
Čištění a údržba Výměna žárovky trouby: 1. Skleněný kryt žárovky se nachází na stropě vnitřku trouby. Skleněným krytem otočte proti směru hodinových ručiček a sejměte jej. 2. Skleněný kryt vyčistěte. 3. V případě potřeby vyměňte žárovku trouby za novou, odolnou do teploty 300 °C. Použijte žárovku stejného typu. 4. Nasaďte skleněný kryt. Výměna žárovky trouby a čištění krytu žárovky (na levé straně vnitřku trouby): 1. Odstraňte levé drážky na rošty. 2. Pomocí křížového šroubováku sejměte skleněný kryt.
Co dělat, když... 29 Vytažení a vyčištění skleněných panelů dvířek 1. Odstraňte dvířka. 2. Podržte okrajovou lištu (B) horní strany dvířek na obou stranách a stiskněte ji směrem dovnitř k uvolnění svorky těsně‐ ní. 3. Vytáhněte lištu dopředu a odstraňte ji. B 4. 5. Uchopte skleněné panely jeden po dru‐ hém na jejich horní straně a vytáhněte je z drážek směrem nahoru. Vyčistěte skleněné tabule dvířek spotřebiče. Tabule vrátíte zpět provedením stejného po‐ stupu v opačném pořadí.
Technické údaje Problém Možná příčina Řešení Na displeji se objeví F102. Zámek dvířek je vadný. • Zavřete správně dvířka spotřebiče • Spotřebič vypněte a znovu zapněte prostřednictvím do‐ movní pojistky nebo ochran‐ ného spínače v pojistkové skříňce. • Pokud se na displeji opět zo‐ brazí F102, obraťte se na autorizované servisní středi‐ sko. Na displeji se zobrazuje chybo‐ vý kód, který není v seznamu. Jedná se závadu na elektroin‐ stalaci.
příslušného místního úřadu, služby pro likvidaci domovního odpadu nebo v obchodě, kde jste výrobek zakoupili. Obalové materiály Obalový materiál neškodí životnímu prostředí a je recyklovatelný. Plastové díly jsou označe‐ ny mezinárodními zkratkami jako PE, PS apod. Zlikvidujte prosím veškerý obalový materiál ve vhodném kontejneru ve sběrném dvoře v místě svého bydliště.
www.aeg.