PRO COMBI BS8314001 USER MANUAL EN
www.aeg.com CONTENTS 1. SAFETY INFORMATION.................................................................................................3 2. SAFETY INSTRUCTIONS................................................................................................ 4 3. PRODUCT DESCRIPTION.............................................................................................. 6 4. CONTROL PANEL...........................................................................................................8 5.
ENGLISH 1. 3 SAFETY INFORMATION Before the installation and use of the appliance, carefully read the supplied instructions. The manufacturer is not responsible if an incorrect installation and use causes injuries and damages. Always keep the instructions with the appliance for future reference. 1.
www.aeg.com • • • • • • • Ensure that the appliance is switched off before replacing the lamp to avoid the possibility of electric shock. Do not use a steam cleaner to clean the appliance. Do not use harsh abrasive cleaners or sharp metal scrapers to clean the glass door since they can scratch the surface, which may result in shattering of the glass.
ENGLISH • The shock protection of live and insulated parts must be fastened in such a way that it cannot be removed without tools. • Connect the mains plug to the mains socket only at the end of the installation. Make sure that there is access to the mains plug after the installation. • If the mains socket is loose, do not connect the mains plug. • Do not pull the mains cable to disconnect the appliance. Always pull the mains plug.
www.aeg.com • Before maintenance, deactivate the appliance and disconnect the mains plug from the mains socket. • Make sure the appliance is cold. There is the risk that the glass panels can break. • Replace immediately the door glass panels when they are damaged. Contact the Service. • Be careful when you remove the door from the appliance. The door is heavy! • Clean regularly the appliance to prevent the deterioration of the surface material. • Remaining fat or food in the appliance can cause fire.
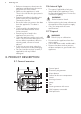
ENGLISH 3.2 Accessories 7 Core temperature sensor Wire shelf To measure how far the food is cooked. For cookware, cake tins, roasts. Telescopic runners Baking tray For shelves and trays. For cakes and biscuits. Steam set Grill- / Roasting pan To bake and roast or as a pan to collect fat. One unperforated and one perforated food container. Trivet The steam set drains the condensing water away from the food during steam cooking.
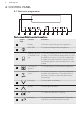
www.aeg.com 4. CONTROL PANEL 4.1 Electronic programmer 1 2 3 4 5 6 7 8 9 10 11 Use the sensor fields to operate the appliance. Sensor field 1 2 - Function Comment Display Shows the current settings of the appliance. ON / OFF To activate and deactivate the appliance. 3 Heating Functions To choose a heating function or a menu: Assisted or Assisted Cook- Cooking. To access the necessary function, touch ing the field once or twice.
ENGLISH Sensor field Function Comment Time and additional functions To set different functions. When a heating function operates, touch the sensor field to set the timer or the functions: Function Lock, Favourite Programme, Heat + Hold, Set + Go. You can also change the settings of the Core Temperature Sensor. Minute Minder To set the function: Minute Minder. 10 11 9 4.
www.aeg.com Symbol Function Fast Heat Up Indicator The function is active. It decreases the heat up time. Weight Automatic The display shows that the automatic weight system is active or that weight can be changed. Heat + Hold The function is active. 5. BEFORE FIRST USE 5.2 First Connection WARNING! Refer to Safety chapters. When you connect the appliance to the mains or after the power cut, you have to set the language, the display contrast, the display brightness and the time of the day. 5.
ENGLISH Symbol Menu item Application Favourite Programme Contains a list of favourite cooking programmes created by the user. 11 Submenu for: Basic Settings Symbol Submenu Description Set Time of Day Sets the current time on the clock. Time Indication When ON, the display shows the current time when you deactivate the appliance. Set + Go When ON, in the Select Options window you can choose the function: Set + Go.
www.aeg.com Heating function Application Half Steam + Heat For dishes with a high moisture content and for poaching fish, custard royale and terrines. Quarter Steam + Heat To bake bread, roast large pieces of meat or to warm up chilled and frozen meals. ECO Steam The ECO functions let you optimize the energy consumption during cooking. It is necessary to set the cooking time first. To get more information about the recommended settings, refer to the cooking tables with the equivalent function.
ENGLISH Heating function Application Defrost To defrost frozen food. Bottom Heat To bake cakes with crispy bottom and to preserve food. Dough Proving For controlled rising of yeast dough before baking. Bread Baking To bake bread. Au Gratin For dishes such as lasagna or potato gratin. Also to gratinate and brown. Preserving To make vegetable preserves such as pickles. Drying To dry sliced fruit (e.g. apples, plums, peaches) and vegetables (e.g. tomatoes, zucchini, mushrooms).
www.aeg.com 2. Fill the water drawer with 800 ml of water. The water supply is sufficient for approximately 50 minutes. 3. Push the water drawer to its initial position. 4. Activate the appliance. 5. Prepare the food in the correct cookware. 6. Select a steam heating function and the temperature. 7. If necessary, set the function Duration or End Time . The first steam shows after approximately 2 minutes. An acoustic signal sounds when the appliance is at approximately the set temperature.
ENGLISH 7. CLOCK FUNCTIONS 7.1 Clock functions table Clock function Application Minute Minder To set a countdown (max. 2 h 30 min). This function has no effect on the operation of the appliance. You can also activate it when the appliance is deactivated. Use to activate the function. Press to set the minutes and or to start. Duration To set the length of an operation (max. 23 h 59 min). End Time To set the switch-off time for a heating function (max. 23 h 59 min).
www.aeg.com 7.3 Heat + Hold 7.4 Extra Time Conditions for the function: The function: Extra Time makes the heating function continue after the end of Duration. • The set temperature is more than 80 °C. • The function: Duration is set. The function: Heat + Hold keeps prepared food warm at 80 °C for 30 minutes. It activates after the baking or roasting procedure ends. You can activate or deactivate the function in the menu: Basic Settings. 1. Activate the appliance. 2. Select the heating function. 3.
ENGLISH 17 With some programmes turn over the food after 30 minutes. The display shows a reminder. 9. USING THE ACCESSORIES WARNING! Refer to Safety chapters. 9.1 Core temperature sensor There are two temperatures to be set: the oven temperature and the core temperature. The core temperature sensor measures the core temperature of the meat. When the meat is at the set temperature, the appliance deactivates. CAUTION! Only use the core temperature sensor supplied or the correct replacement parts.
www.aeg.com 9.3 Telescopic runners inserting the oven accessories Wire shelf: Put the wire shelf on the telescopic runners so that the feet point downwards. The high rim around the wire shelf is a special device to prevent the cookware from slipping. Deep pan: Push the deep pan between the guide bars of the shelf support. Baking tray or deep pan: Put the baking tray or deep pan on the telescopic runners.
ENGLISH 9.4 Trivet and Grill- / Roasting pan WARNING! Be careful when you remove the accessories from a hot appliance. There is a risk of burns. 2. Put the deep pan into the oven on the necessary shelf position. You can use the trivet to grill flat dishes in large quantities and to toast. 1. Put the trivet into the deep pan so that the supports of the wire shelf point down. You can use the trivet to roast larger pieces of meat or poultry on one shelf position. 1.
www.aeg.com Press to go directly to menu: Favourite Programme. You can also use it when the appliance is deactivated. 10.2 Using the Child Lock The Child Lock prevents an accidental operation of the appliance. 1. Activate the appliance. and at the same time 2. Touch until the display shows a message. To deactivate the Child Lock function repeat step 2. 10.3 Function Lock This function prevents an accidental change of the heating function. You can activate it only when the appliance operates. 1.
ENGLISH 21 If you deactivate the appliance, the cooling fan can continue to operate until the appliance cools down. 11. HINTS AND TIPS WARNING! Refer to Safety chapters. The temperature and baking times in the tables are guidelines only. They depend on the recipes and the quality and quantity of the ingredients used. 11.1 Inner side of the door In some models, on the inner side of the door you can find: • the numbers of the shelf positions.
www.aeg.com 11.4 Steam water table Time (min) Water in the water drawer (ml) 15 - 20 300 30 - 40 600 50 - 60 800 11.5 Full Steam / ECO Steam WARNING! Do not open the appliance door when the function is activated. There is a risk of burns. quantity of water necessary for one of the dishes in the operation. Put the dishes into the correct cookware and then on the wire shelves. Adjust the distance between the cookware to let the steam circulate.
ENGLISH 23 Food Temperature (°C) Time (min) Shelf position Water in the water drawer (ml) Fennel 96 35 - 45 2 600 Carrots 96 35 - 45 2 600 Kohlrabi, strips 96 30 - 40 2 550 Peppers, strips 96 20 - 25 2 400 Leeks, rings 96 25 - 35 2 500 Green beans 96 35 - 45 2 550 Lamb’s lettuce, 96 florets 20 - 25 2 450 Brussels sprouts 96 30 - 40 2 550 Beetroot 96 70 - 90 2 800 + 400 Black salsify 96 35 - 45 2 600 Celery, cubed 96 25 - 35 2 500 Asparagus, green 9
www.aeg.com Food Temperature (°C) Time (min) Shelf position Water in the water drawer (ml) Potato dump- 96 lings 35 - 45 2 600 Unpeeled po- 96 tatoes, medium 45 - 55 2 750 Rice (water / rice ratio 1.5:1) 96 35 - 40 2 600 Boiled potatoes, quartered 96 35 - 40 2 600 Bread dumpling 96 35 - 45 2 600 Tagliatelle, fresh 96 20 - 25 2 450 Polenta (liquid ratio 3:1) 96 45 - 50 2 750 Temperature (°C) Time (min) Shelf position Water in the water drawer (ml) Trout, approx.
ENGLISH 25 Meat Food Temperature (°C) Time (min) Shelf position Water in the water drawer (ml) Cooked ham 1000 96 g 55 - 65 2 800 + 150 Chicken breast, poached 90 25 - 35 2 500 Chicken, poached, 1000 - 1200 g 96 60 - 70 2 800 + 150 Veal / pork loin without leg, 800 1000 g 90 80 - 90 2 800 + 300 Kasseler (smoked loin of pork), poached 90 90 - 110 2 800 + 300 Tafelspitz (prime boiled beef) 96 110 - 120 2 800 + 700 Chipolatas 80 15 - 20 2 400 Eggs Food Temperature (°C)
www.aeg.com Food Turbo Grilling (first step: cook meat) Full Steam (second step: add vegetables) Temperature (°C) Time (min) Shelf posi- Temperation ture (°C) Time (min) Shelf position Roast beef 1 kg Brussels sprouts, polenta 180 60 - 70 meat: 1 96 40 - 50 meat: 1 vegetables: 3 Roast pork 1 kg, Potatoes, vegetables, gravy 180 60 - 70 meat: 1 96 30 - 40 meat: 1 vegetables: 3 Roast veal 180 1 kg, Rice, vegetables 50 - 60 meat: 1 96 30 - 40 meat: 1 vegetables: 3 11.
ENGLISH Food Temperature (°C) Time (min) Shelf position Rice 85 20 - 25 2 One-plate dishes 85 20 - 25 2 11.8 Quarter Steam + Heat Add about 300 ml of water.
www.aeg.com • If you cannot find the settings for a special recipe, look for the one that is almost the same. • You can extend baking times by 10 – 15 minutes if you bake cakes on more than one level. • Cakes and pastries at different heights do not always brown equally at first. If this occurs, do not change the temperature setting. The differences equalize during the baking procedure.
ENGLISH 11.
www.aeg.com Food Function Temperature (°C) Time (min) Shelf position 1. 2. 1 Bread (rye Conventional bread): Cooking 1. First part of baking procedure. 2. Second part of baking procedure. 1. 2.
ENGLISH Food Function Temperature (°C) Time (min) Shelf position Short bread / Short bread / Pastry stripes True Fan Cooking 140 20 - 35 3 Short bread / Short bread / Pastry stripes Conventional Cooking 1601) 20 - 30 3 Biscuits made with sponge mixture True Fan Cooking 150 - 160 15 - 20 3 Pastries made True Fan Cookwith egg white / ing Meringues 80 - 100 120 - 150 3 Macaroons True Fan Cooking 100 - 120 30 - 50 3 Biscuits made with yeast dough True Fan Cooking 150 - 160 20 -
www.aeg.com Food Function Temperature (°C) Time (min) Shelf position Vegetables au gratin1) Turbo Grilling 160 - 170 15 - 30 1 Baguettes top- True Fan Cookped with melted ing cheese 160 - 170 15 - 30 1 Sweet bakes Conventional Cooking 180 - 200 40 - 60 1 Fish bakes Conventional Cooking 180 - 200 30 - 60 1 Stuffed vegetables True Fan Cooking 160 - 170 30 - 60 1 1) Preheat the oven. 11.
ENGLISH Food Dry streusel cake Temperature (°C) Time (min) 150 - 160 30 - 45 33 Shelf position 2 positions 3 positions 1/4 - 1) Preheat the oven.
www.aeg.com 2. Put the meat together with the hot roasting pan into the oven on the wire shelf. 3. Put the Core temperature sensor into the meat. 4. Select the function: Slow Cooking and set the correct end core temperature. Food Quantity Temperature (°C) Time (min) Shelf position Roast beef 1000 - 1500 g 120 120 - 150 1 Fillet of beef 1000 - 1500 g 120 90 - 150 3 Roast veal 1000 - 1500 g 120 120 - 150 1 Steaks 200 - 300 g 120 20 - 40 3 11.
ENGLISH • To prevent the meat juices or fat from burning onto the pan, put some liquid into the deep pan. • If necessary, turn the roast (after 1/2 2/3 of the cooking time). • Baste large roasts and poultry with their juices several times during 35 roasting. This gives better roasting results. • You can deactivate the appliance approximately 10 minutes before the end of the roasting time, and use the residual heat. 11.
www.aeg.com Lamb Food Quantity (kg) Function Temperature Time (min) (°C) Shelf position Shelf position Leg of lamb / 1 - 1.5 Roast lamb Turbo Grilling 150 - 170 100 - 120 1 Saddle of lamb 1 - 1.5 Turbo Grilling 160 - 180 40 - 60 1 Food Quantity Function Temperature Time (min) (°C) Saddle / Leg of hare up to 1 kg Conventional 2301) Cooking 30 - 40 1 Saddle of venison 1.5 - 2 kg Conventional 210 - 220 Cooking 35 - 40 1 Haunch of venison 1.
ENGLISH 37 Fish (steamed) Food Quantity (kg) Function Temperature Time (min) (°C) Whole fish 1 - 1.5 Conventional 210 - 220 Cooking Shelf position 40 - 60 1 11.19 Grilling Grill only flat pieces of meat or fish. Always grill with the maximum temperature setting. Always preheat the empty oven with the grill functions for 5 minutes. CAUTION! Always grill with the oven door closed. Set the shelf into the shelf position as recommended in the grilling table.
www.aeg.com 11.
ENGLISH 39 Food Quantity Defrosting time (min) Further deComments frosting time (min) Chicken 1 kg 100 - 140 20 - 30 Put the chicken on an upturned saucer in a big plate. Turn halfway through. Meat 1 kg 100 - 140 20 - 30 Turn halfway through. Meat 500 g 90 - 120 20 - 30 Turn halfway through.
www.aeg.com Vegetables Food Temperature (°C) Cooking time until simmering (min) Continue to cook at 100 °C (min) Carrots 1) 160 - 170 50 - 60 5 - 10 Cucumbers 160 - 170 50 - 60 - Mixed pickles 160 - 170 50 - 60 5 - 10 Kohlrabi / Peas / Asparagus 160 - 170 50 - 60 15 - 20 1) Leave standing in the oven after it is deactivated. 11.23 Drying Use baking parchment as a cover for the wire shelves. appliance door and let the appliance cool down. After that, complete the drying process.
ENGLISH Food Temperature (°C) Time (min) Shelf position White Bread 180 - 200 40 - 60 2 Baguette 200 - 220 35 - 45 2 Brioche 160 - 180 40 - 60 2 Ciabatta 200 - 220 35 - 45 2 Rye Bread 180 - 200 50 - 70 2 Dark Bread 180 - 200 50 - 70 2 All Grain bread 170 - 190 60 - 90 2 11.
www.aeg.com Game Food Food Core Temperature (°C) Saddle of hare 70 - 75 Leg of hare 70 - 75 Whole hare 70 - 75 Saddle of venison 70 - 75 Leg of venison 70 - 75 Fish Food Food Core Temperature (°C) Salmon 65 - 70 Trouts 65 - 70 12. CARE AND CLEANING WARNING! Refer to Safety chapters. 1. Pull carefully the supports up and out of the front catch. 12.1 Notes on cleaning • Clean the front of the appliance with a soft cloth with warm water and a cleaning agent.
ENGLISH The display shows the duration of the function. An acoustic signal sounds when the programme is completed. 3. Touch a sensor field to deactivate the signal. 4. Wipe out the appliance with a soft cloth. Remove the water from the steam generator. Keep the appliance door open for approximately 1 hour. Wait until the appliance is dry. To speed up the drying you can heat up the appliance with hot air at temperature 150 °C for approximately 15 minutes.
www.aeg.com 9. Clean the glass panel with water and soap. Dry the glass panel carefully. When the cleaning is completed, install the glass panels and the oven door. Do the above steps in the opposite sequence. Install the smaller panel first, then the larger. 12.6 Replacing the lamp Put a cloth on the bottom of the interior of the appliance. It prevents damage to the lamp glass cover and the cavity. WARNING! Danger of electrocution! Disconnect the fuse before you replace the lamp.
ENGLISH 45 Problem Possible cause Remedy The oven does not heat up. The fuse is released. Make sure that the fuse is the cause of the malfunction. If the fuse releases again and again, contact a qualified electrician. The lamp does not operate. The lamp is defective. Replace the lamp. The display shows F111. The plug of the core temPut the plug of the core temperature sensor is not corperature sensor as far as rectly installed into the sock- possible into the socket. et.
www.aeg.
ENGLISH 47
892964673-A-472013 www.aeg.