PRO COMBI BS9314001 MANUAL DE INSTRUCCIONES ES
www.aeg.com CONTENIDO 1. INFORMACIÓN SOBRE SEGURIDAD...........................................................................3 2. INSTRUCCIONES DE SEGURIDAD............................................................................... 4 3. DESCRIPCIÓN DEL PRODUCTO...................................................................................7 4. PANEL DE MANDOS...................................................................................................... 8 5. ANTES DEL PRIMER USO..........
ESPAÑOL 1. 3 INFORMACIÓN SOBRE SEGURIDAD Antes de instalar y utilizar el aparato, lea atentamente las instrucciones facilitadas. El fabricante no se hace responsable de los daños y lesiones causados por una instalación y uso incorrectos. Guarde siempre las instrucciones junto con el aparato para futuras consultas. 1.
www.aeg.com • • • • • • • Antes de realizar tareas de mantenimiento, corte la corriente eléctrica. Asegúrese de que el aparato está desconectado antes de reemplazar la lámpara con el fin de impedir que se produzca una descarga eléctrica. No utilice un limpiador a vapor para limpiar el aparato. No utilice limpiadores abrasivos ásperos ni rascadores de metal afilado para limpiar la puerta de cristal si no quiere arañar su superficie, lo que podría hacer que el cristal se hiciese añicos.
ESPAÑOL • No utilice adaptadores de enchufes múltiples ni cables prolongadores. • Asegúrese de no provocar daños en el enchufe ni en el cable de red. Si es necesario cambiar el cable de alimentación del aparato, debe hacerlo el centro de servicio técnico autorizado. • Evite que el cable de red entre en contacto con la puerta del aparato, especialmente si la puerta está caliente.
www.aeg.com • Este aparato está diseñado exclusivamente para cocinar. No debe utilizarse para otros fines, por ejemplo, como calefacción. • Cocine siempre con la puerta del horno cerrada. 2.4 Cocción al vapor ADVERTENCIA! Existe riesgo de lesiones y daños en el aparato. • No abra la puerta del aparato durante la cocción al vapor. Pueden liberarse vapores. 2.5 Mantenimiento y limpieza ADVERTENCIA! Existe riesgo de lesiones, incendios o daños al aparato.
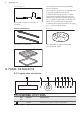
ESPAÑOL 7 3. DESCRIPCIÓN DEL PRODUCTO 3.1 Descripción general 1 2 3 4 5 6 5 4 10 3 7 2 1 8 1 2 3 4 5 6 7 8 9 10 Panel de control Programador electrónico Compartimento de agua Toma de la sonda térmica Resistencia Bombilla Ventilador Generador de vapor con tapa Carril de apoyo, extraíble Posiciones de las parrillas 9 3.2 Accesorios Bandeja honda Parrilla Para bandejas de horno, pastel en molde, asados. Para hornear y asar o como bandeja grasera.
www.aeg.com Un recipiente de cocción perforado y otro sin perforar. Sonda térmica Para medir cuánto se ha hecho el alimento. Los utensilios de cocción al vapor drenan el agua de condensación de los alimentos durante la cocción al vapor. Úselo para preparar alimentos que no deben estar en agua durante la cocción (p. ej., verduras, pescados, pechugas de pollo...). El conjunto no es apto para alimentos que necesiten remojo en agua (p. ej., arroz, polenta, pasta).
ESPAÑOL Sensor 2 3 4 Función Comentario ENCENDIDO/ APAGADO Para activar y desactivar el aparato. OK y selector Para confirmar la selección o el ajuste. Gire el selector para desplazarse. Tecla Inicio Para mostrar el menú principal. Funciones adicionales y de tiempo Programar diferentes funciones. Cuando esté en marcha una función de cocción, toque el sensor para ajustar el temporizador o las funciones: Tecla de Bloqueo, Favoritos, Calentar y Mantener, Ajustar + Empezar.
www.aeg.com Símbolo Función Duración La pantalla muestra el tiempo de cocción necesario. Hora de fin La pantalla indica cuándo termina la duración de la cocción. Hora de inicio La pantalla indica cuándo debe empezar la cocción. Temperatura del horno La pantalla mostrará la temperatura del horno. Indicación de tiempo La pantalla indica cuánto tiempo debe funcionar la función de cocción. Cálculo El aparato calcula el tiempo de cocción necesario.
ESPAÑOL 2. Gire el selector hacia la derecha o la izquierda para seleccionar la opción del menú. 3. Pulse para pasar a un submenú o aceptar el ajuste. 11 Puede volver al menú principal en cualquier momento pulsando . 6.2 Descripción de los menús Menú principal Símbolo Elemento del menú Aplicación Cocción asistida Contiene una lista de los programas de cocción automática. Funciones de cocción Contiene una lista de las funciones de cocción. Limpieza vapor Limpieza con vapor.
www.aeg.com Símbolo Submenú Descripción Tono de teclas Activa y desactiva el tono de los mandos táctiles. El tono del mando táctil ON/OFF no se puede desactivar. Tonos Alarma/Error Activa y desactiva los tonos de alarma. Asistente para limpieza Le lleva por el proceso de limpieza. Asistencia Muestra la configuración y la versión del software. Ajustes de fábrica Pone a cero todos los ajustes y restablece los ajustes de fábrica. 6.
ESPAÑOL Función de cocción 13 Aplicación Calor superior + inferior Para hornear y asar en 1 posición de parrilla. Congelados Para productos precocinados como patatas fritas, porciones o rollitos de primavera crujientes. Grill + Turbo Para asar piezas de carne grandes o aves con hueso en 1 posición de parrilla. También para gratinar y dorar. Grill rápido Para asar al grill grandes cantidades de alimentos de poco espesor y tostar pan.
www.aeg.com Función de cocción ECO-grill Aplicación Las funciones ECO le permiten optimizar el consumo energético durante la cocción. Es necesario ajustar primero el tiempo de cocción. Para obtener más información sobre los ajustes recomendados, consulte las tablas de cocción con la función equivalente. 6.4 Activación de una función de cocción 1. Encienda el horno. 2. Ajuste el menú: Funciones de cocción. 3. Pulse para confirmar. 4. Seleccione una función de cocción. 5. Pulse para confirmar. 6.
ESPAÑOL 6.8 Calor residual Al desactivar el aparato la pantalla mostrará el calor residual. El calor puede emplearse para mantener calientes los alimentos. 6.9 Bajo consumo energético El aparato tiene características que le ayudan a ahorrar energía durante la cocina de cada día: • Calor residual – Cuando está en curso el programa o la función de cocción, las resistencias se desactivan un 10% antes (la bombilla y el ventilador siguen funcionando).
www.aeg.com Si utiliza las funciones de reloj Duración, Hora de fin, el aparato apaga las resistencias al transcurrir el 90 % del tiempo programado. El aparato hace uso del calor residual para continuar el proceso de cocción hasta que se acabe el tiempo (3 - 20 minutos). 7.2 Ajuste de las funciones del reloj • Cuando utilice la función: Duración, Hora de fin, tiene que programar primero la función de cocción y la temperatura. El aparato se apaga automáticamente.
ESPAÑOL 17 8. PROGRAMAS AUTOMÁTICOS de esta función, es necesario introducir el peso de los alimentos. ADVERTENCIA! Consulte los capítulos sobre seguridad. 1. Encienda el horno. 2. Ajuste el menú: Cocción asistida. 8.1 Cocción asistida con Receta automática Pulse para confirmar. 3. Seleccione la categoría y el plato. Este aparato tiene programada una serie de recetas que puede utilizar. Dichas recetas son fijas y no puede cambiarlas. 1. Encienda el horno. 2. Seleccione el menú Cocción asistida.
www.aeg.com La pantalla muestra el símbolo de sonda térmica. 4. Utilice el selector en menos de 5 segundos para ajustar la temperatura interna. 5. Programe la función de calor y, si fuera necesario, su temperatura. El aparato calcula una hora de fin aproximada. La hora final es diferente según las cantidades de alimentos, las temperaturas programadas del horno (mínimo 120° C) y los modos de funcionamiento. El aparato calcula la hora de fin en unos 30 minutos. 6.
ESPAÑOL 19 Bandeja o Bandeja honda: • Todos los accesorios tienen pequeñas hendiduras en la parte superior de los bordes derecho e izquierdo para incrementar la seguridad. Las hendiduras también son dispositivos antivuelco. • El borde elevado que rodea la bandeja es un dispositivo para evitar que los utensilios de cocina se resbalen. 9.3 Carriles telescópicos: colocación de los accesorios del horno Coloque la bandeja para asar honda o plana en los carriles telescópicos.
www.aeg.com La pantalla mostrará la primera posición de memoria libre. 5. Pulse para confirmar. 6. Introduzca el nombre del programa. La primera letra parpadea. 7. Utilice el mando selector para cambiar la letra. 8. Pulse . La siguiente letra parpadeará. 9. Repita el paso 7 las veces que sea necesario. para guardar. 10. Mantenga pulsado Para guardar su programa favorito, 10.3 Tecla de Bloqueo Esta función impide que se produzca accidentalmente un cambio de la función de cocción.
ESPAÑOL un tiempo si una función de cocción está en funcionamiento y no se modifica ningún ajuste. Temperatura Hora de desconexión 30 °C - 115 °C 12,5 h 120 °C - 195 °C 8,5 h 200 °C - 230 °C 5,5 h La desconexión automática no se aplica a las funciones: Luz, Sonda térmica,Hora de fin, Duración. 10.6 Brillo de la pantalla Existen dos modos para el brillo de la pantalla: • Brillo nocturno: cuando el aparato está apagado, el brillo de la pantalla 21 es inferior entre las 22:00 h y las 06:00 h.
www.aeg.com Levantar masa Puede usar esta función automática para cualquier receta de masa de levadura. Proporciona el ambiente adecuado para que suba. Ponga la masa en un plato lo suficientemente grande para que la masa suba y cúbralo con un paño húmedo o con film transparente. Introduzca una parrilla en la primera posición y coloque el plato encima. Cierre la puerta y ajuste la función de levantar masa. Levantar masa. Ajuste el tiempo necesario. 11.
ESPAÑOL 23 • Llene el compartimento con la cantidad máxima de agua y seleccione una duración de 40 min.
www.aeg.
ESPAÑOL 25 Pescado Alimento Temperatura (°C) Tiempo (min) Posición de la par- Agua en el rilla compartimento de agua (ml) Trucha, aprox. 85 250 g 30 - 40 2 550 Gambas, fres- 85 cas 20 - 25 2 450 Gambas, con- 85 geladas 30 - 40 2 550 Filetes de sal- 85 món 25 - 35 2 500 Trucha asal85 monada, aprox. 1.
www.aeg.com Huevos Alimento Temperatura (°C) Tiempo (min) Posición de la parrilla Agua en el compartimento de agua (ml) Huevos duros 96 18 - 21 2 500 Huevos, medio duros 96 13 - 16 2 450 Huevos, poco duros 96 11 - 12 2 400 11.6 Grill + Turbo y Vapor solo sucesivamente Cuando combine funciones, puede cocinar carne, verduras y guarniciones, uno tras otro. Todos los platos estarán listos para servirse al mismo tiempo. • Para comenzar a asar la comida utilice la función: Grill + Turbo.
ESPAÑOL 11.7 Vapor combinado mitad Añada unos 300 ml de agua. Alimento Temperatura (°C) Tiempo (min) Posición de la parrilla Natillas / flan en recipientes individuales 1) 90 35 - 40 2 Huevos al horno 1) 90 30 - 40 2 Terrina 1) 90 40 - 50 2 Filete fino de pescado 85 15 - 25 2 Filete grueso de pes- 90 cado 25 - 35 2 Pescado pequeño hasta 350 g 90 25 - 35 2 Pescado entero hasta 1000 g 90 35 - 45 2 1) Continuar durante otra media hora con la puerta cerrada.
www.aeg.com Alimento Temperatura (°C) Tiempo (min) Posición de la parrilla Pastel de carne, sin cocinar, 500 g 180 30 - 40 2 Redondo ahumado 160 - 180 de cerdo, 600 - 1.000 g (poner en remojo 2 horas) 60 - 70 2 Pollo, 1.000 g 180 - 200 50 - 60 2 Pato, 1.500 - 2.000 g 180 70 - 90 2 Ganso, 3.000 g 170 130 - 170 1 Patatas gratinadas 160 - 170 50 - 60 2 Pasta al gratén 190 40 - 50 2 Lasaña 180 45 - 55 2 Distintos tipos de pan, 500 - 1.
ESPAÑOL 29 11.10 Consejos para hornear Resultado Causa posible Solución La base de la tarta no se ha dorado lo suficiente. La parrilla no está en una posición correcta. Coloque la tarta en un nivel más bajo. La tarta se hunde y se queda La temperatura del horno es pegajosa o muestra estrías demasiado alta. de agua. La próxima vez, seleccione una temperatura ligeramente más baja para el horno. La tarta se hunde y se queda El tiempo de horneado es pegajosa o muestra estrías insuficiente. de agua.
www.aeg.
ESPAÑOL Alimento Función Pan (pan de centeno): 1. Primera parte del proceso de horneado. 2. Segunda parte del proceso de horneado. Calor superior + 1. inferior 2.
www.aeg.
ESPAÑOL Alimento Función Lasaña Gratinado de verduras 1) Temperatura (°C) Tiempo (min) Posición de la parrilla Calor superior + 180 - 200 inferior 25 - 40 1 Grill + Turbo 160 - 170 15 - 30 1 160 - 170 15 - 30 1 Dulces al horno Calor superior + 180 - 200 inferior 40 - 60 1 Pescado al horno Calor superior + 180 - 200 inferior 30 - 60 1 Verduras rellenas Turbo 30 - 60 1 Barras de pan Turbo cortadas a lo largo y cubiertas de queso fundido 160 - 170 1) Precaliente el horno. 11.
www.aeg.com Tartas / pastas / pan en bandejas Alimento Temperatura (°C) Tiempo (min) Buñuelos / Bollos rellenos de crema 160 - 180 1) Pastel Streusel, seco 150 - 160 Posición de la parrilla 2 posiciones 3 posiciones 25 - 45 1/4 - 30 - 45 1/4 - 1) Precaliente el horno.
ESPAÑOL Los 10 primeros minutos puede ajustar una temperatura del horno entre 80 °C y 150 °C. El valor por defecto es de 90 °C. Una vez ajustada la temperatura, el horno sigue cocinando a 80 °C. No utilice esta función para las aves. Cocine siempre sin tapar cuando utilice esta función. 35 2. Coloque la carne junto con la bandeja caliente en el horno en la parrilla. 3. Introduzca la sonda térmica en la carne. 4.
www.aeg.com Alimento Temperatura (°C) Piroggen (versión ru- 180 - 200 sa de la pizza calzone) 11.17 Asado • Utilice recipientes resistentes al calor (consulte las instrucciones del fabricante). • Los asados grandes se pueden preparar directamente en la bandeja honda (en su caso) o en una parrilla colocada sobre la bandeja honda. • Prepare las carnes magras en una fuente de asado tapada. De este modo, la carne quedará más jugosa.
ESPAÑOL 37 Lomo de cerdo Alimento Cantidad Función Temperatura (°C) Tiempo (min) Posición de la parrilla Paletilla / Cuel- 1 - 1,5 kg lo / Redondo de jamón Grill + Turbo 160 - 180 90 - 120 1 Chuletas / Costillas 1 - 1,5 kg Grill + Turbo 170 - 180 60 - 90 1 Pastel de carne 750 g - 1 kg Grill + Turbo 160 - 170 50 - 60 1 Codillo de cerdo (precocinado) 750 g - 1 kg Grill + Turbo 150 - 170 90 - 120 1 Ternera Alimento Cantidad (kg) Función Temperatura Tiempo (°C) (min) Posición de l
www.aeg.com Aves Alimento Cantidad Función Temperatura Tiempo (°C) (min) Posición de la parrilla Aves troceadas 200 - 250 g cada trozo Grill + Turbo 200 - 220 30 - 50 1 Medio pollo 400 - 500 g cada trozo Grill + Turbo 190 - 210 35 - 50 1 Pollo, pularda 1 - 1,5 kg Grill + Turbo 190 - 210 50 - 70 1 Pato 1,5 - 2 kg Grill + Turbo 180 - 200 80 - 100 1 Ganso 3,5 - 5 kg Grill + Turbo 160 - 180 120 - 180 1 Pavo 2,5 - 3.
ESPAÑOL Alimento Temperatura (°C) Tiempo (min) Posición de la parrilla 1ª cara 2ª cara Lomo de cordero 210 - 230 25 - 35 20 - 25 3 Pescado entero 500-1.
www.aeg.
ESPAÑOL Alimento Cantidad Tiempo de Tiempo de Comentarios descongela- descongelación (min) ción posterior (min) Trucha 150 g 25 - 35 10 - 15 - Fresas 300 g 30 - 40 10 - 20 - Mantequilla 250 g 30 - 40 10 - 15 - Nata 2 x 200 g 80 - 100 10 - 15 Monte la nata aunque queden puntos ligeramente congelados. Pasteles 1.4 kg 60 60 - 11.22 Conservar • Utilice únicamente botes de conserva del mismo tamaño disponibles en el mercado.
www.aeg.com Verduras Alimento Temperatura (°C) Tiempo de cocción Continuar la cochasta que empiecen ción a 100 °C (min) a subir burbujas (min) Zanahorias 1) 160 - 170 50 - 60 5 - 10 Pepinos 160 - 170 50 - 60 - Encurtidos variados 160 - 170 50 - 60 5 - 10 Colinabos/ Guisantes/Espárragos 160 - 170 50 - 60 15 - 20 1) Deje reposar en el horno después de apagado. 11.23 Secar Use papel de hornear para cubrir las parrillas. puerta del horno y deje que éste se enfríe.
ESPAÑOL 11.24 Pan Se recomienda no precalentar. Añada 200 ml de agua al compartimento de agua. Alimento Temperatura (°C) Tiempo (min) Posición de la parrilla Pan blanco 180 - 200 40 - 60 2 Baguette 200 - 220 35 - 45 2 Brioche 160 - 180 40 - 60 2 Chapata 200 - 220 35 - 45 2 Pan de centeno 180 - 200 50 - 70 2 Pan negro 180 - 200 50 - 70 2 Pan de semillas 170 - 190 60 - 90 2 11.
www.aeg.com Alimento Temperatura interna del alimento (°C) Cordero asado / Pata de cordero 70 - 75 Caza Alimento Temperatura interna del alimento (°C) Lomo de liebre 70 - 75 Muslos de liebre 70 - 75 Liebre entera 70 - 75 Lomo de corzo/ciervo 70 - 75 Pata de corzo/ciervo 70 - 75 Pescado Alimento Temperatura interna del alimento (°C) Salmón 65 - 70 Trucha 65 - 70 12. MANTENIMIENTO Y LIMPIEZA ADVERTENCIA! Consulte los capítulos sobre seguridad. 12.
ESPAÑOL 3. Extraiga los soportes de la suspensión posterior. Coloque los carriles laterales en el orden inverso. 12.3 Limpieza vapor Retire manualmente los restos de suciedad más gruesa. 1. Vierta aproximadamente 250 ml de agua con 3 cucharadas de vinagre directamente en el generador de vapor. 2. Active la función: Limpieza vapor. En la pantalla aparece la duración de la función. Al finalizar el programa, suena una señal acústica. 3. Toque un sensor para desactivar la señal. 4.
www.aeg.com 1. Apague el aparato. 2. Retire los fusibles de la caja de fusibles o desconecte el disyuntor. 2 La lámpara superior B 1 1. Gire la tapa de cristal hacia la izquierda para extraerla. 7. Tire del borde del acabado de la puerta hacia delante para desengancharla. 8. Uno tras otro, sujete los paneles de cristal de la puerta por su borde superior y extráigalos del carril. 2. Retire el anillo metálico y limpie la tapa de cristal. 3.
ESPAÑOL 47 13.1 Qué hacer si… Problema Causa posible Solución El horno no calienta. El horno está apagado. Encienda el horno. El horno no calienta. El reloj no está en hora. Ajuste la hora. El horno no calienta. No se han configurado los ajustes necesarios. Asegúrese de que los ajustes sean correctos. El horno no calienta. El apagado automático está activado. Consulte el apartado "Desconexión automática". El horno no calienta. El bloqueo de seguridad para niños está activado.
www.aeg.com Es conveniente que anote los datos aquí: Modelo (MOD.) ......................................... Número de producto (PNC) ......................................... Número de serie (S.N.) ......................................... 14. ASPECTOS MEDIOAMBIENTALES Recicle los materiales con el símbolo . Coloque el material de embalaje en los contenedores adecuados para reciclarlo.
ESPAÑOL 49
www.aeg.
ESPAÑOL 51
892964714-A-032014 www.aeg.