BS9354001 BS935400W BS93541071 BS9354151 DE Benutzerinformation
www.aeg.com INHALT 1. 2. 3. 4. 5. 6. 7. 8. 9. 10. 11. 12. 13. SICHERHEITSINFORMATIONEN . . . . . . . . . . . . . . . . . . . . . . . . . . . . . . . . . . . . . . . . . . . . . . . 3 SICHERHEITSHINWEISE . . . . . . . . . . . . . . . . . . . . . . . . . . . . . . . . . . . . . . . . . . . . . . . . . . . . . . 4 GERÄTEBESCHREIBUNG . . . . . . . . . . . . . . . . . . . . . . . . . . . . . . . . . . . . . . . . . . . . . . . . . . . . . 7 VOR DER ERSTEN INBETRIEBNAHME . . . . . . . . . . . . . . . . . . .
DEUTSCH 3 1. SICHERHEITSINFORMATIONEN Lesen Sie vor der Montage und Verwendung des Geräts sorgfältig die mitgelieferte Anleitung. Der Hersteller haftet nicht für Verletzungen oder Schäden, die durch eine fehlerhafte Montage entstehen. Bewahren Sie die Anleitung zum Nachschlagen auf. 1.1 Sicherheit von Kindern und schutzbedürftigen Personen WARNUNG! Es besteht Erstickungsgefahr, das Risiko von Verletzungen oder permanenten Behinderungen.
www.aeg.com • • • • • • • 2. innern. Verwenden Sie zum Anfassen des Zubehörs und der Töpfe wärmeisolierende Handschuhe. Benutzen Sie zum Reinigen des Geräts keinen Dampfreiniger. Trennen Sie vor Wartungsarbeiten das Gerät von der Stromversorgung. Benutzen Sie keine Scheuermittel oder Metallschwämmchen zum Reinigen der Ofenglastür; sie können die Glasfläche verkratzen und zum Zersplittern der Scheibe führen. Verwenden Sie ausschließlich den für dieses Gerät empfohlenen KT Sensor.
DEUTSCH • Die Seiten des Geräts dürfen nur an Geräte oder Einheiten in gleicher Höhe angrenzen. Elektrischer Anschluss WARNUNG! Brand- und Stromschlaggefahr. • Alle elektrischen Anschlüsse sind von einem geprüften Elektriker vorzunehmen. • Das Gerät muss geerdet werden. • Stellen Sie sicher, dass die elektrischen Daten auf dem Typenschild den Daten Ihrer Stromversorgung entsprechen. Wenden Sie sich andernfalls an eine Elektrofachkraft.
www.aeg.com • Um Beschädigungen oder Verfärbungen der Emailbeschichtung zu vermeiden: – Stellen Sie feuerfestes Geschirr oder andere Gegenstände nicht direkt auf den Boden des Gerätes. – Legen Sie keine Alufolie direkt auf den Boden des Geräts. – Stellen Sie kein Wasser in das heiße Gerät. – Lassen Sie nach dem Abschalten des Geräts kein feuchtes Geschirr oder feuchte Speisen im Backofeninnenraum stehen. – Gehen Sie beim Herausnehmen oder Einsetzen der Innenausstattung sorgfältig vor.
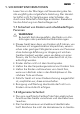
DEUTSCH 3. GERÄTEBESCHREIBUNG 1 2 1 Bedienfeld 3 2 Elektronischer Programmspeicher 3 Wasserschublade 5 4 5 6 4 Buchse für den KT Sensor 7 8 9 7 Ventilator 4 11 3 2 1 5 Heizelement 6 Lampe 8 Rückwandheizelement 9 Dampfgenerator mit Abdeckung 10 Einhängegitter, herausnehmbar 10 11 Einschubebenen 3.1 Zubehör Kombirost Für Kochgeschirr, Kuchenformen, Braten. Backblech Für Kuchen und Plätzchen. Brat- und Fettpfanne Zum Backen und Braten oder zum Auffangen von austretendem Fett.
www.aeg.com KT Sensor Zum Messen des Garzustands. Dampfgarset Ein unperforierter und ein perforierter Garbehälter. Während des Dampfgarens führt das Dampfgarset Kondenswasser vom Gargut weg. Verwenden Sie die Garbehälter zur Zubereitung von Speisen, die während des Kochens nicht in Wasser liegen sollten (z. B. Gemüse, Fischstücke, Hühnerbrust). Die Garbehälter eignen sich nicht für Speisen, die in Wasser gegart werden müssen (z. B. Reis, Polenta, Nudeln).
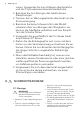
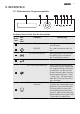
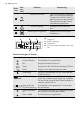
DEUTSCH 9 5. BEDIENFELD 5.1 Elektronischer Programmspeicher 1 2 3 4 5 6 7 8 9 Bedienen Sie das Gerät über die Sensorfelder. Nummer Sensorfeld 1 - 2 3 4 Funktion Display Anzeige der aktuellen Geräteeinstellungen. EIN/AUS Ein- und Ausschalten des Geräts. OK und Drehschalter Bestätigung der Auswahl oder Einstellung. Zum Auswählen den Drehschalter drehen. Home-Taste Anzeige des Hauptmenüs. Zeit- und Zusatzfunktionen Zum Einstellen verschiedener Funktionen.
www.aeg.com Nummer Sensorfeld Funktion Bemerkung Temperaturauswahl Zum Einstellen der Temperatur oder zur Anzeige der aktuellen Temperatur im Gerät. Zum Einoder Ausschalten der Funktion Schnellaufheizung das Feld 3 Sekunden lang berühren. 7 Kurzzeit-Wecker Einstellen von Kurzzeit-Wecker . Bevorzugtes Programm Anzeigen Ihrer bevorzugten Programme.
DEUTSCH 11 6. TÄGLICHER GEBRAUCH WARNUNG! Siehe Sicherheitshinweise. 6.1 Navigation in den Menüs Bedienung der Menüs: 1. Schalten Sie das Gerät ein. 2. Drehen Sie den Drehschalter im Uhrzeigersinn oder gegen den Uhrzei- gersinn, um eine Menüoption auszuwählen. 3. Drücken Sie OK, um das Untermenü aufzurufen oder die Einstellung zu bestätigen. Mit können Sie von jedem Punkt aus zurück in das Hauptmenü springen. 6.
www.aeg.com Symbol Untermenü Anwendung Sprache einstellen Einstellen der Sprache für die Anzeige. Lautstärke Einstellen der Lautstärke der Tastentöne und Signale. Tastentöne Ein- und Ausschalten der Töne der Sensorfelder. Der Ton des Sensorfelds „EIN/AUS“ lässt sich nicht ausschalten. Alarmsignale Ein- und Ausschalten der Alarmsignale. Reinigungsassistent Führt Sie durch den Reinigungsprozess. Service Zeigt die Softwareversion und die Konfiguration an.
DEUTSCH 13 6.3 Ofenfunktionen Untermenü von: Ofenfunktionen Ofenfunktion Anwendung Vital-Dampf Für Gemüse, Fisch, Kartoffeln, Reis, Teigwaren oder besondere Beilagen. Intervall Plus Für Speisen mit einem hohen Feuchtigkeitsgehalt und zum Pochieren von Fisch, Eierstich und Terrinen. Intervall-Dampf Zum Backen von Brot, Braten von großen Fleischstücken und zum Aufwärmen von gekühlten und gefrorenen Speisen.
www.aeg.com Ofenfunktion Anwendung Grillstufe 1 Zum Grillen flacher Lebensmittel und zum Toasten. Warmhalten Zum Warmhalten von Speisen. Auftauen Zum Auftauen von tiefgefrorenen Lebensmitteln. Unterhitze Zum Backen von Kuchen mit krossen Böden und zum Einkochen von Lebensmitteln. Gärstufe Zum kontrollierten Gehen lassen eines Hefeteigs vor dem Backen. Brot Backen Zum Backen von Brot. Überbacken Für Aufläufe wie Lasagne oder Kartoffelgratin. Auch zum Überbacken und Bräunen.
DEUTSCH 2. 3. 4. 5. 6. Füllen Sie 800 ml Wasser in die Wasserschublade. Der Wasservorrat reicht für ca. 50 Minuten. Füllen Sie kein Wasser direkt in den Dampfgenerator ein. Verwenden Sie nur Wasser als Flüssigkeit. Verwenden Sie kein gefiltertes (entmineralisiertes) oder destilliertes Wasser. Schalten Sie das Gerät ein. Wählen Sie die Dampfgarfunktion (siehe Tabelle „Ofenfunktionen“) und die Temperatur. Stellen Sie bei Bedarf die Funktion Dauer oder Ende ein. Nach ca.
www.aeg.com Restwärme Sobald Sie das Gerät ausschalten, wird im Display die Restwärme angezeigt. Die Restwärme kann zum Warmhalten von Speisen genutzt werden. 6.8 Energiesparen Das Gerät verfügt über Funktionen, mit deren Hilfe Sie beim täglichen Kochen Energie sparen können: • Restwärme: – Die Heizelemente werden bei laufender Ofenfunktion/laufendem Programm 10% vor dem Garzeitende ausgeschaltet (die Lampe und der Ventilator bleiben eingeschaltet).
DEUTSCH 4. Berühren Sie ein Sensorfeld, um den Signalton abzuschalten. Nützliche Informationen: • Für die Funktionen Dauer und Ende müssen Sie zuerst die Ofenfunktion und die Temperatur einstellen. Erst danach können Sie die Uhrfunktion einstellen. Das Gerät wird automatisch ausgeschaltet. • Sie können die Funktionen Dauer und Ende gleichzeitig verwenden, wenn das Gerät zu einem bestimmten späteren Zeitpunkt automatisch ein- und ausgeschaltet werden soll.
www.aeg.com Gerichte mit Gewichtsautomatik Schweinebraten Kalbsbraten Rinderschmorbraten 2. Wählen Sie das Menü Koch-Assistent . Mit OK bestätigen. 3. Wählen Sie die Kategorie und das Gericht. Mit OK bestätigen. 4. Wählen Sie Rezeptautomatik . Mit OK bestätigen. Reh/Hirschbraten Wenn Sie die Funktion Manuell verwenden, verwendet das Gerät automatische Einstellungen. Diese können Sie ändern. Gehen Sie dazu wie für andere Funktionen beschrieben vor.
DEUTSCH 9.1 KT Sensor Der KT Sensor misst die Temperatur im Inneren des Fleisches. Das Gerät wird ausgeschaltet, sobald das Fleisch die eingestellte Temperatur erreicht hat. Zwei Temperaturen sind einzustellen: • Die Backofentemperatur • Die Kerntemperatur Verwenden Sie nur den mitgelieferten KT Sensor oder ein Originalersatzteil. Verwendung des KT Sensors: 1. Führen Sie die Spitze des KT Sensors mittig in das vorbereitete Fleischstück ein. 2. Schalten Sie das Gerät ein. 3.
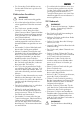
www.aeg.com Kombirost: Schieben Sie den Kombirost zwischen die Führungsstäbe der Einhängegitter, mit den Füßen nach unten zeigend. • Alle Zubehörteile besitzen kleine Kerben oben auf der rechten und linken Kante, um die Sicherheit zu erhöhen. Diese Einkerbungen dienen auch als Kippsicherung. • Durch den umlaufend erhöhten Rahmen des Rostes ist das Kochgeschirr zusätzlich gegen Abrutschen gesichert. 10. ZUSATZFUNKTIONEN 10.
DEUTSCH 2. Berühren Sie und gleichzeitig, bis das Display eine Meldung anzeigt. 10.3 Tastensperre Die Tastensperre verhindert ein versehentliches Verstellen der Ofenfunktion. Die Tastensperre lässt sich nur bei eingeschaltetem Gerät einschalten. Einschalten der Tastensperre : 1. Schalten Sie das Gerät ein. 2. Wählen Sie eine Ofenfunktion oder Einstellung. 3. Drücken Sie wiederholt, bis im Display Tastensperre angezeigt wird. 4. Mit OK bestätigen. Ausschalten der Tastensperre : 1. 2. Drücken Sie .
www.aeg.com 11. PRAKTISCHE TIPPS UND HINWEISE 11.1 Innenseite der Tür Bei einigen Modellen finden Sie an der Innenseite der Tür: • Die Nummerierung der Einschubebenen. • Informationen über die Backofenfunktionen, Empfehlungen für Einschubebenen und Temperaturen für die Zubereitung üblicher Gerichte. Die Temperaturen und Backzeiten in den Tabellen sind nur Richtwerte. Sie sind abhängig von den Rezepten, der Beschaffenheit und der Menge der verwendeten Zutaten. 11.
DEUTSCH • Öffnen Sie die Tür nach dem Garvorgang vorsichtig, da sich im Gerät Dampf angesammelt hat. • Sie können je nach Geschmack, Öl und Gewürze zu den Speisen geben. Öl verhindert ein Anhaften der Speisen am Vakuumbeutel. • Damit die Speisen schneller und gleichmäßiger gar werden, stellen Sie den Vakuumgrad auf die höchst mögliche Stufe. • Die Garzeiten sind Empfehlungen und können entsprechend Ihren Vorlieben abweichen. • Die in den Kochtabellen angegebene Gardauer ist für Speisen für 4 Personen.
www.aeg.com Lebensmittel Kaninchen, ohne Knochen Dauer (Min.) Stufe Wasser in der Wasserschublade (ml) 50 - 60 3 600 Dauer (Min.
DEUTSCH Lebensmittel Muscheln Dicke der Menge für TemperaLebens4 Persotur (°C) mittel nen (g) Große Größe Muscheln mit Schale Garnelen ohne Schale Große Größe Tintenfisch 25 Dauer (Min.) Stufe Wasser in der Wasserschublade (ml) 650 60 100 110 3 500 1000 95 20 - 25 3 500 500 75 26 - 30 3 400 1000 85 100 110 3 800 + 200 Forellenfilet 1) 2 Filets à 1.
www.aeg.com Lebensmittel Gewicht Menge für 4 Personen (g) Temperatur (°C) Dauer (Min.
DEUTSCH 27 11.7 Wassertabelle für das Sous Vide Garen Temperatur (°C) Wasser in der Wasserschublade (ml) Dauer1) (Min.) 50 500 120 50 600 190 55 550 120 55 650 190 60 600 120 60 700 190 65 350 30 65 550 60 70 400 30 70 600 60 75 450 30 75 650 60 80 500 30 80 700 60 85 550 30 85 750 60 90 500 30 90 700 60 95 500 20 95 700 40 95 800 60 1) Die Zeitangaben sind nur Richtwerte. 11.
www.aeg.com Funktion „Gärstufe“ ein. Stellen Sie die benötigte Zeit ein. 11.9 Dampfgaren Dampfgar-Kochgeschirr • Verwenden Sie nur hitze- und korrosionsbeständiges Kochgeschirr oder Garbehälter aus Chromstahl (nur ausgewählte Modelle). Einschubebenen • Die richtigen Einschubebenen sind in der folgenden Tabelle aufgeführt. Die Einschubebenen werden von unten nach oben gezählt. Allgemeine Hinweise • Wenn Sie länger als 30 Minuten oder große Mengen an Speisen garen, geben Sie bei Bedarf Wasser hinzu.
DEUTSCH 29 Gemüse Einschubebene Temperatur (ºC) Wassermenge in der Wasserschublade in ml Zeit1) (Min.
www.aeg.com Einschubebene Temperatur (ºC) Wassermenge in der Wasserschublade in ml Zeit1) (Min.) Weiße Gartenbohnen 2 96 500 30 - 40 Wirsing 2 96 400 20 - 25 Zucchini (Scheiben) 2 96 350 15 - 20 Speise Einschubebene Temperatur (ºC) Wassermenge in der Wasserschublade in ml Zeit1) (Min.
DEUTSCH 31 Einschubebene Temperatur (ºC) Wassermenge in der Wasserschublade in ml Zeit1) (Min.) Lachsfilets 2 85 500 25 - 35 Lachsforelle, ca. 1000 g 2 85 600 40 - 45 Muscheln 2 96 500 20 - 30 Flaches Fischfilet 2 80 350 15 Speise 1) Die Zeitangaben sind Richtwerte. Fleisch Einschubebene Temperatur (ºC) Wassermenge in der Wasserschublade in ml Zeit1) (Min.
www.aeg.com 1) Die Zeitangaben sind Richtwerte. 11.12 Heißluftgrillen und VitalDampf nacheinander Sie können Fleisch, Gemüse und Beilagen nacheinander durch die Kombination der Funktionen garen. Alle Speisen können dann gleichzeitig serviert werden. • Verwenden Sie die Funktion Heißluftgrillen, um das Gargut anzubraten. • Geben Sie dann das vorbereitete Gemüse und die Beilagen in ofengeeig- Speise netes Geschirr und stellen Sie es mit dem Braten in den Backofen.
DEUTSCH 33 Aufwärmen Intervall Plus (Wassermenge: ca. 300 ml) Lebensmittel Einschubebene Temperatur (°C) Zeit (Min.) Knödel 2 85 25 - 35 Nudeln 2 85 20 - 25 Reis 2 85 20 - 25 Tellergerichte 2 85 20 - 25 11.14 Intervall-Dampf Intervall-Dampf 1) Lebensmittel Einschubebene Temperatur (°C) Zeit (Min.
www.aeg.com • Bei längeren Backzeiten können Sie den Backofen etwa 10 Minuten vor Ablauf der Zeit ausschalten und die Restwärme nutzen. Wenn Sie gefrorene Lebensmittel in den Backofen geben, können sich die Backbleche beim Backen verformen. Nachdem die Backbleche abgekühlt sind, hebt sich die Verformung wieder auf. Hinweise zu den Backtabellen • Der Hersteller empfiehlt bei der ersten Zubreitung die niedrigere Temperatur einzustellen.
DEUTSCH Backergebnis Der Kuchen ist nach der eingestellten Zeit nicht fertig gebacken. 35 Mögliche Ursache Abhilfe Die Backofentemperatur ist zu niedrig. Stellen Sie beim nächsten Kuchen eine etwas höhere Backofentemperatur ein. 11.17 Backen auf einer Einschubebene: Backen in Formen Backware Backofenfunktion Einschubebene Temperatur (°C) Dauer (Min.
www.aeg.com Kuchen/Gebäck/Brot auf Backblechen Backware Backofenfunktion Einschubebene Temperatur (°C) Dauer (Min.) Hefezopf/Hefekranz Ober-/Unterhitze 3 170 - 190 30 - 40 Christstollen Ober-/Unterhitze 2 160 - 180 1) 50 - 70 Brot (Roggenbrot): 1. Erster Teil des Backvorgangs. 2. Zweiter Teil des Backvorgangs.
DEUTSCH 37 Plätzchen Backofenfunktion Einschubebene Temperatur (°C) Dauer (Min.
www.aeg.com Aufläufe und Überbackenes Backofenfunktion Einschubebene Temperatur (°C) Dauer (Min.
DEUTSCH 39 11.18 Backen auf mehreren Ebenen Kuchen/Gebäck/Brot auf Backblechen Heißluft mit Ringheizkörper Einschubebene Backware Temperatur (°C) Dauer (Min.) 2 Ebenen 3 Ebenen Windbeutel/ Eclairs 1/4 - 160 - 180 1) 25 - 45 Streuselkuchen, trocken 1/4 - 150 - 160 30 - 45 1) Backofen vorheizen. Plätzchen/small cakes/Törtchen/Gebäck/Brötchen Heißluft mit Ringheizkörper Backware Einschubebene Temperatur (°C) Dauer (Min.
www.aeg.com 2. ratur beträgt 90 °C. Nach der Einstellung der Temperatur behält der Backofen eine Temperatur von 80 °C bei. Benutzen Sie die Funktion Bio-Garen nicht für Geflügel. Das Fleisch in der heißen Bratpfanne auf den Kombirost in den Backofen stellen. 3. Den KT Sensor in das Fleisch einführen. 4. Die Funktion Bio-Garen auswählen und die gewünschte Kerntemperatur einstellen. Wenn Sie diese Funktion verwenden, benutzen Sie keinen Deckel. 1.
DEUTSCH 11.21 Braten • Benutzen Sie zum Braten hitzebeständiges Geschirr (beachten Sie die Angaben des Herstellers). • Große Bratenstücke können direkt in der Brat- und Fettpfanne (falls vorhanden) oder auf dem Kombirost über der Brat- und Fettpfanne gebraten werden. • Braten Sie magere Fleischsorten in einem Bräter mit Deckel. So bleibt das Fleisch saftig. • Alle Fleischarten, die bräunen oder eine Kruste bekommen sollen, können im Bräter ohne Deckel gebraten werden.
www.aeg.com Kalbfleisch Fleischart Menge Backofenfunktion Einschubebene Temperatur in °C Zeit (Min.) Kalbsbraten 1 kg Heißluftgrillen 1 160 - 180 90 - 120 Kalbshaxe 1,5 - 2 kg Heißluftgrillen 1 160 - 180 120 - 150 Fleischart Menge Backofenfunktion Einschubebene Temperatur in °C Zeit (Min.
DEUTSCH Fleischart 43 Menge Backofenfunktion Einschubebene Temperatur in °C Zeit (Min.) Pute 2,5 - 3,5 kg Heißluftgrillen 1 160 - 180 120 - 150 Pute 4 - 6 kg Heißluftgrillen 1 140 - 160 150 - 240 Fisch, gedünstet Fleischart Menge Backofenfunktion Einschubebene Temperatur in °C Zeit (Min.) Fisch, ganz 1 - 1,5 kg Ober-/Unterhitze 1 210 - 220 40 - 60 Nur flache Fleisch- oder Fischstücke grillen. Heizen Sie den leeren Backofen immer 5 Minuten lang mit der Grill-Funktion vor. 11.
www.aeg.com Grillgut Zeit (Min.) Einschubebene Überbackener Toast Erste Seite Zweite Seite 6-8 - 4 1) Backofen vorheizen. 11.24 Convenience-Lebensmittel (Fertiggerichte) Heißluft mit Ringheizkörper Convenience-Lebensmittel (Fertiggerichte) Einschubebene Temperatur (°C) Zeit (Min.
DEUTSCH 45 Backofenfunktionen Einschubebene Temperatur (°C) Zeit (Min.) Baguettes Ober-/Unterhitze 3 gemäß Herstelleranweisungen gemäß Herstelleranweisungen Obstkuchen Ober-/Unterhitze 3 gemäß Herstelleranweisungen gemäß Herstelleranweisungen Gargut 1) Pommes Frites zwischendurch 2 bis 3 Mal wenden 11.25 Auftauen Nehmen Sie die Lebensmittel aus der Verpackung und stellen Sie sie auf einem Teller.
www.aeg.com • Sobald die Flüssigkeit in den ersten Gläsern zu perlen beginnt (dies dauert bei 1-Liter-Gläsern ca. 35-60 Minuten), Backofen ausschalten oder die Temperatur auf 100 °C zurückschalten (siehe Tabelle). Beerenobst Einkochen Temperatur in °C Einkochen bis Perlbeginn (Min.) Weiterkochen bei 100 °C (Min.) Erdbeeren/Blaubeeren/Himbeeren/reife Stachelbeeren 160 - 170 35 - 45 - Temperatur in °C Einkochen bis Perlbeginn (Min.) Weiterkochen bei 100 °C (Min.
DEUTSCH 47 Obst Einschubebene 1 Ebene 2 Ebenen Temperatur (°C) Dauer (Std.) Pflaumen 3 1/4 60 - 70 8 - 10 Aprikosen 3 1/4 60 - 70 8 - 10 Apfelscheiben 3 1/4 60 - 70 6-8 Birnen 3 1/4 60 - 70 6-9 Backofenfunktion Einschubebene Temperatur °C Zeit (Min.
www.aeg.com Hammel / Lamm Speise Speisekerntemperatur °C Hammelkeule 80 - 85 Hammelrücken 80 - 85 Lammbraten / Lammkeule 70 - 75 Wild Speise Speisekerntemperatur °C Hasenrücken 70 - 75 Hasenkeule 70 - 75 Ganzer Hase 70 - 75 Reh-/Hirschrücken 70 - 75 Reh-/Hirschkeule 70 - 75 Fisch Speise Speisekerntemperatur °C Lachs 65 - 70 Forellen 65 - 70 12. REINIGUNG UND PFLEGE WARNUNG! Siehe Sicherheitshinweise.
DEUTSCH 3. Schalten Sie die Funktion Dampfreinigung im Hauptmenü ein. Die Gesamtdauer beträgt ca. 33 Minuten. 4. Nach Ablauf des Programms ertönt ein Signal. Berühren Sie ein Sensorfeld, um es abzuschalten. 5. Wischen Sie den Garraum mit einem weichen Schwamm aus. Sie können das warme Wasser aus dem Dampfgenerator verwenden. Benutzen Sie nicht den mit dem Gerät gelieferten Schwamm. 6. Entfernen Sie das Restwasser aus dem Dampfgenerator. 7. Lassen Sie die Gerätetür nach dem Reinigungsvorgang ca.
www.aeg.com 2. 12.4 Lampe WARNUNG! Es besteht die Gefahr eines elektrischen Schlags. Die Lampe und die Glasabdeckung der Lampe können heiß werden. Bevor Sie die Lampe austauschen: • Schalten Sie das Gerät aus. • Entfernen Sie die Sicherungen aus dem Sicherungskasten, oder schalten Sie den Schutzschalter aus. VORSICHT! Legen Sie ein Tuch auf den Boden des Backofens. Auf diese Weise schützen Sie die Glasabdeckung der Backofenlampe und den Innenraum des Backofens.
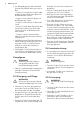
DEUTSCH 5. Legen Sie die Ofentür mit der Außenseite nach unten auf ein weiches Tuch und eine stabile Unterlage. Dies verhindert Kratzer. 6. Fassen Sie die Türabdeckung (B) an der Türoberkante an beiden Seiten an und drücken Sie sie nach innen, um den Kippverschluss zu lösen. Ziehen Sie die Türabdeckung nach vorne, um sie abzunehmen. 2 7. B 51 1 8. 9.
www.aeg.com Problem Das Gerät heizt nicht. Mögliche Ursache Abhilfe Die Sicherung hat ausgelöst. Vergewissern Sie sich, dass die Sicherung der Grund für die Störung ist. Löst die Sicherung wiederholt aus, wenden Sie sich an eine Elektrofachkraft. Im Display erscheint Der Stecker des KT Sensor Stecken Sie den Stecker F111. ist nicht richtig an die Buch- des Kerntemperatursensors se angeschlossen. so weit wie möglich in die Buchse ein. Die Lampe funktioniert nicht. Die Lampe ist defekt.
DEUTSCH 53
www.aeg.
DEUTSCH 55
892956924-E-282013 www.aeg.