BSK774221M USER MANUAL EN User Manual Steam oven
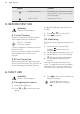
www.aeg.com CONTENTS 1. SAFETY INFORMATION............................................................................................. 3 2. SAFETY INSTRUCTIONS.............................................................................................4 3. PRODUCT DESCRIPTION...........................................................................................7 4. CONTROL PANEL....................................................................................................... 8 5.
ENGLISH 1. 3 SAFETY INFORMATION Before the installation and use of the appliance, carefully read the supplied instructions. The manufacturer is not responsible for any injuries or damages that are the result of incorrect installation or usage. Always keep the instructions in a safe and accessible location for future reference. 1.
www.aeg.com • • • • • • • • • Always use oven gloves to remove or put in accessories or ovenware. Before carrying out any maintenance, disconnect the appliance from the power supply. Ensure that the appliance is switched off before replacing the lamp to avoid the possibility of electric shock. Do not use a steam cleaner to clean the appliance.
ENGLISH • The appliance must be earthed. • Make sure that the parameters on the rating plate are compatible with the electrical ratings of the mains power supply. • Always use a correctly installed shockproof socket. • Do not use multi-plug adapters and extension cables. • Make sure not to cause damage to the mains plug and to the mains cable. Should the mains cable need to be replaced, this must be carried out by our Authorised Service Centre.
www.aeg.com • Always cook with the oven door closed. • If the appliance is installed behind a furniture panel (e.g. a door) make sure the door is never closed when the appliance is in operation. Heat and moisture can build up behind a closed furniture panel and cause subsequent damage to the appliance, the housing unit or the floor. Do not close the furniture panel until the appliance has cooled down completely after use. 2.4 Steam Cooking WARNING! Risk of burns and damage to the appliance.
ENGLISH • Non-stick surfaces on pots, pans, trays, utensils etc., can be damaged by the high temperature Pyrolytic cleaning operation of all Pyrolytic Ovens and can be also a source for low level harmful fumes. • Fumes released from all Pyrolytic Ovens / Cooking Residues as described are not harmful to humans, including infants or persons with medical conditions. 2.7 Internal light • The type of light bulb or halogen lamp used for this appliance is only for household appliances.
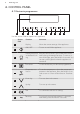
www.aeg.com 4. CONTROL PANEL 4.1 Electronic programmer 1 2 3 4 5 6 7 8 9 10 11 Use the sensor fields to operate the appliance. Sensor field 1 2 3 4 5 6 7 8 9 - Function Comment Display Shows the current settings of the appliance. ON / OFF To turn on and off the appliance. Heating Functions Press the sensor field to choose the menu: Assisor Assisted Cook- ted Cooking or Heating Functions. To turn on or ing turn off the light, press the field for 3 seconds.
ENGLISH Sensor field Function Comment Time and additional functions To set different functions. When a heating function operates, press the sensor field to set the timer or the functions: Function Lock, Favourites, Heat + Hold, Set + Go. You can also change the settings of the core temperature sensor. Minute Minder To set the function: Minute Minder. 10 11 4.2 Display A 9 B C E D A. B. C. D. E.
www.aeg.com Symbol Function Weight Automatic The display shows that the automatic weight system is active or that weight can be changed. Heat + Hold The function is active. 5. BEFORE FIRST USE WARNING! Refer to Safety chapters. 5.1 Initial Cleaning Remove all accessories and removable shelf supports from the appliance. Refer to "Care and cleaning" chapter. Clean the appliance and the accessories before first use. Put the accessories and the removable shelf supports back to their initial position.
ENGLISH 11 6.2 The menus in overview Main menu Symbol Menu item Application Heating Functions Contains a list of heating functions. Assisted Cooking Contains a list of automatic programmes. Favourites Contains a list of favourite cooking programmes created by the user. Pyrolysis Pyrolytic cleaning. Basic Settings Used to set the appliance configuration. Specials Contains a list of additional heating functions.
www.aeg.com Symbol Submenu Description Cleaning Reminder Reminds you when to clean the appliance. DEMO mode Activation / deactivation code: 2468 Service Shows the software version and configuration. Factory Settings Resets all settings to factory settings. 6.3 Heating Functions Heating function Application True Fan Cooking To bake on up to three shelf positions at the same time and to dry food. Set the temperature 20 - 40 °C lower than for the function: Conventional Cooking.
ENGLISH Heating function 13 Application Moist Fan Baking To prepare baked goods in tin on one shelf position. To save energy during cooking. This function must be used in accordance with the cooking tables in order to achieve the desired cooking result. To get more information about the recommended settings, refer to the cooking tables. This function was used to define the energy efficiency class acc. to EN 60350-1. To get more information about the recommended settings, refer to the cooking tables.
www.aeg.com 6.5 Activating a heating function 1. Activate the appliance. 2. Select the menu: Heating Functions. 3. Press to confirm. 4. Select a heating function. 5. Press to confirm. 6. Set the temperature. 7. Press to confirm. 6.6 Steam cooking The water drawer cover is in the control panel. WARNING! Use only water. Do not use filtered (demineralised) or distilled water. Do not use other liquids. Do not put flammable or alcoholic liquids into the water drawer. 1.
ENGLISH 15 Do not use the drained water to fill the water tank again. A B 6.10 Heat-up indicator C When you activate a heating function, the bar on the display comes on. The bar shows that the temperature increases. When temperature is reached the buzzer sounds 3 times and the bar flashes and then disappears. 6.11 Fast Heat Up Indicator 2. Put the second end of the draining pipe (C) into a container. Put it at a lower position than the outlet valve (A). 3.
www.aeg.com If you set the time for a clock function, the time starts to count down after 5 seconds. If you use the clock functions: Duration, End Time, the appliance deactivates the heating elements after 90 % of the set time. The appliance uses the residual heat to continue the cooking process until the time ends (3 - 20 minutes). 7.2 Setting the clock functions Before you use the functions: Duration, End Time, you must set a heating function and temperature first.
ENGLISH 8.1 Recipes online You can find the recipes for the automatic programmes specified for this appliance on our website. To find the proper Recipe Book check the PNC number on the rating plate on the front frame of the appliance cavity. 8.2 Automatic programmes The automatic programmes give optimum settings for each type of meat or other recipes. • Meat programmes with the function: Weight Automatic (menu: Assisted Cooking) — This function automatically calculates the roasting time.
www.aeg.com 6. You can change the weight at any time. Press or to change the weight. 7. When the time ends, an acoustic signal sounds. Press any symbol to deactivate the signal. With some programmes turn over the food after 30 minutes. The display shows a reminder. 9. USING THE ACCESSORIES WARNING! Refer to Safety chapters. 9.1 Core temperature sensor There are two temperatures to be set: the oven temperature and the core temperature.
ENGLISH 19 9.3 Accessories for steam cooking The steam kit accessories are not supplied with the appliance. For more information, please contact your local supplier. The dietary baking dish for steam cooking functions Deep pan: Push the deep pan between the guide bars of the shelf support. The dish consists of a glass bowl, a lid with a hole for the injector tube (C) and a steel grill to put at the bottom of the baking dish.
www.aeg.com Injector tube (C) Injector for direct steam cooking (D) • Do not use the baking dish on a hot cooking surface. Steel grill (E) • Do not clean the baking dish with abrasives, scourers and powders. • Do not put the hot baking dish on cold / wet surfaces. 9.4 Steam cooking in a dietary baking dish Put the food onto the steel grill in the baking dish and put the lid on it. • Do not put cold liquids in the baking dish when it is hot. 1.
ENGLISH C 21 WARNING! Be careful when you use the injector when the oven operates. Always use oven gloves to touch the injector when the oven is hot. Always remove the injector from the oven when you do not use a steam function. The injector tube is specially made for cooking and does not contain dangerous materials. 2. Put the baking dish onto the second shelf position from the bottom. 3. Put the other end of the injector tube into the steam inlet.
www.aeg.com For more information about steam cooking, refer to the cooking tables for steam cooking in the chapter "Hints and Tips". 10. ADDITIONAL FUNCTIONS 10.1 Favourites Activating the programme You can save your favourite settings, such as duration, temperature or heating function. They are available in the menu: Favourites. You can save 20 programmes. 1. Activate the appliance. 2. Select the menu: Favourites. Saving a programme 5. Press 3.
ENGLISH 4. Press to confirm. If the Pyrolysis function operates, the door is locked and the symbol of a key comes on in the display. To deactivate the function, press . The display shows a message. Press again and then to confirm. When you deactivate the appliance, the function also deactivates. 10.4 Set + Go The function lets you set a heating function (or a programme) and use it later with one press of any symbol. 1. Activate the appliance. 2. Set a heating function. again and again until the 3.
www.aeg.com 11. HINTS AND TIPS WARNING! Refer to Safety chapters. The temperature and baking times in the tables are guidelines only. They depend on the recipes and the quality and quantity of the ingredients used. 11.1 Inner side of the door In some models, on the inner side of the door you can find: • the numbers of the shelf positions. • information about the heating functions, recommended shelf positions and temperatures for typical dishes. 11.
ENGLISH 25 11.
www.aeg.
ENGLISH 27 Bread and pizza Food Conventional Cooking True Fan Cooking Time (min) Comments Temperature (°C) Shelf posi- Temperation ture (°C) Shelf position 190 1 190 1 60 - 70 1-2 pieces, 500 gr per piece Rye bread 190 1 180 1 30 - 45 In a bread tin Bread 190 2 180 2 (2 and 4) 25 - 40 6 - 8 rolls in a baking tray Pizza1) 230 - 250 1 230 - 250 1 10 - 20 In a baking tray or a deep pan Scones1) 200 3 190 3 10 - 20 In a baking tray White bread1) rolls1) 1) Preheat th
www.aeg.
ENGLISH 29 11.7 Grilling Preheat the empty oven for 3 minutes before cooking. Food Quantity Temperature (°C) Time (min) 1st side 2nd side Shelf position Pieces Quantity (kg) 4 0.8 max. 12 - 15 12 - 14 4 Beef steaks 4 0.6 max. 10 - 12 6-8 4 Sausages - max. 12 - 15 10 - 12 4 Pork chops 4 0.6 max. 12 - 16 12 - 14 4 Chicken (cut in 2) 2 1.0 max. 30 - 35 25 - 30 4 Kebabs 4 - max. 10 - 15 10 - 12 4 Breast of chicken 4 0.4 max.
www.aeg.com Pork Food Quantity (kg) Temperature (°C) Time (min) Shelf position Shoulder, neck, ham joint 1 - 1.5 160 - 180 90 - 120 1 or 2 Chop, spare rib 1 - 1.5 170 - 180 60 - 90 1 or 2 Meat loaf 0.75 - 1 160 - 170 50 - 60 1 or 2 Pork knuckle (precooked) 0.75 - 1 150 - 170 90 - 120 1 or 2 Food Quantity (kg) Temperature (°C) Time (min) Shelf position Roast veal 1 160 - 180 90 - 120 1 or 2 Knuckle of veal 1.
ENGLISH 31 11.9 Moist Fan Baking During cooking, open the appliance door only when necessary. Food Temperature (°C) Time (min) Shelf position Pasta gratin 190 - 200 45 - 55 2 Potato gratin 160 - 170 60 - 75 2 Moussaka 180 - 200 75 - 90 2 Lasagne 160 - 170 55 - 70 2 Cannelloni 170 - 190 65 - 75 2 Bread pudding 150 - 160 75 - 90 2 Rice pudding 170 - 190 45 - 60 2 Apple cake 150 - 160 75 - 85 2 White bread 180 - 190 50 - 60 2 11.
www.aeg.com 11.11 Defrost Food Quantity (kg) Defrosting time (min) Further defrosting time (min) Comments Chicken 1.0 100 - 140 20 - 30 Place the chicken on an upturned saucer placed on a large plate. Turn halfway through. Meat 1.0 100 - 140 20 - 30 Turn halfway through. Meat 0.5 90 - 120 20 - 30 Turn halfway through. Trout 1.50 25 - 35 10 - 15 - Strawberries 3.0 30 - 40 10 - 20 - Butter 2.5 30 - 40 10 - 15 - Cream 2 x 2.
ENGLISH 33 Vegetables Food Temperature (°C) Cooking time until simmering (min) Continue to cook at 100 °C (min) Carrots1) 160 - 170 50 - 60 5 - 10 Cucumbers 160 - 170 50 - 60 - Mixed pickles 160 - 170 50 - 60 5 - 10 Kohlrabi / Peas / Asparagus 160 - 170 50 - 60 15 - 20 1) Leave standing in the oven after it is deactivated. 11.13 Drying • Cover trays with grease proof paper or baking parchment.
www.aeg.com 11.
ENGLISH Food Quantity (kg) Tempera- Time ture (°C) (min) Shelf position Comments Chicken 1.0 200 55 - 65 2 Whole Turkey 4.0 170 180 - 240 2 Whole Duck 2.0 - 2.5 170 - 180 120 - 150 2 Whole Goose 3.0 160 - 170 150 - 200 1 Whole Rabbit - 170 - 180 60 - 90 2 Cut in pieces Fish Food Quanti- Temperaty (kg) ture (°C) Time (min) Shelf position Comments Trout 1.5 180 25 - 35 2 3 - 4 fish Tuna 1.2 175 35 - 50 2 4 - 6 fillets Hake - 200 20 - 30 2 - 11.
www.aeg.com Meat Food Temperature (°C) Time (min) Shelf position Cooked ham 130 55 - 65 2 Poached chicken breast 130 25 - 35 2 Kasseler (smoked loin of pork) 130 80 - 100 2 Food Temperature (°C) Time (min) Shelf position Trout 130 25 - 30 2 Salmon filet 130 25 - 30 2 Food Temperature (°C) Time (min) Shelf position Rice 130 35 - 40 2 Unpeeled potatoes, medium 130 50 - 60 2 Boiled potatoes, quartered 130 35 - 45 2 Polenta 130 35 - 45 2 Fish Side dishes 11.
ENGLISH 37 11.17 Steam Regenerating Preheat an empty oven for 10 minutes before cooking. Food Temperature (°C) Time (min) Shelf position Casserole / Gratin 130 15 - 25 2 Pasta and sauce 130 10 - 15 2 Side dishes (e.g. rice, potatoes, pasta) 130 10 - 15 2 One-plate dishes 130 10 - 15 2 Meat 130 10 - 15 2 Vegetables 130 10 - 15 2 11.18 Bread Baking Preheat an empty oven for 10 minutes before cooking.
www.aeg.com Food Food core temperature (°C) English roast beef, well done 70 - 75 Shoulder of pork 80 - 82 Shin of pork 75 - 80 Lamb 70 - 75 Chicken 98 Hare 70 - 75 Trout / Sea bream 65 - 70 Tuna fish / Salmon 65 - 70 12. CARE AND CLEANING WARNING! Refer to Safety chapters. 12.1 Notes on cleaning • Clean the front of the appliance with a soft cloth with warm water and a cleaning agent. • To clean metal surfaces, use a dedicated cleaning agent.
ENGLISH 1 Option Description Quick 1:30 for a low degree of dirt Normal 2:00 min for a usual degree of dirt Intense 2:30 for a high degree of dirt 2 Install the shelf supports in the opposite sequence. 12.4 Pyrolysis 4. Touch to confirm. CAUTION! Remove all accessories and removable shelf supports. When the pyrolytic cleaning starts, the appliance door is locked and the lamp does not work. CAUTION! Before your start the cleaning procedure, make sure that the water tank is empty.
www.aeg.com After some time, you can have lime deposits in your oven. To prevent this, clean the parts of the oven that generate the steam. Empty the tank after each steam cooking. Types of water • Soft water with low lime content the manufacturer recommends this because it decreases the quantity of cleaning procedures. • Tap water - you can use it if your domestic water supply has purifier or water sweetener.
ENGLISH 41 3. Hold the pushed component with one hand. Use a screwdriver with the other hand to lift and turn the right side hinge lever. 6. Close the oven door halfway to the first opening position. Then pull forward and remove the door from its seat. 4. Identify the hinge to the left side of the door. 7. Put the door on a soft cloth on a stable surface. 8. Hold the door trim (B) on the top edge of the door at the two sides and push inwards to release the clip seal. 2 B 1 5.
www.aeg.com Make sure the glass slides out of the supports completely. Make sure that you install the middle panel of glass in the seats correctly. A B C 12.7 Replacing the lamp 11. Clean the glass panels with water and soap. Dry the glass panels carefully. When the cleaning is completed, install the glass panels and the oven door. Do the above steps in the opposite sequence. Make sure that you put the glass panels (A, B and C) back in the correct sequence.
ENGLISH 43 13.1 What to do if... Problem Possible cause Remedy You cannot activate or oper- The oven is not connected Check if the oven is correctly ate the oven. to an electrical supply or it is connected to the electrical connected incorrectly. supply (refer to the connection diagram if available). The oven does not heat up. The oven is deactivated. Activate the oven. The oven does not heat up. The clock is not set. Set the clock. The oven does not heat up. The necessary settings are not set.
www.aeg.com Problem Possible cause Remedy The display shows an error code that is not in this table. There is an electrical fault. • Deactivate the oven with the house fuse or the safety switch in the fuse box and activate it again. • If the display shows the error code again, contact the Customer Care Department. Steam and condensation You left the dish in the oven settle on the food and in the for too long. cavity of the oven.
ENGLISH 14.1 Building In 14.3 Electrical installation min. 550 20 600 The manufacturer is not responsible if you do not follow the safety precautions from the Safety chapters. 558 16 114 min. 560 6 45 589 This appliance is supplied only with a main cable. 573 14.4 Cable 548 Cable types applicable for installation or replacement: 594 21 6 3 H07 RN-F, H05 RN-F, H05 RRF, H05 VV-F, H05 V2V2-F (T90), H05 BB-F For the section of the cable refer to the total power on the rating plate.
www.aeg.com 15. ENERGY EFFICIENCY 15.1 Product Fiche and information according to EU 65-66/2014 Supplier's name AEG Model identification BSK774221M Energy Efficiency Index 81.2 Energy efficiency class A+ Energy consumption with a standard load, conventional mode 0.93 kWh/cycle Energy consumption with a standard load, fan-forced 0.69 kWh/cycle mode Number of cavities 1 Heat source Electricity Volume 72 l Type of oven Built-In Oven Mass 36.
ENGLISH the display during a cooking cycle and cooking times may be different from the cooking times in other programmes. 47 You may activate the lamp again but this action will reduce the expected energy savings. When you use Moist Fan Baking, the lamp automatically deactivates after 30 seconds. 16. ENVIRONMENTAL CONCERNS Recycle the materials with the symbol . Put the packaging in applicable containers to recycle it.
867340586-B-482016 www.aeg.