D NL F E I GB PL H UA RUS Bluetooth Soundtower Bluetooth geluidstoren Tour audio Bluetooth Torre de sonido bluetooth Torre audio Bluetooth Bluetooth Sound tower Wieża muzyczna Bluetooth Bluetooth zenetorony Звукова башта з Bluetooth Напольная звуковая колонка Bluetooth BLUETOOTH SOUNDTOWER BSS 4813 Bedienungsanleitung/Garantie Gebruiksaanwijzing Mode d’emploi Instrucciones de servicio Istruzioni per l’uso Instruction Manual Instrukcja obsługi/Gwarancja Használati utasítás Інструкція з експлуатації Руково
Inhalt Deutsch English Inhalt Übersicht der Bedienelemente........................................ Seite Bedienungsanleitung......................................................... Seite Technische Daten................................................................ Seite Garantie................................................................................. Seite Entsorgung...........................................................................
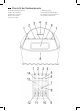
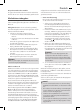
Übersicht der Bedienelemente Locatie van bedieningselementen Situation des commandes Ubicación de los controles Posizione dei comandi Location of Controls Lokalizacja kontrolek A Kezelőszervek Elhelyezkedése Розташування органів керування Расположение элементов
Deutsch Bedienungsanleitung Vielen Dank, dass Sie sich für unser Produkt entschieden haben. Wir wünschen Ihnen viel Freude mit dem Gerät. Symbole in dieser Bedienungsanleitung WARNUNG: Warnt vor Gefahren für Ihre Gesundheit und zeigt mögliche Verletzungsrisiken auf. ACHTUNG: Weist auf mögliche Gefährdungen für das Gerät oder andere Gegenstände hin. HINWEIS: Hebt Tipps und Informationen für Sie hervor. Allgemeine Sicherheitshinweise • Offene Brandquellen, wie z.B.
Deutsch Rückseite (ohne Abbildung) RESET Taste (Zurücksetzen) AUX IN Buchsen (2x RCA) LINE IN Buchse (3,5mm Stereo-Klinke) FM Wurfantenne Fernbedienung 1 SOURCE Taste (Quelle wählen) 2 MUTE (Stumm) Taste 3 PAIR/ (Wiedergabe/Pause / Pairing) Taste 4 Taste (Ein/Aus) 5 CH+/CH- Tasten (gespeicherte Radiosender anwählen) 6 MO/ST Taste (Mono/Stereo) 7 SLEEP Taste (Einschlaftimer) 8 CLOCK Taste (Uhrzeit einstellen) 9 / TUNING Tasten (Suchlauf vorwärts/rückwärts) 10 VOL+/VOL- Tasten (Lautstärke) 11 TREBLE Tasten (H
Deutsch Uhrzeit einstellen 1. Halten Sie im Standby die CLOCK Taste (8 an der FB) ca. 3 Sekunden gedrückt. Im Display erscheinen die Anzeige „CLK“ und die aktuelle eingestellte Uhrzeit. Die Anzeige der Stunden blinkt. 2. Stellen Sie die Stunden mit den Tasten / TUNING (9 an der FB) ein. 3. Drücken Sie die CLOCK Taste. Die Minuten beginnen zu blinken. 4. Stellen Sie die Minuten mit den Tasten / TUNING ein. 5. Drücken Sie erneut die CLOCK Taste. Die Anzeige „CLK“ erlischt und die Uhrzeit wird gespeichert.
Deutsch 7 Gespeicherte Radiosender anwählen Die gespeicherten Radiosender können durch wiederholtes Drücken der CH+/CH- Taste (5 an der FB) angewählt werden. Aufgrund der unterschiedlichen Gerätehersteller, Modelle und Softwareversionen kann eine volle Funktionalität nicht gewährleistet werden. Musikdateien wiedergeben • Geräte anmelden (Pairing) Bevor Sie über das Gerät Musik hören können, müssen Sie die Geräte untereinander anmelden.
Deutsch HINWEIS: • Einige Mobiltelefonmarken verfügen über einen Energiesparmodus. Deaktivieren Sie den Energiesparmodus, da es ansonsten zu Problemen bei der Datenübertragung über Bluetooth kommen kann. • Um Audiodaten übertragen zu können, muss Bluetooth in Ihrem Abspielgerät aktiviert bleiben. Beachten Sie die Bedienungsanleitung Ihres Abspielgerätes. • Verwenden Sie zur Musikwiedergabe ein Mobiltelefon, bei dem ein Telefonat eingeht, wird die Wiedergabe unterbrochen.
Deutsch Fundstelle der EG-Konformitätserklärung Die vollständige EG-Konformitätserklärung können Sie beziehen über: ETV Elektro-technische Vertriebsgesellschaft mbH Industriering Ost 40 D-47906 Kempen Garantie Garantiebedingungen 1. Gegenüber Verbrauchern gewähren wir bei privater Nutzung des Geräts eine Garantie von 24 Monaten ab Kaufdatum. Ist das Gerät zur gewerblichen Nutzung geeignet, gewähren wir beim Kauf durch Unternehmer für das Gerät eine Garantie von 12 Monaten.
Deutsch Entsorgung Bedeutung des Symbols „Mülltonne“ Schonen Sie unsere Umwelt, Elektrogeräte gehören nicht in den Hausmüll. Nutzen Sie die für die Entsorgung von Elektrogeräten vorgesehenen Sammelstellen und geben dort Ihre Elektrogeräte ab, die Sie nicht mehr benutzen werden. Sie helfen damit die potenziellen Auswirkungen, durch falsche Entsorgung, auf die Umwelt und die menschliche Gesundheit zu vermeiden.
Nederlands Gebruiksaanwijzing Dank u voor uw keuze van dit product. We hopen dat u er veel plezier van beleeft. Symbolen in deze gebruiksaanwijzing WAARSCHUWING: Waarschuwt voor gezondheidsrisico’s en duidt op potentiaal verwondingsgevaar. LET OP: Duidt op potentiaal gevaar voor het apparaat of voor andere voorwerpen. OPMERKING: Duidt op tips en informatie voor u.
Nederlands Achterzijde (niet afgebeeld) RESET-toets (Reset) AUX IN-aansluitingen (2x RCA) LINE IN-aansluiting (3,5 mm stereo aansluiting) FM draadantenne Afstandsbediening 1 SOURCE-toets (selecteer bron) 2 MUTE (Demp) toets 3 PAIR/ -toets (afspelen/pauze / koppelen) 4 toets (Aan/Uit) 5 CH+/CH- toetsen (Voorkeurzenders selecteren) 6 MO/ST-toets (Mono/Stereo) 7 SLEEP-toets (slaaptimer) 8 CLOCK-toets (klokinstellingen) 9 / TUNING toetsen (Vooruit/Achteruit scannen) 10 VOL+/VOL- toetsen (Volume) 11 TREBLE-
Nederlands De klok instellen 1. Druk op en houd in de standbymodus de CLOCK-toets (8 op de afstandsbediening) voor ca. 3 seconden ingedrukt. De display zal “CLK” en de huidige ingestelde tijd weergeven. De uurinstelling zal knipperen. 2. Gebruik de / TUNING -toetsen (9 op de afstandsbediening) om de uren in te stellen. 3. Druk op de CLOCK-toets. De minuten beginnen te knipperen. 4. Gebruik de / TUNING -toetsen om de minuten aan te passen. 5. Druk nogmaals op de CLOCK-toets.
Nederlands 4. Druk nogmaals op de MEM-toets. Het radiostation wordt opgeslagen. Selecteer de vooraf ingestelde radiostations De vooraf ingestelde radiostations kunnen worden geselecteerd door herhaaldelijk op de CH+/CH- toets (5 op de afstandsbediening) te drukken. Muziekbestanden afspelen U hebt twee mogelijkheden om uw eigen muziekbestanden met het apparaat af te spelen: via kabel of draadloos via Bluetooth.
Nederlands OPMERKING: • Om een optimale verbinding te garanderen dient u ervoor te zorgen dat de batterij van uw speler volledig is opgeladen. • Sommige merken van mobiele telefoons hebben een energie spaarstand. Schakel de energie spaarstand uit, dit kan namelijk voor problemen zorgen tijdens de gegevensoverdracht via Bluetooth. • Om audiogegevens te kunnen sturen, dient Bluetooth ingeschakeld te blijven op uw speler. Bestudeer de gebruiksaanwijzing van uw speler.
Nederlands Verwijdering Betekenis van het “vuilnisbak”-symbool Houd rekening met het milieu, gooi elektrische apparaten niet weg bij het huishoudafval. Breng overbodige of defecte elektrische apparaten naar gemeentelijke inzamelpunten. Help potentiële milieu- en gezondheidsgevaren door onverantwoordelijk wegwerpen te voorkomen. Draag bij aan hergebruik en ander opnieuw gebruik van oude elektrische en elektronische apparaten. Uw gemeente kan u informatie geven over inzamelingspunten.
Français Manuel d‘instructions Merci d’avoir choisi notre produit. Nous espérons que vous saurez profiter votre appareil. Symboles de ce mode d’emploi AVERTISSEMENT : Avertit contre les dangers pour la santé et indique les risques potentiels de blessure. ATTENTION : Indique de potentiels dangers pour l’appareil ou d’autres objets. NOTE : Souligne les conseils et informations donnés à l’utilisateur.
Français Panneau arrière (sans image) Bouton RESET (réinitialiser) Prises AUX IN (2x RCA) Connecteur LINE IN (connecteur stéréo 3,5 mm) Antenne filaire FM Télécommande 1 Bouton SOURCE (sélectionner la source) 2 Bouton MUTE (Sourdine) 3 Bouton PAIR/ (Lecture/Pause / Pairage) 4 Bouton (Marche/Arrêt) 5 Boutons CH+/ CH- (sélectionner les stations de radio présélectionnées) 6 Bouton MO/ST (Mono/Stéréo) 7 Bouton SLEEP (minuterie de sommeil) 8 Bouton CLOCK (réglage de l’heure) 9 Boutons / TUNING (recherche en
Français Régler l’heure 1. En mode veille, maintenez le bouton CLOCK (8 sur la télécommande) enfoncé pendant environ 3 secondes. L’écran affichera “CLK” et l’heure actuellement réglée. Le réglage de l’heure clignotera. 2. Utilisez les boutons / TUNING (9 sur la télécommande) pour régler les heures. 3. Appuyez sur le bouton CLOCK. Les minutes clignoteront. 4. Utilisez les boutons / TUNING pour régler les minutes. 5. Appuyez à nouveau sur le bouton CLOCK.
Français Lire des fichiers audio L’appareil vous offre deux possibilités d’écouter vos fichiers audio : via le branchement d’un câble ou sans câble via Bluetooth. Avec le câble (Câble non inclus dans la livraison) L’appareil est équipé de deux connexions sur la face arrière : AUX IN ou LINE IN. 1. Branchez l’appareil externe comme suit : • En branchant un câble RCA (2x RCA) aux connecteurs AUX IN. • En branchant un câble RCA 3,5 mm stéréo au connecteur LINE IN.
Français NOTE : • Si un téléphone portable sur lequel vous jouez de la musique reçoit un appel, la musique sera interrompue. Le son ne sera cependant pas transmis par les hautparleurs. Une fois que votre coup de téléphone est terminé, les appareils seront à nouveau connectés l’un à l’autre. Il se peut que vous ayez besoin de redémarrer la lecture. Description des commandes PAIR/ (6/3) Mise en pause et reprise de la lecture. Appuyer pour reprendre la lecture.
Français Élimination Signification du symbole “Elimination“ Prendre soin de l’environnement, ne pas jeter des appareils électriques avec les ordures ménagères. Porter les appareils électriques obsolètes ou défectueux dans les centres de récupération municipaux. Aider à éviter les impacts potentiels sur l’environnement et la santé en luttant contre les déchets sauvages. Vous contribuerez ainsi au recyclage et autres formes de réutilisation des appareils électriques usagés.
Español Instrucciones de servicio Le agradecemos la confianza depositada en este producto y esperamos que disfrute de su uso. Símbolos en este manual del usuario AVISO: Advierte de riesgos para su salud, e indica riesgo potencial de heridas. ATENCIÓN: Indica peligros potenciales para el dispositivo u otros objetos. NOTA: Indica recomendaciones e información para usted.
Español Parte trasera (no se Muestra) Botón RESET (reinicio) Tomas de AUX IN (2x RCA) Conector LINE IN (conector estéreo 3,5 mm) FM antena cable Mando a distancia 1 Botón SOURCE (seleccionar origen) 2 Botón MUTE 3 Botón PAIR/ (Reproducir/Pausa / Vincular) 4 Botón (encender/apagar) 5 Botones CH+/ CH- (seleccionar emisoras preestablecidas) 6 Botón MO/ST (mono/estéreo) 7 Botón SLEEP (temporizador) 8 Botón CLOCK (configuración del reloj) 9 Botones / (explorar adelante/atrás) 10 Botones VOL+/VOL- (volumen)
Español 25 Configuración del reloj 1. En el modo en espera, mantenga pulsado el botón CLOCK (8 en el mando a distancia) durante aproximadamente 3 segundos. En la pantalla aparecerá el mensaje “CLK” y la hora establecida actualmente. Las cifras de la hora parpadearán. 2. Utilice los botones / TUNING (9 en el mando a distancia) para ajustar la hora. 3. Pulse el botón CLOCK. Las cifras de los minutos comenzarán a parpadear. 4. Utilice los botones / TUNING para ajustar los minutos. 5.
Español 3. Utilice los botones CH+/CH- (5 en el mando a distancia) para seleccionar la posición de la memoria en la que desea guardar la emisora de radio. 4. Pulse el botón MEM de nuevo. Se guardará la emisora de radio. Seleccionar una emisora memorizada Las emisoras memorizadas pueden seleccionarse pulsando repetidamente el botón CH+/CH- (5 en el mando a distancia).
Español NOTA: • La compatibilidad Bluetooth no puede garantizarse para dispositivos (como teléfonos móviles) futuros. • Para garantizar una conexión óptima, asegúrese de que la batería del reproductor esté totalmente cargada. • Algunas marcas de teléfonos móviles tienen un modo de ahorro de energía. Desactive el modo de ahorro de energía, podría resultar en problemas durante la transferencia de datos por Bluetooth. • Para poder transferir datos de audio, el Bluetooth debe estar activado en su reproductor.
Español Eliminación Significado del símbolo “cubo de basura” Cuide del medio ambiente, no deseche aparatos eléctricos con los residuos domésticos. Deseche los aparatos eléctricos obsoletos o defectuosos en los puntos de recolección municipales. Ayude a evitar potenciales impactos medioambientales y en la salud por una eliminación de residuos inadecuada. Contribuye al reciclaje y otros modos de uso de aparatos eléctricos y electrónicos viejos.
Italiano Manuale dell’utente Grazie per aver scelto il nostro prodotto. Vi auguriamo un buon utilizzo del dispositivo. Simboli per questo manuale di istruzioni per’uso AVVISO: Avvertimenti di pericoli alla salute e indica rischi potenziali di lesioni. ATTENZIONE: Indica pericoli potenziali per il dispositivo e altri oggetti. NOTA: Sottolinea consigli e informazioni.
Italiano Telecomando 1 Tasto SOURCE (seleziona fonte) 2 Tasto MUTE 3 Tasto PAIR/ (riproduzione/pausa / Abbinamento) 4 Tasto (On/Off) 5 Tasti CH+/ CH- (selezionare preselezione stazioni radio) 6 Tasto MO/ST (Mono/Stereo) 7 Tasto SLEEP (timer sleep) 8 Tasto CLOCK (impostazioni orologio) 9 Tasti / TUNING (scansione in Avanti/all’indietro) 10 Tasti VOL+/VOL- (volume) 11 Tasti TREBLE (impostazione alti) 12 Tasti BASS (impostazioni bassi) 13 Tasti numerici 14 Tasto MEM Precauzioni di sicurezza speciali di q
Italiano 3. Premi il tasto CLOCK. I minuti inizieranno a lampeggiare. 4. Usa i tasti / TUNING per regolare i minuti. 5. Premi il tasto CLOCK di nuovo. La notifica “CLK” scompare e l’ora impostata sarà salvata. Funzioni Generali Accendere/spegnere il dispositivo • Con il tasto (3/4), è possibile impostare l‘unità in modalità standby e di esercizio. In modalità standby, l‘orario apparirà sul display. • Per scollegare l’unità completamente dalla corrente, tirare la spina dalla presa.
Italiano Con il cavo (Cavo non incluso nel pacco) L’apparecchio è fornito di due possibilità di connessione sul retro: AUX IN o LINE IN. 1. Collegare il dispositivo esterno come segue: • Collegando un cavo semplice (2x RCA) alle prese AUX IN. • Collegando un cavo stereo semplice di 3.5 mm alla presa LINE IN. Se necessario, usa un’adattatore corretto (non incluso nel pacco). 2. Premere ripetutamente il tasto SOURCE (2/1) finché “AUX o LINE” non compare sul display. 3.
Italiano Descrizione dei controlli PAIR/ (6/3) È possibile mettere in pausa o continuare la riproduzione musicale. Premere nuovamente per continuare la riproduzione. / (7/9) Premere 1 x = Inizia nuovamente la canzone dall’inizio. Premere 2 x = Salta alla canzone precedente. Premere 3 x = Salta alla canzone prima della precedente. / (7/9) Premere per saltare alla canzone successiva e alle canzoni successive. Pulizia ATTENZIONE: Non immergere il dispositivo in acqua.
English Instruction Manual Thank you for choosing our product. We hope you will enjoy using the appliance. Symbols in these Instructions for Use WARNING: Warns of dangers for your health and indicates potential risks of injury. • To avoid any danger, a damaged power cord must be replaced only by the producer, its customer service or a similarly qualified person with an equal cord. • If the device won’t be used over an extended period of time, disconnect the power cord and remove the batteries.
English 6 7 8 9 10 11 12 13 14 MO/ST button (Mono/Stereo) SLEEP button (sleep timer) CLOCK button (clock settings) / TUNING buttons (scan forward/back) VOL+/VOL- buttons (volume) TREBLE buttons (treble settings) BASS buttons (bass settings) Number buttons MEM button Special Safety Precautions for this device WARNING: Avoid hearing loss due to extreme volume. CAUTION: • Do not subject the speakers to extreme heat, cold or humidity. • Do not operate the device on maximum volume. This can cause damage.
English • To disconnect the unit completely from the mains, pull the mains plug from the socket. NOTE: If no button is pressed within 6 hours, the appliance will automatically switch to standby mode. Volume By pressing the VOL+/VOL- buttons (1/10) you can adjust the desired volume. Infrared Remote Control For wireless control within a distance of 5 m. If the distance decreases you should change the batteries.
English 37 NOTE: If possible, adjust the volume of the external unit to a comfortable level. If the pairing was successful, the display will briefly show “CONNECT” and the Bluetooth control lamp (4) lights up. Cordless via Bluetooth Bluetooth involves a technology for wireless radio connection of devices over a short distance. Devices with Bluetooth standard are transmitting between 2.402 and 2.480 GHz in the ISM band (Industrial, Scientific and Medical).
English Troubleshooting Fault Unit cannot be operated. Cause Solution Unit crashes Disconnect from the and “hangs”. mains for around 5 seconds. Then switch the unit on again. Perform a factory reset. see page 35 “Restoring the factory defaults” No audio signal Speaker is not Check whether a connecvia the Bluetooth paired to the tion exists. If necessary, connection audio source. pair the speaker again to the audio source.
Język polski Instrukcja użytkowania Dziękujemy za wybór naszego produktu. Mamy nadzieję, że korzystanie z urządzenia sprawi Państwu radość. Symbole użyte w tej instrukcji obsługi OSTRZEŻENIE: Niebezpieczeństwo dla zdrowia oraz potencjalne ryzyko obrażeń ciała. UWAGA: Oznacza potencjalne zagrożenie urządzenia lub innych obiektów. WSKAZÓWKA: Podświetlone wskazówki oraz informacje.
Język polski Pilot 1 Przycisk SOURCE (wybór źródła) 2 Przycisk MUTE (wycisenie) 3 Przycisk PAIR/ (Odtwarzanie/Pauza / Parowanie) 4 Przycisk button (Włączanie/Wyłączanie) 5 Przyciski CH+/CH- (wybór wstępnie ustawionych stacji radiowych) 6 Przycisk MO/ST (Mono/Stereo) 7 Przycisk SLEEP (timer funkcji sen) 8 Przycisk CLOCK (ustawienia zegara) 9 Przyciski / TUNING (przewijanie do przodu/do tyłu) 10 Przyciski VOL+/VOL- (Głośność) 11 Przyciski TREBLE (ustawienia sopranów) 12 Przyciski BASS (ustawienia basów)
Język polski 2. Za pomocą przycisków / TUNING (9 na pilocie) wyregulować godziny. 3. Nacisnąć przycisk CLOCK. Migają minuty. 4. Za pomocą przycisków / TUNING wyregulować minuty. 5. Nacisnąć przycisk CLOCK ponownie. Powiadomienie „CLK” znika, a ustawienia czasu zostają zapisane. Ogólne funkcjonowanie Włączanie/ wyłączanie urządzenia • Za pomocą przycisku (3/4), można przełączać urządzenie między trybem czuwania a roboczym. W trybie czuwania, czas pojawi się na wyświetlaczu.
Język polski Odtwarzanie plików muzycznych Są dwie możliwości odtwarzania własnych plików muzycznych za pomocą urządzenia: poprzez połączenie kablowe oraz bezprzewodowo poprzez Bluetooth. Połączenie kablowe (Kabel nie jest ujęty w zestawie) Urządzenie wyposażone jest w dwie opcje połączeń na tylnej stronie: AUX IN lub LINE IN. 1. Podłączyć urządzenie zewnętrzne według wskazówek: • Poprzez podłączenie kabla typu cinch (2x RCA) do gniazdek AUX IN typu jack. • Poprzez łączenie wtyczki gniazdka stereo 3.
Język polski WSKAZÓWKA: • Niektóre marki telefonów komórkowych zapewniają tryb oszczędzania energii. Tryb oszczędzania energii należy wyłączyć, ponieważ może on być przyczyną problemów podczas transferu danych za pomocą technologii Bluetooth. • Aby możliwe było przesyłanie danych dźwiękowych, funkcja Bluetooth odtwarzacza musi pozostać aktywna. Należy zapoznać się z instrukcją obsługi odtwarzacza.
Język polski uznamy za stosowne) wymieniając całe urządzenie na nowe. Sprzęt do naprawy powinien być dostarczony w komplecie wraz z dowodem zakupu oraz z ważną kartą gwarancyjną do sprzedawcy w miarę możliwości w oryginalnym opakowaniu lub innym odpowiednim dla zabezpieczenia przed uszkodzeniem. W razie braku kompletnego opakowania fabrycznego, ryzyko uszkodzenia sprzętu podczas transportu do i z miejsca zakupu ponosi reklamujący.
Magyarul Használati útmutató Köszönjük, hogy a termékünket választotta. Reméljük, elégedetten használja majd a készüléket. A használati útmutatóban található szimbólumok FIGYELMEZTETÉS: Egészségét károsító veszélyforrásokra figyelmeztet, és jelzi a lehetséges sérülésveszélyeket. VIGYÁZAT: A készülékre vagy más tárgyakra veszélyt jelentő dolgokat jelez. Az alábbi jelzések a készüléken találhatók és jelentésük a következő: A villámjel a készülékházban levő veszélyes feszülségre figyelmezteti a felhasználót.
Magyarul Távirányító 1 SOURCE gomb (forrás kiválasztása) 2 MUTE (Némítás) gomb 3 PAIR/ (Lejátszás/Megállítás / Kapcsolás) gomb 4 gomb (Be/Ki) 5 CH+/ CH- gombok (előre beállított rádióállomások kiválasztása) 6 MO/ST gomb (monó/sztereó) 7 SLEEP gomb (alvó mód időzítő) 8 CLOCK gomb (idő beállítás) / TUNING gombok (keresés előre/hátra) 9 10 VOL+/VOL- gombok (hangerő) 11 TREBLE gombok (magas hangszín beállítás) 12 BASS gombok (mély hangszín beállítás) 13 Számgombok 14 MEM gomb Speciális biztonsági előíráso
Magyarul 5. Nyomja meg még egyszer a CLOCK gombot. A kijelzőről eltűnik a “CLK” felirat és a készülék menti a beállított időt. Általános Használat A készülék be-/kikapcsolása • A gombbal (3/4), átkapcsolhatja a készüléket a készenléti és a működési módok között. Készenléti módban a kijelzőn az idő látható. • A készülék teljes áramtalanításához húzza ki a dugaszt a fali csatalakozóból. MEGJEGYZÉS: Ha 6 órán át egyetlen gombot sem nyom meg, a készülék automatikusan készenléti módba kapcsol.
Magyarul Kábellel (az összekötő kábelt a csomag nem tartalmazza) A készülék hátulján két csatlakoztatási lehetőség áll rendelkezésre: AUX IN vagy LINE IN. 1. A külső készüléket a következő módon csatlakoztassa: • RCA kábellel (2 x RCA) az AUX IN jack bemenetbe. • 3,5 mm sztereó RCA csatlakozóval a LINE IN jack bemenetbe. Szükség esetén használja a megfelelő adaptereket (a csomag nem tartalmazza). 2.
Magyarul / (7/9) Nyomja meg 1 x = Dal újrakezdése az elejétől. Nyomja meg 2 x = Ugrás az előző dalra. Nyomja meg 3 x = Ugrás az előző dal előtti dalra, stb. / (7/9) Nyomja meg a következő és az azt követő dalokra való ugráshoz. Tisztítás VIGYÁZAT: Ne merítse vízbe a készüléket. • Tisztítás előtt szüntesse meg a készülék tápellátását. • A készüléket csak száraz törlőruhával tisztítsa, ne használjon tisztítószereket. Hibaelhárítás Hiba Ok A készülék nem A készülék használható. összeomlik és „lefagy”.
Українська Інструкція з експлуатації Дякуємо, що вибрали наш виріб. Сподіваємось, що ви будете задоволені його можливостями. Символи, які використовуються в цій інструкції ПОПЕРЕДЖЕННЯ. Попереджає про небезпеку для здоров’я і позначає потенційний ризик травмування. УВАГА. Позначає потенційну небезпеку для пристрою або інших предметів. ПРИМІТКА. Виділяє підказки та інформацію для користувача.
Українська Задня панель (не показано) Кнопка RESET (скидання) Роз’єми AUX IN (2x RCA) Роз’єм LINE IN (3,5 мм роз’єм стерео) Дротова FM-антена Пульт дистанційного керування 1 Кнопка SOURCE (вибір джерела) 2 Кнопка MUTE (вимкнення звуку) 3 Кнопка PAIR/ (відтворення/пауза / режим пари) 4 Кнопка (увімк./вимк.
Українська Відновлення заводських налаштувань Будь-яку помилку, що виникла під час роботи пристрою, можна усунути, якщо натиснути кнопку скидання налаштувань. • За допомогою дротика чи подібного предмета натисніть кнопку скидання налаштувань (RESET) на тильній панелі пристрою, щоб скинути налаштування електроніки. Після виконання цієї дії всі встановлені налаштування буде втрачено. Налаштування годинника 1. У режимі очікування натисніть і тримайте кнопку CLOCK (8 на пульті ДК) приблизно 3 секунди.
Українська сигнал слабкий, рекомендовано перемкнутись на режим монофонічного звуку. Зберігання станцій вручну 1. Виконайте пошук потрібної радіостанції, як описано вище у пункті 2, частині “Пошук радіостанції вручну”. 2. Щоб зберегти радіостанцію, натисніть кнопку MEM (14 на пульті ДК). 3. Користуйтеся кнопками CH+/CH- (5 на пульті ДК), щоб вибрати комірку пам’яті для збереження радіостанції. 4. Натисніть кнопку MEM ще раз. Радіостанцію буде збережено.
Українська ПРИМІТКА. • Залежно від виробника пристрою для під’єднання пристрою може знадобитися знову виконати реєстрацію (PAIRING). • У випадку виникнення проблем під час повторного спарення з пристроєм відтворення вимкніть WiFi-/ і функцію передачі мобільних даних на пристрої відтворення. • Ми не можемо гарантувати сумісність із Bluetooth для пристроїв (наприклад, для мобільних телефонів), які вийдуть на ринок у майбутньому.
Українська Право на технічні зміни та зміни у дизайні зберігається продовж процесу розробки продукту. Цей пристрій відповідає всім діючим директивам Ради Європи, зокрема щодо електромагнітної сумісності і директиві щодо низької напруги, та вироблений відповідно до останніх вимог безпеки.
Русский Руководство по эксплуатации Спасибо за выбор нашего продукта. Надеемся, он вам понравится. Символы применяемые в данном руководстве пользователя ПРЕДУПРЕЖДЕНИЕ: Предупреждает об опасности для здоровья и возможном риске получения травмы. ВНИМАНИЕ: Указывает на возможную опасность для изделия и других окружающих предметов. ПРИМЕЧАНИЯ: Дает советы и информацию.
Русский Расположение элементов 1 2 3 4 5 6 57 Первое применение устройства/ введение Кнопки громкости ( VOL ) Кнопка SOURCE (режим, выбор источника) Кнопка (Вкл./Режим ожидания) Сигнальная лампа Bluetooth Дисплей Кнопка PAIR/ (воспроизведение/пауза / Сопряжение) 7 Кнопки FM/ (поиск станций вперед/назад / следующая/предыдущая музыкальная фонограмма) 8 ИК-приемник для пульта дистанционного управления (ПДУ) • Выберите для устройства подходящее место. Пригодна сухая, ровная и нескользкая поверхность.
Русский ПРЕДУПРЕЖДЕНИЕ: • При транспортировке заклейте липкой лентой клеммы батарейки для обеспечения безопасности. • При утечке из батарейки не допускайте попадания жидкости в глаза или на кожу. При контакте кислоты с глазами, промойте чистой водой и обратитесь за медицинской помощью в случае симптомов травмы. ВНИМАНИЕ: Не выбрасывайте батарейки вместе с бытовыми отходами. Пожалуйста, отнесите использованные батарейки в центр сбора или обратно розничному продавцу.
Русский Прямой ввод частоты: Если Вы знаете частоту радиостанции, можно ввести ее следующим образом. • Введите частоту с помощью цифровых кнопок (13) на пульте дистанционного управления. Если введена неправильная частота, на дисплее появится сообщение “ERROR”. 3. При слишком слабом приеме или помехах на принимаемую радиостанцию, попробуйте улучшить прием за счет измерения положения или развертывания/ сворачивания антенны. Если принимается стерео станция, дисплей будет показывать “STEREO”.
Русский жительное время появится сообщение “NO CON”. Нажмите кнопку PAIR/ (6/3), чтобы реактивировать режим сопряжения. 3. Выберите меню Bluetooth в плеере и зарегистрируйте в нем динамик. Для этого см. руководство по эксплуатации плеера. Устройство “AEG BSS 4813” будет показано в плеере в качестве выбранного для пары. ПРИМЕЧАНИЯ: К динамику можно подключить только один блок воспроизведения. Если динамику уже подключен к другому блоку воспроизведения, динамик не появится в меню выбора для протокола BT.
Русский Неисправность Не удается подключить динамик Причина Устранение Не работает Проверьте, поддержипарная связь. вает ли источник аудио протокол A2DP. Выключен ис- Включите источник точник аудио. аудио. Включите функцию Режим Bluetooth Bluetooth в источнике выключен в аудио. источнике аудио. Не поддерИспользуйте другое живается устройство воспроизведанная версия дения. Bluetooth. Технические характеристики Модель:........................................................................
Stand 04/13 BSS 4813 Elektro-technische Vertriebsges. mbH www.etv.