Café Olé CO 20. Kaffeeautomat mit Timer und Milchaufschäumer Coffee Machine with Timer und Frothed Milk Spout Cafetière électrique avec dispositif pour faire mousser le lait Koffiezetapparaat met timer en melkopschuimer Kávovar s èasovaèem a.
1 M A L B C D E F K G J H A D B C E F 2 Downloaded from CoffeeMachineManual.
4 5 6 7 8 9 10 11 12 13 Downloaded from CoffeeMachineManual.
g g Dear customer, Please read these operating instructions through carefully. Please make sure you read the safety instructions on the first pages of these operating instructions! Keep the operating instructions for future reference. Pass them on to any future owners.
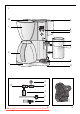
g appliances may only be repaired by trained technicians. Improper repairs can put the appliance user in considerable danger. No liability can be assumed for possible damage if the appliance is used for the wrong purpose or if it is operated incorrectly. Preparation 1. Fill with water (Figure 4) Lift up the lid above the water tank (Figure 1/A). Remove the water tank (Figure 1/C) and fill it with clear, cold tap water. 1 Never use hot water.
g lock. It remains hot enough to drink for a lengthy period of time. 3 To ensure that the coffee is uniformly strong, you should stir it in the jug after it has been made. 5. Setting the functions with the operating features (Figure 9) 5.1 Using for the first time Your appliance has a timer with which you can set the time of day and preprogram the switch on time up to 24 hours in advance. 0 Place the mains plug in the socket. The time display (Figure 9/A) will flash "0:00".
g on. The symbol (1 cup) will appear in the display (Figure 9/A) next to the time. 0 Press the on/off button (Figure 9/H) to start the brewing procedure. If afterwards you wish to select "3-5 cups" turn the selector dial (Figure 9/G) to the left until the stop is reached again. 3. Making coffee with preprogrammed start time Either you have already programmed the required start time or you can do so now as described in 5.3.
g 3 Caution: During operation the indicator for steam (Figure 9/C) sometimes goes out. The required steam temperature is reached within a short time by turning the steam selector (Figure 9/F) to the right. 0 Fill the receptacle (Figure 1/E), for instance with cold milk. 0 Close the lid of the receptacle. 0 Attach the container to the frothed milk spout (Figure 11).
g 0 Now fill the water tank (Figure 1/C) about half way up with water and only then add the correct quantity of descaling agent; – never do this the other way round! Achtung: Only use liquid descalers! 0 Swing the swing filter into position in the appliance. Place the empty thermos jug with lid on the plate (Figure 1/J). (Please note that the lid serves to open the anti-drip valve and so ensures that the water flows through properly.
g Clean the exterior of the appliance with a damp cloth, but never immerse it in water! Wash out the thermos jug and lid with hot water, using a brush if necessary, and dry it with a cloth. Do not clean it in a dishwasher. What to do if... • only steam but no frothed milk is produced? – Attach the receptacle or flexible hose correctly. – Put the milk froth spout together correctly and firmly.
AEG Kundendienst in Europa Deutschland Europa Sollte dieses AEG Kleingerät wider Erwarten nicht funktionieren, senden Sie es bitte an folgende Adresse: Beginnt die Postleitzahl Ihres Wohnortes mit 2 - 3 - 4 - 5 AEG Kleingeräte-Zentralwerkstatt Firma Elektro Stefan Irsen Sachtlebenstraße 1, 41541 Dormagen Beginnt die Postleitzahl Ihres Wohnortes mit 0 - 1 - 6 - 7 - 8 - 9 AEG Kleingeräte-Zentralwerkstatt Firma Trepesch GmbH Steinstraße 500, 90419 Nürnberg Österreich, 4010 Linz, 0732 / 770101 - 30 Belgique/