Congratulations! You are now the owner of a high quality, efficient and exiling cooking appliance. From now on cooking should not only be made easier, bul we believe you will find the new cooker a joy 10 use.
900 1092 UK Contents Safety instructions For the installer For the user Appliance description Features First use Operating the controls Switching on the electronic timer Precanceling the ovens Operating the electronic timer for both ovens Hob Features.
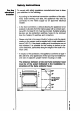
For the electrical instanter Safety instructions To comply with safety regulations manufactures have to draw your attention to the following: Ac carding to the technical connection conditions of the electricity board serving your area, the appliance may only be connected to the mains supply by an approved electrical installer. In the fixed connection, a device allowing the appliance to be isolated on al poles from the mains supply with a contact opening width of at least 3 mm must be provided.
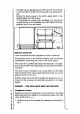
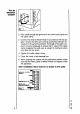
SO0 1042 UK 01 1082 UK ~ The height can be adjusted up from 80 cm to 81 emir 82 om or down farm ine up with your kitchen furniture Remove the fixing screws in the plinth, adjust plinth to the height required and refit screws. To compensate for uneven floor conditions, you may ke fo consider placing a foot (available from AEG Spare Parts Department) next to the rear castor.
For the electrical installer AR 2. Pass cable through the grommet in the lower back panel and the cable clamp. 3. Connect the wires to the terminals in accordance with the diagram. Ensure that finks are correct positioned between terminals (5 or & way terminal biopic. The length of the earth conductor must be adequate to ensure that in case of the cable clamp breaking the earth wire is subject to mechanic strain ably after the five wires. 4. Tighten the cable clamp screw. 5.
0901 1082 UK When you use the appliance to prepare your food, the oven doors and cooking plates become hot. Therefore keep small children well away from the appliance. ‘This especially applies when you are grilling or patriotically cleaning the oven {where applicable). Overheated fat and cooling oil may ignite. Prepare foods requiring fat or oll (chips) only under constant supervision. ~ Do not use the appliance to heat your room, Take care when using small electrical appliances near the cooker.
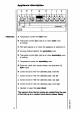
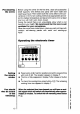
Features Appliance description oml @ loom el oo ™ RUED et — 571 L A Temperature control for main oven B Thermostat control light {red) is on when main oven is heating € Riot light {yellow) is on when the appliance is switched on D Cooking method defector for secondary oven E Thermostat control light {red) is on when secondary oven is heating F Temperature control for secondary oven G Electronic clock with minute minder, and auto-timer for both ovens #H Central knob for 210 mm diameter plate, front deft 1 Co
AUGUSTUS 1VI2 UK UH GOD 1042 UK First use ‘The contort knobs and K) can be muted clockwise or anti-clockwise to any position. Further information to this can be found in the “hob” and “oven” sections. However, the oven temperature control knobs (A) and (F) must be turned clockwise to set and anti-clockwise to tum off.
Pr-cleaning the ovens Setting the minute minder You should also be aware of the following: 10 Before using the ovens for the first time, clean all accessories {shelf supports, wire shelves and pans) with warm water and washing-up liquid. Then switch both the ovens either 1o the conventional or the hot air cooking method (as appropriate) and defect the highest temperature and leave both ovens on for at least one hour with both oven doors closed.
ELEAZAR 1082 UK " The electronic timer is designed to switch the ovens on and off automatically.
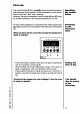
How to programmer the oven to switch off automatically You should be aware of the following: 12 gt Lbl =8 & o?o?e 3811 ~ Select the cooking method and temperature as required. ~ Press button B ), hold it depressed, and enter the required duration with knob E The cooking duration appears in display F and symbol e} is illuminated. When button B is released the time of day appears in display F. Symbol [x] shows throughout time controlled cooking.
BAD 1082 UK Py O ~ Set the cooking method selector and temperature control as required. ~ Press button B [, hold it depressed and enter the required duration with knob E and then, by pressing button C set the cooking end time. _~ When buttons B i1 and C [+ are released, the time of day reappears in display F. Symbol (= is illuminated. The oven switches on automatically at the correct time, having deducted the cooking duration from the cooking end. it then switches off automatically at the cooking end.
Ceramic cooking zones 14 The Hob Your hob features 4 ceramic cooking zones with stemless control for maximum irreconcilability The control knobs on the panel feature indicators to show which control knob belongs to which cooking zone. 351 ® Residual heat indicators There is residual heat indicator for each of the cooking plates on the ceramic hob (2 lights on the left and 2 on the right). Her the indicator is on it means the plate is still hot. After the plate has cooled down the indicator lamp goes out.
BARRIO 1092 UK The vapors created in the oven are vented through the back of the hob., Please press the push-button only when the cooking plates are notion operation to prevent the risk of burning yourself. Should you operate the push-button when the cooking plates are in use, we recommend you to use a long-handled caking spoon to open o close the vent.
Good pans for better resits 16 General the correct pans ® For best results use good quality pans with smooth flat bases. ® The pan base should be thick and flat. Pans with uneven, distorted or rough bases (e. g., cast iron) should not be used as they extend the cooking times and may cause damage to the cooking plates. ® Cooking plates and pan base should be of the same or similar diameter. The pan should be placed centrally on the cooking plate.
K900 1097 UK ABSORB 1092 UK (Ceramic and solid pistes) After you have switched on one of the ceramic plates you will hear a faint hum caused by the radiant heating elements. Do not place aluminum foil or plastic containers on the hot ceramic hob, Do not allow sugar or foodstuffs containing sugar to come in contact with the hot ceramic hob ~ it will damage the hob. Protect the cooking areas from damp to prevent them from deteriorating; dry pan base before use: dry cooking areas well after cleaning.
General Cooking methods for secondary oven Hot air cooking in the main oven Shelf levels main and secondary ovens 18 Ovens Before using for the first time, refer (o the section describing precanceling of the ovens. The secondary oven is a conventional one with top and bottom heat and grit When the oven is in use the cooling fan is on. The main oven is a hot air oven. For further details consult the relevant sections in this booklet.
FRO 1002 UK The fat filter supplied protects the fan against soling. It must al~ ways be in place when: ~ Meat is cooked in uncovered containers using the hot air mode (4] {do not insert when banking; ~ During Isotherm procrastinating (on multi-function ovens only) or traditional grilling. How to insert the fat fighter: Hood the tat filter by the handle and insert the two tabs (see illustration) into the slots in the back panel of the oven thereby covering the fan opening. SRR 10.
Switching on and off Even interior light The main oven is illuminated when you tum the oven temperature control to the lamp symbol 3] Secondary oven [ Decide whether you want 1o use the conventional oven or the grill Select the relevant symbol on the cooking method selector and the temperature required. Main oven [@ Turn the temperature control clockwise 1o the required temperature. Both ovens The red thermostat lights are on for as long as the ovens are preheating.
BLOOD 10082 UK BFX90T 1082 UK BLOOD 192 UK. ® Bake ware Cakes are baked dither in cake tins or alliteratively on baking sheets, full width baking sheets are available from AEG Spare Parts as an optional extra. How bake ware effects browning: 1. Bake ware, which Is dark in color, has & non-stick coating or is made from aluminum is the best as heat is absorbed and then transferred to the cake resulting in shorter cooking times, lower energy consumption and better browning. 2.
= Baking times and temperatures ‘When baking with hot air it is often unnecessary to per-heat the oven. For exceptions see enclosed baking saris. if you use the oven for batch baking, choose cakes which require similar temperatures. Different cooking times can be overcome by either placing cakes into the oven later or by removing them earlier. The baking chart is provided as & quick reference to keep near the oven.
BUSBOY 1082 UK BBGO00 1092 UK Roasting and stewing Main oven with hot air. Secondary oven with conventional fop and bottom heat. Recommendations Wipe and weigh the meat. If stuffing is used, weigh the stuffed joint to calculate the cooking time. Place the joint in a suitable roasting dish, season with salt and pepper and brush lean joints with meted fat. When cooking pies. place dish on 2 baking sheet o avoid spillage on to the fiasco of the oven.
General 24 Ovenware Never use stainless steel ovenware In the oven, since it reflects the heat. Meat, poultry, and fish should be cooked in ovenproof dishes or in the meat pan for large quantities. Choose a dish which is just a little larger than the joint itself. This will contain any fat in a smaller area and reduce splashing. if you wish to roast potatoes in the same dish around the joint rather than in a separate one you need o make allowances for this when selecting a suitable dish.
REGRESS 1092 UK Warning ‘The handle must bae removed whilst grilling. Failing to do 0 will resit in overheating of the handle. This may cause damage leading to breakage of the handier. inserting the handle Lock it into the grip at the front of the pan. See illustration. Make sure that the handle is trimly attached to the pain Removing the handle Crass the button on the handle.
Traditional grilling 7 ana 7] How to use the grit 26 Prime cuts of meat such as steaks and chops or fish weighing less than 1 kg can either be fried or grilled. Salt large pieces shorty before riling and small ones just after riling. Tum meat/fish after haft the rifling time so that both sides are uniformly browned.
BIOKO 102 UK W The hot air oven is extremely versatile since you can cook a complete meal in . You can cook different foods at the same time, such as fish and cakes, without any transfer of smile or taste from one to the other. W When menu cooking try to chaise foods which require similar cooking temperatures, ® When cooking meat in uncovered containers the fat filter must be inserted.
Defrosting by Mot Alr A in the main m Food in flat aluminum containers defrosts especially well since aluminum is a good heat conductor. For freezing and subsequent defrosting of meat and vegetable dishes, flat aluminum containers should therefore be used. For defrosting uncooked frozen meat and fruit, closed ovenproof dishes are especially well suited, ® Position the containers on the wire sheaf or in the meat pan 4th from the top. Food Temp.
BUBOES 1082 1K 1 ® For bottling, use only jars with rubber seals and glass feeds. Never use jars with screw fittings or bayonet catches or metal tins. And make sure you use thresh foodstuffs! The oven holds 6 botching jars of 1-1.5 liters capacity. Place 1 cup of hot water in the drip-pan so that the necessary humidity is retained in the oven, w Position the jars in the enameled pan on the 4th level from the top.
Ceramic general Cleaning and care Although ceramic hobs are easy o clean they require regular care and cleaning to maintain them in good condition. Let the hob coo! down before cleaning. 1. Never use abrasive cleaners or scouring powders or scouring pads. 2. Clean the hob after every use while the silage is still minimal. Use a soft damp cloth and a little washing up liquid. Rub the hob dry using a soft clean cloth. Make sure that no residual cleaning material is left on the hob. 3.
TORPOR 1002 UK These instructions refer 1o a large range of AEG double and single ovens. W All secondary ovens have a catalytic roof panel as standard. Some models have a compete catalytic set provided as standard.
Main oven Cleaning the jam cover{s) or replacing the oven tamps) in the main oven Oven righting 82 It your oven has a catalytic roof, sides and back panel either as standard equipment or if you have bought these parts separately and fitted them, then the following information will be of interest to you. The liners help to keep the oven cleaner as they clean themselves to a great extent during roasting and being at temperatures above 200 °C.
POODLE 1092 UK ® Removing the oven door Fully open the oven door. 1. Pull the door cater on both door hinges towards you {see Illustration. 2. Lift the door up and pule forward away from the oven {grip the sides do not pull on the door handiness. & Replacing the oven door 1. Unsent both brackets into the oven frame. 2. Fully open the door and return door caches to their working positions (sea illustration).
Removing the shelf supports Cleaning the catalytic roof in the second oven 34 & Sheaf supports To clean the sides of the oven, the shelf supports {see illustration) can be removed, Pull the shelf support at the bottom, towards the center of the vane and unhook from the top, Replace in reverse order, The catalytic roof of your oven may require cleaning from time to time. To remove the roof panel proceed as follows: Loosen the two holding screws APOLLOS 200 BAKU APOGEE 1002 UK.
SOAPBOX 1092 UK ARGOT 1082 1K After cleaning re-insert roof panel and re-fasten screws 88.c 1 The fat fighter should be cleaned after every use. To remove fitter, tweed it by the handle and Sift upwards. Place the fat filter in a saucepan, add approximately 1 tbsp. of automatic washing powder or 1 tsp. of dishwasher powder and cover fighter with water, Bring to the boil and lave to soak for approx. 30 mind. or longer depending on the degree of dolling.
Optional extras Additional wire shelf £T No. 661 307 541 Baking sheet Ceramic oven dish £ No. 611 898 620 E No.
Faults you can rectify yourself 38 What to coif (something goes wrong?) the pilot lamps do not show? the oven does not heat? 1. You may well have not operated all relevant switches or 2. The fuse in the fuse box has blown 3. IMPORTANT ~ Mike sure that the vane door is closed completely. the ruses keep bowing? Please call an approved and qualified electrician, the oven damp fails? See Cleaning and care on page 32. Replacement lamps are not covered by warranty and are not free of charge.
KOHL 1042 UK. Service Should you be unable to locate the cause of the problem in spite of the above check-list please contact your AEG service department quoting the E and F numbers which you will find on the rating plate {see industrialization. S Please transfer these numbers to the space provided below for your convenience. These numbers enable the service department to prepare as far as possible any spare parts required 1o rectify the fault on first call. This may save you money.
AEG Exaggerate AG Posthaste 1036 D-8500 Nirenberg 1 © Copyright by AEG H 260 275 540 AEG Domestic Appliances Ltd Customer Care Department 5877 High Street Slough Berkshire 8L1 1DZ Telephone: 08705 350350