Congratulations! You are now the owner of a high quality, efficient and exciting cooking appliance. From now an cooking should not only be made easier, but we believe you will find the new cooker a joy 1o use. The cooker will provide you with very good cooking results, is easy to use and maintain, if you take a file time to study the information contained in the instruction booklet, as well as in the lead-in pages of the accompanying recipe book.
911 1098 UK Contents Safety instructions For the installer For the user Appliance description Features First use Operating the controls Push-in oven door handier Switching on the electronic timer Precanceling the oven How to use the oven Operating the electronic timer General How to use the cooking functions for the oven Switching on and off Chromatic Baking Roasting and stewing Roasting, Isotherm procrastinating using the meat thermometer Riling Specialized applications of the hot air oven Menu cooking Def
For the installer For the user Safety instructions The safety requirements state that the following information be given When installing cooking appliances info kitchen furniture the enclosed installation instructions must be strictly adhered to. ~ [f the high quality ceramic roof develops cracks or i breaks, do not use the oven at all, In this event isolate the appliance from the electrical supply circuit, Contact AEG Service Department as soon as possible.
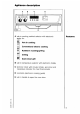
AUSSIE 10098 UK Appliance description Push-in cooking method selector with electronic display for: E Hot air cooking Conventional electric cooking er A | Isotherm procrastinating ] Grilling ey Yv*) Dual-circuit grit B Push-n temperature selector with electronic display € Electronic clock with minute minder, auto-timer and temperature indicator for meat thermometer D Chromatic (electronic cooking guide) E Pushkin handle to open the oven door Features
Operating the control knobs Releasing the handle First use To operate the control knob press to release. Control knob (A} can be turned clockwise or anti-clockwise to any position However, the over: temperature control knob (8) must be muted clockwise to set and anti-clockwise to turn off. The temperature control knob (B} can be set to maximum 280 °C, You can reduce soiling of the control knobs whilst the oven is in operation by pushing them in (child safety feature.
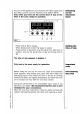
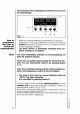
UH902 593 LK BISON! 1082 UK As soon as the appliance is connected to the mains supply (and also after a power cut), the electronic timer flashes 00.00 Only when you have set the correct time of day on the timer is the oven ready for operation. Press knob E '@l to release. ~ When finished with knob E ) press to retract. Press buttons C b1 and D [ af the same time, hold them in position, and set the actual time of day by muting knob E @l The time of day appears in display F.
The symbols have the following meanings: Operating the electronic timer (A1 Setting the internal meat temperature in °C (B Setting the minute minder {up to 99 minutes) 5 Setting the cooking duration of the oven {up to 23 hours 59 minutes) =1 Meting the end of the cooking duration {up to 23 hours 59 minutes in advance} @ @ Rotary control for time selections AUTO" Indicator symbol, fulminated during time confirmed cooking EASED 508 UK
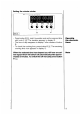
UEAQ04 503 UK Setting the minute minder [100.2 -~ Press button B hold it in position and set the required time with knob E @) The duration appears in display G. The time of day reappears in display F after release of button 8, Tb check the cooking time, press button B {8, The remaining cooking time now appears in display G. When the selected time has elapsed you will hear an audible signal which will switch off automatically after approximately 2 minutes.
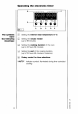
How fo programmer the oven to switch off automatically Note 10 The electronic timer is designed to switch the oven on and off automatically. 96.1 Select the cooking method and temperature as required ~ Press button C 1, hold it depressed, and enter the required duration with knob E &5, When button C s released, the time of day reappears in display F The word “AUTO” is illuminated indicating time controlled cooking is in progress.
VEDAS B3 UK — Set the cooking method selector and temperature control as required. ~ Press button C ], hold it depressed and enter the required duration with nab € and then, by pressing button D &, set the cooking end time. — When buttons are released, the time of day reappears in display F. The oven switches on automatically at the correct time, having deducted the cooking duration from the cooking end. it then switches off automatically at the cooking end.
General Cooking methods for the main oven Shelf levels Oven Before using for the first time, refer to the section describing precanceling of the ovens. The oven is a multi-function oven which features conventional cooking with top and bottom heat, hot air cooking, Isotherm procrastinating and traditional grilling.
FPO 1092 UK The fat filter supplied protects the fan against soling. It must always be in place when: Meat is cooked in uncovered containers using the hot air mode X (do not insert when baking!); ~ During Isotherm procrastinating [T) {on multi-function ovens only} or traditional grilling. How to insert the fat filter: Hold the fat filter by the handle and insert the two tabs (see illustrations) into the slots in the back panel of the oven thereby covering the fan opening.
Switching on and off 14 Using the oven Decide which cooking method you want to use and select the appropriate symbol on the cooking method selector, . g., & for Hot Air. Then select the required temperature with the temperature control. The red thermostat fight is on for as long as the oven is per-heating. The thermostat light cycles on and oft during operation, Indicating heating periods.
BFK900 10/92 UK BLACKOUT /02 UK HALLOO 1082 UK & Bake ware Cakes are baked either in cake tins or alternatively on baking sheets, full width baking sheets are available from AEG Spare Parts as an optional extra. How bake ware affects browning: 1. Bake ware, which is lard in color, has a non-stick coating or is made from aluminum is the best as heat is absorbed and then transferred to the cake resulting in shorter cooking times, lower energy consumption and better browning. 2.
& Baking times and temperatures When baking with hot air it is offend unnecessary 1o per-heal the oven. For exceptions see enclosed baking charts. If you use the oven for batch baking, chocs cakes which require similar temperatures.
HUBBUBS 1002 UK HUBBUB 1092 UK BBGI0 1092 UK Cooking method ® Choose the most suitable cooking method from the various options: Conventional cottonwood heat Hot air vev Diathermy procrastinating Where the attached cooking charts highlight shelf positions and temperate in bold print the oven may give you the better result when using this cooking method.
Ovenware Never use stainless steel ovenware in the oven, since it reflects the heat. Meat, poultry, and fish should be cocked in ovenproof dishes or in the nest pan for large quantities. Choose a dish which is just a lite larger than the joint itself. This will contain any fat in a smaller area and reduce splashing.
BRUTE 593 LK The meat thermometer takes the guesswork out of roasting meat regardless of whether you use the conventional, hot air or Isotherm procrastinating method. A therm couple is located in the tip of the meat thermometer which “senses” the temperatures, When the meat thermometer is plugged into the side of the oven, the oven will work autocratically unit the temperature inside the meat is the same as the one you selected on the electronic timer.
Note To switch off 20 4. Press button A [ on the electronic clock, hold it depressed and enter the required internal meat temperature with knob E i, for example 85 %C. This temperature appears in the left display G of the electronic clock for as dong as you keep button A [/ depressed. When you release button pears in display G. 841 5. Set the cooking method selector and the temperature control 1o the settings required using the cooking charts supplied as a.
BFTR01 58 UK GREGG 10i92 UK Roasting with the meat thermometer temperature guide Meat Internal temperature selection Beef rare 45-50°C medium 60-65°C wel done 75-80°C meat loaf 75-80°C Pork 80-85°C Veal 80-85°C Lamb well cooked 80°C pink 70-75°C Game 75-80°C Poultry 80-85°C except goose 86-90°C Warning! The handier must be removed whilst grilling. Failing to do so will result in overheating of the handle. This may cause damage leading to breakage of the handle.
Traditional rifling Band@ 22 Removing the handier Press the bunion on the handle. See Illustration How to use the grill Prime cuts of meat such as steaks and chops or fish weighing less than 1 kg can either be fried or grilled. Salt large pieces shortly before riling and small ones just after riling. Turk meat/fish after half the riling time so that both sides are uniformly browned, Tum thin pieces once; thicker pieces need tuning more often.
BODE 1082 LK m The hot air oven is extremely versatile since you can cook a complete meal unit. You can cook different foods at the same dime, such as fish and cakes, without any transfer of smell or taste from one to the other. W When menu cooking try to choose foods which require scimitar cooking temperatures m When cooking meat in uncovered containers the fat filter must be inserted.
Defrosting by hot air in the oven 24 # Food in flat aluminum containers defrost especially well since alumni is a good heat conductor. For freezing and subsequent defrosting of meat and vegetable dishes, flat aluminum containers should therefore be used. For defrosting uncooked frozen meat and fruit, closed ovenproof dishes are especially well suited. Position the containers on the wire shelf or in the meat pan 4th from the top. Food Temp.
REGOR 1092 UK For bottling, use only jars with rubber seals and glass lids. Never use jars with screw fittings or bayonet catches or metal tins. And make sure you use fresh foodstuffs! The oven holds 6 bottling jars of 11,5 Jitters capacity. Lace 1 cup of hot water in the drip-pan so that the necessary humidity is retained in the oven.
Removing the oven door {main and/or secondary ovens) 26 Cleaning and care Your oven has catalytic self-clean liners on the sides and the back of the oven. The liners help fo keep the oven cleaner as they clean themselves to & great extent during roasting and baking at temperatures above 200 °C. As cleaning may be improved by exposure 10 a higher temperature it may be necessary 1o run the oven at 250 °C for 1 or 2 hoers per week.
280 GRIEG APIARY 0593 UK PROS: W Replacing the oven door 1. Insert both brackets into the oven frame. 2. Fully open the door and return door catches o their working positions (see illustration. ® Shelf supports To clean the sides of the oven, the shelf supports (ses illustration) can be removed. B Pull the shelf support at the bottom, towards the center of the oven and unhook from the top. Replace in reverse order.
Cleaning the lamp cover or replacing the oven lamp in the oven Oven Sighting Manual cleaning 28 Warning! Isolate the oven from supply before replacing the oven lamp. To clean the glass cover or change the oven lamp the glass cover should only be clipped by hand. Do not use tools of any kind, After cleaning the lamp cover or changing the light bulb refit the lamp cover, You can fulminate the oven for cleaning.
POOR 10:08 UK SHOOTER 0503 UK The fat filter should be cleaned after every use. To remove filter, hold i by the handle and lift upwards. Place the fat filter in a saucepan, add approximately 1 tsp. of automatic washing powder or 11tsp. of dishwasher powder and cover Filter with water. Bring to the boil and leave to soak for approx. 30 mind, or longer depending on the degree of soiling. Make sure the solution does ot boil aver a8 it could mark your hob. Rinse filter in clear water and dry.
Faults you can rectify yourself a0 What (something goes wrong?) the pilot lamps do not show? .. the oven does not heat? 1. You may well have not operated all relevant switches or 2. The fuse in the fuse box has blown. 3. IMPORTANT Make sure that the oven door is closed completely. .. the fuses keep blowing? Please call an approved and qualified electrician, .. the oven lamp fails? See Cleaning and care on page 28. Replacement lamps are not covered by warranty and are not free of charge. ..
K000 10158 UK Service Should you be unable to locate the cause of the problem in spite of the above check-list please contact your AEG service depart men quoting the € and F numbers or KD which you will find on the rating plate (see stratification. Please transfer these numbers to the space provided below for Y Our convenience, These numbers enable the service department to prepare as far as possible any spare parts required to rectify the fault on first call. This may save you money. E-No.
AEG Exaggerate AG Pontiac 1038 D-90327 Nirenberg © Copyright by AEG H 260 263 240 -~ AEG Domestic Appliances Ltd Customer Care Department 55-77 High Street Slough Berkshire SL11DZ Telephone: 08705 350350