COMPETENCE D2160-1 Build-in Electric Fanned Double Oven Operating Instructions
IMPORTANT SAFETY INFORMATION These warnings are provided in the interests of your safety. Ensure that you understand them all before installing or using the appliance. Your safety is of paramount importance. If you are unsure about any of the information in this book contact the Customer Care Department. Telephone 0870 5 350350 During use the appliance becomes Hot. Care should be taken to avoid touching heating elements inside the oven. Stand clear when opening the drop down oven doors.
CONTENTS FOR THE USER FOR THE INSTALLER Important Safety Information . . . . . . . . . . . . . . . . 1 Description Of The Oven . . . . . . . . . . . . . . . . . . . . Getting To Know Your Oven . . . . . . . . . . . . . . . . . . . The Cooling Fan For The Controls . . . . . . . . . . . . . Control Panel Indicator Neons . . . . . . . . . . . . . . . . . Grill And Oven Furniture . . . . . . . . . . . . . . . . . . . . . . . Before Using For The First Time . . . . . . . . . . . . . . .
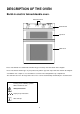
DESCRIPTION OF THE OVEN Build-in electric fanned double oven. Electronic Timer Control Panel Top Oven Main Oven Please note: D2160-1G control knobs will differ in type and shape from that shown in the diagram. Please note that the handle type on your product may differ in type and shape from that shown in the diagram. Your build-in oven comprises of a conventional second oven and dual grill in the top compartment. The main fanned oven is the larger of the two ovens.
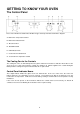
GETTING TO KNOW YOUR OVEN The Control Panel Please note: D2160-1G control knobs will differ in type and shape from that shown in the diagram. A - Main Oven Temperature Control B - Main Oven Indicator Neon C - Electronic Timer D - Dual Grill Control E - Grill Indicator Neon F - Second Oven Indicator Neon G - Second Oven Temperature Control The Cooling Fan for the Controls The cooling fan comes on immediately when the grill is switched on and after a short time when either of the ovens are in use.
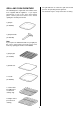
The grill deflector sits above the grill element and prevents fat splashing onto the grill roof. GRILL AND OVEN FURNITURE The following items of grill and oven furniture have been supplied with the appliance. If you require replacements of any of the items listed below, please contact your local Service Force Centre quoting the relevant part number. The deflector may be easily removed for cleaning.
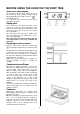
BEFORE USING THE OVEN FOR THE FIRST TIME When First Switching on The oven has a 24 hour clock. When the oven is first switched on at the wall the electronic display will automatically show 12.00, the 'Time' ( ) neon will also flash. To set the time of day and use the timer refer to instructions on page 7. Rating plate This is situated on the lower front frame of the oven and can be seen upon opening the main cavity door.
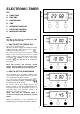
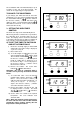
ELECTRONIC TIMER A KEY A COOK TIME B END TIME C COUNTDOWN D TIME E DECREASE CONTROL F SELECTOR CONTROL G INCREASE CONTROL C B D E NOTE: The time of day must be set before the main oven will operate manually. 1. HOW TO SET THE TIME OF DAY The oven has a 24 hour clock. When the electricity supply is first switched ON, the display will show 12.00 and the 'Time' ( ) indicator neon will flash as Fig. 1.
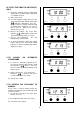
The 'Countdown' will sound intermittently for up to 2 minutes at the end of the timed period. The sound can be stopped by pressing any button. TO CANCEL THE COUNTDOWN If you change your mind and want to cancel the 'Countdown', press the Selector Control button until the 'Countdown' indicator ( ) flashes and then the decrease control ( - ) until 0 . 00 shows in the display as Fig. 5. The Countdown indicator ( ) will continue to flash for a few seconds and then return to the time of day. Fig. 5 3.
B) TO SET THE TIMER TO SWITCH OFF ONLY i) Ensure the electricity supply is switched ON and that the correct time of day is displayed, e.g. 10.00am as Fig. 9. ii) Place food in oven. iii) To set the length of cooking time, press the Selector Control button until the 'Cook Time' ( ) indicator is illuminated. Press the increase control (+) until the required length of cooking time is displayed, e.g. 2 hrs 15 mins as Fig. 10. Depress the decrease control (-) if necessary. Fig. 9 iv) Release the buttons.
6. THINGS TO NOTE l In the event of an interruption of the electricity supply, the timer will reset itself to zero, and all programming will be cancelled. 7. AUTOMATIC COOKING It is advisable to leave food in the oven for as short a time as possible before automatic cooking. Always ensure commercially prepared food is well within its use by date and that home prepared food is fresh and of good quality.
THE DUAL GRILL CAUTION - ACCESSIBLE PARTS MAY BECOME HOT WHEN THE GRILL IS IN USE. CHILDREN SHOULD BE KEPT AWAY. The grill is a dual circuit grill which means that the full area of the grill can be used or for economy purposes, the centre section only can be used when cooking smaller quantities of food. USING THE GRILL Please note: D2160-1G control knobs will differ in type and shape from that shown in the diagram. 1.
THE GRILL PAN AND HANDLE The grill pan is supplied with a removable handle. 1. To attach the handle, place the wirework under the cut out in the pan so that the metal plate hooks over the top of the grill pan. 1. 2. Slide the handle to the left and over the central bump on the grill pan. Ensure the handle is correctly located. The grill pan handle should be in place when grilling. 2. 3. To remove the handle, slide the handle to the right and lift the handle away from the cut out on the grill pan.
l Preheat the grill on full setting for a few minutes to seal meat or for toasting. Adjust the heat setting and the shelf as necessary during cooking. l The food should be turned over during cooking as required. l When using the centre section grill, ensure food is placed centrally on the grilling grid directly beneath the grill element. Note If you require an additional handle for your grill pan, this can be ordered from your local Service Force Centre by quoting part number 311479800\6.
THE SECOND OVEN The second oven is the smaller of the two ovens. It is heated by elements in the top and bottom of the oven. It is designed for cooking smaller quantities of food on one shelf. It gives especially good results if used to cook fruit cakes, sweet and savoury flans or quiche. The second oven is also ideal for use as a warming compartment to warm dishes and keep food hot. Use a temperature setting of 80° - 100°C on the second oven temperature control.
HINTS AND TIPS l All cooking should be carried out using shelf positions one and two using a cranked shelf. Shelf positions are counted from the bottom upwards. l When more space is required, for example when roasting or casseroling, a straight shelf from the main oven may be placed on the second oven base. l There should always be at least 2.5cm (1") between the top of the food and the element. This gives best cooking results and allows room for rise in yeast mixtures, Yorkshire puddings etc.
THE MAIN FAN OVEN The fan oven is particularly suitable for cooking larger quantities of food. The advantages of fan oven cooking are: PREHEATING The fan oven quickly reaches its temperature, so it is not usually necessary to preheat the oven. Without preheating however, you may find you need to add an extra 5-10 minutes on the recommended cooking times. For recipes needing high temperatures, e.g. bread, pastries, scones, soufflés, etc., best results are achieved if the oven is preheated first.
HINTS AND TIPS l Arrange the shelves in the required positions before switching the oven ON. Shelves are numbered from the bottom upwards. l When cooking more than one dish in the fan oven, place dishes centrally on different shelves rather than cluster several dishes on one shelf, this will allow the heat to circulate freely for the best cooking results. l When batch baking one type of food, e.g. Victoria sandwich cakes, those of similar size will be cooked in the same time.
OVEN COOKING CHART The oven temperatures are intended as a guide only. It may be necessary to increase or decrease the temperatures by 10°C to suit individual preferences and requirements. FAN OVEN FOOD Biscuits Bread Bread rolls/buns Cakes: Small & Queen Sponges Victoria Sandwich Madeira Rich Fruit Christmas Gingerbread Meringues Flapjack Shortbread Casseroles: Beef/Lamb Chicken Convenience Foods Fish Fish Pie (Potato Topped) Fruit Pies, Crumbles Milk Puddings Pasta, Lasagne etc.
ROASTING CHART ROASTING CHART INTERNAL TEMPERATURES Rare : 50-60°C; Medium : 60-70°C; Well done :70-80°C MEAT SECOND/FAN COOKING TIME OVEN Beef 160-180°C 20-35 min per ½kg/1lb and 20-35 min over Beef, boned 160-180°C 20-35 min per ½kg/1lb and 25-35 min over Mutton and Lamb 160-180°C 25-35 min per ½kg/1lb and 25-35 min over Pork and Veal 160-180°C 30-40 min per ½kg/1lb and 30-40 min over Ham 160-180°C 30-40 min per ½kg/1lb and 30-40 min over Chicken 160-180°C 15-20 min per ½kg/1lb and 20 m
DEFROSTING This main oven function enables you to defrost most foods without heat faster than some conventional methods as the oven fan circulates air around the food. It is particularly suitable for delicate frozen foods which are to be served cold e.g. cream filled gateaux, cakes covered with icings or frostings, cheesecakes, biscuits, scones etc. USING DEFROST FEATURE Please note: D2160-1G control knobs will differ in type and shape from that shown in the diagram. 1.
l Joints of meat up to 2kg/4½lb in weight can be thawed using the defrost function. l All joints of meat and poultry must be thawed thoroughly before cooking. l Always cook thoroughly immediately after thawing. l DO NOT leave food at room temperature once it is defrosted. Cook raw food immediately or store cooked food in the fridge once it has cooled. l Care must always be taken when handling foods in the home.
HELPFUL HINTS WHEN BUYING AND PREPARING FOOD Care must be taken when handling foods in the home. Always follow the basic rules of food hygiene to prevent bacterial and microbial growth and cross contamination when preparing, reheating, cooking, cooling, defrosting and freezing foods. 1. Always ensure food you purchase is of good quality and in prime condition. Shop at a reliable source and buy the 'freshest' looking package - avoid shop worn labels or produce covered in dust.
CARE AND CLEANING BEFORE CLEANING THE OVEN ALWAYS ALLOW THE COOLING FAN TO COOL THE OVEN DOWN BEFORE SWITCHING OFF THE ELECTRICITY SUPPLY. CLEANING MATERIALS Before using any cleaning materials on your oven, check that they are suitable and that their use is recommended by the manufacturer. Cleaners that contain bleach should NOT be used as they may dull the surface finishes. Harsh abrasives and scourers should also be avoided as damage will occur.
CLEANING THE DOOR GLASS To prevent damaging or weakening the door glass panels avoid the use of the following: l Household detergents and bleaches l Impregnated pads unsuitable for non-stick saucepans l Brillo/Ajax pads or steel wool pads l Chemical oven pads or aerosols l Rust removers l Bath/Sink stain removers Hinge location point The main oven and second oven inner door glass panels are removable for cleaning. Under no circumstances should the door assembly be detached from the product for cleaning.
TO REPLACE THE INNER GLASS PANEL 1. Holding the glass panel in your right hand fully open the oven door with your left. 2. Gently ease and push the glass into the location points under the handle before lowering and sliding the glass into position under the hinge location points at the rear. Ensure the glass is properly located and the text 'This way up' is facing towards you and at the top edge of the door. Do not attempt to use the oven without the glass being in place.
IF SOMETHING DOESN'T WORK Please carry out the following checks on your appliance before calling a Service Engineer. It may be that the problem is a simple one which you can solve yourself without the expense of a service call. In-guarantee customers should make sure that the checks have been made as the engineer will make a charge if the fault is not a mechanical or electrical breakdown. Please note that proof of purchase is required for in-guarantee service calls.
The oven light fails to illuminate The oven light bulb may need replacing see page 25. If the Main Oven is set for automatic cooking the light will illuminate when the cook time begins. The oven fan is noisy Check that the oven is level. Check that shelves and bakeware are not vibrating in contact with the oven back panel. The oven temperature is too high or low Check that the recommended temperatures and shelf positions are being used. See pages 18 and 19.
SERVICE AND SPARE PARTS In the event of your appliance requiring service, or if you wish to purchase spare parts please contact your local Service Force Centre by telephoning: Before calling out an engineer, please ensure you have read the details under the heading 'If Something Doesn't Work'. 0870 5 929929 When you contact the Service Force Centre you will need to give the following details: Your call will be routed to the Service Force Centre covering your post code area.
GUARANTEE CONDITIONS Standard guarantee conditions AEG offer the following guarantee to the first purchaser of this appliance: 1. The guarantee is valid for 12 months commencing when the appliance is handed over to the first retail purchaser, which must be verified by purchase invoice or similar documentation. The guarantee does not cover commercial use. 2. The guarantee covers all parts or components which fail due to faulty workmanship or faulty material.
INSTALLATION INSTRUCTIONS TECHNICAL DETAILS Voltage: 230/240 Volts AC 50 Hz Loading info: Second Oven: 2.0kW Dual Grill: 2.8kW Base Element: 1.3kW Main Oven Fan Element: 2.5kW Fan Motor: 0.03kW Oven light: 0.05kW Wattage: 5.0/5.4kW Height: 897mm Width: 592mm Depth: Weight: 563mm (excluding handles and knobs) 56kg This appliance complies with European Council Directive 72/23/EEC. This appliance carries the C.E. mark.
WARNINGS: This appliance must be installed by a qualified electrician/competent person. Safety may be impaired if installation is not carried out in accordance with these instructions. Red or Brown Earth (Green or Green/Yellow) Blue or Black This appliance must be earthed. Do not remove the screws from the earth tab extending from the oven mains terminal block (Fig.1).
NOTE: It is good practice to: Fit an Earth Leakage Circuit Breaker to your house wiring. Wire your appliance to the latest IEE regulations. THINGS TO NOTE This appliance is designed to be fitted in cabinets of the recommended dimensions as shown (Fig. 3), page 33. If your cabinet interior dimension is between 565-570mm the oven may still be fitted. However, a minor modification to the cabinet will be required to reduce the aperture size down to 560-565mm.
RECOMMENDED CABINET DIMENSIONS (IN MILLIMETRES) 600 min 560 558 907 min 570 See Below min d max e d n e m m m 550 8 oc e in R 0 0 0 2 7 2 300 min 6 1 5 Cross section through cabinet showing oven positioned 872 897 9 7 84 7 8 9 5 542 Fig.
HOW TO FINISH UNPACKING Place packed appliance next to the cabinet in which it will be installed. Remove the appliance packing except for bottom tray which should be left in position until the appliance is ready to be fitted into its cabinet. It is imperative that the appliance is left in the base to protect both the appliance and the floor. Ensure the user is given these operating instructions.
TO REMOVE COVER OF MAINS TERMINAL From the rear of the appliance, remove mains input terminal cover to gain access to terminal block. First remove retaining screw with pozidrive screwdriver. See Fig. 4. Fig.4 Prise cover loose using screwdriver in position (1) then lever off with screwdriver in position (2) at either side. See Fig. 5. Fig.5 Lift cover and remove screw from cable clamp. See Fig. 6. Fig.
CONNECTING TO MAINS TERMINAL WARNING: This appliance must be earthed. Make connection as shown in Fig. 7 by proceeding as follows:Preform wires to the appropriate shape to suit fitting into the mains terminal block. Strip inner insulation wirestrippers. on wires using Twist the bared wires using pliers. Fig.7 Cut bared wires 10mm away from the end of the inner insulation. Where uninsulated Earth wires are used ensure they are suitably sheathed to leave 10mm bare wire to fit into the terminal.
FITTING INTO THE CABINET IMPORTANT: Ensure that the oven is switched off at the wall before any further work is carried out. Fig.8 Using a tape measure establish the internal width of the cabinet. Refer to page 32 if greater than 565mm. Position the appliance in front of the cabinet. See Fig. 8. Take out all oven furniture before installation to reduce the weight you need to lift. The oven door should be taped up to keep it closed whilst lifting.
NOTES 38
IMPORTANT NOTICE In line with our continuing policy of research and development, we reserve the right to alter models and specifications without prior notice. This instruction booklet is accurate at the date of printing, but will be superseded if specifications or appearance are changed. AEG DOMESTIC APPLIANCES 55 - 77 HIGH STREET, SLOUGH, BERKSHIRE, SL1 1DZ TELEPHONE 0870 5 350350 http://www.aeghome.co.