
User manual


6
www.aeg.com
ENGLISH
Thank you for choosing an AEG product. In order to ensure the best results, always use original AEG accessories and spare
parts. They have been designed especially for your product. This product is designed with the environment in mind. All plastic
parts are marked for recycling purposes.
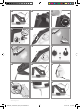
COMPONENTS
A. Steam button
B. Soft handle
C. Temperature alignment mark
D. Temperature selector
E. Temperature indicator light
F. Steam pipe
G. Power cord
H. Power cord storage
I. Boiler unit
J. Water tank
K. Water tank lid
L. Maximum water level indicator
M. CARESSIUM™ ceramic soleplate
N. Iron rest
O. Steam activation slider (AUTO-MANUAL STEAM)
P. Steam level control knob
Q. Steam level indicator light
R. Power indicator light
S. Power button
T. Boiler safety cap
U. Boiler at key
Picture page 2-3
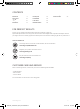
GETTING STARTED
1 Before rst use. Remove all adhesive remains and gently rub with a dampened cloth. Position the steam generator
iron horizontally on the ironing-board or on a heat resistant, secure surface at the same height as an ironing-board.
Unwind and straighten the power cord and the steam cord. When turned on for the rst time, temporary vapours/
odours may occur.
2 Open the water tank lid. Fill the water tank using cold water. It is recommended to use AEG AquaSense ltered
water, taking out impurities like limescale. Otherwise use destilled water. If the tap water is particularly hard, use a mix
of 50% destilled water and 50% tap water. Empty the water tank to rinse out any foreign particles which may remain
from the manufacturing process.
3 Always rell the water tank to MAX level using cold water (A). Replace the water tank lid.
Caution! Never operate the appliance without any water in the tank.
4 Connect the steam generator iron to the mains supply. Press the power button (A). Turn the temperature selector
clockwise to maximum setting (B). The temperature indicator light on the iron will illuminate. Then, select a steam
level by turning the steam level control knob between low - medium - high steam (C).
5 When the temperature indicator light turns on, the steam station is pre-heating. When the light turns o, it is ready
to be used. Press and hold the steam button for some seconds to get steam. Then hold for a few more seconds in
order to clean the steam generating system.
6 Iron an old towel, to ensure that any residues inside the iron are not transferred to the laundry.
If necessary, wipe the soleplate with a slightly damp cloth.
OPERATING INSTRUCTIONS
7 To activate the steam function, press the steam button for 3-5 seconds, release the button to eject a concentrated
jet of steam. When releasing the button, use up the steam before putting it back on the iron rest of the steam station.
It is recommended that the steam button is used for short periods.
Caution! Never release steam while the iron is standing on its rest.
8 Continuous (AUTO) steam function: Press and hold the steam button, and move the steam activation slider forward,
to lock the steam button. Release both buttons. A jet steam will eject continuously and steadily (AUTO STEAM). To
unlock the steam button and stop the continuous jet steam, press the steam activation slider backwards.
9 Turn o the station by pressing the button for a while and release.
10 Always cool the iron fully on the iron rest before stowing away. Once the iron is cool, empty the water tank. Store the
steam generator iron on the iron rest.
11 Always store the cord by the cord storage on the generator base. NEVER wind the power cord around the iron.
DBS7135_SteamStation_AEG_NO-FARSI.indd 6 2017-07-06 14:29:33