
Operation Manual


INSTALLATION
9
RECIRCULATION VERSION AIREOUTLET
• Inserttheconnectionextensionpieceslaterally
14.1 in connection 15.
• Insert the Connector 15 into the Support
bracket 7.3 and fix it with a screw.
• Make sure that the outlet of the extension
pieces 14.1 is horizontally and vertically
aligned with the chimney outlets.
• Connecttheairoutletconnection15 to the
hood body outlet using either a flexible or
rigid pipe ø 150 mm, the choice of which
is left to the installer.
• Ensurethattheactivatedcharcoalfiltershave
been inserted.
ELECTRICAL CONNECTION
• Connect the hood to the mains through a
two-pole switch having a contact gap of at
least 3 mm.
• Remove the grease filters (see paragraph
Maintenance) being sure that the connector
of the feeding cable is correctly inserted in
the socket placed on the side of the fan.
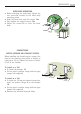
CHIMNEY ASSEMBL
Y
Upper exhaust Chimney
• Slightlywidenthetwosidesoftheupperflue
and hook them behind the brackets 7.2.1,
making sure that they are well seated.
• Securethesidestothebracketsbyusingthe
4 screws 12c (2,9 x 9,5) supplied.
• Make sure that the outlet of the extensions
pieces is aligned with the chimney outlets.
Lower exhaust Chimney
• Slightlywiden thetwosidesof thechimney
and hook them between the upper chimney
and the wall, making sure that they are well
seated.
• Fixthelowerpartlaterallytothehoodbody
using the 2 screws 12c (2,9 x 9,5) supplied.