
Owner manual


INSTALLATION
7
INSTALLATION
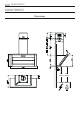
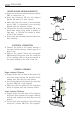
Wall drilling and bracket fixing
Wall marking:
• Drawaverticallineonthesupportingwalluptotheceiling,orashighaspractical,atthe
centre of the area in which the hood will be installed.
• Drawahorizontallineat450mmabovethehob.
• Placebracket7.2.1 on the wall as shown about 1-2 mm from the ceiling or upper limit align-
ing the centre (notch) with the vertical reference line.
• Markthewallatthecentresoftheholesinthebracket.
• Placebracket7.2.1 on the wall as shown at X mm below the first bracket (X = height of the
upper chimney section supplied), aligning the centre (notch) with the vertical line.
• Markthewallatthecentresoftheholesinthebracket.
• Markareferencepointasindicatedat116mmfromtheverticalreferencelineand590mm
abovethehorizontalreferenceline.
• Repeatthisoperationontheotherside.
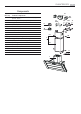
• Drillø8mmholesatallthecentrepointsmarked.
• Insertthewallplugs11intheholes.
• Fixthelowerbracket7.2.1 using the 12a screws (4,2 x 44,4) supplied.
• Fixtheupperbracket7.2.1 and the air outlet connection support 7.3 together using the 2
screws 12a (4,2 x 44,4) supplied.
• Insertthetwoscrews12a (4,2 x 44,4) supplied in the hood body fixing holes, leaving a gap of
5-6 mm between the wall and the head of the screw.