DE4003000 EN User Manual
www.aeg.com CONTENTS 1. SAFETY INFORMATION.................................................................................................3 2. SAFETY INSTRUCTIONS................................................................................................ 4 3. PRODUCT DESCRIPTION.............................................................................................. 6 4. BEFORE FIRST USE.........................................................................................................
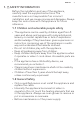
ENGLISH 1. 3 SAFETY INFORMATION Before the installation and use of the appliance, carefully read the supplied instructions. The manufacturer is not responsible if an incorrect installation and use causes injuries and damages. Always keep the instructions with the appliance for future reference. 1.
www.aeg.com • • • • • • Ensure that the appliance is switched off before replacing the lamp to avoid the possibility of electric shock. Do not use a steam cleaner to clean the appliance. Do not use harsh abrasive cleaners or sharp metal scrapers to clean the glass door since they can scratch the surface, which may result in shattering of the glass.
ENGLISH • Connect the mains plug to the mains socket only at the end of the installation. Make sure that there is access to the mains plug after the installation. • If the mains socket is loose, do not connect the mains plug. • Do not pull the mains cable to disconnect the appliance. Always pull the mains plug. • Use only correct isolation devices: line protecting cut-outs, fuses (screw type fuses removed from the holder), earth leakage trips and contactors.
www.aeg.com • Remaining fat or food in the appliance can cause fire. • Clean the appliance with a moist soft cloth. Only use neutral detergents. Do not use abrasive products, abrasive cleaning pads, solvents or metal objects. • If you use an oven spray, obey the safety instructions on the packaging. • Do not clean the catalytic enamel (if applicable) with any kind of detergent. 2.5 Internal light • The type of light bulb or halogen lamp used for this appliance is only for household appliances.
ENGLISH 7 4. BEFORE FIRST USE WARNING! Refer to Safety chapters. 4.1 Initial Cleaning Remove all accessories and removable shelf supports from the appliance. Clean the appliance before first use. Put the accessories and the removable shelf supports back to their initial position. 4.2 Setting the time Preheat the two ovens. Heat up one oven at a time. Set the functions listed below, if applicable. 1. Set the function and the temperature to 250ºC. Let the appliance operate for 1 hour.
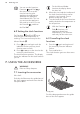
www.aeg.com 5.2 Activating and deactivating the top / main oven It depends on the model if your appliance has knob symbols, indicators or lamps: • The indicator comes on when the oven heats up. • The lamp comes on when the oven operates. • The symbol shows whether the knob controls the oven functions or the temperature. 1. Turn the knob for the top / main oven functions to select an oven function. 2. Turn the knob for the temperature to select a temperature. 3.
ENGLISH Symbol Oven function Application Defrost To defrost frozen food. 5.5 Display The electronic programmer works only with the main oven. A B C A) Function indicators B) Time display C) Function indicator 5.6 Buttons Button Function Description MINUS To set the time. CLOCK To set a clock function. PLUS To set the time. 6. CLOCK FUNCTIONS 6.1 Clock functions table Clock function Application Time of day To set, change or check the time of day. Minute Minder To set countdown time.
www.aeg.com You can use the functions Duration and End at the same time to set the time for how long the appliance should operate and when the appliance should deactivate. This lets you activate the appliance with a delay in time. First set the Duration the End and then . 6.2 Setting the clock functions For Duration and End , set an oven function and temperature of cooking. This is not necessary for the Minute Minder . For the Minute Minder function the display shows the time left. 3.
ENGLISH 11 7.2 Trivet and Grill- / Roasting pan WARNING! Be careful when you remove the accessories from a hot appliance. There is a risk of burns. You can use the trivet to roast larger pieces of meat or poultry on one shelf position. Wire shelf and the deep pan together: Push the deep pan between the guide bars of the shelf support and the wire shelf on the guide bars above. 1. Put the trivet into the deep pan so that the supports of the wire shelf point up. 2.
www.aeg.com 9. HINTS AND TIPS WARNING! Refer to Safety chapters. The temperature and baking times in the tables are guidelines only. They depend on the recipes and the quality and quantity of the ingredients used. 9.1 Double oven Top oven The top oven is the smaller of the two ovens. It has 6 shelf positions. Use it to cook smaller quantities of food. It gives especially good results when used to cook fruitcakes, sweets and savoury flants or quiche.
ENGLISH Food Temperature (°C) Time (min) Shelf position - Gingerbread 140 - 150 75 - 90 1 - Meringues 90 - 100 150 - 180 1 - Flapjack 160 - 170 25 - 30 1 - Shortbread 130 - 150 45 - 65 1 - Beef / Lamb 150 - 170 150 - 180 1 - Chicken 160 - 180 75 - 90 1 Convenience Foods Follow manufacturer's instructions.
www.aeg.
ENGLISH Set the shelf into the shelf position as recommended in the grilling table. 15 Always preheat the empty oven with the grill functions for 5 minutes. For grilling in the top oven adjust the shelf position to suit different thicknesses of food. CAUTION! Always grill with the oven door closed. Always set the pan to collect the fat into the first shelf position. Grill only flat pieces of meat or fish.
www.aeg.com Food Quantity Defrosting time (min) Further deComments frosting time (min) Chicken 1 kg 100 - 140 20 - 30 Put the chicken on an upturned saucer in a big plate. Turn halfway through. Meat 1 kg 100 - 140 20 - 30 Turn halfway through. Meat 500 g 90 - 120 20 - 30 Turn halfway through.
ENGLISH 2. Pull the rear end of the shelf support away from the side wall and remove it. 2 1 17 The heating element folds down. 3. Clean the oven ceiling. 4. Install the heating element in the opposite sequence. Install the heating element correctly above the supports on the inner walls of the appliance. 5. Install the shelf supports. 10.5 Removing and installing the door Install the shelf supports in the opposite sequence. 10.
www.aeg.com 9. Clean the glass panel with water and soap. Dry the glass panel carefully. When the cleaning is completed, install the glass panels and the door. Do the above steps in the opposite sequence. Install the smaller panel first, then the larger. 10.6 Replacing the lamp 45° Put a cloth on the bottom of the interior of the appliance. It prevents damage to the lamp glass cover and the cavity. 4. Hold the door with one hand on each side and pull it away from the appliance at an upwards angle.
ENGLISH 19 11. TROUBLESHOOTING WARNING! Refer to Safety chapters. 11.1 What to do if... Problem Possible cause Remedy The oven does not heat up. The oven is deactivated. Activate the oven. The oven does not heat up. The clock is not set. Set the clock. The oven does not heat up. The necessary settings are not set. Make sure that the settings are correct. The oven does not heat up. The fuse is released. Make sure that the fuse is the cause of the malfunction.
www.aeg.com your local recycling facility or contact your municipal office.
ENGLISH 21
www.aeg.
ENGLISH 23
867300129-A-112014 www.aeg.