DE4003020 EN OVEN USER MANUAL
FOR PERFECT RESULTS Thank you for choosing this AEG product. We have created it to give you impeccable performance for many years, with innovative technologies that help make life simpler – features you might not find on ordinary appliances. Please spend a few minutes reading to get the very best from it. ACCESSORIES AND CONSUMABLES In the AEG webshop, you’ll find everything you need to keep all your AEG appliances looking spotless and working perfectly.
Contents 3 CONTENTS 4 7 8 9 10 11 13 18 22 22 26 26 Safety information Product description Before first use Daily use Clock functions Using the accessories Helpful hints and tips Care and cleaning What to do if… Installation Environment concerns GREAT BRITAIN & IRELAND Guarantee/Customer Service The following symbols are used in this user manual: Important information concerning your personal safety and information on how to avoid damaging the appliance.
Safety information SAFETY INFORMATION Before the installation and use, read this manual carefully: • For your personal safety and the safety of your property • For the respect of the environment • For the correct operation of the appliance. Always keep these instructions with the appliance also if you move or sell it. The manufacturer is not responsible if incorrect installation or use results in damage.
Safety information 5 • Before the installation, make sure that the kitchen cabinet has the recess dimensions applicable. • Make sure that the appliance is installed below and adjacent safe structures. • Keep the minimum distances to the other appliances and units. • The appliance cannot be positioned on a base. • Built in ovens and built in cooking surfaces are attached with special connection system. To prevent damage to the appliance, only use an appliance with the appliances from the same manufacturer.
Safety information • Always close the appliance door when you cook, even while grilling. Care and cleaning • Before maintenance, switch off the appliance and disconnect the appliance from the power supply. • Before maintenance, make sure that the appliance is cold. There is the risk of burns. There is the risk that the glass panels can break. • Keep the appliance clean at all times. A build-up of fats or other foodstuff can result in a fire.
Product description 7 Disposal of the appliance • To prevent the risk of physical injury or damage – Disconnect the appliance from the power supply. – Cut off the mains cable and discard it. – Discard the door catch. This prevents children or small animals from being closed inside of the appliance. There is the risk of suffocation.
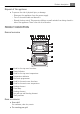
Before first use To put in the deep roasting pan. • Deep roasting pan To bake and roast or as pan to collect fat. BEFORE FIRST USE WARNING! Refer to "Safety information" chapter. Initial Cleaning • Remove all parts from the appliance. • Clean the appliance before first use. Refer to chapter "Care and Cleaning". Setting the time The oven only operates after time set. When you connect the appliance to the electrical supply or in case of a power cut, the Time function indicator flashes automatically.
Daily use 9 DAILY USE WARNING! Refer to "Safety information" chapter. Activating and deactivating the top oven 1. 2. 3. Turn the knob for the top oven functions to an oven function. Turn the knob for the top oven temperature to a temperature. The power indicator comes on while the appliance operates. The temperature indicator comes on while the temperature in the appliance increases.
Clock functions Main oven functions Oven function OFF position Light True Fan Application The appliance is OFF. To light up the oven interior. To roast or roast and bake the food that requires the same cooking temperature, using more than one shelf, without flavour transference. Fan Controlled DeTo defrost frozen food.
Using the accessories 2. 3. Push the Selection button again and again until necessary function indicator flashes. To set the time for Minute minder , Duration or End , use "+" or "-" button. The related function indicator comes on. When the time period is completed, the function indicator flashes and an acoustic signal sounds for 2 minutes. With the functions Duration 4. 5. 11 and End the oven stops automatically. Push any button to stop the signal.
Using the accessories Inserting the oven shelf and deep roasting pan together Put the oven shelf on the deep roasting pan. Push the deep roasting pan between the guide-bars of one of the oven levels. Grilling set The grilling set includes the roasting pan grid and the deep roasting pan. You can use the roasting pan grid in two positions: turned up and down. To roast larger pieces of meat or poultry on one level: 1. Put the roasting pan grid in the deep roasting pan.
Helpful hints and tips 13 HELPFUL HINTS AND TIPS WARNING! Refer to "Safety information" chapter. The temperature and baking times in the tables are guidelines only. They depend on the recipes, quality and quantity of the ingredients used. CAUTION! Use a deep baking tray for very moist cakes. Fruit juices can cause permanent stains on the enamel. Top oven The top oven is the smaller of the two ovens. It has 6 shelf levels. Use is to cook smaller quantities of food.
Helpful hints and tips Baking results Possible cause Remedy The cake sinks (becomes soggy, lumpy, streaky) Oven temperature too high Use a lower setting The cake sinks (becomes soggy, lumpy, streaky) Baking time is too short Set a longer baking time Do not set higher temperatures to decrease baking times The cake sinks (becomes soggy, lumpy, streaky) Too much liquid in the mixture Use less liquid.
Helpful hints and tips Temperature [°C] Approx Cook Time (mins) Shelf Position - Beef/Lamb 150 - 170 150 - 180 1 - Chicken 160 - 180 75 - 90 1 Food 15 Casseroles: Convenience Foods Follow manufacturer´s instructions. Fish 170 - 190 20 - 30 1 Fish Pie (Potato Topped) 190 - 200 20 - 30 1 Fruit Pies, Crumbles 190 - 200 30 - 50 1 Milk Puddings 150 - 170 90 - 120 1 Pasta Lasagne etc.
Helpful hints and tips Temperature [°C] Approx Cook Time (mins) Biscuits 180 - 190 10 - 20 Bread 190 - 210 30 - 35 - Small & Queen 160 - 170 18 - 25 - Sponges 160 - 170 20 - 25 - Madeira 140 - 160 60 - 75 - Rich Fruit 130 - 140 120 - 150 - Christmas 130 - 140 180 - 270 Fish 160 - 180 20 - 30 Fruit Pies, Crumbles 170 - 180 30 - 50 Milk Puddings 140 - 160 60 - 90 - Choux 180 - 190 30 - 40 - Shortcrust 180 - 190 25 - 35 180 - 190 30 - 40 depends on size Food Cakes:
Helpful hints and tips Meat Temperature [°C] Cooking Time 160 - 180 20-35 minutes per ½ kg (1lb) and 20-35 minutes over 160 - 180 30-40 minutes per ½ kg (1lb) and 30-40 minutes over 160 - 180 15-20 minutes per ½ kg (1lb) and 20 minutes over 160 - 180 15-20 minutes per ½ kg (1lb) and 20 minutes over 160 - 180 25-35 minutes per ½ kg (1lb) and 25-30 minutes over 160 - 180 35-40 minutes per ½ kg (1lb) and 35-40 minutes over 160 - 180 20 minutes per ½ kg (1lb) and 20 minutes over Mutton/ Lamb Po
Care and cleaning Food Grill Time (mins in total) Kebabs 12 - 18 Kidneys - Lamb/Pig 6 - 10 Sausages 20 - 30 Steaks - Rare 4-6 - Medium 6-8 - Well Done Toasted Sandwiches 12 - 15 3-4 Defrosting • Put the food out of the packaging and set it on a plate on the oven shelf. • Do not cover with a plate or bowl. This can extend the time to defrost very much. • Put the oven shelf in the first shelf level from the bottom.
Care and cleaning 19 Shelf Support Rails Removing the shelf support rails 1. Pull the front of the shelf support rail away from the side wall. 2. Pull the rear shelf support rail away from the side wall and remove it. Installing the shelf support rails Install the shelf support rails in opposite sequence. Important! The rounded ends of the shelf support rails must point to the front! Oven Ceiling You can fold down the heating element on the oven ceiling to clean the oven ceiling easily.
Care and cleaning Folding down the heating element 1. Remove the shelf support rails. 2. Hold the heating element with the two hands at the front 3. Pull it forwards against the spring pressure and out along the support on both sides. 4. The heating element folds down. The oven ceiling is ready to clean. Installing the heating element 1. Install the heating element in opposite sequence. Install the heating element correctly on the two sides above the support on the inner wall of the oven. 2.
Care and cleaning 21 The oven door has 2, 3 or 4 panels of glass (depends on the model) Removing and cleaning the door glasses 1. Hold the door trim (B) on the top edge of the door at the two sides and push inwards to release the clip seal. B 2. Pull the door trim to the front to remove it. 3. Hold the door glass panels on their top edge one by one and pull them upwards out of the guide Clean the door glass panels. To install panels follow the procedure in reverse.
What to do if… Use the same oven lamp type. 4. Install the glass cover. WHAT TO DO IF… WARNING! Refer to "Safety information" chapter. Problem Possible cause Remedy The oven does not heat up The oven is not switched on Switch on the oven The oven does not heat up The clock is not set Set the clock The oven does not heat up The necessary settings are not set Control the settings The oven does not heat up The fuse in the fuse box is released Control the fuse.
Installation 600 min 550 min 2000 min 538 907 min 560 min 570 max 866 888 20 11 888 866 874-879 16 5 300 min 548 23
Installation 90°
Installation 25 2x 3,5x25 Electrical installation WARNING! Only a qualified and competent person must do the electrical installation. The manufacturer is not responsible if you do not follow safety precautions from chapter "Safety". This appliance is supplied without a main plug and a main cable.
Environment concerns c) If you wish to connect an oven and a hob to a cooker point you can by connecting the oven and hob separately to the cooker point. Oven and hob units should be separately connected to a cooker point. (See Picture) 1 3 2 1 Cooker Point 2 Hob 3 Oven It is good practice to : – Fit an Earth Leakage Circuit Breaker to your house wiring. – Wire your appliance to the latest IEE regulations.
by reason only of faulty workmanship or materials, we will, at our option repair or replace the same FREE OF CHARGE for labour, materials or carriage on condition that: • Appliance has been correctly installed and used only on the electricity supply stated on the rating plate. • Appliance has been used for normal domestic purposes only, in accordance with manufacturer's instructions. • Appliance hasn't been serviced, maintained, repaired, taken apart or tampered with by person not authorised by us.
www.aeg.