DI 8610 Dunstabzugshaube Afzuigkap Hotte aspirante Cooker Hood Cappa aspirante Montage- und Gebrauchsanweisung Installatie- en gebruiksaanwijzing Manuel de montage et d’utilisation Operating and Installation Instructions Istruzioni di montaggio ed uso
Geachte klant, Lees deze informatie aandachtig door. Lees vooral het hoofdstuk “Veiligheid” op de eerste pagina’s. Bewaar dit boekje goed, zodat u nog eens iets kunt nalezen. Geef het door aan een eventuele volgende eigenaar van het apparaat. • Bij technische problemen kunt u altijd contact opnemen met de AEG service-afdeling, zie hoofdstuk “Klantenservice”.
Inhoudsopgave Veiligheidsaanwijzingen voor de gebruiker voor de keukenmeubel-monteur 28 28 28 Algemeen Abluftbetrieb Gebruik als recirculatiekap 30 30 31 Bediening van de afzuigkap Controle-inrichting voor vet- en koolfilters LED-indicatie vetfilters (D) LED-indicatie koolfilter (E) Verzadigingsindicatie terugzetten 32 33 33 33 33 Onderhoud Metalen vetfilters Demonteren van de metalen vetfilters Koolfilter Vervangen van de gloeilamp 34 34 34 35 36 Reiniging 37 Extra leverbare accessoires 37 Klan
Veiligheidsaanwijzingen voor de gebruiker • U dient erop te letten dat op ingeschakelde kookzones en gasbranders altijd een pan staat, opdat het apparaat niet door te sterke hitte-ontwikkeling wordt beschadigd. Bij olie-, gas- en kolenfornuizen dient open vuur beslist te worden vermeden. • Bovendien moet bij het frituren op een fornuis of kookplaat de frituurpan tijdens het gebruik altijd in het oog worden gehouden. • De olie in de frituurpan kan door oververhitting vlam vatten.
• Als u de afgewerkte lucht in een niet in gebruik zijnd kanaal dat is bestemd voor de afvoer van rook-/verbrandingsgassen wilt leiden, raden wij u aan de schoorsteenveger om toestemming te vragen. Voor het afvoeren van de afgewerkte lucht moeten de plaatselijke voorschriften in acht genomen worden. • Bij gebruik als afzuigkap moet gezorgd worden voor een voldoende grote toevoeropening, die ongeveer even groot als de afvoeropening moet zijn.
Algemeen Abluftbetrieb • Het apparaat wordt als afzuigkap geleverd en kan in combinatie met een koolfilter (extra leverbaar accessoire) als recirculatiekap worden gebruikt. • Daarvoor is een origineel AEG koolfilter nodig (zie “Extra leverbare accessoires”). • De lucht wordt met behulp van een op de afvoeropening A aan te brengen buis naar buiten geleid. Afb. 1. • Voor de beste afzuigprestaties moet de afvoerbuis dezelfde diameter hebben als de afvoeropening.
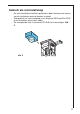
Gebruik als recirculatiekap • De lucht wordt door koolfilters gefilterd en door het bovenste rooster aan de luchtafvoer weer de keuken in geleid. • Voor gebruik als recirculatiekap is een origineel AEG koolfilter KF20 (extra leverbaar accessoire) nodig. • De luchtgeleider met 4 schroeven Ø 3,5x6,5 mm bevestigen. Afb. 2. F afb.
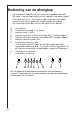
Bediening van de afzuigkap • De afzuigkap is voorzien van een motor met regelbaar toerental. Wij raden u aan de kap enkele minuten voordat u met koken begint in te schakelen en ca. 15 minuten nadat u klaar bent met koken verder te laten lopen, opdat alle luchtjes worden verwijderd.
Controle-inrichting voor vet- en koolfilters Deze afzuigkap beschikt over een inrichting die aangeeft wanneer de vetfilters gereinigd resp. het koolfilter vervangen moet worden (bij gebruik als recirculatiekap met koolfilter). Deze kap wordt door de fabriek zonder koolfilter geleverd, daarom is de verzadigingsindicatie voor het koolfiter uitgeschakeld.
Onderhoud • Voordat u werkzaamheden aan het apparaat gaat uitvoeren, eerst de stekker uit het stopcontact trekken. Metalen vetfilters • De metalen vetfilters hebben de taak om de vetdeeltjes die bij het koken ontstaan, op te zuigen en worden altijd, d.w.z. zowel bij gebruik als afzuigkap als bij gebruik als recirculatiekap, gebruikt. De metalen vetfilters moeten elke 4 weken worden gedemonteerd en in de afwasautomaat of met de hand worden schoongemaakt.
Koolfilter • Het koolfilter moet worden gebruikt, als het apparaat als recirculatiekap wordt gebruikt. • Daarvoor is een origineel AEG koolfilter nodig (zie “Extra leverbare accessoires”). • Reinigen/vervangen van het koolfilter In tegenstelling tot andere koolfilters kan het LONG LIFE koolfilter gereinigd en gereactiveerd worden. Bij normaal gebruik van de kap moet het filter eens per twee maanden worden gereinigd. Dat kunt u het beste in de afwasautomaat doen.
Attentie • Als u deze aanwijzingen m.b.t. reiniging van het apparaat en vervanging resp. reiniging van de filters niet opvolgt, kan dat tot brand leiden. Deze aanwijzingen beslist opvolgen! • De fabrikant is niet aansprakelijk voor schade aan de motor of schade t.g.v. brand die het gevolg zijn van ondeskundig onderhoud of niet opvolgen van de bovengenoemde veiligheidsvoorschriften. Vervangen van de gloeilamp • Stekker uit het stopcontact trekken. • Afdekkapje van de lamp m.b.v.
Reiniging • Attentie: eerst de stekker uit het stopcontact trekken. Geen spitse voorwerpen in het beschermrooster van de motor steken. • De buitenkant van het apparaat met een mild sopje reinigen. Gebruik geen scherpe reinigingsmiddelen, borstels of schuurmiddel. • Het bedieningspaneel en het vetfilterrooster alleen met een vochtige doek en mild afwasmiddel reinigen. • Het is belangrijk om op tijd de filters te vervangen resp. te reinigen. Als u deze aanwijzingen niet opvolgt, kan t.g.v.
Klantenservice Als u vragen hebt waar deze gebruiksaanwijzing geen antwoord op geeft, kunt u de volgende afdelingen raadplegen: Consumentenbelangen (voor algemene, product- of tel. (0172) 468 172 gebruiksinformatie) fax. (0172) 468 470 Storingen / reparaties (voor bezoek servicetechnicus) tel. (0172) 468 300 fax. (0172) 468 255 Belangrijk! Houd bij het opgeven van een storing altijd het E-nr. en F-nr. van uw apparaat bij de hand.
Garantiebepalingen en Service 1.
Reparatievoorwaarden Onze reparatievoorwaarden zijn conform de afspraak tussen de Consumentenbond en Vlehan* Art. 1 Aan de consument zal na een melding van een storing zo mogelijk direct, doch uiterlijk binnen één werkdag worden medegedeeld op welke dag het bezoek van de technicus zal plaatsvinden. De reparatie zal als regel binnen zeven werkdagen na de melding zijn uitgevoerd. Art. 2 a.
Art. 6 Op elke uitgevoerde en betaalde reparatie zal bij normaal huishoudelijk gebruik een volledige garantie van minimaal 3 maanden worden gegeven. Deze garantie omvat het kosteloos uitvoeren van een hernieuwde reparatie. Op de uitgewisselde en betaalde onderdelen geldt een garantietermijn van 12 maanden. Bij een beroep op garantie op de reparatie dient de consument op verzoek de gespecificeerde rekening van de voorgaande reparatie aan de technicus te overleggen. Art.
Technische gegevens Afmetingen (in cm): Hoogte x Breedte x Diepte 80-106,5 x 100 x 65 Totale aansluitwaarde: 250 W Ventilatormotor: Verlichting: 1 x 170 W 4 x20 W Lengte van het aansluitsnoer: 150 cm Accessoires/Montagemateriaal 1 luchtgeleider 6 houtschroeven 6 x 70 mm 6 pluggen Ø 10 mm 10 moeren 8 plaatschroeven 3 x 9 mm 14 plaatschroeven 4 x 8 mm 10 plaatschroeven 4 x 7 mm 42
Elektrische aansluiting Veiligheidsaanwijzingen voor de elektroinstallateur Controleer vóór het in gebruik nemen of de spanning op het typeplaatje overeenkomt met de netspanning. Als het apparaat is voorzien van een stekker, kan het aan elk volgens de voorschriften geïnstalleerd en goed bereikbaar stopcontact worden aangesloten. Als vaste aansluiting noodzakelijk is, mag het apparaat alleen door een erkend elektro-installateur worden aangesloten.
Montage - afb. 6-7-8 De wasemkap is voorzien van bevestigingspluggen die geschikt zijn voor de meeste plafonds. Er moet echter contact opgenomen worden met een gekwalificeerd technicus om u ervan te vergewissen dat de materialen geschikt zijn voor het type plafond. Het plafond moet stevig genoeg zijn om het gewicht van de kap te houden. Sluit het elektriciteitsnet in de schakelkast in uw woning af tijdens de elektrische aansluiting. • Stel de maat van de draagstructuur van de kap in.
3 4 273 4 4 4 244 4 4 6 6 273 190 7 14,5 5 6 214 9 7 7 8 8 7 7 2a 2a 2b 2b 12 10 11 10 10 10 11 afb.
• Bij een afzuigende werking (13A) moet het andere uiteinde van de afvoerbuis op de afvoerinrichting van de woning worden aangesloten. Bij een luchtcirculerende werking (13F) moet de luchtstroomrichter F op het frame gemonteerd worden en met 4 schroeven op de beugel bevestigd worden. Sluit tenslotte de afvoerbuis op de koppelingsring op de luchtstroomrichter aan. • Breng de moeren met de bevestigingshaken in de delen van de bovenste en onderste schouwelementen aan ter hoogte van de rechthoekige openingen.
14 F 15 13F 15 15 15 16 15 15 16 13A 15 15 afb.
• Voer de elektrische aansluiting van het bedieningspaneel en de lampen uit (17). • Koppel de twee bovenste delen (18) van de schouw voor afdekking van het frame aan elkaar , gebruik 6 schroeven (3 aan elke zijde, zie ook het schema voor koppeling van de twee delen). • Breng het onderste deel van de schouw op zijn plaats aan zodat de motorruimte en de aansluitdoos volledig bedekt zijn, en zet het met twee schroeven vast vanuit de binnenkant van de wasemkap (19).
18 18 18 18 18 18 18 18 18 18 17 M 17 X 19 20 X 20 19 afb.