DK 1160 DK 1190 Dunstabzugshaube Afzuigkap Hotte aspirante Cooker Hood Montage- und Gebrauchsanweisung Installatie- en gebruiksaanwijzing Notice et d’utilisation et d’installation Operating and Installation Instructions
Contents 64 Safety warnings for user for kitchen unit installer 64 64 64 Introduction Extractor version Filter Version 66 66 67 Hood Operation 68 Maintenance and care Metal grease filter Open the metal grease filter Carbon filter Changing the light bulb 70 70 70 71 72 Cleaning 73 Special accessories 73 Technical assistance service 73 Guarantee conditions 74 Technic Details Mounting accessories included 76 76 Electrical connection Safety warnings for the electrician Wall unit mounting 77
Safety warnings for user • • • • • • • • Always cover lighted elements, to prevent excess heat from damaging the appliance. In the case of oil, gas and coal fired cookers it is essential to avoid open flames. Also, when frying, keep the deep frying pan on the cooker top/ cooker under careful control. The hot oil in the frying pan might ignite due to overheating. The risk of self-ignition increases when the oil being used is dirty. It is extremely important to note that overheating can cause a fire.
• • • • • • • • 66 When the unit is used in its extractor version, a sufficiently large ventilation hole must be provided, with dimensions that are approximately the same as the outlet hole. National and regional building regulations impose a number of restrictions on using hoods and fuel-burning appliances connected to a chimney, such as coal or oil room-heaters and gas fires, in the same room.
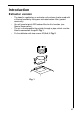
Introduction Extractor version • • • • The hood is supplied as an extractor unit and can also be used with a filtering function by fitting one activated carbon filter (special accessory). You will need original AEG carbon filter for this function (see Special Accessories). The air is discharged to the outside through a pipe, which must be fitted to connection flange D. Fig. 1. Fix the deflector with two screws Ø3,5x6,5. Fig. 2. D Fig.
Filter Version • • • The air is filtered through an activated charcoal filter and returned to the kitchen through the top grill of the outlet pipe. You will need an original AEG KF20 activated carbon filter for the filtering function. (See Special Accessories). Fix the deflector using 2 screws Ø 3,5x6.5 mm. Fig. 2. Fig.
Hood Operation • • • The hood is fitted with one motor having several speed. Turn the hood on a few minutes before you start cooking then you will get an underpressure in the kitchen. It should be left on after cooking for about 15 minutes or until all odours have disappeared.
Maintenance and care • The hood must always be disconnected from the mains power supply before beginning any maintenance work. Metal grease filter • The purpose of the grease filters is to aspirate grease particles which form during cooking and it must always be used, either in the external evacuation or internal recycling function. Attention: the metal grease filters must be removed and washed, either by hand or in the dishwasher, every four weeks.
Carbon filter • • • • • • • • The carbon filter should only be used if you want to use the hood in its filtering function. To do this you will need an original AEG activated carbon filter (see special accessories). This filter cannot be cleaned or reused. As a general rule, the activated carbon filter should be changed once every four months. Mounting — Fig.
Warning • • Failure to observe the instructions on cleaning the unit and changing the filters will cause a fire hazard. You are therefore strongly recommended to follow these instructions. The manufacturer declines all responsibility for any damage to the motor or any fire damage linked to inappropriate maintenance or failure to observe the above safety recommendations. Changing the light bulb • • • • • Disconnect the cooker hood from the main supply. Remove the lamp cover. Fig. 6.
Cleaning • • • • Warning: always disconnect the hood from the mains power supply before cleaning it. Never insert pointed objects in the motor’s protective grid. Wash the outside surfaces using a delicate detergent solution. Never use caustic detergents or abrasive brushes or powders. Only ever clean the switch panel and filter grille using a damp cloth and delicate detergents. It is extremely important to clean the unit and change the filters at the recommended intervals.
Guarantee conditions Guarantee Conditions AEG offer the following guarantee to the first purchaser of this appliance. 1. The guarantee is valid for 12 months commencing when the appliance is handed over to the first retail purchaser, which must be verified by purchase invoice or similar documentation.The guarantee does not cover commercial use. 2. The guarantee covers all parts or components which fail due to faulty workmanship or faulty materials.
Before you move please contact your nearest Customer Care Centre, listed below, to give them details of your new home.They will then ensure that the local Service Organisation is aware of your move and able to look after you and your appliances.
Technic Details Models: DK 1160 DK1190 Dimensions (in cm): Height Width Depht 87,5-111,6 59,8 51,5 87,5-111,6 89,8 51,5 Maximum absorbed power: 250 W 250 W Motor absorption: Lighting: 170 W 2 x 40 W 170 W 2 x 40 W Lenght of the cable: 135 cm 135 cm Mounting accessories included 1 deflector 1 chimney support 2 grids 2 hooks 4 wood-screws 5 x 45 mm 4 wall plugs Ø 8 mm 2 metal screws 3,5 x 6,5 2 metal screws 3 x 9 76
Electrical connection Safety warnings for the electrician Before connecting the appliance to the power supply, check that the voltage indicated on the rating plate corresponds to the mains power supply available. Appliances fitted with a plug can be connected to any standard power socket within easy access. Should it be necessary to provide a fixed connection, the hood must only be installed by an electrician authorised by the local electricity board.
Wall unit mounting - Fig. 7 • • • • • • • • • 78 Put the template onto the wall (1) and drill two Ø12mm holes (2). Fit two hooks (3) on the drilled holes. Hang the hood on the hooks and adjust the position of the hood using the two screws on the bottom of the hooks (5). Remove the metal filters (4) and mark two points (6). Remove the hood and drill two Ø8mm holes on the marked points. Fit two Ø8mm wall dowels (7), Hang again the hood and fix the hood definitively with two screws 5X45 (8).
Ø 120 mm Fig.
AEG Hausgeräte GmbH Postfach 1036 D-90327 Nürnberg http://www.aeg.hausgeraete.de © Copyright by AEG LI1USB Ed.