EEK35106YM USER MANUAL EN User Manual Oven
www.aeg.com CONTENTS 1. SAFETY INFORMATION............................................................................................. 2 2. SAFETY INSTRUCTIONS.............................................................................................4 3. PRODUCT DESCRIPTION...........................................................................................7 4. CONTROL PANEL....................................................................................................... 7 5.
ENGLISH 3 manufacturer is not responsible for any injuries or damages that are the result of incorrect installation or usage. Always keep the instructions in a safe and accessible location for future reference. 1.
www.aeg.com • • • • • • • • Always use oven gloves to remove or put in accessories or ovenware. Before carrying out any maintenance, disconnect the appliance from the power supply. Ensure that the appliance is switched off before replacing the lamp to avoid the possibility of electric shock. Do not use a steam cleaner to clean the appliance.
ENGLISH • Make sure that the parameters on the rating plate are compatible with the electrical ratings of the mains power supply. • Always use a correctly installed shockproof socket. • Do not use multi-plug adapters and extension cables. • Make sure not to cause damage to the mains plug and to the mains cable. Should the mains cable need to be replaced, this must be carried out by our Authorised Service Centre.
www.aeg.com 2.4 Care and cleaning WARNING! Risk of injury, fire, or damage to the appliance. • Before maintenance, deactivate the appliance and disconnect the mains plug from the mains socket. • Make sure the appliance is cold. There is the risk that the glass panels can break. • Replace immediately the door glass panels when they are damaged. Contact the Authorised Service Centre. • Be careful when you remove the door from the appliance.
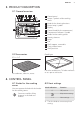
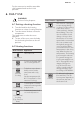
ENGLISH 7 3. PRODUCT DESCRIPTION 3.1 General overview 1 2 3 4 5 6 7 2 8 14 9 10 5 4 3 2 1 11 12 13 3.2 Accessories 1 Control panel 2 Lamps / symbols of the cooking zones 3 Knob for the heating functions 4 Power lamp / symbol 5 Display 6 Control knob (for the temperature) 7 Temperature indicator / symbol 8 Knobs for the cooking zones 9 Heating element 10 Lamp 11 Fan 12 Shelf support, removable 13 Cavity embossment 14 Shelf positions Combi pan Wire shelf For cookware, cake tins, roasts.
www.aeg.com 2. To complete the cooking process, turn the knob to the off position. 4.3 Automatic heat-up Only applicable for hobs with the automatic heat-up function. The automatic heat-up function heats the cooking zone with full power for some time. 1. Turn the knob for the cooking zone clockwise as far as possible (beyond the highest heat setting). 2. Immediately set the necessary heat setting. 3. To deactivate the function, turn the knob to the off position. 4.
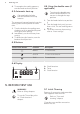
ENGLISH 9 Put the accessories and the removable shelf supports back to their initial position. 6. DAILY USE WARNING! Refer to Safety chapters. Oven function Application 6.1 Setting a heating function 1. Turn the knob for the heating functions to select a heating function. 2. Turn the control knob to select the temperature. The lamp turns on when the oven operates. 3. To turn off the oven, turn the knob for the heating functions to the off position. Moist Baking 6.
www.aeg.com Oven function Application To bake on up to three shelf positions at the same time and to dry food. Set the temperature 20 40 °C lower than for ConTrue Fan ventional Cooking. Cooking / To add humidity during True Fan the cooking. To get the Cooking PLUS right colour and crispy crust during baking. To give more juiciness during reheating. Fast Grilling Refer to “Hints and tips” chapter. 1. Fill the cavity embossment with tap water. To grill flat food in large quantities and to toast bread.
ENGLISH 11 7. CLOCK FUNCTIONS 7.1 Clock functions table Clock function Application TIME OF DAY To set, change or check the time of day. DURATION To set how long the appliance operates. END To set when the appliance deactivates. TIME DELAY To combine DURATION and END function. MINUTE MINDER To set countdown time. This function has no effect on the operation of the appliance. You can set the MINUTE MINDER at any time, also when the appliance is off. 7.2 Setting the time.
www.aeg.com Appliance turns on automatically later on, works for the set DURATION time and stops at the set END time. At the set time an acoustic signal sounds. 7. The appliance deactivates automatically. Press any button to stop the signal. 8. Turn the knob for the oven functions and the knob for the temperature to the off position. 7.6 Setting the MINUTE MINDER 1. Press again and again until starts to flash. 2. Press time.
ENGLISH 13 9. ADDITIONAL FUNCTIONS 9.1 Cooling fan When the oven operates, the cooling fan turns on automatically to keep the surfaces of the oven cool. If you turn off the oven, the cooling fan can continue to operate until the oven cools down. 10. HINTS AND TIPS WARNING! Refer to Safety chapters. The temperature and baking times in the tables are guidelines only. They depend on the recipes and the quality and quantity of the ingredients used. 10.
www.aeg.com 10.2 Cooking recommendations Your oven may bake or roast differently to the oven you had before. The below tables provide you with the standard settings for temperature, cooking time and shelf position. 10.3 Inner side of the door On the inner side of the door you can find: • the numbers of the shelf positions. • information about the oven functions, recommended shelf positions and temperatures for dishes. If you cannot find the settings for a special recipe, look for the similar one.
ENGLISH Food Time (min) Food Temperature (°C) Time (min) Bread 15 - 25 Chicken 210 60 - 80 Focaccia 15 - 25 Roast pork 180 65 - 80 Meat 15 - 25 Pasta 15 - 25 Pizza 15 - 25 Rice 15 - 25 Vegetables 15 - 25 Roasting Use the glass baking dish. Use the second shelf position. Use 200 ml of water. Food Temperature (°C) Time (min) Roast beef 200 50 - 60 15 10.5 Baking • Use the lower temperature the first time.
www.aeg.com Baking results Possible cause Remedy The cake browns unevenly. The oven temperature is too high and the baking time is too short. Set a lower oven temperature and a longer baking time. The mixture is unevenly distributed. Spread the mixture evenly on the baking tray. The oven temperature is too low. The next time you bake, set a slightly higher oven temperature. The cake is not ready in the baking time given. 10.
ENGLISH Food Function Buttered almond cake / Sugar cakes Fruit flans (made with yeast Temperature (°C) 17 Time (min) Shelf position Top / Bottom Heat 190 - 2101) 20 - 30 3 True Fan Cooking 150 35 - 55 3 Top / Bottom Heat 170 35 - 55 3 Fruit flans made with short pastry True Fan Cooking 40 - 80 3 Yeast cakes with delicate toppings (e.g.
www.aeg.com 10.
ENGLISH Food Accessories Temperature (°C) Shelf position Time (min) Whole fish, 0.2 kg baking tray or dripping pan 180 3 25 - 35 Fish fillet, 0.3 kg pizza pan on wire shelf 180 3 40 - 50 Pouched meat, 0.25 kg baking tray or dripping pan 190 3 40 - 50 Shashlik, 0.
www.aeg.
ENGLISH Food Temperature (°C) Time (min) Shelf position Piroggen (Russian version of calzone) 180 - 2001) 15 - 25 2 21 1) Preheat the oven. 2) Use a deep pan. 10.12 Roasting Use heat-resistant ovenware. Roast large roasting joints directly in the tray or on the wire shelf placed above the tray. Put some water in the tray to prevent the meat juices or fat from burning. To keep meat more succulent: • roast lean meat in the roasting tin with the lid or use roasting bag.
www.aeg.com Food Quantity (kg) Function Temperature (°C) Time (min) Shelf position Meatloaf 0.75 - 1 Turbo Grilling 160 - 170 50 - 60 1 Pork knuckle (precooked) 0.75 - 1 Turbo Grilling 150 - 170 90 - 120 1 Veal Food Quantity (kg) Function Temperature Time (min) (°C) Shelf position Roast veal 1 Turbo Grilling 160 - 180 90 - 120 1 Knuckle of veal 1.
ENGLISH Food Quantity (kg) Function Temperature Time (min) (°C) Shelf position Chicken, poulard 1 - 1.5 Turbo Grilling 190 - 210 50 - 70 1 Duck 1.5 - 2 Turbo Grilling 180 - 200 80 - 100 1 Goose 3.5 - 5 Turbo Grilling 160 - 180 120 - 180 1 Turkey 2.5 - 3.5 Turbo Grilling 160 - 180 120 - 150 1 Turkey 4-6 Turbo Grilling 140 - 160 150 - 240 1 Food Quantity (kg) Function Temperature Time (min) (°C) Whole fish 1 - 1.5 Top / Bottom 210 - 220 Heat 23 Fish (steamed) 10.
www.aeg.
ENGLISH Food Quantity (kg) Defrosting time (min) Further deComments frosting time (min) Cream 2 x 0.2 80 - 100 10 - 15 Whip the cream when still slightly frozen in places. Gateau 1.4 60 60 - 10.17 Drying - True Fan Cooking Cover trays with grease proof paper or baking parchment. For a better result, stop the oven halfway through the drying time, open the door and let it cool down for one night to complete the drying. Vegetables For one tray use the third shelf position.
www.aeg.com Baking on one level. Baking in tins Food Function Temperature (°C) Time (min) Shelf position Fatless sponge cake True Fan Cooking 140 - 150 35 - 50 2 Fatless sponge cake Top / Bottom Heat 160 35 - 50 2 160 60 - 90 2 Apple pie (2 tins Ø20 Top / Bottom Heat 180 cm, diagonally off set) 70 - 90 1 Apple pie (2 tins Ø20 True Fan Cooking cm, diagonally off set) Baking on one level. Biscuits Use the third shelf position.
ENGLISH 27 Grill with the maximum temperature setting. Use the fourth shelf position. Food Time (min) 1st side 2nd side Burgers 8 - 10 6-8 Toast 1-3 1-3 11. CARE AND CLEANING WARNING! Refer to Safety chapters. 11.1 Notes on cleaning Clean the front of the oven with a soft cloth with warm water and a mild cleaning agent. To clean metal surfaces, use a dedicated cleaning agent. Clean the oven interior after each use. Fat accumulation or other food remains may result in a fire.
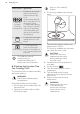
www.aeg.com 11.5 Removing and installing the door 1 2 Install the removed accessories in the opposite sequence. 11.4 Oven ceiling You can remove the door and the internal glass panels to clean it. The number of glass panels is different for different models. WARNING! The door is heavy. 1. Open the door fully. 2. Fully press the clamping levers (A) on the two door hinges. WARNING! Deactivate the appliance before you remove the heating element. Make sure that the appliance is cold.
ENGLISH 29 1. Turn off the oven. Wait until the oven is cooled down. 2. Disconnect the oven from the mains. 3. Put a cloth on the bottom of the cavity. The top lamp 9. Clean the glass panel with water and soap. Dry the glass panel carefully. When the cleaning is completed, do the above steps in the opposite sequence. Install the smaller panel first, then the larger and the door. WARNING! Make sure that the glasses are inserted in the correct position otherwise the surface of the door may overheat. 1.
www.aeg.com Problem Possible cause Remedy The oven does not heat up. The fuse is blown. Make sure that the fuse is the cause of the malfunction. If the fuse is blown again and again, contact a qualified electrician. The lamp does not operate. The lamp is defective. Replace the lamp. Steam and condensation You left the dish in the oven settle on the food and in the for too long. cavity of the oven.
ENGLISH 31 13. ENERGY EFFICIENCY 13.1 Product Fiche and information according to EU 65-66/2014 Supplier's name AEG Model identification EEK35106YM Energy Efficiency Index 95.3 Energy efficiency class A Energy consumption with a standard load, conventional mode 0.99 kWh/cycle Energy consumption with a standard load, fan-forced 0.81 kWh/cycle mode Number of cavities 1 Heat source Electricity Volume 71 l Type of oven Built-Under Oven Mass 32.
www.aeg.com 14. ENVIRONMENTAL CONCERNS Recycle materials with the symbol . Put the packaging in relevant containers to recycle it. Help protect the environment and human health by recycling waste of electrical and electronic appliances. Do not dispose of * appliances marked with the symbol with the household waste. Return the product to your local recycling facility or contact your municipal office.
ENGLISH 33
www.aeg.
ENGLISH 35
867352156-A-312018 www.aeg.