G e s c h i r r s p ü l e r D i s h w a s h e r Model ESL 6185 D GB Bedienungsanleitung Instruction book Seite 2 page 23
Contents Safety instructions 24 Disposal 24 Economical and ecological dishwashing 24 Installation instructions Building-in Levelling Fixing to the adjacent units Water supply connections Water inlet hose with safety hose Water outlet hose connection Electrical connection 25 25 25 25 25 25 26 26 Description of the appliance 27 The control panel First use 27 29 Prior to using for the first time The water softener Filling with dishwasher salt Rinse aid 30 30 31 32 In daily use Loading cutlery and
Safety instructions It is most important that this instruction book should be retained with the appliance for future reference. Should the appliance be sold or transferred to another owner, or should you move house and leave the appliance, always ensure that the book is left with the appliance in order that the new owner can get to know the functioning of the appliance and the relevant safety information. This information has been provided in the interest of your safety.
Installation instructions Any electrical and/or plumbing work required to install this appliance should be carried out by a qualified electrician and/or plumber or competent person. Water supply connections This dishwasher may be fed with either hot (max. 60°) or cold water. Nevertheless we advise you a cold water supply. A hot water supply is not always efficient with very soiled crockery as it shortens the washing programmes a lot. Remove all packaging before positioning the machine.
Water outlet hose connection Electrical connection The end of the drain hose can be connected in the following ways: Information concerning the electrical connection is given on the rating plate on the edge of the dishwasher’s door. 1. To the sink outlet spigot, securing it to the underside of the work surface. This will prevent waste water from the sink running into the machine. Before plugging the appliance into the wall socket, make sure that: 1.
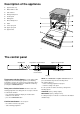
Description of the appliance 1. Upper basket stop 2. Water hardness dial 3. Salt container 4. Detergent dispenser 5. Control panel 6. Rating plate 7. Rinse aid dispenser 8. Filters 9. Lower spray arm 10. Upper spray arm 11.
Option selection button: allows you to enter a menu of options with relative submenu. How to set the several options: 1. Press more times the option selection button, until the desired option is displayed. 2. To modify the current setting of the option press the confirm/start button. 3. Press more times the option selection button until the selection of the desired submenu is displayed. 4. Press again the confirm/start button: the option is memorised.
Symbols: indicate the various options. In this row several details are displayed: - setting mode, guide to the selection of the washing programmes, duration time of the programme, options, (when together with the washing programme one or more options are set, the update of the programme duration will occur automatically). - Once the programme has started, indicates the sequence of the running phases and the running time of the programme in progress.
Prior to using for the first time Before using your dishwasher for the first time: a) Setting manually 1. Ensure that the electrical and water connections comply with the installation instructions 1. Open the dishwasher’s door. 2. Remove all packaging from inside the appliance 3. Turn the water hardness switch to position 1 or 2 (see table). 2. Remove the lower basket from the dishwasher. 3. Set the water softener 4. Replace the lower basket. 4.
Filling with dishwasher salt Only use salt specifically designed for use in dishwashers. All other types of salt not specifically designed for use in a dishwasher, especially table salt, will damage the water softener. Only fill with salt just before starting one of the complete washing programmes. This will prevent any grains of salt or salty water, which may have been spilt, remaining on the bottom of the machine for any period of time, which may cause corrosion. To fill: 1.
Rinse aid ● Rinse aid is automatically added during the last rinse, ensuring thorough rinsing, and spot and streak free drying. The dispenser, which is positioned inside the door, holds about 110 ml of rinse aid, which is sufficient for 16 - 40 dishwashing programmes, depending upon the dosage setting. If you are using dishwasher detergent that already contains rinse aid, the detergent including the rinse aid must be placed in the detergent compartment.
In daily use ● Check if it’s necessary to refill with dishwasher salt or rinse aid ● Load cutlery and dishes into the dishwasher. ● Fill with dishwasher detergent . ● Select a wash programme suitable for the cutlery and dishes. ● Start the wash programme. Loading cutlery and dishes Sponges, household cloths and any object that can absorb water may not be washed in the dishwasher. ● Before loading the dishes, you should: - Remove large left-overs.
In case that plates are loaded in the upper basket: The cutlery basket Long bladed knives stored in an upright position are a potential hazard. Long and/or sharp items of cutlery such as carving knives must be positioned horizontally in the upper basket. Take care when loading or unloading sharp items such as knives. load them starting from the rear positions of the basket; tilting them slightly forwards and avoiding the front positions near the door.
Use of detergent Only use detergents specifically designed for use in dishwashers. Using no more then the correct amount of detergent contributes to reducing pollution. Please observe the manufacturer’s dosing and storage recommendations as stated on the detergent packaging. Fill with detergent 1. If the lid is closed: press release button (1). The lid springs open. 2. Fill the detergent dispenser (2) with detergent.
Different kinds of detergent Detergent tablets Use of "3 in 1" combi detergents Detergent tablets of different brands dissolve at different speeds. For this reason some detergent tablets cannot dissolve and develop their full cleaning power during short programmes. Therefore please use long programmes when using detergent tablets, to ensure the complete removal of detergent residuals. Do not place the tablets in the tub or in the cutlery basket as this will result in poorer wash results.
Washing programmes Programme Degree of soil and type of load Cycle description (3) Consumption values Energy consumption (in kWh) Water consumption (in litres) 1,1 - 1,5 12 - 25 Normal / light soil. Crockery, cutlery, pots and pans Cold prewash Main wash up to 65° or 50°C 1 or 2 cold rinses 1 hot rinse Drying (1) 30 Minutes Light soil. Crockery and cutlery Main wash up to 60°C 1 hot rinse 0,8 9 70° Intensive Heavy soil.
Starting a washing programme The message CONFIRM CANCEL? appears in the display. Press the confirm/start button. The dishwasher returns to setting mode and in the display will appear the message CHOOSE PROGRAMME. If a delay start is cancelled, also the set programme will be cancelled. In this case the washing programme has to be set again. (If a new washing programme will be selected, check that there is detergent in the detergent dispenser).
Maintenance and cleaning Clean the external surfaces of the machine and control panel with a damp soft cloth. If necessary use only neutral detergents. Never use abrasive products, scouring pads or solvent (acetone, trichloroethylene etc....). Ensure that the seals around the door, the detergent and rinse aid dispensers are cleaned regularly with a damp cloth. We recommend every 3 months to run a 65°C wash programme without dishes using detergent.
What to do, when... Certain problems are due to the lack of simple maintenance or oversights, which can be solved with the help of the instructions given here, without calling out an engineer. ...alarm messages or codes are displayed The dishwasher will not start or stops during operation.
...the wash results are not satisfactory The dishes are not clean ● ● ● ● ● ● ● ● The wrong wash programme has been selected. The dishes were arranged in such a way as to stop water reaching all parts of the surface. The baskets must not be overloaded. The spray arms do not rotate freely due to wrong arrangement of the load. The filters in the base of the washing compartment are dirty or incorrectly positioned. Too little or no detergent has been used.
Hints for test centres Testing in accordance with EN 60704 must be carried out with appliance fully loaded and using the test programme (see "Washing programmes" chart). Test in accordance with EN 50242 must be carried out when the salt dispenser and rinse aid container have been filled with salt and rinse aid respectively and using the test programme (see "Washing programmes" chart).
The Electrolux Group. The World’s No.1 choice. The Electrolux Group is the world’s largest producer of powered appliances for kitchen, cleaning and outdoor use. More than 55 million Electrolux Group products (such as refrigerators, cookers, vacuum cleaners, chain saws and lawn mowers) are sold each year to a value of approx. 14 billion USD in more than 150 countries around the world.