FAVORIT 34032 EN DISHWASHER PT MÁQUINA DE LAVAR LOIÇA USER MANUAL MANUAL DE INSTRUÇÕES 2 24
FOR PERFECT RESULTS Thank you for choosing this AEG product. We have created it to give you impeccable performance for many years, with innovative technologies that help make life simpler – features you might not find on ordinary appliances. Please spend a few minutes reading to get the very best from it. ACCESSORIES AND CONSUMABLES In the AEG webshop, you’ll find everything you need to keep all your AEG appliances looking spotless and working perfectly.
Contents 3 CONTENTS 4 7 8 10 10 12 12 14 16 17 18 20 22 22 Safety information Product description Control panel Use of the appliance Setting the water softener Use of dishwasher salt Use of detergent and rinse aid Loading cutlery and dishes Washing programmes Setting and starting a washing programme Care and cleaning What to do if… Technical data Environment concerns The following symbols are used in this user manual: Important information concerning your personal safety and information on how to avoid
Safety information SAFETY INFORMATION Before the installation and use, read this manual carefully: • For your safety and the safety of your property. • To help the environment. • For the correct operation of the appliance. Always keep these instructions with the appliance also if you move or give it to a different person. The manufacturer is not responsible if an incorrect installation and use causes damage.
Safety information 5 • Fill the appliance with salt before you start a washing programme. Remaining salt in the appliance can cause corrosion or make a hole in the bottom of the appliance. • Do not fill the rinse aid dispenser with other products than the rinse aid, (dishwasher cleaning agent, liquid detergent). This can cause damage to the appliance. • Make sure that the spray arms can move freely before you start a washing programme.
Safety information • Make sure not to squash or cause damage to the water hoses when you install the appliance. • Make sure that the water couplings are tight to prevent a water leakage. • The first time you use the appliance, make sure that the hoses do not have water leaks. • The water inlet hose has a safety valve and a double sheath with an inner mains cable. There is pressure in the water inlet hose only when the water flows.
Product description 7 To discard the appliance • To prevent the risk of injury or damage: – Disconnect the mains plug from the mains socket. – Cut off the mains cable and discard it. – Remove the door catch. This prevents children or pets to be closed in the appliance. There is a risk of suffocation. – Discard the appliance at the local waste disposal centre.
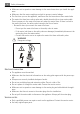
Control panel 5 6 7 8 9 Rinse aid dispenser Rating plate Filters Lower spray arm Upper spray arm CONTROL PANEL A 1 5 1 2 3 4 5 B 2 4 3 On/off button Programme indicator lights Indicator lights PROGRAM/Reset button Delay start button Indicator lights End-of-programme The indicator comes on when: • The washing programme is completed. • You adjust the level of the water softener. • You activate/deactivate the audible signals. • There is a malfunction of the appliance.
Control panel 9 • To set the washing programme. Refer to the chapter 'Setting and starting a washing programme'. • To set the water softener. Refer to the chapter 'Setting the water softener'. • To deactivate/activate the audible signals. Refer to the section 'Audible signals'. • To cancel a washing programme in progress. Refer to the chapter 'Setting and starting a washing programme'. Delay start button Use this button to delay the start of the washing programme with an interval of 3 hours.
Use of the appliance – The audible signals are active. Press the programme button again. The end-of-programme indicator light goes off. – The audible signals are deactivated. 6. Switch of the appliance to confirm the operation. Do these steps to activate again the audible signals: 1. Follow the procedure how to deactivate the audible signals from point 1 to point 4. 2. The programme light A goes off. The end-of-programme indicator light is off. (The programme light B continues to flash).
Setting the water softener 11 Water hardness adjustment Water hardness German degrees (°dH) French degrees (TH°) mmol/l Clarke degrees manually electronically 23 - 28 40 - 50 4,0 - 5,0 28 - 35 21) 6 19 - 22 33 - 39 3,3 - 3,9 23 - 27 21) 51) 15 - 18 26 - 32 2,6 - 3,2 18 - 22 1 4 11 - 14 19 - 25 1,9 - 2,5 13 - 17 1 3 4 - 10 7 - 18 0,7 - 1,8 5 - 12 1 2 <4 <7 < 0,7 <5 12) 12) 1) Factory position. 2) Do not use salt at this level.
Use of dishwasher salt If the water softener is set electronically to the level 1, the salt indicator light stays off. USE OF DISHWASHER SALT How to fill the salt container 1. Turn the cap counterclockwise and open the salt container. 2. Fill the salt container with 1 litre of water (only for the first time you fill with salt). 3. Use the funnel to fill the salt container with salt. 4. Remove the salt around the opening of the salt container. 5. Turn the cap clockwise to close the salt container.
Use of detergent and rinse aid 3. 4. 5. 13 If the washing programme has a prewash phase, put a small quantity of detergent in the prewash detergent compartment 1 . If you use the detergent tablets, put the tablet in the detergent dispenser 3 . Close the detergent dispenser. Press the lid until it locks into position. Different brands of detergent dissolve in different times. Some detergent tablets do not have the best cleaning results during short washing programmes.
Loading cutlery and dishes LOADING CUTLERY AND DISHES Hints and tips • • • • • • • • • • • • Do not put in the appliance items that can absorb water (sponges, household cloths). Remove the remaining food from the items. Make soft the remaining burned food on the items. Put hollow items (cups, glasses and pans) with the opening down. Make sure that water does not collect in containers or in bowls. Make sure that cutlery and dishes do not bond together.
Loading cutlery and dishes Put the knives with the handles up. Mix the spoons with other cutlery to prevent them to bond together. Use the cutlery grid. If the dimensions of the cutlery prevent use of the cutlery grid, you can easily remove it. Upper basket The upper basket is for plates (maximum 24 cm in diameter), saucers, salad bowls, cups, glasses, pots and lids. Arrange the items to let water touch all surfaces. Prevent to put plates in the first three sectors in the front part of the basket.
Washing programmes Maximum height of the dishes in: the upper basket the lower basket Higher position 20 cm 31 cm Lower position 24 cm 27 cm Do these steps to move the upper basket to the higher position: 1. Move the front runner stops (A) out. 2. Pull the basket out. 3. Put the basket in the upper position. 4. Put back the front runner stops (A) in their initial position. CAUTION! If the basket is in the upper position, do not put cups on the cup racks.
Setting and starting a washing programme 17 Consumption values Programme Programme time (minute) Energy (kWh) Water (litre) 120-130 1,8-2,0 22-24 100-110 1,4-1,6 19-21 130-140 1,0-1,2 14-16 12 0,1 5 The water pressure and temperature, the variations of the mains supply and the quantity of dishes can change the consumption values. SETTING AND STARTING A WASHING PROGRAMME Select and start a washing programme without delay 1. 2. 3. 4. Switch on the appliance.
Care and cleaning How to cancel a washing programme or a delay start If a washing programme or a delay start has not started, you can change the selection. When a washing programme or a delay start are in progress, it is not possible to change the selection. It is necessary to cancel the washing programme or a delay start to make a new selection. How to cancel a washing programme 1. Press and hold the programme button until the programme and programme-in-progress lights go off. 2.
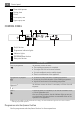
Care and cleaning 19 • Flat filter (C). A B C 1. To unlock the filters (A) and (B), turn the handle on the microfilter (B) approximately 1/4 counterclockwise and remove. 2. Hold the coarse filter (A) by the handle and remove it from the microfilter (B). 3. Remove the flat filter (C) from the bottom of the appliance. 4. Fully clean the filters with water. 5. Put the flat filter (C) to its initial position. Make sure that it assembles correctly in the two guides (D). 6.
What to do if… WHAT TO DO IF… The appliance does not start or stops during operation. First try to find a solution to the problem (refer to the chart). If not, contact the service centre. Malfunction The appliance does not fill with water. The appliance does not drain the water. The anti-flood device operates. The programme does not start. Fault code Possible cause • The light of the programme in progress flashes. • The end-of-programme indicator light flashes 1 time.
What to do if… Malfunction Fault code Possible cause 21 Possible solution The mains plug is not connected in. Put in the mains plug. Blow out fuse in the household fuse box. Replace the fuse. The delay start is set. If you want to cancel the delay start, refer to 'Select and start a washing programme'. After the check, switch on the appliance. The programme continues from the point of interruption. If the malfunction shows again, contact the service centre.
Technical data Problem Possible cause Possible solution There are streaks, milky stains, or a bluish layer on glasses and dishes. Rinse aid dosage is too high. Decrease the rinse aid dosage. Dry water drop stains on glasses and dishes. Rinse aid dosage is too low. Increase the rinse aid dosage. The detergent can be the cause. Use a different brand of detergent. The dishes are wet. You have set a washing programme without drying phase or with a decreased drying phase.
Environment concerns 23 The packaging materials are environmentally friendly and can be recycled. The plastic components are identified by markings, e.g. >PE<, >PS<, etc. Discard the packaging materials in the applicable container at the community waste disposal facilities. WARNING! To discard the appliance, follow the procedure: • Pull the mains plug out of the socket. • Cut off the mains cable and mains plug and discard them. • Discard the door catch.
PARA RESULTADOS PERFEITOS Obrigado por escolher este produto AEG. Criámo-lo para lhe oferecer um desempenho impecável durante vários anos, com tecnologias inovadoras que tornam a sua vida mais fácil – funcionalidades que poderá não encontrar em aparelhos convencionais. Continue a ler durante alguns minutos para tirar o máximo partido do produto. ACESSÓRIOS E CONSUMÍVEIS Na loja web AEG, encontrará tudo aquilo de que necessita para manter os seus aparelhos AEG imaculados e a funcionarem na perfeição.
Índice 25 ÍNDICE 26 30 30 33 33 35 35 37 40 41 42 43 46 46 Informações de segurança Descrição do produto Painel de controlo Utilização do aparelho Regular o amaciador da água Utilização do sal para máquinas de lavar loiça Utilização de detergente e abrilhantador Carregar pratos e talheres Programas de lavagem Seleccionar e iniciar um programa de lavagem Manutenção e limpeza O que fazer se… Dados técnicos Preocupações ambientais Os símbolos que se seguem são utilizados no presente manual: Informações imp
Informações de segurança INFORMAÇÕES DE SEGURANÇA Antes da instalação e utilização, leia atentamente este manual: • Para a sua segurança e para a segurança da sua máquina. • Para proteger o ambiente. • Para o funcionamento correcto da máquina. Guarde sempre estas instruções com a máquina, mesmo que seja transferida ou entregue a outra pessoa. O fabricante não é responsável por danos resultantes de uma instalação e utilização incorrectas.
Informações de segurança 27 • Utilize apenas produtos específicos para máquinas de lavar loiça (detergente, sal, abrilhantador). • Tipos de sal que não são específicos para máquinas de lavar loiça podem causar danos no descalcificador de água. • Encha a máquina com sal antes de iniciar um programa de lavagem. O sal restante na máquina pode causar corrosão ou fazer um furo na parte inferior da máquina.
Informações de segurança Ligação à rede de abastecimento de água • Utilize mangueiras novas para ligar a máquina ao fornecimento de água. Não utilize mangueiras usadas. • Não ligue a máquina a canos novos ou canos que não sejam usados há muito tempo. Deixe a água correr durante alguns minutos e, depois, ligue a mangueira de entrada. • Certifique-se de que não esmaga nem provoca danos nas mangueiras de água ao instalar a máquina.
Informações de segurança 29 • Certifique-se de que não esmaga nem provoca danos na ficha de alimentação eléctrica e no cabo de alimentação atrás da máquina. • Certifique-se de que a ficha de alimentação eléctrica está acessível após a instalação. • Não puxe o cabo de alimentação eléctrica para desligar a máquina. Puxe sempre a ficha de alimentação. Centro de assistência • Apenas uma pessoa qualificada pode efectuar trabalhos ou reparações na máquina. Contacte o centro de assistência.
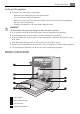
Descrição do produto DESCRIÇÃO DO PRODUTO 1 2 3 4 5 6 7 8 9 Cesto superior Indicador da dureza da água Depósito de sal Distribuidor de detergente Distribuidor de abrilhantador Placa de características Filtros Braço aspersor inferior Braço aspersor superior PAINEL DE CONTROLO A 1 5 B 4 2 3
Painel de controlo 1 2 3 4 5 31 Botão de Ligar/Desligar Indicadores luminosos de programa Indicadores luminosos Botão PROGRAM/Reset Botão de Início Diferido Indicadores luminosos Fim do programa O indicador acende-se quando: • O programa de lavagem está concluído. • Regula o nível da dureza da água. • Os sinais sonoros são activados/desactivados. • Há uma anomalia no aparelho. Programa em curso • Acende-se quando é seleccionado um programa de lavagem.
Painel de controlo Modo de selecção O aparelho tem de estar no modo de selecção para estas operações: • Para seleccionar e iniciar um programa de lavagem. • Para regular electronicamente o nível da dureza da água. • Para desactivar/activar os sinais sonoros. Prima o botão de ligar/desligar. O aparelho está no modo de selecção quando: • Todos os indicadores luminosos de programa estão desligados e o indicador de fim do programa está intermitente. Prima o botão de ligar/desligar.
Utilização do aparelho 4. 33 Desligue o aparelho para confirmar a operação. UTILIZAÇÃO DO APARELHO 1. 2. 3. 4. 5. 6. 7. Certifique-se de que o nível definido de amaciador da água corresponde à dureza da água na sua área. Caso contrário, ajuste o amaciador da água. Encha o depósito de sal com sal para máquinas de lavar loiça. Encha o distribuidor de abrilhantador com abrilhantador. Coloque os pratos e talheres no aparelho. Defina o programa de lavagem correcto para o tipo de carga e sujidade.
Regular o amaciador da água Ajuste manual Rode o indicador da dureza da água para a posição 1 ou 2 (consulte a tabela). Regulação electrónica 1. 2. 3. 4. 5. 6. Ligue o aparelho. Certifique-se de que o aparelho está no modo de selecção. Mantenha premido o botão de programa até que o indicador luminoso do programa A fique intermitente e o indicador luminoso do programa B se acenda.
Utilização do sal para máquinas de lavar loiça 35 UTILIZAÇÃO DO SAL PARA MÁQUINAS DE LAVAR LOIÇA Como encher o depósito de sal 1. Rode a tampa para a esquerda e abra o depósito de sal. 2. Encha o depósito de sal com 1 litro de água (apenas da primeira vez que enche com sal). 3. Utilize o funil para encher o depósito com sal. 4. Retire o sal em torno da abertura do depósito de sal. 5. Rode a tampa para a direita para fechar o depósito de sal.
Utilização de detergente e abrilhantador 3. 4. 5. Se o programa de lavagem tiver uma fase de pré-lavagem, coloque uma pequena quantidade de detergente no compartimento de detergente de pré-lavagem 1 . Se utilizar pastilhas de detergente, coloque a pastilha no distribuidor de detergente 3 . Feche o distribuidor de detergente. Pressione a tampa até ficar bloqueada. As diferentes marcas de detergente dissolvem em tempos diferentes.
Carregar pratos e talheres 37 3. Inicie um programa de lavagem sem loiça. 4. Quando o programa de lavagem estiver concluído, regule o amaciador da água para a dureza da água na sua área. 5. Regule a quantidade de abrilhantador. CARREGAR PRATOS E TALHERES Sugestões e conselhos • • • • • • • • • • Não coloque itens que possam absorver água na máquina (esponjas, panos domésticos). Retire os resíduos de comida da loiça. Amoleça os resíduos de comida queimada na loiça.
Carregar pratos e talheres O cesto de talheres Coloque os garfos e as colheres com os cabos para baixo. Coloque as facas com os cabos para cima. Misture as colheres com outros talheres para evitar que fiquem coladas. Utilize a grelha para talheres. Se o tamanho dos talheres não permitir a utilização da grelha para talheres, pode retirá-la facilmente. Cesto superior O cesto superior destina-se aos pratos (no máximo 24 cm de diâmetro), pires, saladeiras, chávenas, copos, tachos e tampas.
Carregar pratos e talheres 39 Coloque os copos de pé alto nas prateleiras para chávenas com o pé para cima. Para peças maiores, levante as prateleiras para chávenas. Regular a altura do cesto superior Pode colocar o cesto superior em duas posições para aumentar a flexibilidade de carga. CUIDADO Ajuste a altura antes de carregar o cesto superior.
Programas de lavagem PROGRAMAS DE LAVAGEM Programa Tipo de sujidade Tipo de carga Sujidade intensa Faianças, talheres, tachos e panelas Pré-lavagem Lavagem a 70 °C 2 enxaguamentos intermédios Enxaguamento final Secagem Sujidade normal Faianças e talheres Pré-lavagem Lavagem a 65 °C 1 enxaguamento intermédio Enxaguamento final Secagem Sujidade normal Faianças e talheres Pré-lavagem Lavagem a 50 °C 1 enxaguamento intermédio Enxaguamento final Secagem 1) Descrição do programa Utilize este pr
Seleccionar e iniciar um programa de lavagem 41 SELECCIONAR E INICIAR UM PROGRAMA DE LAVAGEM Seleccionar e iniciar um programa de lavagem sem início diferido 1. 2. 3. 4. Ligue o aparelho. Certifique-se de que o aparelho está no modo de selecção. Seleccione um programa de lavagem. Prima o botão de programa várias vezes até que o indicador luminoso do programa de lavagem pretendido se acenda. Consulte a tabela "Programas de lavagem". Feche a porta do aparelho. O programa de lavagem inicia automaticamente.
Manutenção e limpeza 2. Prima o botão de programa para seleccionar um novo programa de lavagem. No fim do programa de lavagem • O aparelho pára automaticamente. • Ouvem-se sinais sonoros. 1. Abra a porta do aparelho. – O indicador de fim do programa está aceso. – O indicador luminoso de programa está aceso. 2. Desligue o aparelho. 3. Para obter os melhores resultados de secagem, mantenha a porta entreaberta durante alguns minutos.
O que fazer se… 43 1. Para desbloquear os filtros (A) e (B), rode o manípulo do microfiltro (B) aproximadamente 1/4 para a esquerda e retire. 2. Segure o filtro grosso (A) pelo manípulo e retire-o do microfiltro (B). 3. Retire o filtro plano (C) da parte inferior da máquina. 4. Limpe totalmente os filtros com água. 5. Coloque o filtro plano (C) na posição inicial. Certifique-se de que encaixa correctamente nas duas guias (D). 6.
O que fazer se… Avaria Código de avaria Causa possível Solução possível A pressão da água é demasiado baixa. Contacte os serviços de abastecimento de água da sua área. A torneira da água está fechada. Abra a torneira da água. O filtro da mangueira de entrada de água está obstruído. Limpe o filtro. A ligação da mangueira de entrada de água não está correcta. Certifique-se de que a ligação está correcta. A mangueira de entrada Certifique-se de que a de água está danificada.
O que fazer se… 45 Após a verificação, ligue o aparelho. O programa continua a partir do ponto de interrupção. Se a avaria persistir, contacte o centro de assistência. Para outros códigos de avaria, não indicados na tabela, contacte o centro de assistência. Os dados de contacto do Centro de Assistência Técnica encontram-se na placa de características. Recomendamos que anote os dados aqui: Modelo (MOD.) Número do produto (PNC) Número de série (S.N.) .................... .................... ..............
Dados técnicos Problema Causa possível Solução possível A loiça está molhada. Definiu um programa de lavagem sem fase de secagem ou com uma fase de secagem reduzida. Deixe a porta aberta durante alguns minutos antes de retirar a loiça. A loiça está molhada e baça. O distribuidor de abrilhantador está vazio. Encha o distribuidor de abrilhantador com abrilhantador.
ADVERTÊNCIA Para eliminar a máquina, siga o procedimento: • Retire a ficha da tomada. • Corte o cabo de alimentação eléctrica e a ficha de alimentação eléctrica e elimine-os. • Elimine o fecho da porta. Isto evita que as crianças se fechem dentro da máquina e coloquem a vida em perigo.
www.aeg.