FAVORIT 65000 I NL AFWASMACHINE FR LAVE-VAISSELLE EN DISHWASHER GEBRUIKSAANWIJZING NOTICE D'UTILISATION USER MANUAL 2 25 48
VOOR PERFECTE RESULTATEN Bedankt dat u voor dit AEG product heeft gekozen. Dit apparaat is ontworpen om vele jaren uitstekend te presteren, met innovatieve technologieën die het leven gemakkelijker helpen maken – functies die gewone apparaten wellicht niet hebben. Neem een paar minuten de tijd om het door te lezen zodat u er optimaal van kunt profiteren.
Inhoud 3 INHOUD 4 8 9 11 12 13 14 15 15 16 17 19 20 23 23 Veiligheidsinformatie Beschrijving van het product Bedieningspaneel Bediening van het apparaat De waterontharder instellen Gebruik van zout voor de vaatwasser Gebruik van afwasmiddel en glansmiddel De Multitabfunctie De vaatwasser inruimen Wasprogramma's Een afwasprogramma selecteren en starten Onderhoud en reiniging Problemen oplossen Technische gegevens Milieubescherming In deze gebruiksaanwijzing worden de volgende symbolen gebruikt: Belangrij
Veiligheidsinformatie VEILIGHEIDSINFORMATIE Lees deze handleiding zorgvuldig alvorens het apparaat te installeren of te gebruiken: • Voor uw veiligheid en de veiligheid van uw eigendommen. • Om het milieu te helpen. • voor de correcte werking van het apparaat. Houd deze instructies altijd in de buurt van het apparaat, ook als u verhuist of het apparaat aan iemand anders geeft. De fabrikant is niet verantwoordelijk voor schade veroorzaakt door een foutieve installatie.
Veiligheidsinformatie 5 • Gebruik alleen gespecificeerde producten voor afwasmachines (afwasmiddel, zout, glansspoelmiddel). • Zout dat niet gespecificeerd is voor afwasmachines, veroorzaakt schade aan de waterontharder. • Vul het apparaat met zout voordat u een afwasprogramma start. Zout dat in het apparaat is achtergebleven, kan roest veroorzaken of een gat in de onderkant van het apparaat maken. • Vul het glansmiddeldoseerbakje nooit met andere middelen dan glansspoelmiddel (bijv.
Veiligheidsinformatie Voorzorgsmaatregelen bij vorst • Installeer het apparaat niet op een plek waar de temperatuur onder de 0°C komt. • De fabrikant is niet aansprakelijk voor enige schade door bevriezing. Wateraansluiting • Gebruik nieuwe slangen om het apparaat aan te sluiten op de watertoevoer. Gebruik geen gebruikte slangen. • Sluit het apparaat niet op nieuwe leidingen aan of op leidingen die lang niet zijn gebruikt. Laat het water enkele minuten stromen en sluit dan de toevoerslang pas aan.
Veiligheidsinformatie 7 • Vervang of verander het netsnoer niet zelf. Neem contact op met het servicecentrum. • Zorg ervoor dat de stroomsnoeren en kabel niet knakken of beschadigd raken achter het apparaat. • Zorg ervoor dat het netsnoer na installatie bereikbaar is. • Trek niet aan het netsnoer om het apparaat los te koppelen. Trek altijd aan de stekker. Service-afdeling • Alleen een erkende persoon mag dit apparaat repareren. Neem contact op met het servicecentrum.
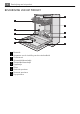
Beschrijving van het product BESCHRIJVING VAN HET PRODUCT 10 1 9 2 3 4 5 1 2 3 4 5 6 7 8 9 10 Bovenrek Aanpassen van de instelling van de waterhardheid Zoutreservoir Afwasmiddeldoseerbakje Glansmiddeldoseerbakje Typeplaatje Filters Onderste sproeiarm Bovenste sproeiarm Top sproeiarm 8 7 6
Bedieningspaneel 9 BEDIENINGSPANEEL 2 1 3 9 1 2 3 4 5 6 7 8 9 4 5 8 6 7 Aan-/uit-toets Programmagids Program-toets Programma-indicatielampjes Display Delay-toets Start-toets Indicatielampjes Option-toets Indicatielampjes Multitab-indicatielampje. Gaat aan als u de functie inschakelt. ÖKO PLUS-indicatielampje. Gaat aan als u de functie inschakelt. Wasfase-indicatielampje. Gaat aan wanneer de wasfase loopt. Spoelfase-indicatielampje. Gaat aan wanneer de spoelfase loopt. Droogfase-indicatielampje.
Bedieningspaneel Indicatielampjes Delay-indicatielampje. Gaat aan als u de uitgestelde start ingeschakeld heeft. Deur-indicatielampje. Gaat aan als de deur open staat of niet goed is gesloten. 1) Wanneer het zoutreservoir en/of het glansmiddeldoseerbakje leeg zijn, gaan de bijbehorende indicatielampjes niet aan als er een wasprogramma loopt. Aan-/uit-toets Druk op deze toets om het apparaat in of uit te schakelen.
Bediening van het apparaat Option-toets Multitabfunctie 11 ÖKO PLUS Twee keer indrukken UITGESCHAKELD INGESCHAKELD Drie keer indrukken INGESCHAKELD INGESCHAKELD Vier keer indrukken UITGESCHAKELD UITGESCHAKELD Functies Multitabfunctie Als u gecombineerde afwasmiddeltabletten gebruikt ('3 in 1', '4 in 1', '5 in 1', enz.), gebruikt u de multitab-functie. Zie 'Multitabfunctie'. ÖKO PLUS Met deze functie wordt de temperatuur in de droogfase verlaagd. Het stroomverbruik daalt met 25%.
De waterontharder instellen 7. Start het afwasprogramma. Als u gecombineerde afwasmiddeltabletten gebruikt ('3 in 1', '4 in 1', '5 in 1' enz.), gebruikt u de multitabfunctie (zie 'De Multitabfunctie'). DE WATERONTHARDER INSTELLEN De waterontharder verwijdert mineralen en zouten van de watertoevoer. Deze mineralen en zouten kunnen schade aan het apparaat toebrengen. Pas het niveau van de waterontharder aan als dit niveau niet overeenstemt met de hardheid van het water in uw omgeving.
Gebruik van zout voor de vaatwasser 13 Handmatig instellen Zet de schijf voor de waterhardheid in stand 1 of 2 (zie de tabel). Elektronische instelling 1. Schakel het apparaat in. 2. Zorg dat het apparaat in de instelmodus staat. 3. Druk tegelijkertijd op de Delay-toets en de Start-toets en houd deze toetsen ingedrukt totdat de programma-indicatielampjes AUTO, PRO en 30MIN gaan knipperen. 4. Laat de Delay-toets en de Start-toets los. 5.
Gebruik van afwasmiddel en glansmiddel GEBRUIK VAN AFWASMIDDEL EN GLANSMIDDEL 1 3 2 4 30 7 4 MA X + 3 2 - 1 20 6 5 Gebruik van afwasmiddel Gebruik niet meer dan de juiste hoeveelheid afwasmiddel om het milieu te beschermen. Volg het advies van de afwasmiddelfabrikant op de verpakking. Het afwasmiddeldoseerbakje vullen: 1. Druk op de vrijgaveknop 2 om het deksel te openen 7 van het afwasmiddelbakje. 2. Doe het afwasmiddeltablet in het afwasmiddeldoseerbakje 1 . 3.
De Multitabfunctie 15 4. Sluit het glansmiddeldoseerbakje. Druk op het deksel totdat het op zijn plaats klikt. Stel de glansmiddeldosering in Fabrieksinstelling: stand 3. U kunt de dosering van het glansmiddel instellen tussen stand 1 (laagste dosering) en stand 4 (hoogste dosering). Draai de glansmiddelknop 4 om de dosering te vergroten of te verkleinen. DE MULTITABFUNCTIE De multitabfunctie is voor gecombineerde afwastabletten.
Wasprogramma's • • • • • • Zorg ervoor dat zich geen water kan ophopen in opbergdozen of kommen. Zorg ervoor dat serviesgoed en bestek niet in elkaar liggen. Zorg ervoor dat glazen andere glazen niet aanraken. Leg kleine voorwerpen in de bestekmand. Meng lepels met ander bestek om te voorkomen dat ze aan elkaar kleven. Als u de voorwerpen in de manden plaatst, zorg er dan voor dat het water alle oppervlakken kan bereiken. • Leg lichte voorwerpen in het bovenrek.
Een afwasprogramma selecteren en starten 17 Verbruikswaarden Energie (kWh) Programma1) Water (liter) 0,9 - 1,7 8 - 17 1,5 - 1,7 15 - 16 0,9 9 1,0 - 1,1 10 - 11 0,1 4 1) Op de display verschijnt de tijd van het programma. De druk en temperatuur van het water, de variaties in stroomtoevoer en de hoeveelheid vaat kan deze waarden veranderen. EEN AFWASPROGRAMMA SELECTEREN EN STARTEN Het afwasprogramma starten zonder uitgestelde start 1. 2. 3. 4. Sluit de deur van het apparaat.
Een afwasprogramma selecteren en starten • De uitgestelde starttijd knippert niet meer in het display. • De fase-indicatielampjes van het ingestelde afwasprogramma gaan uit. • Nadat het aftelproces voltooid is, wordt het wasprogramma automatisch gestart. – Het indicatielampje van de lopende fase gaat aan. Als de deur van het apparaat wordt geopend, wordt de aftelling onderbroken. Als u de deur weer sluit, gaat het aftellen verder vanaf het punt van de onderbreking.
Onderhoud en reiniging 19 3. Laat de deur van het apparaat een paar minuten op een kier staan, voor betere droogresultaten. Verwijder de voorwerpen uit de manden. • Laat de borden afkoelen voordat u deze uit het apparaat neemt. Hete borden zijn gevoelig voor beschadigingen. • Ruim eerst het onderrek en dan het bovenrek uit. • Er kan water liggen aan de zijkanten en op de deur van het apparaat. Roestvrij staal koelt sneller af dan borden.
Problemen oplossen 7. Zet filter (B) op de oorspronkelijke plaats terug. Zorg ervoor dat het filter goed wordt gemonteerd in de twee geleiders (C). 8. Zet filter (A) in filter (B) op zijn plaats. Draai filter (A) met de klok mee (rechtsom) totdat het filter wordt vergrendeld. C De sproeiarmen reinigen Probeer niet de sproeiarmen te verwijderen. Als etensresten de openingen in de sproeiarmen hebben verstopt, verwijder deze dan met een smal en puntig voorwerp.
Problemen oplossen Storing Het apparaat pompt geen water weg. Mogelijke oorzaak 21 Mogelijke oplossing De aansluiting van de wateraanvoerslang is niet correct. Zorg dat de aansluiting altijd correct is. De watertoevoerslang is beschadigd. Verzeker u ervan dat de watertoevoerslang niet is beschadigd. De gootsteenafvoer is geblokkeerd. Ontstop de gootsteenafvoer. De aansluiting van de wateraf- Zorg dat de aansluiting altijd voerslang is niet correct. correct is.
Problemen oplossen De afwas- en droogresultaten zijn niet bevredigend Probleem De borden zijn niet schoon. Mogelijke oorzaak Het afwasprogramma is niet geschikt voor het type lading en de mate van vervuiling. Mogelijke oplossing Zorg ervoor dat het afwasprogramma geschikt is voor het type lading en de mate van vervuiling. U heeft de items niet goed in Plaats de items correct in de de mandjes geplaatst. Het wa- mandjes. ter heeft niet alle oppervlakken aangeraakt.
Technische gegevens 23 Het glansmiddeldoseerbakje inschakelen 1. Schakel het apparaat in. 2. Zorg dat het apparaat in de instelmodus staat. 3. Druk tegelijkertijd op de Delay-toets en de Start-toets en houd deze toetsen ingedrukt totdat de programma-indicatielampjes AUTO, PRO en 30MIN gaan knipperen. 4. Laat de toets Delay en Start los. 5. Druk op toets Option. • gaan de programma-indicatielampjes AUTO en 30MIN uit. • Het programma-indicatielampje PRO blijft knipperen.
Milieubescherming verkeerde afvalverwerking. Voor gedetailleerdere informatie over het recyclen van dit product, kunt u contact opnemen met de gemeente, de gemeentereiniging of de winkel waar u het product hebt gekocht. Recycle de materialen met het symbool . Gooi de verpakking in een geschikte verzamelcontainer om het te recyclen.
POUR DES RÉSULTATS PARFAITS Merci d'avoir choisi ce produit AEG. Nous l'avons créé pour vous offrir la meilleure performance pour une longue durée, avec des technologies innovantes qui vous simplifient la vie - autant de caractéristiques que vous ne trouverez pas sûrement pas sur d'autres appareils. Veuillez prendre quelques instants pour lire cette notice afin d'utiliser au mieux votre appareil.
Sommaire SOMMAIRE 27 31 32 34 35 36 37 38 38 39 40 42 43 46 47 Consignes de sécurité Description de l'appareil Bandeau de commande Utilisation de l'appareil Réglage de l'adoucisseur d'eau Utilisation du sel régénérant Utilisation du produit de lavage et du liquide de rinçage Fonction "Tout en 1" Rangement des couverts et de la vaisselle Programmes de lavage Sélection et départ d'un programme de lavage Entretien et nettoyage En cas d'anomalie de fonctionnement Caractéristiques techniques En matière de
Consignes de sécurité 27 CONSIGNES DE SÉCURITÉ Lire attentivement cette notice d'utilisation avant l'installation et l'utilisation de l'appareil : • Pour votre sécurité et la sécurité de votre appareil. • Pour protéger l'environnement. • Pour le bon fonctionnement de l’appareil. Conservez cette notice d'utilisation avec l'appareil. Si vous déménagez ou si l'appareil est cédé à une autre personne, assurez-vous que la notice d'utilisation l'accompagne.
Consignes de sécurité • • • • • • • panier supérieur ou dans le panier à couteaux (tous les modèles ne sont pas équipés d'un panier à couteaux). N'utilisez que des produits (sel, produit de lavage, liquide de rinçage) spécifiques pour lave-vaisselle. Tout autre type de sel non spécialement étudié pour être utilisé dans un lave-vaisselle, en particulier le sel de cuisine, peut endommager l'adoucisseur d'eau. Approvisionnez en sel juste avant de démarrer un programme de lavage.
Consignes de sécurité 29 Précautions contre le gel • N'installez pas l'appareil dans un endroit où la température ambiante est inférieure à 0 °C. • Le fabricant ne pourra être tenu responsable en cas de dommages dus au gel. Tuyau d’arrivée d’eau • Utilisez des tuyaux neufs pour raccorder l'appareil à l'arrivée d'eau. N’utilisez pas de tuyaux usagés. • Ne raccordez pas l’appareil à des conduites neuves ou qui n’ont pas été utilisées depuis longtemps.
Consignes de sécurité • Vérifiez que les données électriques figurant sur la plaque signalétique correspondent à celles de votre réseau. • Utilisez toujours une prise correctement installée, protégée contre les chocs. • L'appareil ne doit pas être raccordé à l'aide d'un prolongateur ou d'une prise multiple. Risque d'incendie. • Ne remplacez et ne modifiez jamais le câble d'alimentation. Contactez votre service après-vente.
Description de l'appareil DESCRIPTION DE L'APPAREIL 10 1 9 2 3 4 5 1 2 3 4 5 6 7 8 9 10 Panier supérieur Sélecteur de dureté de l'eau Réservoir de sel régénérant Distributeur de produit de lavage Distributeur de liquide de rinçage Plaque signalétique Filtres Bras d'aspersion inférieur Bras d'aspersion supérieur Bras d'aspersion supérieur 8 7 6 31
Bandeau de commande BANDEAU DE COMMANDE 2 1 3 9 1 2 3 4 5 6 7 8 9 4 5 8 6 7 Touche Marche/Arrêt Guide des programmes Touche Program Voyants de programme Écran Touche Delay Touche Start Voyants Touche Option Voyants Voyant Tout en 1 Il s'allume lorsque la fonction est activée. Voyant ÖKO PLUS Il s'allume lorsque la fonction est activée. Symboles de déroulement du lavage Il s'allume quand la phase de lavage est en cours.
Bandeau de commande 33 Voyants Voyant du réservoir à sel Il s'allume lorsque le réservoir de sel régénérant doit être rempli. 1) Le voyant de réapprovisionnement en sel régénérant peut rester allumé plusieurs heures après le remplissage du réservoir à sel. Cela n'affecte pas le fonctionnement de l'appareil. Voyant Delay Il s'allume lorsque la fonction de départ différé est activée. Voyant de porte Il s'allume quand la porte est ouverte ou n'a pas été fermée correctement.
Utilisation de l'appareil Touche Option Appuyez sur cette touche pour régler les fonctions. Si la fonction est activée, le voyant correspondant s'allume. Touche Option Tout en 1 ÖKO PLUS Appuyez une fois. ACTIVÉ DÉSACTIVÉ Appuyez deux fois. DÉSACTIVÉ ACTIVÉ Appuyez trois fois. ACTIVÉ ACTIVÉ Appuyez quatre fois. DÉSACTIVÉ DÉSACTIVÉ Fonctions Tout en 1 Si vous utilisez des pastilles de détergent multifonctions (« 3 en 1 », « 4 en 1 » « 5 en 1 », etc.), utilisez la fonction Tout en 1.
Réglage de l'adoucisseur d'eau 3. 4. 5. 6. 7. 35 Remplissez le distributeur de liquide de rinçage. Rangez les couverts et la vaisselle dans le lave-vaisselle. Sélectionnez le programme de lavage en fonction de la charge et du degré de salissure. Remplissez le réservoir avec la quantité nécessaire de produit de lavage. Démarrez le programme de lavage. Si vous utilisez des pastilles de détergent multifonctions (« 3 en 1 », « 4 en 1 » « 5 en 1 », etc.
Utilisation du sel régénérant Réglage manuel Tournez le sélecteur de dureté de l'eau sur 1 ou 2 (reportez-vous au tableau). Réglage électronique 1. Mettez en fonctionnement l'appareil. 2. Contrôlez que l'appareil est en mode Programmation. 3. Appuyez simultanément sur les touches Delay et Start, jusqu'à ce que les voyants des touches AUTO, PRO et 30MIN commencent à clignoter. 4. Relâchez les touches Delay et Start. 5. Appuyez sur la touche Program. • Les voyants de programme PRO et 30MIN s'éteignent.
Utilisation du produit de lavage et du liquide de rinçage 37 Il est normal que de l'eau s'écoule du réservoir lorsque vous le remplissez de sel. UTILISATION DU PRODUIT DE LAVAGE ET DU LIQUIDE DE RINÇAGE 1 3 2 4 30 7 4 MA X + 3 2 - 1 20 6 5 Utilisation du produit de lavage Afin de préserver l'environnement, n'utilisez que la quantité nécessaire de produit de lavage. Respectez les recommandations fournies par le fabricant du produit de lavage qui figurent sur l'emballage du produit.
Fonction "Tout en 1" 1. Appuyez sur la touche de déverrouillage 6 afin d'ouvrir le couvercle 5 du distributeur de liquide de rinçage. 2. Remplissez le distributeur de liquide de rinçage 3 de liquide de rinçage. Le repère 'max.' indique le niveau maximum. 3. Essuyez tout débordement de liquide de rinçage à l'aide de papier absorbant, afin d'éviter une formation excessive de mousse lors du lavage. 4. Vérifiez que le couvercle est fermé après chaque remplissage.
Programmes de lavage 39 Conseils et astuces • Les éponges, les chiffons de nettoyage et tout autre objet absorbant l'eau ne doivent pas être lavés au lave-vaisselle. • Enlevez tous les restes d'aliments. • Laissez tremper les casseroles au fond desquelles adhèrent des restes d'aliments brûlés ou attachés. • Chargez les articles creux, tels que tasses, verres, casseroles, etc. en les retournant, • de manière à ce que l'eau ne s'accumule pas dans le creux ou dans un fond bombé.
Sélection et départ d'un programme de lavage Programme Niveau de sa- Type de charlissure ge Description du programme Ce programme permet de rin- Rinçage cer les plats rapidement. Cela empêche les restes de nourriture de coller sur les plats et évite les mauvaises odeurs. N'utilisez pas de produit de lavage avec ce programme. Fonction ÖKO PLUS Oui, sans impact. 1) L'appareil réagit différemment suivant le degré de salissure et la quantité d'articles insérés dans les paniers.
Sélection et départ d'un programme de lavage 41 6. Appuyez sur la touche Start, le programme de lavage sélectionné démarre automatiquement. • Les voyants de phase s'éteignent, mais le voyant de la phase en cours reste allumé. Lancement du programme de lavage avec départ différé 1. 2. 3. 4. 5. Fermez la porte de l'appareil. Mettez en fonctionnement l'appareil. Contrôlez que l'appareil est en mode Programmation. Sélectionnez un programme et les fonctions de lavage.
Entretien et nettoyage Pour modifier la sélection lorsque le programme a démarré, vous devez annuler le programme. • Appuyez simultanément sur les touches Delay et Start jusqu'à ce que : – Tous les voyants du programme s'allument. – Deux lignes horizontales apparaissent sur l'affichage. Avant de démarrer un nouveau programme de lavage, vérifiez qu'il y a du produit de lavage dans le distributeur correspondant.
En cas d'anomalie de fonctionnement 43 2. Le filtre (A) est constitué de 2 pièces. Pour démonter le filtre, séparez-les. 3. Nettoyez soigneusement les filtres avec de l’eau. 4. Rassemblez les 2 pièces du filtre (A) et poussez. Vérifiez qu'elles s'emboîtent correctement. 5. Retirez le filtre (B). 6. Nettoyez soigneusement le filtre (B) avec de l’eau. 7. Replacez le filtre (B) dans sa position initiale. Vérifiez qu'il est correctement placé dans les deux guides (C). 8.
En cas d'anomalie de fonctionnement • - Le système de sécurité anti-débordement s'est déclenché. AVERTISSEMENT Mettez à l'arrêt l'appareil avant d'effectuer les contrôles. Anomalie de fonctionnement L'appareil n'est pas approvisionné en eau. Cause possible Le robinet d'arrivée d'eau est obstrué ou incrusté de tartre. Solution possible Nettoyez le robinet d'arrivée d'eau. La pression d'eau est trop basse. Contactez votre compagnie locale de distribution des eaux.
En cas d'anomalie de fonctionnement 45 Si l'anomalie persiste, contactez le service après-vente. Si d'autres codes d'alarme s'affichent, contactez le service après-vente. Les informations nécessaires au service après-vente figurent sur la plaque signalétique. Inscrivez les éléments suivants : – Modèle (MOD.) ........................................................ – Référence produit (PNC) .......................................... – Numéro de série (S.N.) ..............................................
Caractéristiques techniques Problème La vaisselle est mouillée. Cause possible Solution possible Le programme de lavage choi- Pour de meilleurs résultats de si n'avait pas de phase de séséchage, entrouvrez la porte chage ou avait une phase de pendant quelques minutes. séchage courte. La vaisselle est mouillée et ter- Le distributeur de liquide de ne. rinçage est vide. Remplissez le distributeur de liquide de rinçage.
En matière de protection de l'environnement 47 Si l'eau chaude est produite à partir de sources énergétiques alternatives plus respectueuses de l'environnement (par ex. panneaux solaires ou photovoltaïques et énergie éolienne), utilisez un raccordement à l'eau chaude pour réduire la consommation énergétique. EN MATIÈRE DE PROTECTION DE L'ENVIRONNEMENT Le symbole sur le produit ou son emballage indique que ce produit ne peut être traité comme déchet ménager.
FOR PERFECT RESULTS Thank you for choosing this AEG product. We have created it to give you impeccable performance for many years, with innovative technologies that help make life simpler – features you might not find on ordinary appliances. Please spend a few minutes reading to get the very best from it. ACCESSORIES AND CONSUMABLES In the AEG webshop, you’ll find everything you need to keep all your AEG appliances looking spotless and working perfectly.
Contents 49 CONTENTS 50 53 54 56 57 58 59 60 60 61 62 64 65 67 68 Safety information Product description Control panel Use of the appliance Setting the water softener Use of dishwasher salt Use of detergent and rinse aid Multitab function Loading cutlery and dishes Washing programmes Select and start a washing programme Care and cleaning What to do if… Technical data Environment concerns The following symbols are used in this user manual: Important information concerning your personal safety and informa
Safety information SAFETY INFORMATION Before the installation and use, read this manual carefully: • For your safety and the safety of your property. • To help the environment. • For the correct operation of the appliance. Always keep these instructions with the appliance also if you move or give it to a different person. The manufacturer is not responsible if an incorrect installation and use causes damage.
Safety information 51 • Do not fill the rinse aid dispenser with other products than the rinse aid, (dishwasher cleaning agent, liquid detergent). This can cause damage to the appliance. • Make sure that the spray arms can move freely before you start a washing programme. • The appliance can release hot steam if you open the door while a washing programme operates. There is a risk of skin burns. • Do not remove the dishes from the appliance until the washing programme is completed.
Safety information • The water inlet hose has a safety valve and a double sheath with an inner mains cable. There is pressure in the water inlet hose only when the water flows. If there is a leak in the water inlet hose, the safety valve interrupts the flow of water. – Be careful when you connect the water inlet hose: – Do not put the water inlet hose or the safety valve in water. – If the water inlet hose or the safety valve are damaged, immediately disconnect the mains plug from the mains socket.
Product description 53 – Remove the door catch. This prevents children or pets to be closed in the appliance. There is a risk of suffocation. – Discard the appliance at the local waste disposal centre. WARNING! The dishwasher detergents are dangerous and can cause corrosion ! • If an accident occurs with these detergents, contact immediately a physician. • If the detergent gets into the mouth, contact immediately a physician.
Control panel CONTROL PANEL 2 1 3 9 1 2 3 4 5 6 7 8 9 4 5 8 6 7 On/off button Programme guide Program button Programme indicators Display Delay button Start button Indicators Option button Indicators Multitab indicator. It comes on when you activate the function. ÖKO PLUS indicator. It comes on when you activate the function. Washing phase indicator. It comes on when the washing phase operates. Rinsing phase indicator. It comes on when the rinsing phases operate. Drying phase indicator.
Control panel 55 Indicators Door indicator. It comes on when the door is open or not closed correctly. 1) When the salt container and/or the rinse aid dispenser are empty, the related indicators do not come on while a washing programme operates. On/off button Press this button to activate or deactivate the appliance. After ten minutes from the end of the washing programme, the AUTO OFF function automatically deactivates the appliance. This helps to decrease energy consumption.
Use of the appliance Option button Multitab ÖKO PLUS Press three times ACTIVATED ACTIVATED Press four times DEACTIVATED DEACTIVATED Functions Multitab If you use the combi detergent tablets ('3 in 1', '4 in 1', '5 in 1'), use the multitab function. Refer to 'Multitab function'. ÖKO PLUS This function decreases the temperature in the drying phase. The power consumption decreases by 25%. The dishes can be wet at the end of the programme when you open the appliance door.
Setting the water softener 57 If you use the combi detergent tablets ('3 in 1', '4 in 1', '5 in 1'), use the multitab function (refer to 'Multitab function'). SETTING THE WATER SOFTENER The water softener removes minerals and salts from the water supply. These minerals and salts can cause damage to the appliance. Adjust the level of the water softener if this does not agree with the water hardness in your area. Contact your local water authority to know the water hardness in your area.
Use of dishwasher salt Electronic adjustment 1. Activate the appliance. 2. Make sure that the appliance is in setting mode. 3. Press and hold the Delay button and the Start button at the same time until the programme indicators AUTO, PRO and 30MIN flash. 4. Release the Delay button and the Start button. 5. Press the Program button, • The programme indicators PRO and 30MIN go off. • The programme indicator AUTO continues to flash. = level 5).
Use of detergent and rinse aid 59 USE OF DETERGENT AND RINSE AID 1 3 2 4 30 7 4 MA X + 3 2 - 1 20 6 5 Use of detergent To help the environment, do not use more than the correct quantity of detergent. Obey the instructions on the detergent packaging. How to fill the detergent dispenser: 1. Press the release button 2 to open the lid 7 of the detergent dispenser. 2. Put the detergent in the dispenser 1 . 3.
Multitab function You can set the rinse aid dosage between position 1 (lowest dosage) and position 4 (highest dosage). Turn the rinse aid selector 4 to increase or decrease the dosage. MULTITAB FUNCTION The multitab function is for combi detergent tablets. These tablets contain agents as detergent, rinse aid and dishwasher salt. Some types of tablets can contain other agents.
Washing programmes • • • • 61 Mix the spoons with other cutlery to prevent them to bond together. When you put the items in the baskets, make sure that the water can touch all surfaces. Put light items in the upper basket. Make sure that the items do not move. Water droplets can collect on plastic items and non-stick pans.
Select and start a washing programme Energy (kWh) Programme1) 0,1 Water (litre) 4 1) The display shows the programme time. The water pressure and temperature, the variations of the mains supply and the quantity of dishes can change the consumption values. SELECT AND START A WASHING PROGRAMME Starting the washing programme without delay start 1. 2. 3. 4. Close the appliance door. Activate the appliance. Make sure that the appliance is in setting mode. Set the washing programme.
Select and start a washing programme 63 Cancelling the delay start The countdown is not operating 1. Press the Delay button again and again until: • The display shows the time of the washing programme. • The phase indicators come on. 2. Press the Start button to start the washing programme. The countdown is operating 1. Press the Delay button again and again until: • The display shows the time of the washing programme. • The phase indicators come on. • The washing programme starts automatically.
Care and cleaning CARE AND CLEANING To remove and clean the filters Dirty filters decrease the washing results. Although the maintenance is very low with these filters, make a check at intervals and if necessary, clean them. 1. Turn the filter (A) counterclockwise and remove it out from filter (B). B A 2. Filter (A) has two parts. To disassemble the filter, pull them apart. 3. Fully clean the parts with water. 4. Put the two parts of the filter (A) together and push.
What to do if… 65 If the holes in the spray arms become clogged, remove remaining parts of soil with a thin pointed object. To clean the external surfaces Clean the external surfaces of the appliance and control panel with a moist soft cloth. Only use neutral detergents. Do not use abrasive products, abrasive cleaning pads or solvents (acetone). WHAT TO DO IF… The start of the appliance does not occur or it stops during operation. First try to find a solution to the problem (refer to the table).
What to do if… Malfunction Possible cause Possible solution You did not press the Start touchpad or button. Press the Start touchpad or button. The mains plug is not connected in the mains socket. Connect the mains plug. The fuse in the fuse box is dam- Replace the fuse. aged. The delay start is set. • Cancel the delay start. • When the countdown is completed, the washing programme starts automatically. After the check, activate the appliance.
Technical data Problem Possible cause 67 Possible solution The salt container cap is not closed correctly. Make sure that the salt container cap is closed correctly. There are streaks, whitish stains, or a bluish layer on glasses and dishes. The rinse aid quantity is too high. Decrease the rinse aid quantity. Dry water drop stains on glasses and dishes. The rinse aid quantity is too low. Increase the rinse aid quantity. The detergent can be the cause. Use a different brand of detergent.
Environment concerns Water supply pressure Water supply 1) Capacity Minimum 0,5 bar (0,05 MPa) Maximum 8 bar (0,8 MPa) Cold water or hot water Place settings maximum 60 °C 12 1) Connect the water inlet hose to a water tap with a 3/4'' thread. The rating plate on the inner edge of the appliance door shows the electrical connection data. If the hot water comes from alternative sources of energy, (e.g.
www.aeg-electrolux.