FAVORIT 77012 NL Gebruiksaanwijzing EN User manual FR Notice d'utilisation DE Benutzerinformation 2 20 37 55
www.aeg.com INHOUD 1. 2. 3. 4. 5. 6. 7. 8. 9. 10. 11. 12. 13. VEILIGHEIDSINFORMATIE . . . . . . . . . . . . . . . . . . . . . . . . . . . . . . . . . . . . . . . . . . . . . . . . . . 3 BESCHRIJVING VAN HET PRODUCT . . . . . . . . . . . . . . . . . . . . . . . . . . . . . . . . . . . . . . . . . . 5 BEDIENINGSPANEEL . . . . . . . . . . . . . . . . . . . . . . . . . . . . . . . . . . . . . . . . . . . . . . . . . . . . . . . 5 PROGRAMMA’S . . . . . . . . . . . . . . . . . . . . . . . . . . . . . . . . .
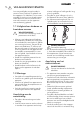
NEDERLANDS 1. 3 VEILIGHEIDSINFORMATIE Lees zorgvuldig de meegeleverde instructies voor installatie en gebruik van het apparaat. De fabrikant is niet verantwoordelijk voor letsel en schade veroorzaakt door een foutieve installatie. Bewaar de instructies van het apparaat voor toekomstig gebruik. nieuwe leidingen of leidingen die lang niet zijn gebruikt. • Zorg dat er geen lekkages zijn als u het apparaat de eerste keer gebruikt.
www.aeg.com ervoor dat het netsnoer na installatie bereikbaar is. • Trek niet aan het aansluitnoer om het apparaat los te koppelen. Trek altijd aan de stekker. 1.3 Gebruik • Dit apparaat is bedoeld voor huishoudelijk gebruik of gelijksoortige toepassingen zoals: – Personeelskeukens in winkels, kantoren of andere werkomgevingen – Boerderijen – Door gasten in hotels, motels en andere residentiële omgevingen – Bed-and-breakfast accomodaties. WAARSCHUWING! Gevaar voor letsel.
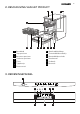
NEDERLANDS 2. BESCHRIJVING VAN HET PRODUCT 2 1 3 4 13 12 10 9 11 7 8 6 5 1 Bovenblad 8 Waterhardheidsknop 2 Top sproeiarm 3 Bovenste sproeiarm 9 Glansmiddeldoseerbakje 10 Wasmiddeldoseerlade 4 Onderste sproeiarm 11 Bestekmand 5 Filters 6 Typeplaatje 12 Onderrek 13 Bovenrek 7 Zoutreservoir 3.
www.aeg.com 1 Aan/uit-toets 5 Delay-toets 2 Program-toets 3 Programma-indicatielampjes 6 Start-toets 4 Display (weergave) 8 Option-toets Indicatielampjes 7 Indicatielampjes Beschrijving Multitab-indicatielampje. ExtraHygiene-indicatielampje. Wasfase-indicatielampje. Spoelfase-indicatielampje. Droogfase-indicatielampje. Einde-indicatielampje. Glansmiddelindicatielampje. Dit indicatielampje is uit als het programma werkt. Zoutindicatielampje. Dit indicatielampje is uit als het programma werkt.
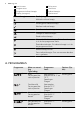
NEDERLANDS Programma 5) 6) Mate van vervuiling Type lading Programma fasen Options (Opties) Normaal bevuild Serviesgoed en bestek Voorspoelen Wassen 50 °C Spoelingen Drogen ExtraHygiene Licht bevuild Serviesgoed en bestek Wassen 55 °C Spoelingen ExtraHygiene Alles Voorspoelen 7 1) Het apparaat detecteert de mate van vervuiling en de hoeveelheid serviesgoed in de korven. De temperatuur en hoeveelheid water, het energieverbruik en de programmaduur worden automatisch aangepast.
www.aeg.com 5. OPTIES Schakel de opties in of uit, voordat u een programma start. U kunt de opties niet inschakelen of uitschakelen als er een programma bezig is. Zorg er als één of meerdere opties worden ingesteld voor dat de bijbehorende lampjes branden voordat het programma start. 5.1 Multitabfunctie Activeer deze optie alleen als u allesin-1-tabletten gebruikt. Deze optie stopt de stroom van glansmiddel en zout. De bijbehorende indicatielampje gaan uit. De programmaduur kan stijgen.
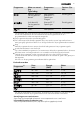
NEDERLANDS 9 Waterontharder afstelling Waterhardheid Duitse graden (°dH) Franse graden (°fH) mmol/l Clarkegraden Handmatig Elektronisch 43 - 50 76 - 90 7,6 - 9,0 53 - 63 2 1) 9 37 - 42 65 - 75 6,5 - 7,5 46 - 52 21) 8 29 - 36 51 - 64 5,1 - 6,4 36 - 45 21) 7 23 - 28 40 - 50 4,0 - 5,0 28 - 35 21) 6 19 - 22 33 - 39 3,3 - 3,9 23 - 27 21) 51) 15 - 18 26 - 32 2,6 - 3,2 18 - 22 1 4 11 - 14 19 - 25 1,9 - 2,5 13 - 17 1 3 4 - 10 7 - 18 0,7 - 1,8 5 - 12 1 2 <4 <
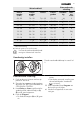
www.aeg.com 6.2 Het zoutreservoir vullen 1. 2. 3. 4. 5. Draai de dop linksom om het zoutreservoir te openen. Doe een liter water in het zoutreservoir (alleen de eerste keer). Vul het zoutreservoir met regenereerzout. Verwijder het zout rond de opening van het zoutreservoir. Draai de dop rechtsom om het zoutreservoir te sluiten. LET OP! Water en zout kunnen uit het zoutreservoir stromen als u het bijvult. Gevaar voor roest.
NEDERLANDS 11 5. U dient het juiste programma in te stellen en te starten voor het type lading en de mate van vervuiling. 7.1 Vaatwasmiddel gebruiken A 1. B 2. 30 3. 4 MAX + 32 - 1 20 C 4. 5. 7.2 Een programma instellen en starten Instelmodus Het apparaat moet in de instelmodus staan om bepaalde acties te accepteren. Het apparaat staat in de instelmodus als, na de activering: • Alle programmalampjes aan gaan. • De display twee horizontale statusstreepjes weergeeft.
www.aeg.com – Het indicatielampje van de lopende fase gaat aan. De deur openen als het apparaat in werking is Als u de deur opent, stopt het apparaat. Als u de deur weer sluit, gaat het apparaat verder vanaf het punt van onderbreking. De uitgestelde start annuleren tijdens het aftellen Blijf op Delay drukken tot: • Het display geeft de programmaduur weer. • De fase-indicatielampjes aan gaan. • Het programma wordt gestart.
NEDERLANDS • Voor het gemakkelijk verwijderen van aangebrande voedselresten weekt u de pannen eerst in water voordat u ze in het apparaat plaatst. • Plaats holle voorwerpen (bijv. kopjes, glazen en pannen) met de opening naar beneden. • Zorg ervoor dat serviesgoed en bestek niet in elkaar schuiven. Meng lepels met ander bestek. • Zorg er voor dat glazen andere glazen niet aanraken • Leg kleine voorwerpen in de bestekmand. • Leg lichte voorwerpen in de bovenste korf.
www.aeg.com 9.1 De filters reinigen C 1. Draai het filter (A) linksom en verwijder het. 2. Haal om het filter (A) te demonteren, (A1) en (A2) uit elkaar. Verwijder het filter (B). Reinig de filters met water. Zet het filter (B) terug in de startpositie. Zorg ervoor dat ze goed worden gemonteerd onder de twee geleiders (C). C A B A1 3. 4. 5. A2 6. Monteer het filter (A) en zet het in positie in filter (B). Rechtsom draaien tot het vastzit.
NEDERLANDS • 15 WAARSCHUWING! Schakel het apparaat uit voordat u controles uitvoert. - Het apparaat pompt geen water weg. • - Het bescherminssysteem tegen waterlekkage is in werking getreden. Storing Mogelijke oorzaak Mogelijke oplossing Het programma start niet. De stekker zit niet in het stopcontact. Sluit de stekker aan. De deur van het apparaat is open. Sluit de deur van het apparaat. U hebt niet op toets Start gedrukt. Druk op Start. De zekering in de zekering- Vervang de zekering.
www.aeg.com • Er is te veel vaatwasmiddel gebruikt. Vlekken en droog water komen op glazen en serviesgoed terecht. • De vrijgegeven hoeveelheid glansmiddel is niet voldoende. Stel de keuzeschakelaar van het glansmiddel in op een hogere stand. • De kwaliteit van het vaatwasmiddel kan de oorzaak zijn. Het serviesgoed is nat. • Het afwasprogramma bevatte geen droogfase of een droogfase op lage temperatuur. • Het glansmiddeldoseerbakje is leeg. • De kwaliteit van het glansmiddel kan de oorzaak zijn.
NEDERLANDS 17 11.1 Plaatsing onder een keukenaanrecht 1. Zorg er voor dat de afmetingen van de opening overeenkomen met de afmetingen in de afbeelding. 2. Zet het apparaat naast een waterkraan en een afvoer. 570-600 mm 820 mm 600 mm 3. 4. 1 5. 2 3 4 Verwijder het werkbad van het apparaat. Gebruik de instelbare voetjes om het apparaat waterpas te zetten. Als het apparaat waterpas staat sluit de deur goed af. Installeer het apparaat onder het aanrecht van de keuken.
www.aeg.com 11.2 Aansluiting waterafvoerslang max. 850 mm max. 4000 mm min. 400 mm Sluit de waterafvoerslang aan op: • De afvoer van de gootsteen. Bevestig de waterafvoerslang onder het keukenaanrecht. Hiermee wordt voorkomen dat het afvalwater van de gootsteen terug het apparaat in. • Een standpijp met ventilatieopening. De binnendiameter moet minimaal 40 mm zijn. Verwijder de stop uit de afvoer als het apparaat het water wegpompt. Dit voorkomt dat het water terug loopt naar het apparaat.
NEDERLANDS 19 2) Als het hete water door alternatieve, milieuvriendelijkere energiebronnen geproduceerd wordt (bijv. zonnepanelen en windenergie), gebruik dan een heetwatervoorziening om het energieverbruik te verminderen. 13. MILIEUBESCHERMING Recycle de materialen met het symbool . Gooi de verpakking in een geschikte verzamelcontainer om het te recyclen. Help om het milieu en de volksgezondheid te beschermen en recycle het afval van elektrische en elektronische apparaten.
www.aeg.com CONTENTS 1. 2. 3. 4. 5. 6. 7. 8. 9. 10. 11. 12. 13. SAFETY INFORMATION . . . . . . . . . . . . . . . . . . . . . . . . . . . . . . . . . . . . . . . . . . . . . . . . . . . PRODUCT DESCRIPTION . . . . . . . . . . . . . . . . . . . . . . . . . . . . . . . . . . . . . . . . . . . . . . . . . . CONTROL PANEL . . . . . . . . . . . . . . . . . . . . . . . . . . . . . . . . . . . . . . . . . . . . . . . . . . . . . . . . PROGRAMMES . . . . . . . . . . . . . . . . . . . . . . . . . . . . . . . . .
ENGLISH 1. 21 SAFETY INFORMATION Before the installation and use of the appliance, carefully read the supplied instructions. The manufacturer is not responsible if an incorrect installation and use causes injuries and damages. Always keep the instructions with the appliance for future reference. • The water inlet hose has a safety valve and a sheath with an inner mains cable. 1.1 Children and vulnerable people safety WARNING! Risk of suffocation, injury or permanent disability.
www.aeg.com – Staff kitchen areas in shops, offices and other working environments – Farm houses – By clients in hotels, motels and other residential type environments – Bed and breakfast type environments. completed. There can be detergent on the dishes. WARNING! Risk of electrical shock, fire or burns. • Do not put flammable products or items that are wet with flammable products in, near or on the appliance. • Do not use water spray and steam to clean the appliance.
ENGLISH 1 Worktop 8 Water hardness dial 2 Top spray arm 3 Upper spray arm 9 Rinse aid dispenser 10 Detergent dispenser 4 Lower spray arm 11 Cutlery basket 5 Filters 12 Lower basket 6 Rating plate 7 Salt container 13 Upper basket 3. CONTROL PANEL 1 2 8 A B C 4 3 7 5 6 1 On/off button 5 Delay button 2 Program button 6 Start button 3 Programme indicators 4 Display 7 Indicators Indicators 8 Option button Description Multitab indicator. ExtraHygiene indicator. Washing phase indicator.
www.aeg.com Indicators Description Door indicator. It comes on when the door is not closed. 4.
ENGLISH 25 Consumption values Programme1) Duration (min) Energy (kWh) Water (l) 40 - 150 0.6 - 1.4 7 - 14 140 - 160 1.4 - 1.6 13 - 14 200 - 220 1.1 - 1.2 9 - 11 30 0.8 9 160 - 180 0.8 - 1.9 9 - 10 50 - 60 1.0 - 1.1 10 - 11 14 0.1 4 1) The pressure and the temperature of the water, the variations of the mains supply, the options and the quantity of dishes can change the programme duration and the consumption values.
www.aeg.com If the option is not applicable to the programme, the indicator does not come on. 6. BEFORE FIRST USE 1. Make sure that the set level of the water softener agrees with the water hardness in your area. If not, adjust the water softener. Contact your local water authority to know the water hardness in your area. 2. Fill the salt container. 3. Fill the rinse aid dispenser. 4. Open the water tap. 5. Processing residues can stay in the appliance. Start a programme to remove them.
ENGLISH 27 Manual adjustment Turn the water hardness dial to the position 1 or 2. Electronic adjustment 1. Press the on/off button to activate the appliance. 2. Make sure that the appliance is in setting mode. Refer to ‘SETTING AND STARTING A PROGRAMME’. 3. Press and hold Delay and Start at the same time until the indicators (A), (B) and (C) flash. 4. Press Program. • The indicators (B) and (C) go off. • The indicator (A) continues to flash. • The display shows the setting of = the water softener.
www.aeg.com 6.3 Filling the rinse aid dispenser 1. Press the release button (D) to open the lid (C). 2. Fill the rinse aid dispenser (A), no more than the mark 'max'. 3. Remove the spilled rinse aid with an absorbent cloth to prevent too much foam. 4. Close the lid. Make sure that the release button locks into position. B A M AX 4 3 2 1 + - C D You can turn the selector of the released quantity (B) between position 1 (lowest quantity) and position 4 (highest quantity). 7. DAILY USE 1.
ENGLISH 29 the same time until the appliance is in setting mode. Opening the door while the appliance operates Starting a programme without delay start If you open the door, the appliance stops. When you close the door, the appliance continues from the point of interruption. 1. Open the water tap. 2. Press the on/off button to activate the appliance. 3. Close the appliance door. 4. Make sure that the appliance is in setting mode. 5.
www.aeg.com • Let the dishes become cold before you remove them from the appliance. Hot dishes can be easily damaged. • First remove the items from the lower basket, then from the upper basket. • There can be water on the sides and on the door of the appliance. Stainless steel becomes cool more quickly than the dishes. 8. HINTS AND TIPS 8.1 The water softener Hard water contains a high quantity of minerals that can cause damage to the appliance and bad washing results.
ENGLISH 8.4 Before starting a programme Make sure that: • The filters are clean and correctly installed. • The spray arms are not clogged. • The position of the items in the baskets is correct. 31 • The programme is applicable for the type of load and for the degree of soil. • The correct quantity of detergent is used. • There is dishwasher salt and rinse aid (unless you use combi detergent tablets). • The cap of the salt container is tight. 9.
www.aeg.com 6. Assemble the filter (A) and put it into position in filter (B). Turn it clockwise until it locks. An incorrect position of the filters can cause bad washing results and damage to the appliance. 9.2 Cleaning the spray arms Do not remove the spray arms. If the holes in the spray arms are clogged, remove remaining parts of soil with a thin pointed object. Only use neutral detergents. Do not use abrasive products, abrasive cleaning pads or solvents. 9.
ENGLISH Problem Possible cause Possible solution The water pressure is too low. Contact your local water authority. 33 The water tap is clogged or Clean the water tap. there is limescale on it. The filter in the water inlet hose is clogged. Clean the filter. The water inlet hose has a kink or a bend. Make sure that the position of the hose is correct. The anti-flood device is on. Close the water tap and There are water leakages in contact the Service. the appliance.
www.aeg.com 11. INSTALLATION WARNING! Refer to “SAFETY INFORMATION”. 11.1 Installation under a kitchen counter Make sure that the dimensions of the recess agree with the dimensions in the figure. 2. Put the appliance adjacent to a water tap and a water drain. 1. 570-600 mm 820 mm 600 mm 3. 4. 1 5. 2 3 4 Remove the worktop of the appliance. Loosen or tighten the adjustable feet for a correct level of the appliance. With a correct level the appliance door closes and seals correctly.
ENGLISH 35 11.2 Water drain connection max. 850 mm max. 4000 mm min. 400 mm Connect the water drain hose to: • The sink spigot. Attach the water drain hose under the kitchen counter. This prevents that waste water from the sink goes back to the appliance. • A stand pipe with vent-hole. The internal diameter must be minimum 40 mm. Remove the sink plug when the appliance drains. This prevents water to go back to the appliance.
www.aeg.com 13. ENVIRONMENT CONCERNS Recycle the materials with the symbol . Put the packaging in applicable containers to recycle it. Help protect the environment and human health and to recycle waste of electrical and electronic appliances. Do not dispose appliances marked with the symbol with the household waste. Return the product to your local recycling facility or contact your municipal office.
FRANÇAIS 37 SOMMAIRE 1. 2. 3. 4. 5. 6. 7. 8. 9. 10. 11. 12. 13. CONSIGNES DE SÉCURITÉ . . . . . . . . . . . . . . . . . . . . . . . . . . . . . . . . . . . . . . . . . . . . . . . . . DESCRIPTION DE L'APPAREIL . . . . . . . . . . . . . . . . . . . . . . . . . . . . . . . . . . . . . . . . . . . . . . BANDEAU DE COMMANDE . . . . . . . . . . . . . . . . . . . . . . . . . . . . . . . . . . . . . . . . . . . . . . . . PROGRAMMES . . . . . . . . . . . . . . . . . . . . . . . . . . . . . . . . . . . . . . . .
www.aeg.com 1. CONSIGNES DE SÉCURITÉ Avant d'installer et d'utiliser cet appareil, lisez soigneusement les instructions fournies. Le fabricant ne peut être tenu pour responsable des dommages et blessures liés à une mauvaise installation ou utilisation. Conservez toujours cette notice avec votre appareil pour vous y référer ultérieurement. 1.
FRANÇAIS tallation. Assurez-vous que la prise de courant est accessible une fois l'appareil installé. • Ne tirez pas sur le câble électrique pour débrancher l'appareil. Tirez toujours sur la prise. 1.
www.aeg.com 2. DESCRIPTION DE L'APPAREIL 2 1 3 4 13 12 10 9 11 7 8 6 5 1 Plan de travail 8 Sélecteur de dureté de l'eau 2 Bras d'aspersion supérieur 3 Bras d'aspersion intermédiaire 9 Distributeur de liquide de rinçage 10 Distributeur de produit de lavage 4 Bras d'aspersion inférieur 11 Panier à couverts 5 Filtres 6 Plaque signalétique 12 Panier inférieur 13 Panier supérieur 7 Réservoir de sel régénérant 3.
FRANÇAIS 1 Touche Marche/Arrêt 5 Touche Delay 2 Touche Program 3 Voyants des programmes 6 Touche Start 4 Affichage 8 Touche Option Voyants 41 7 Voyants Description Voyant « Tout en 1 ». Voyant ExtraHygiene. Voyant de phase de lavage. Voyant de phase de rinçage. Voyant de phase de séchage. Voyant de fin. Voyant du réservoir de liquide de rinçage. Ce voyant est éteint pendant le déroulement du programme. Voyant du réservoir de sel régénérant. Ce voyant est éteint pendant le déroulement du programme.
www.aeg.com Programme 4) 5) 6) Degré de salissure Type de charge Phases du programme Options Vaisselle fraîchement salie Vaisselle et couverts Lavage à 60 °C Rinçage ExtraHygiene Normalement sale Vaisselle et couverts Prélavage Lavage à 50 °C Rinçages Séchage ExtraHygiene Légèrement sale Vaisselle et couverts Lavage à 55 °C Rinçages ExtraHygiene Tous Prélavage 1) L'appareil détecte le degré de salissure et la quantité de vaisselle dans les paniers.
FRANÇAIS 43 Informations pour les instituts de test Pour toute information relative aux performances de test, envoyez un courrier électronique à l'adresse : info.test@dishwasher-production.com Notez le numéro du produit (PNC) situé sur la plaque signalétique. 5. OPTIONS Activez ou désactivez les options avant de démarrer un programme. Vous ne pouvez pas activer ni désactiver les options pendant le déroulement d'un programme.
www.aeg.com reil. Démarrez un programme pour les évacuer. N'utilisez pas de produit de lavage et ne chargez pas les paniers. Si vous utilisez des pastilles de détergent multifonctions, activez l'option « Tout en 1 ». 6.1 Réglage de l'adoucisseur d'eau Réglage de l'adoucisseur d'eau Dureté de l'eau Degrés allemands (°dH) Degrés français (°tH) mmol/l Degrés Clarke Manuel Électronique 51 - 70 91 - 125 9.1 - 12.5 64 - 88 2 1) 10 43 - 50 76 - 90 7.6 - 9.
FRANÇAIS • Les voyants (B) et (C) s'éteignent. • Le voyant (A) continue à clignoter. • L'écran indique le réglage de l'adoucisseur d'eau. Exemple : = niveau 5. 45 5. Appuyez sur Program à plusieurs reprises pour modifier le réglage. 6. Mettez à l'arrêt l'appareil pour confirmer. 6.2 Remplissage du réservoir de sel régénérant 1. 2. 3. 4. 5. Tournez le couvercle vers la gauche et ouvrez le réservoir de sel régénérant.
www.aeg.com 7. UTILISATION QUOTIDIENNE 1. Ouvrez le robinet d'eau. 2. Appuyez sur la touche Marche/Arrêt pour allumer l'appareil. Assurez-vous que l'appareil est en mode Programmation ; reportez-vous au chapitre « RÉGLAGE ET DÉPART D'UN PROGRAMME ». • Si le voyant du réservoir de sel régénérant est allumé, remplissez le réservoir. • Si le voyant du liquide de rinçage est allumé, remplissez le distributeur de liquide de rinçage. 3. Chargez les paniers. 4. Ajoutez du produit de lavage. 5.
FRANÇAIS • Seul le voyant correspondant à la phase en cours reste allumé. • L'affichage indique le décompte de la durée du programme par intervalles d'une minute. Démarrage d'un programme avec départ différé 1. Sélectionnez le programme et les options. 2. Appuyez sur Delay à plusieurs reprises jusqu'à ce que l'affichage indique le délai choisi pour le départ différé (de 1 à 24 heures). • Le délai clignote sur l'affichage. • Le voyant correspondant au départ différé s'allume. 3. Appuyez sur Start.
www.aeg.com 8. CONSEILS 8.1 Adoucisseur d'eau L'eau dure contient une grande quantité de minéraux pouvant endommager l'appareil et donner de mauvais résultats de lavage. L'adoucisseur d'eau neutralise ces minéraux. Le sel régénérant préserve la propreté et le bon état de l'adoucisseur d'eau. Il est important de régler l'adoucisseur d'eau sur un niveau adéquat. Cela garantit que l'adoucisseur d'eau utilise la quantité correcte de sel régénérant et d'eau. 8.
FRANÇAIS lisez des pastilles de détergent multifonctions). 49 • Le bouchon du réservoir de sel régénérant est vissé. 9. ENTRETIEN ET NETTOYAGE AVERTISSEMENT Avant toute opération d'entretien, éteignez l'appareil et débranchez la prise secteur. Les filtres sales et les bras d'aspersion obstrués diminuent les résultats de lavage. Contrôlez-les régulièrement et nettoyez-les si nécessaire. 9.1 Nettoyage des filtres C 1. Tournez le filtre (A) vers la gauche et sortez-le. 2.
www.aeg.com abrasifs, de tampons à récurer ni de solvants. 10. EN CAS D'ANOMALIE DE FONCTIONNEMENT L'appareil ne démarre pas ou s'arrête en cours de programme. Veuillez vous reporter aux informations suivantes avant de contacter le service après-vente pour résoudre un problème. Pour certaines anomalies, l'écran affiche un code d’alarme : • - L'appareil n'est pas approvisionné en eau. • • - L'appareil ne se vidange pas. - Le système de sécurité anti-débordement s'est déclenché.
FRANÇAIS Après avoir effectué les vérifications, mettez l'appareil en fonctionnement. Le programme reprend là où il a été interrompu. Si le problème persiste, contactez le service après-vente. Si l'écran affiche d'autres codes d'alarme, contactez le service après-vente. 10.1 Si les résultats de lavage et de séchage ne sont pas satisfaisants Traînées blanchâtres ou pellicules bleuâtres sur les verres et la vaisselle • La quantité de liquide de rinçage libérée est trop importante.
www.aeg.com 11.1 Installation sous un plan de travail de cuisine 1. Vérifiez que les dimensions de la niche correspondent aux dimensions de l'illustration. 2. Placez l'appareil à proximité d'un robinet d'arrivée d'eau et d'un dispositif d'évacuation d'eau. 570-600 mm 820 mm 600 mm 3. 4. 1 5. 2 3 4 Retirez le plan de travail de l'appareil. Desserrez ou serrez les pieds réglables pour que l'appareil soit de niveau. La porte de l'appareil se ferme correctement lorsque l'appareil est de niveau.
FRANÇAIS 53 11.2 Raccordement du tuyau de vidange max. 850 mm max. 4000 mm min. 400 mm Raccordez le tuyau de vidange au : • Siphon de l'évier. Fixez le tuyau d'évacuation d'eau sous le plan de travail de la cuisine. Cela empêche tout reflux des eaux usées de l'évier vers l'appareil. • Une conduite verticale avec évent. Le diamètre intérieur ne doit pas être inférieur à 40 mm. Retirez la bonde de l'évier lorsque l'appareil évacue l'eau. Cela empêche l'eau de repartir dans l'appareil.
www.aeg.com Consommation électrique Mode « Veille » 0.10 W Mode « Arrêt » 0.10 W 1) Raccordez le tuyau d'arrivée d'eau à un robinet fileté (3/4 pouce). 2) Si l'eau chaude est produite à partir de sources d'énergie respectueuses de l'environnement (par exemple, panneaux solaires ou énergie éolienne), utilisez une arrivée d'eau chaude afin de réduire la consommation d'énergie. 13. EN MATIÈRE DE PROTECTION DE L'ENVIRONNEMENT Recyclez les matériaux portant le symbole .
DEUTSCH 55 INHALT 1. 2. 3. 4. 5. 6. 7. 8. 9. 10. 11. 12. 13. SICHERHEITSHINWEISE . . . . . . . . . . . . . . . . . . . . . . . . . . . . . . . . . . . . . . . . . . . . . . . . . . . GERÄTEBESCHREIBUNG . . . . . . . . . . . . . . . . . . . . . . . . . . . . . . . . . . . . . . . . . . . . . . . . . . BEDIENFELD . . . . . . . . . . . . . . . . . . . . . . . . . . . . . . . . . . . . . . . . . . . . . . . . . . . . . . . . . . . . . PROGRAMME . . . . . . . . . . . . . . . . . . . . . . . . . . . . . . . .
www.aeg.com 1. SICHERHEITSHINWEISE Lesen Sie die mitgelieferte Anleitung sorgfältig vor der Montage und dem ersten Gebrauch des Geräts durch. Der Hersteller ist nicht dafür verantwortlich, wenn eine fehlerhafte Montage oder Verwendung Verletzungen und Schäden verursacht. Bewahren Sie die Anleitung zusammen mit dem Gerät für den zukünftigen Gebrauch auf. 1.1 Sicherheit von Kindern und schutzbedürftigen Personen WARNUNG! Erstickungs- und Verletzungsgefahr oder Gefahr einer dauerhaften Behinderung.
DEUTSCH • Achten Sie darauf, Netzstecker und Netzkabel nicht zu beschädigen. Wenden Sie sich zum Austausch des beschädigten Netzkabels an den Kundendienst oder einen Elektriker. • Stecken Sie den Netzstecker erst nach Abschluss der Montage in die Steckdose. Stellen Sie sicher, dass der Netzstecker nach der Montage noch zugänglich ist. • Ziehen Sie nicht am Netzkabel, wenn Sie das Gerät vom Stromnetz trennen möchten. Ziehen Sie dazu immer direkt am Netzstecker. 1.
www.aeg.com 2. GERÄTEBESCHREIBUNG 2 1 3 4 13 12 10 9 11 7 8 6 5 1 Arbeitsplatte 8 Wasserhärtestufen-Wähler 2 Oberer Sprüharm 3 Mittlerer Sprüharm 9 Klarspülmittel-Dosierer 10 Reinigungsmittelbehälter 4 Unterer Sprüharm 11 Besteckkorb 5 Filter 6 Typenschild 12 Unterkorb 13 Oberkorb 7 Salzbehälter 3.
DEUTSCH 1 Taste „Ein/Aus“ 5 Delay-Taste 2 Program-Taste 3 Programm-Kontrolllampen 6 Start-Taste 4 Display 8 Option-Taste Kontrolllampen 7 Kontrolllampen Beschreibung Kontrolllampe „Multitab“. Kontrolllampe „ExtraHygiene“. Kontrolllampe „Hauptspülgang“. Kontrolllampe „Klarspülphase“. Kontrolllampe „Trocknungsphase“. Kontrolllampe „Programmende“. Kontrolllampe „Klarspülmittel“. Diese Kontrolllampe erlischt während des Programmbetriebs. Kontrolllampe „Salz“.
www.aeg.com Programm 5) 6) Verschmutzungsgrad Beladung Programmphasen Optionen Normal verschmutzt Geschirr und Besteck Vorspülen ExtraHygiene Hauptspülgang 50 °C Spülgänge Trocknen Leicht verschmutzt Geschirr und Besteck Hauptspülgang 55 °C ExtraHygiene Spülgänge Alle Vorspülen 1) Das Gerät erkennt den Verschmutzungsgrad und die Anzahl der Geschirrteile in den Körben. Es stellt dann automatisch die Wassertemperatur und -menge, den Energieverbrauch und die Programmdauer ein.
DEUTSCH 61 5. OPTIONEN Schalten Sie die Optionen vor dem Programmstart ein oder aus. Sie können die Optionen nicht ein- oder ausschalten, wenn ein Programm angelaufen ist. Haben Sie eine oder mehrere Optionen eingeschaltet, prüfen Sie, ob die entsprechenden Kontrolllampen leuchten, bevor Sie das Programm starten. 5.1 Multitab Schalten Sie diese Option nur ein, wenn Sie Kombi-Reinigungstabletten verwenden. Mit der Option „Multitab“ wird die Zufuhr von Klarspülmittel und Salz ausgeschaltet.
www.aeg.com 6.1 Einstellen des Wasserenthärters WasserenthärterEinstellung Wasserhärte Deutsche Wasserhärtegrade (°dH) Französische Wasserhärtegrade (°fH) mmol/l Clarke Wasserhärtegrade Manuell Elektronisch 51 - 70 91 - 125 9.1 - 12.5 64 - 88 2 1) 10 43 - 50 76 - 90 7.6 - 9.0 53 - 63 2 1) 9 37 - 42 65 - 75 6.5 - 7.5 46 - 52 21) 8 29 - 36 51 - 64 5.1 - 6.4 36 - 45 21) 7 23 - 28 40 - 50 4.0 - 5.0 28 - 35 21) 6 19 - 22 33 - 39 3.3 - 3.
DEUTSCH 63 6. Schalten Sie das Gerät zur Bestätigung aus. 6.2 Füllen des Salzbehälters 1. 2. 3. 4. 5. Drehen Sie den Deckel gegen den Uhrzeigersinn und öffnen Sie den Salzbehälter. Füllen Sie 1 Liter Wasser in den Salzbehälter (nur beim ersten Mal). Füllen Sie den Salzbehälter mit Geschirrspülsalz. Entfernen Sie das Salz, das sich um die Öffnung des Salzbehälters herum angesammelt hat. Drehen Sie den Deckel im Uhrzeigersinn, um den Salzbehälter zu schließen.
www.aeg.com • Füllen Sie den Salzbehälter auf, wenn die Kontrolllampe „Salz“ leuchtet. • Leuchtet die Kontrolllampe „Klarspülmittel“, füllen Sie den Klarspülmittel-Dosierer. 3. Beladen Sie die Körbe. 4. Füllen Sie Reinigungsmittel ein. 5. Stellen Sie je nach Beladung und Verschmutzungsgrad das passende Programm ein. 7.1 Verwendung des Reinigungsmittels A 1. B 2. 30 3. 4 MAX + 32 - 1 20 C 4. 5. 7.
DEUTSCH • Im Display wird der Ablauf der Zeitvorwahl angezeigt, die in Schritten von jeweils 1 Stunde abnimmt. • Die Phasenkontrolllampen des eingestellten Programms erlöschen. • Nach Ablauf der Zeitvorwahl startet das Programm. – Die Anzeige des laufenden Programmabschnitts leuchtet auf. Öffnen der Tür während eines laufenden Programms Wenn Sie die Tür öffnen, unterbricht das Gerät das Programm. Wenn Sie die Tür wieder schließen, arbeitet das Gerät ab dem Zeitpunkt der Unterbrechung weiter.
www.aeg.com • Spülen Sie im Gerät keine Geschirrteile aus Holz, Horn, Aluminium, Zinn oder Kupfer. • Spülen Sie in diesem Gerät keine Gegenstände, die Wasser aufnehmen können (Schwämme, Geschirrtücher, usw.). • Entfernen Sie Speisereste vom Geschirr. • Um eingebrannte Essensreste einfach zu beseitigen, weichen Sie diese ein, bevor Sie das Kochgeschirr in das Gerät stellen. • Ordnen Sie hohle Gefäße (z. B. Tassen, Gläser, Pfannen) mit der Öffnung nach unten ein.
DEUTSCH 67 9.1 Reinigen der Filter C 1. Drehen Sie den Filter (A) nach links und nehmen Sie ihn heraus. 2. Um den Filter (A) auseinanderzubauen, ziehen Sie (A1) und (A2) auseinander. Nehmen Sie den Filter (B) heraus. Reinigen Sie die Filter mit Wasser. Setzen Sie den Filter (B) wieder in der ursprünglichen Position ein. Vergewissern Sie sich, dass er korrekt unter den beiden Führungen (C) sitzt. C A B A1 3. 4. 5. A2 6. Bauen Sie den Filter (A) zusammen und setzen Sie ihn in Filter (B) ein.
www.aeg.com können, bevor Sie den Kundendienst rufen. Bei manchen Störungen zeigt das Display einen Alarmcode an: • - Es läuft kein Wasser in das Gerät. • - Das Gerät pumpt das Wasser nicht ab. Problem • - Die Aquasafe-Einrichtung ist ausgelöst. WARNUNG! Schalten Sie das Gerät aus, bevor Sie die Überprüfungen vornehmen. Mögliche Ursache Mögliche Abhilfe Das Programm star- Der Netzstecker steckt tet nicht. nicht richtig in der Steckdose. Die Gerätetür ist offen. Schließen Sie die Gerätetür.
DEUTSCH Tritt das Problem erneut auf, wenden Sie sich an den Kundendienst. Wenn das Display andere Alarmcodes anzeigt, wenden Sie sich an den Kundendienst. 10.1 Die Spül- und Trocknungsergebnisse sind nicht zufriedenstellend. Weiße Streifen oder blau schimmernder Belag auf Gläsern und Geschirr • Die zugegebene Klarspülmittelmenge ist zu hoch. Stellen Sie den Dosierwähler für Klarspülmittel niedriger ein. • Die Reinigungsmittelmenge ist zu hoch.
www.aeg.com 11.1 Montage als Einbaugeschirrspüler 1. Achten Sie darauf, dass die Einbaunische die in der Abbildung gezeigten Abmessungen aufweist. 2. Installieren Sie das Gerät in der Nähe eines Wasserhahns und eines Wasserablaufs. 570-600 mm 820 mm 600 mm 3. 4. 1 5. 2 3 4 Nehmen Sie die Arbeitsplatte des Geräts ab. Richten Sie das Gerät mit den Schraubfüßen waagerecht aus. Die Tür eines waagerecht ausgerichteten Geräts lässt sich dicht und sicher schließen.
DEUTSCH 71 11.2 Anschluss des Ablaufschlauchs max. 850 mm max. 4000 mm min. 400 mm Schließen Sie den Wasserablaufschlauch an Folgendes an: • Den Siphon eines Spülbeckens. Befestigen Sie den Wasserablaufschlauch unter der Arbeitsplatte. Dadurch wird verhindert, dass Abwasser aus dem Siphon in das Gerät zurückfließen kann. • Ein Standrohr mit Entlüftungsöffnung. Der Innendurchmesser muss mindestens 40 mm betragen. Nehmen Sie den Spülbeckenstöpsel aus dem Becken, während das Gerät das Wasser abpumpt.
www.aeg.com Leistungsaufnahme Unausgeschaltet 0.10 W Ausgeschaltet 0.10 W 1) Schließen Sie den Zulaufschlauch an einen Wasserhahn mit einem 3/4"-Außengewinde an. 2) Wenn Sie Heißwasser mit umweltfreundlichen, alternativen Energiequellen (z. B. Solaranlagen oder Windkraft) aufbereiten, können Sie durch den Anschluss des Geräts an die Heißwasserversorgung Energie sparen. 13. UMWELTTIPPS Recyceln Sie Materialien mit dem Symbol . Entsorgen Sie die Verpackung in den entsprechenden Recyclingbehältern.
DEUTSCH 73
www.aeg.
DEUTSCH 75
117920541-A-112012 www.aeg.