FAVORIT 77420 M0P FAVORIT 77420 W0P NL Gebruiksaanwijzing EN User manual FR Notice d'utilisation 2 18 34
www.aeg.com INHOUD 1. 2. 3. 4. 5. 6. 7. 8. 9. 10. 11. VEILIGHEIDSVOORSCHRIFTEN . . . . . . . . . . . . . . . . . . . . . . . . . . . . . . . . . . . . . . . . . . . . . . . . 3 BESCHRIJVING VAN HET PRODUCT . . . . . . . . . . . . . . . . . . . . . . . . . . . . . . . . . . . . . . . . . . . 5 BEDIENINGSPANEEL . . . . . . . . . . . . . . . . . . . . . . . . . . . . . . . . . . . . . . . . . . . . . . . . . . . . . . . . 6 PROGRAMMA’S . . . . . . . . . . . . . . . . . . . . . . . . . . . . . . . . . . .
NEDERLANDS 1. 3 VEILIGHEIDSVOORSCHRIFTEN Lees zorgvuldig de meegeleverde instructies voor installatie en gebruik van het apparaat. De fabrikant is niet verantwoordelijk voor letsel en schade veroorzaakt door een foutieve installatie. Bewaar de instructies van het apparaat voor toekomstig gebruik. 1.1 Veiligheid van kinderen en kwetsbare mensen WAARSCHUWING! Gevaar voor verstikking, letsel of permanente invaliditeit.
www.aeg.com WAARSCHUWING! Gevaarlijke spanning. • Als de watertoevoerslang beschadigd is, haal dan onmiddellijk de stekker uit het stopcontact. Neem contact op met de service-afdeling om de watertoevoerslang te vervangen. 1.
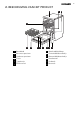
NEDERLANDS 2.
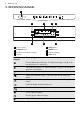
www.aeg.com 3. BEDIENINGSPANEEL 1 Extra 2 Delay Quick 60MIN 55° Quick 3 4 Option 5 Program Delay Start Option 8 7 6 1 Aan/uit-toets 5 Delay-toets 2 Program-toets 3 Programma-indicatielampjes 6 Option-toets 4 Display 8 Start-toets Indicatielampjes 7 Indicatielampjes Beschrijving Glansmiddelindicatielampje. Dit indicatielampje is altijd uit als het programma in werking is. Zoutindicatielampje. Dit indicatielampje is altijd uit als het programma in werking is.
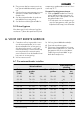
NEDERLANDS 7 4.
www.aeg.com Verbruikswaarden Programma1) Bereidingsduur (min) Energie(kWh) Water (l) 40 - 150 0.5 - 1.1 6 - 11 130 - 150 1.1 - 1.2 10 - 11 180 - 200 0.8 - 0.9 8-9 30 0.8 7 204 0.70 8.9 50 - 60 0.9 - 1.0 7-8 70 - 80 0.6 - 0.9 10 - 11 1) De druk en temperatuur van het water, de variaties in stroomtoevoer, de opties en de hoeveelheid vaat kan de verbruikswaarden veranderen.
NEDERLANDS 2. Zorg ervoor dat het zoutreservoir en het glansmiddeldoseerbakje gevuld zijn. 3. Start het kortste programma met een spoelfase, zonder afwasmiddel en zonder vaat. 4. Stel de waterontharder af op de waterhardheid in uw omgeving. 5. Stel de hoeveelheid glansmiddel in. 5.3 ExtraHygiene 9 temperatuur gedurende minimaal 10 minuten op 70 °C. De optie ExtraHygiene activeren 1. Druk op Option totdat het ExtraHygiene-indicatielampje aan gaat.
www.aeg.com 2) Gebruik geen zout op dit niveau. U moet de waterontharder handmatig en elektronisch instellen. Handmatig instellen Zet de waterhardheidsknop in stand 1 of 2. 6.2 Het zoutreservoir vullen 1. 2. 3. 4. 5. Draai de dop linksom om het zoutreservoir te openen. Doe een liter water in het zoutreservoir (alleen de eerste keer). Vul het zoutreservoir met regenereerzout. Verwijder het zout rond de opening van het zoutreservoir. Draai de dop rechtsom om het zoutreservoir te sluiten.
NEDERLANDS 11 6.3 Het glansmiddeldoseerbakje vullen 1. B A M AX 4 3 2 1 + - C D Druk op de ontgrendelknop (D) om het deksel (C) te openen. 2. Vul het glansmiddeldoseerbakje (A) niet verder dan de aanduiding 'max'. 3. Verwijder gemorst glansmiddel met een absorberend doekje om te voorkomen dat er te veel schuim ontstaat. 4. Sluit het deksel. Zorg ervoor dat het ontgrendelknopje op zijn plaats dichtklikt.
www.aeg.com 7.2 Een programma instellen en starten Instelmodus Bij sommige instellingen moet het apparaat in de instelmodus worden gezet. Druk op de aan/uit-toets om het apparaat te activeren. Het apparaat staat in de instelmodus als alle programmalampjes gaan branden en het display 2 horizontale statusbalkjes weergeeft. Als dit niet op het bedieningspaneel wordt aangegeven, houdt u tegelijkertijd Delay en Option ingedrukt totdat het apparaat in de instelmodus staat.
NEDERLANDS Als u niet op de aan/uit-toets drukt, schakelt de functie Auto Off het apparaat een paar minuten na het einde van het programma automatisch uit. Dit helpt het energieverbruik te verminderen, 13 den zijn gevoelig voor beschadigingen. • Ruim eerst het onderrek en dan het bovenrek uit. • Er kan water liggen aan de zijkanten en op de deur van het apparaat. Roestvrij staal koelt sneller af dan borden. Let op • Laat de borden afkoelen voordat u deze uit het apparaat neemt. Hete bor- 8.
www.aeg.com • Leg lichte voorwerpen in de bovenste korf. Zorg ervoor dat de voorwerpen niet verschuiven. • Zorg er voor dat de sproeiarmen vrij kunnen ronddraaien voordat u een programma start. • De positie van de items in de mandjes correct is. • Het programma van toepassing is op het type lading en de mate van bevuiling. • De juiste hoeveelheid afwasmiddel is gebruikt. • Er regenereerzout en glansmiddel is toegevoegd (tenzij u gecombineerde afwastabletten gebruikt).
NEDERLANDS 6. 7. 15 Zorg ervoor dat het filter (B) juist wordt geplaatst onder de 2 geleiders (C). Monteer het filter (A) en zet het terug in filter (B). Rechtsom draaien tot het vastzit. Een onjuiste plaatsing van de filters kan leiden tot slechte wasresultaten en het apparaat beschadigen. 9.2 De sproeiarmen reinigen Probeer niet de sproeiarmen te verwijderen. Als etensresten de openingen in de sproeiarmen hebben verstopt, verwijder deze dan met een smal en puntig voorwerp. 9.
www.aeg.com Probleem Mogelijke oplossing Als de starttijdkeuze start is ingesteld, annuleert u deze functie of wacht u tot het einde van het aftellen. Het apparaat wordt niet met wa- Controleer of de waterkraan is geopend. ter gevuld. Zorg dat de waterdruk niet te laag is. Neem hiervoor zo nodig contact op met uw lokale waterleidingbedrijf. Controleer of de waterkraan niet verstopt is. Controleer of het filter in de toevoerslang niet verstopt is.
NEDERLANDS van , en beginnen te knipperen. 3. Druk op Start. • De indicatielampjes van en gaan uit. • Het indicatielampje van blijft knipperen. • Het display toont de huidige instelling. 17 4. Druk op Start om de instelling te wijzigen. 5. Druk op de aan/uit-toets om het apparaat te deactiveren en om de instelling te bevestigen. 6. Stel de hoeveelheid glansmiddel in. 7. Vul het glansmiddeldoseerbakje. Glansmiddeldoseerbakje uit Glansmiddeldoseerbakje aan 11.
www.aeg.com CONTENTS 1. 2. 3. 4. 5. 6. 7. 8. 9. 10. 11. SAFETY INSTRUCTIONS . . . . . . . . . . . . . . . . . . . . . . . . . . . . . . . . . . . . . . . . . . . . . . . . . . . . . PRODUCT DESCRIPTION . . . . . . . . . . . . . . . . . . . . . . . . . . . . . . . . . . . . . . . . . . . . . . . . . . . . CONTROL PANEL . . . . . . . . . . . . . . . . . . . . . . . . . . . . . . . . . . . . . . . . . . . . . . . . . . . . . . . . . . PROGRAMMES . . . . . . . . . . . . . . . . . . . . . . . . . . . . . .
ENGLISH 1. 19 SAFETY INSTRUCTIONS Before the installation and use of the appliance, carefully read the supplied instructions. The manufacturer is not responsible if an incorrect installation and use causes injuries and damages. Always keep the instructions with the appliance for future reference. • • • 1.1 Children and vulnerable people safety WARNING! Risk of suffocation, injury or permanent disability.
www.aeg.com from the mains socket. Contact the Service to replace the water inlet hose. 1.3 Use • This appliance is intended to be used in household and similar applications such as: – Staff kitchen areas in shops, offices and other working environments – Farm houses – By clients in hotels, motels and other residential type environments – Bed and breakfast type environments. WARNING! Risk of injury, burns, electrical shock or fire. • Do not change the specification of this appliance.
ENGLISH 2.
www.aeg.com 3. CONTROL PANEL 1 Extra Quick 3 2 Delay Quick 60MIN 55° Option 4 5 Program Delay Start Option 8 7 6 1 On/off button 5 Delay button 2 Program button 3 Programme indicators 6 Option button 4 Display 8 Start button Indicators 7 Indicators Description Rinse aid indicator. It is always off while the programme operates. Salt indicator. It is always off while the programme operates. Washing phase indicator. It comes on when the washing phase operates.
ENGLISH 23 4.
www.aeg.com Programme1) Duration (min) Energy (kWh) Water (l) 180 - 200 0.8 - 0.9 8-9 30 0.8 7 204 0.70 8.9 50 - 60 0.9 - 1.0 7-8 70 - 80 0.6 - 0.9 10 - 11 1) The pressure and the temperature of the water, the variations of the mains supply, the options and the quantity of dishes can change the values. Information for test institutes For all the necessary information for test performance. send an email to: info.test@dishwasher-production.
ENGLISH 25 you can see the update of the programme duration. • If the option is not applicable to the programme, the related indicator does not come on. 5.3 ExtraHygiene With this option you have better hygiene results. During the rinsing phase, the temperature stays at 70 °C for at least 10 minutes. How to activate the ExtraHygiene option 1. Press Option until the ExtraHygiene indicator comes on. In the display 6. BEFORE FIRST USE 1.
www.aeg.com Manual adjustment Turn the water hardness dial to the position 1 or 2. 6.2 Filling the salt container 1. 2. 3. 4. 5. Turn the cap counterclockwise and open the salt container. Put 1 litre of water in the salt container (only for the first time). Fill the salt container with dishwasher salt. Remove the salt around the opening of the salt container. Turn the cap clockwise to close the salt container. CAUTION! Water and salt can come out from the salt container when you fill it.
ENGLISH 27 6.3 Filling the rinse aid dispenser 1. Press the release button (D) to open the lid (C). 2. Fill the rinse aid dispenser (A), no more than the mark 'max'. 3. Remove the spilled rinse aid with an absorbent cloth to prevent too much foam. 4. Close the lid. Make sure that the release button locks into position. B A M AX 4 3 2 1 + - C D You can turn the selector of the released quantity (B) between position 1 (lowest quantity) and position 4 (highest quantity). 7. DAILY USE 1.
www.aeg.com 7.2 Setting and starting a programme Setting mode For some settings it is necessary that the appliance is in setting mode. Press the on/off button to activate the appliance. The appliance is in setting mode when all the programme indicators come on and the display shows 2 horizontal status bars. If the control panel does not show this condition, press and hold, at the same time Delay and Option until the appliance is in setting mode. Starting a programme without delay start 1.
ENGLISH If you do not press the on/off button, the Auto Off function automatically deactivates the appliance a few minutes after the end of the programme. This helps to decrease the energy consumption, 29 • First remove the items from the lower basket, then from the upper basket. • There can be water on the sides and on the door of the appliance. Stainless steel becomes cool more quickly than the dishes. Important • Let the dishes become cold before you remove them from the appliance.
www.aeg.com 8.4 Before starting a programme Make sure that: • The filters are clean and correctly installed. • The spray arms are not clogged. • The position of the items in the baskets is correct. • The programme is applicable for the type of load and for the degree of soil. • The correct quantity of detergent is used. • There is dishwasher salt and rinse aid (unless you use combi detergent tablets). • The cap of the salt container is tight. 9.
ENGLISH 31 9.2 Cleaning the spray arms 9.4 Internal cleaning Do not remove the spray arms. If the holes in the spray arms are clogged, remove remaining parts of soil with a thin pointed object. If you regularly use short duration programmes, these can leave deposits of grease and limescale inside the appliance. To prevent this, we recommend to run long duration programmes at least 2 times per month. 9.3 External cleaning Clean the appliance with a moist soft cloth. Only use neutral detergents.
www.aeg.com Problem Possible solution Make sure that the drain hose has no kinks or bends. The anti-flood device is on. Close the water tap and contact the Service. After the checks are completed, activate the appliance. The programme continues from the point of interruption. If the problem occurs again, contact the Service. If the display shows other alarm codes, contact the Service. 10.
ENGLISH Electrical connection 33 Refer to the rating plate. Voltage 220-240 V Frequency 50 Hz Water supply pressure Min. / max. (bar / MPa) (0.5 / 0.05 ) / (8 / 0.8 ) Water supply 1) Cold water or hot water2) Capacity Place settings 9 Power consumption Left-on mode 0.10 W Off-mode 0.10 W max. 60 °C 1) Connect the water inlet hose to a water tap with a 3/4'' thread. 2) If the hot water comes from alternative sources of energy, (e.g.
www.aeg.com SOMMAIRE 1. 2. 3. 4. 5. 6. 7. 8. 9. 10. 11. INSTRUCTIONS DE SÉCURITÉ . . . . . . . . . . . . . . . . . . . . . . . . . . . . . . . . . . . . . . . . . . . . . . . . DESCRIPTION DE L'APPAREIL . . . . . . . . . . . . . . . . . . . . . . . . . . . . . . . . . . . . . . . . . . . . . . . . BANDEAU DE COMMANDE . . . . . . . . . . . . . . . . . . . . . . . . . . . . . . . . . . . . . . . . . . . . . . . . . PROGRAMMES . . . . . . . . . . . . . . . . . . . . . . . . . . . . . . . . . . . . . . . .
FRANÇAIS 1. 35 INSTRUCTIONS DE SÉCURITÉ Avant d'installer et d'utiliser cet appareil, lisez soigneusement les instructions fournies. Le fabricant ne peut être tenu pour responsable des dommages et blessures liés à une mauvaise installation ou utilisation. Conservez toujours cette notice avec votre appareil pour vous y référer ultérieurement. 1.1 Sécurité des enfants et des personnes vulnérables AVERTISSEMENT Risque d'asphyxie, de blessure ou d'invalidité permanente.
www.aeg.com AVERTISSEMENT Tension dangereuse. • Si le tuyau d'arrivée d'eau est endommagé, débranchez immédiatement la fiche de la prise secteur. Contactez le service après-vente pour remplacer le tuyau d'arrivée d'eau. 1.
FRANÇAIS 2.
www.aeg.com 3. BANDEAU DE COMMANDE 1 Extra 2 Quick 3 Delay Quick 60MIN 55° 4 Option 5 Program Delay Start Option 8 7 6 1 Touche Marche/Arrêt 5 Touche Delay 2 Touche Program 3 Voyants des programmes 6 Touche Option 4 Affichage 8 Touche Start Voyants 7 Voyants Description Voyant du réservoir de liquide de rinçage. Ce voyant est toujours éteint pendant le déroulement du programme. Voyant du réservoir de sel régénérant.
FRANÇAIS 39 4.
www.aeg.com Valeurs de consommation Programme 1) Durée (min) Consommation électrique (kWh) Eau (l) 40 - 150 0.5 - 1.1 6 - 11 130 - 150 1.1 - 1.2 10 - 11 180 - 200 0.8 - 0.9 8-9 30 0.8 7 204 0.70 8.9 50 - 60 0.9 - 1.0 7-8 70 - 80 0.6 - 0.9 10 - 11 1) Les valeurs de consommation peuvent changer en fonction de la pression et de la température de l'eau, des variations de l'alimentation électrique, de la quantité de vaisselle chargée ainsi que des options sélectionnées.
FRANÇAIS Si vous cessez d'utiliser des pastilles de détergent multifonctions, avant de commencer à utiliser à la fois du produit de lavage, du liquide de rinçage et du sel régénérant, effectuez ces étapes : 1. Réglez l'adoucisseur d'eau au niveau maximal. 2. Assurez-vous que le réservoir de sel régénérant et le distributeur de liquide de rinçage sont pleins. 3. Démarrez le programme le plus court par une phase de rinçage, sans produit de lavage ni vaisselle. 4.
www.aeg.com Réglage de l'adoucisseur d'eau Dureté de l'eau Degrés allemands (°dH) Degrés français (°fH) mmol/l Degrés Clarke Manuel Électronique 19 - 22 33 - 39 3.3 - 3.9 23 - 27 21) 51) 15 - 18 26 - 32 2.6 - 3.2 18 - 22 1 4 11 - 14 19 - 25 1.9 - 2.5 13 - 17 1 3 4 - 10 7 - 18 0.7 - 1.8 5 - 12 1 2 <4 <7 < 0.7 <5 12) 12) 1) Réglage d'usine. 2) N'utilisez pas de sel à ce niveau. L'adoucisseur d'eau doit être réglé manuellement et électroniquement.
FRANÇAIS 43 6.2 Remplissage du réservoir de sel régénérant 1. 2. 3. 4. 5. Tournez le couvercle vers la gauche et ouvrez le réservoir de sel régénérant. Mettez 1 litre d'eau dans le réservoir de sel régénérant (uniquement la première fois). Remplissez le réservoir avec du sel régénérant. Enlevez le sel qui se trouve autour de l'ouverture du réservoir de sel régénérant. Tournez le couvercle vers la droite pour fermer le réservoir de sel régénérant.
www.aeg.com 6.3 Remplissage du distributeur de liquide de rinçage 1. B A M AX 4 3 2 1 + - C D Appuyez sur le bouton d'ouverture (D) pour ouvrir le couvercle (C). 2. Remplissez le distributeur de liquide de rinçage (A), sans dépasser le repère « max ». 3. Si le liquide de rinçage déborde, épongez-le avec un chiffon absorbant pour éviter tout excès de mousse. 4. Fermez le couvercle. Assurez-vous que le bouton d'ouverture se verrouille correctement.
FRANÇAIS 45 7.1 Utilisation du produit de lavage A 1. B 2. 30 3. 4 MAX + 32 - 1 20 C 4. 5. 7.2 Réglage et départ d'un programme Mode Programmation Certains réglages nécessitent que l'appareil soit en mode Programmation. Appuyez sur la touche Marche/Arrêt pour allumer l'appareil. L'appareil est en mode Programmation lorsque tous les voyants de programme s'allument et 2 barres d'état horizontales sont affichées.
www.aeg.com Ouverture de la porte au cours du fonctionnement de l'appareil Si vous ouvrez la porte, l'appareil s'arrête. Lorsque vous refermez la porte, l'appareil reprend là où il a été interrompu. Annulation du départ différé au cours du décompte En annulant le départ différé, vous annulez également le programme. 1. Maintenez enfoncées simultanément les touches Delay et Option jusqu'à ce que tous les voyants de programme s'allument et que 2 barres d'état horizontales s'affichent. 2.
FRANÇAIS adjuvants. Assurez-vous que ces pastilles sont adaptées à la dureté de l'eau de votre région. Reportez-vous aux instructions figurant sur l'emballage de ces produits. • Les tablettes de détergent ne se dissolvent pas complètement durant les programmes courts. Pour éviter que des résidus de produit de lavage ne se déposent sur la vaisselle, nous recommandons d'utiliser des pastilles de détergent avec des programmes longs. N'utilisez que la quantité nécessaire de produit de lavage.
www.aeg.com 9.1 Nettoyage des filtres 1. Tournez le filtre (A) vers la gauche et sortez-le. 2. Pour démonter le filtre (A), détachez (A1) et (A2). Retirez le filtre (B). Lavez les filtres à l'eau courante. Avant de remettre le filtre (B) en place, assurez-vous qu'il ne reste aucun résidu alimentaire ni salissure à l'intérieur ou autour du bord du collecteur d'eau. C A B A1 3. 4. 5. A2 6. 7. Assurez-vous que le filtre (B) est correctement positionné, sous les 2 guides (C).
FRANÇAIS Veuillez vous reporter aux informations suivantes avant de contacter le service après-vente pour résoudre un problème. Pour certaines anomalies, l'écran affiche un code d’alarme : • - L'appareil n'est pas approvisionné en eau. • • 49 - L'appareil ne se vidange pas. - Le système de sécurité anti-débordement s'est déclenché. AVERTISSEMENT Éteignez l'appareil avant de procéder aux vérifications. Problème Solution possible L'appareil ne fonctionne pas.
www.aeg.com • La quantité de produit de lavage est excessive. Taches et traces de gouttes d'eau séchées sur les verres et la vaisselle • La quantité de liquide de rinçage libérée n'est pas suffisante. Placez le sélecteur de dosage du liquide de rinçage sur un niveau plus élevé. • Il se peut que la qualité du produit de lavage soit en cause. La vaisselle est mouillée • Le programme ne contient pas de phase de séchage ou une phase de séchage à basse température.
FRANÇAIS 51 max. 60 °C Arrivée d'eau 1) Eau froide ou eau chaude2) Capacité Couverts Consommation électrique Mode « Veille » 0.10 W Mode « Arrêt » 0.10 W 9 1) Raccordez le tuyau d'arrivée d'eau à un robinet fileté (3/4 pouce). 2) Si l'eau chaude est produite à partir de sources d'énergie respectueuses de l'environnement (par exemple, panneaux solaires ou énergie éolienne), utilisez une arrivée d'eau chaude afin de réduire la consommation d'énergie. 12.
117908090-A-092013 www.aeg.