FAVORIT 78022 VI NL AFWASAUTOMAAT EN DISHWASHER FR LAVE-VAISSELLE GEBRUIKSAANWIJZING USER MANUAL NOTICE D'UTILISATION 2 22 41
www.aeg.com INHOUD 4 6 7 8 10 11 14 17 18 20 VEILIGHEIDSINFORMATIE BESCHRIJVING VAN HET PRODUCT BEDIENINGSPANEEL PROGRAMMA’S OPTIES VOOR HET EERSTE GEBRUIK DAGELIJKS GEBRUIK ONDERHOUD EN REINIGING PROBLEEMOPLOSSING TECHNISCHE INFORMATIE MILIEUBESCHERMING Recycle de materialen met het symbool . Gooi de verpakking in een geschikte verzamelcontainer om het te recyclen. Help om het milieu en de volksgezondheid te beschermen en recycle het afval van elektrische en elektronische apparaten.
NEDERLANDS 3 VOOR PERFECTE RESULTATEN Bedankt dat u voor dit AEG product heeft gekozen. Dit apparaat is ontworpen om vele jaren uitstekend te presteren, met innovatieve technologieën die het leven gemakkelijker helpen maken – functies die gewone apparaten wellicht niet hebben. Neem een paar minuten de tijd om het door te lezen zodat u er optimaal van kunt profiteren.
www.aeg.com VEILIGHEIDSINFORMATIE Lees zorgvuldig de meegeleverde instructies voor installatie en gebruik van het apparaat. De fabrikant is niet verantwoordelijk voor letsel en schade veroorzaakt door een foutieve installatie. Bewaar de instructies van het apparaat voor toekomstig gebruik. VEILIGHEID VAN KINDEREN EN KWETSBARE MENSEN • Laat het water stromen tot het schoon is voordat u het apparaat aansluit op nieuwe leidingen of leidingen die lang niet zijn gebruikt.
NEDERLANDS • Steek de stekker pas in het stopcontact als de installatie is voltooid. Zorg ervoor dat het netsnoer na installatie bereikbaar is. • Trek niet aan het aansluitnoer om het apparaat los te koppelen. Trek altijd aan de stekker.
www.aeg.com BESCHRIJVING VAN HET PRODUCT 1 2 12 11 10 9 8 1 Top sproeiarm 2 Bovenste sproeiarm 3 Onderste sproeiarm 4 Filters 5 Typeplaatje 6 Zoutreservoir 7 Waterhardheidsknop 8 Glansmiddeldoseerbakje 9 Wasmiddeldoseerlade 10 Bestekmand 11 Onderrek 12 Bovenrek LICHTSTRAAL • Als een programma in werking is, verschijnt er een rode lichtstraal op de vloer onder de deur van het apparaat. Als het programma klaar is, verandert het rode licht in een groen licht.
NEDERLANDS BEDIENINGSPANEEL 1 2 3 4 5 6 7 8 1 Aan/uit-toets 6 ExtraHygiene-toets 2 Display 7 Multitab-toets 3 Toets startuitstel 8 RESET-toets 4 Programmatoets (omlaag) 9 Indicatielampjes 9 5 Programmatoets (omhoog) Indicatielampjes Beschrijving Zoutindicatielampje. Dit indicatielampje is uit als het programma werkt. Glansmiddelindicatielampje. Dit indicatielampje is uit als het programma werkt. Einde-indicatielampje.
www.aeg.
NEDERLANDS 6) Gebruik dit programma om het serviesgoed snel te spoelen. Hierdoor kunnen voedselresten niet aan het serviesgoed vastkoeken en ontstaan er geen vieze geurtjes in het apparaat. U hoeft voor dit programma geen afwasmiddel te gebruiken. Verbruikswaarden Programma1) Duur (min) Energie (KWh) Water (l) 1 40 - 150 0.6 - 1.4 7 - 14 2 140 - 160 1.4 - 1.6 13 - 14 3 200 - 220 1.1 - 1.2 9 - 11 4 30 0.8 9 5 160 - 180 0.8 - 0.9 9 - 10 6 50 - 60 1.0 - 1.1 10 - 11 7 70 - 80 0.
www.aeg.com OPTIES Schakel de opties in of uit, voordat u een programma start. U kunt de opties niet inschakelen of uitschakelen als er een programma bezig is. Zorg er als één of meerdere opties worden ingesteld voor dat de bijbehorende lampjes branden voordat het programma start. EXTRAHYGIENE Deze optie geeft betere resultaten voor de hygiëne. Tijdens de spoelfase blijft de temperatuur gedurende 10 tot 14 minuten op 70 °C.
NEDERLANDS 11 VOOR HET EERSTE GEBRUIK 1. Controleer of het ingestelde niveau van de waterontharder juist is voor de waterhardheid in uw omgeving. Als dat niet het geval is, dan stelt u de waterontharder in. Neem contact op met uw plaatselijke waterinstantie voor informatie over de hardheid van het water in uw omgeving. 2. Het zoutreservoir vullen. 3. Vul het glansmiddeldoseerbakje. 4. Draai de waterkraan open. 5. Er kunnen wasmiddelen in het apparaat achtergebleven zijn.
www.aeg.com Handmatig instellen Zet de waterhardheidsknop in stand 1 of 2. Elektronische instelling 1. Druk op de aan-/uittoets om het apparaat te activeren. Zorg ervoor dat het apparaat in de instelmodus staat, zie ‘HET PROGRAMMA INSTELLEN EN STARTEN'. 2. Druk tegelijkertijd op toets (4) en (5) en houd de toetsen ingedrukt totdat de indicatielampjes van toets (3), (4) en (5) knipperen. 3. Druk op toets (3). • De indicatielampjes van toets (4) en (5) gaan uit.
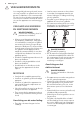
NEDERLANDS 13 HET GLANSMIDDELDOSEERBAKJE VULLEN LET OP! Gebruik alleen glansmiddel voor afwasautomaten. Andere producten kunnen het apparaat beschadigen. B A M AX 4 3 2 1 + - Het glansmiddel helpt om tijdens de laatste spoelfase het servies te drogen zonder strepen en vlekken. C D 1. Druk op de ontgrendelknop (D) om de deksel (C) te openen. 2. Vul het glansmiddeldoseerbakje (A) niet verder dan de aanduiding 'max'. 3.
www.aeg.com DAGELIJKS GEBRUIK 1. Draai de waterkraan open. 2. Druk op de aan-/uittoets om het apparaat te activeren. Zorg dat het apparaat in de instelmodus staat. Zie ‘EEN PROGRAMMA INSTELLEN EN STARTEN'. • Vul het zoutreservoir als het zoutindicatielampje brandt. • Vul het glansmiddeldoseerbakje als het indicatielampje van het glansmiddel brandt. 3. Ruim de rekken in. 4. Voeg vaatwasmiddel toe. 5. U dient het juiste programma in te stellen en te starten voor het type lading en de mate van vervuiling.
NEDERLANDS Vaatwastabletten lossen niet helemaal op bij korte programma's en er blijven resten van het vaatwasmiddel achter op het servies. Wij raden aan dat u vaatwastabletten gebruikt bij lange programma's. HET PROGRAMMA INSTELLEN EN STARTEN Instelmodus Het apparaat moet in de instelmodus staan om bepaalde acties te accepteren. Het apparaat staat in de instelmodus als, na de activering: • Het display geeft twee horizontale statusstreepjes weer.
www.aeg.com ten. Dit helpt het energieverbruik te verminderen. • Laat de borden afkoelen voordat u deze uit het apparaat neemt. Hete borden zijn gevoelig voor beschadigingen. • Ruim eerst het onderrek en dan het bovenrek uit. Er kan water liggen aan de zijkanten en op de deur van het apparaat. Roestvrij staal koelt sneller af dan borden.
NEDERLANDS 17 ONDERHOUD EN REINIGING WAARSCHUWING! Schakel het apparaat uit en trek de stekker uit het stopcontact voordat u onderhoudshandelingen verricht. Vuile filters en verstopte sproeiarmen verminderen de wasresultaten. Controleer regelmatig de filters en reinig deze zo nodig. DE FILTERS REINIGEN 1. C C A B A1 A2 DE SPROEIARMEN REINIGEN Probeer niet de sproeiarmen te verwijderen.
www.aeg.com PROBLEEMOPLOSSING Het apparaat start of stopt niet tijdens de werking. Probeer eerst het probleem zelf op te lossen (zie tabel). Zo niet, bel dan de serviceafdeling. Bij sommige problemen wordt er op de display een alarmcode weergegeven: • - Het apparaat wordt niet gevuld met water. • - Het apparaat pompt geen water weg. • - Het bescherminssysteem tegen waterlekkage is in werking getreden. WAARSCHUWING! Schakel het apparaat uit voordat u controle uitvoert.
NEDERLANDS 19 DE WAS- EN DROOGRESULTATEN ZIJN NIET NAAR TEVREDENHEID Storing Mogelijke oorzaak Mogelijke oplossing De borden zijn niet schoon. De filters zijn verstopt. Reinig de filters. De filters zijn niet juist gemonteerd en geplaatst. Zorg ervoor dat de filters juist zijn gemonteerd en geinstalleerd. De sproeiarmen zijn verstopt. Verder het vuil met een dun, puntig voorwerp. Het programma is niet geschikt voor het type lading en de mate van vervuiling.
www.aeg.com Storing Mogelijke oorzaak Mogelijke oplossing Er is te veel vaatwasmiddel gebruikt. Zorg ervoor dat u de juiste hoeveelheid vaatwasmiddel gebruikt in het doseerbakje voordat u een programma start. De vrijgegeven hoeveelheid glansmiddel is te laag. Stel de hoeveelheid glansmiddel hoger in. De kwaliteit van het vaatwasmiddel kan de oorzaak zijn. Probeer een ander merk vaatwasmiddel. Het serviesgoed is nat. Het programma had geen droogfase. Een programma instellen met droogfase.
NEDERLANDS 21 Aansluiting op het elek- Zie het typeplaatje. triciteitsnet Voltage Tijd 220-240 V 50 Hz Waterdruk Min. / max. (bar / MPa) Watertoevoer 1) Koud water of warm water2) (0.5 / 0.05 ) / (8 / 0.8 ) Vermogen Couverts Energieverbruik Modus aan 0.10 W Modus uit 0.10 W max. 60 °C 12 1) Sluit de slang aan op een kraan met 3/4”-schroefdraad. 2) Als het hete water door alternatieve, milieuvriendelijkere energiebronnen geproduceerd wordt (bijv.
www.aeg.com CONTENTS 24 26 27 28 30 31 34 36 37 39 SAFETY INFORMATION PRODUCT DESCRIPTION CONTROL PANEL PROGRAMMES OPTIONS BEFORE FIRST USE DAILY USE CARE AND CLEANING TROUBLESHOOTING TECHNICAL INFORMATION ENVIRONMENT CONCERNS Recycle the materials with the symbol . Put the packaging in applicable containers to recycle it. Help protect the environment and human health and to recycle waste of electrical and electronic appliances.
ENGLISH 23 FOR PERFECT RESULTS Thank you for choosing this AEG product. We have created it to give you impeccable performance for many years, with innovative technologies that help make life simpler – features you might not find on ordinary appliances. Please spend a few minutes reading to get the very best from it. ACCESSORIES AND CONSUMABLES In the AEG webshop, you’ll find everything you need to keep all your AEG appliances looking spotless and working perfectly.
www.aeg.com SAFETY INFORMATION Before the installation and use of the appliance, carefully read the supplied instructions. The manufacturer is not responsible if an incorrect installation and use causes injuries and damages. Always keep the instructions with the appliance for future reference. • The water inlet hose has a safety valve and a sheath with an inner mains cable. CHILDREN AND VULNERABLE PEOPLE SAFETY WARNING! Risk of suffocation, injury or permanent disability.
ENGLISH – Staff kitchen areas in shops, offices and other working environments – Farm houses – By clients in hotels, motels and other residential type environments – Bed and breakfast type environments. WARNING! Risk of injury. • Do not change the specification of this appliance. • Put knives and cutlery with sharp points in the cutlery basket with the points down or in a horizontal position. • Do not keep the appliance door open without supervision to prevent to fall on it.
www.aeg.com PRODUCT DESCRIPTION 1 2 12 11 10 9 8 1 Top spray arm 2 Upper spray arm 3 Lower spray arm 4 Filters 5 Rating plate 6 Salt container 7 Water hardness dial 8 Rinse aid dispenser 9 Detergent dispenser 10 Cutlery basket 11 Lower basket 12 Upper basket LIGHT BEAM • When a programme operates, a red light beam shows on the floor below the appliance door. When the programme is completed, the red light changes to a green light.
ENGLISH 27 CONTROL PANEL 1 2 3 4 5 6 7 8 9 1 On/off button 6 ExtraHygiene button 2 Display 7 Multitab button 3 Delay button 8 RESET button 4 Programme button (down) 9 Indicators 5 Programme button (up) Indicators Description Salt indicator. This indicator is off while the programme operates. Rinse aid indicator. This indicator is off while the programme operates. End indicator.
www.aeg.
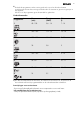
ENGLISH Consumption values Programme1) Duration (min) Energy (kWh) Water (l) 1 40 - 150 0.6 - 1.4 7 - 14 2 140 - 160 1.4 - 1.6 13 - 14 3 200 - 220 1.1 - 1.2 9 - 11 4 30 0.8 9 5 160 - 180 0.8 - 0.9 9 - 10 6 50 - 60 1.0 - 1.1 10 - 11 7 70 - 80 0.8 - 0.9 11 - 12 8 14 0.1 4 1) The pressure and the temperature of the water, the variations of the mains supply, the options and the quantity of dishes can change the programme duration and the consumption values.
www.aeg.com OPTIONS Activate or deactivate the options before the start of a programme. You cannot activate or deactivate the options while a programme operates. If one or more options are set, make sure that the related indicators are on before the programme starts. EXTRAHYGIENE This option gives better results for the hygiene. During the rinsing phase, the temperature stays at 70 °C for 10 to 14 minutes.
ENGLISH 31 BEFORE FIRST USE 1. Make sure that the set level of the water softener agrees with the water hardness in your area. If not, adjust the water softener. Contact your local water authority to know the water hardness in your area. 2. Fill the salt container. 3. Fill the rinse aid dispenser. 4. Open the water tap. 5. Processing residues can stay in the appliance. Start a programme to remove them. Do not use detergent and do not load the baskets.
www.aeg.com Manual adjustment Turn the water hardness dial to the position 1 or 2. Electronic adjustment 1. Press the on/off button to activate the appliance. Make sure that the appliance is in setting mode, refer to ‘SETTING AND STARTING A PROGRAMME’. 2. Press and hold buttons (4) and (5) at the same time until the indicators of buttons (3), (4) and (5) flash. 3. Press button (3). • The indicators of buttons (4) and (5) go off. • The indicator of button (3) continues to flash.
ENGLISH 33 FILLING THE RINSE AID DISPENSER CAUTION! Only use rinse aid for dishwashers. Other products can cause damage to the appliance. B A M AX 4 3 2 The rinse aid, during the last rinsing phase, helps to dry the dishes without streaks and stains. 1 + - Press the release button (D) to open the lid (C). 2. Fill the rinse aid dispenser (A), no more than the mark 'max'. 3. Remove the spilled rinse aid with an absorbent cloth to prevent too much foam. 4. Close the lid.
www.aeg.com DAILY USE 1. Open the water tap. 2. Press the on/off button to activate the appliance. Make sure that the appliance is in setting mode. Refer to ’SETTING AND STARTING A PROGRAMME’. • If the salt indicator is on, fill the salt container. • If the rinse aid indicator is on, fill the rinse aid dispenser. 3. Load the baskets. 4. Add the detergent. 5. Set and start the correct programme for the type of load and soil.
ENGLISH 35 SETTING AND STARTING A PROGRAMME Opening the door while the appliance operates Setting mode If you open the door, the appliance stops. When you close the door, the appliance continues from the point of interruption. The appliance must be in setting mode to accept some operations. The appliance is in setting mode when, after the activation: • The display shows 2 horizontal status bars. If the control panel shows other conditions, press RESET until the appliance is in setting mode.
www.aeg.com CARE AND CLEANING WARNING! Before maintenance, deactivate the appliance and disconnect the mains plug from the mains socket. Dirty filters and clogged spray arms decrease the washing results. Make a check regularly and, if necessary, clean them. CLEANING THE FILTERS 1. A1 Turn the filter (A) counterclockwise and remove it. To disassemble the filter (A), pull apart (A1) and (A2). Remove the filter (B). Wash the filters with water. Put the filter (B) to its initial position.
ENGLISH 37 TROUBLESHOOTING The appliance does not start or it stops during operation. Before you contact the Service, refer to the information that follows for a solution to the problem. With some problems, the display shows an alarm code: • - The appliance does not fill with water. • - The appliance does not drain the water. • - The anti-flood device is on. WARNING! Deactivate the appliance before you do the checks. Problem Possible cause Possible solution The programme does not start.
www.aeg.com THE WASHING RESULTS AND DRYING RESULTS ARE NOT SATISFACTORY Problem Possible cause Possible solution The dishes are not clean. The filters are clogged. Clean the filters. The filters are not correctly assembled and installed. Make sure that the filters are correctly assembled and installed. The spray arms are clogged. Remove remaining soil with a thin pointed object. The programme was not applicable for the type of load and soil.
ENGLISH Problem Dry water drop stains on glasses and dishes. 39 Possible cause Possible solution The quantity of detergent was too much. Make sure that you add the correct quantity of detergent in the dispenser before you start a programme. The released quantity of rinse aid was not sufficient . Increase the released quantity of rinse aid. The quality of the detergent Try a different brand of decan be the cause. tergent. The dishes are wet. The programme had no drying phase.
www.aeg.com Capacity Place settings 12 Power consumption Left-on mode 0.10 W Off-mode 0.10 W 1) Connect the water inlet hose to a water tap with a 3/4'' thread. 2) If the hot water comes from alternative sources of energy, (e.g. solar panels, aeolian energy), use the hot water supply to decrease energy consumption.
FRANÇAIS 41 SOMMAIRE 43 45 46 47 49 50 54 57 58 61 CONSIGNES DE SÉCURITÉ DESCRIPTION DE L'APPAREIL BANDEAU DE COMMANDE PROGRAMMES OPTIONS AVANT LA PREMIÈRE UTILISATION UTILISATION QUOTIDIENNE ENTRETIEN ET NETTOYAGE EN CAS D'ANOMALIE DE FONCTIONNEMENT CARACTERISTIQUES TECHNIQUES EN MATIÈRE DE PROTECTION DE L'ENVIRONNEMENT Recyclez les matériaux portant le symbole . Déposez les emballages dans les conteneurs prévus à cet effet.
www.aeg.com POUR DES RÉSULTATS PARFAITS Merci d'avoir choisi ce produit AEG. Nous l'avons conçu pour qu'il vous offre des performances irréprochables pour longtemps, en intégrant des technologies innovantes qui vous simplifient la vie grâce à des caractéristiques que vous ne trouverez pas forcément sur des appareils ordinaires. Veuillez prendre quelques instants pour lire cette notice afin d'utiliser au mieux votre appareil.
FRANÇAIS 43 CONSIGNES DE SÉCURITÉ Avant d'installer et d'utiliser cet appareil, lisez soigneusement les instructions fournies. Le fabricant ne peut être tenu pour responsable des dommages et blessures liés à une mauvaise installation ou utilisation. Conservez toujours cette notice avec votre appareil pour vous y référer ultérieurement.
www.aeg.com lation. Assurez-vous que la prise de courant est accessible une fois l'appareil installé. • Ne tirez pas sur le câble électrique pour débrancher l'appareil. Tirez toujours sur la prise.
FRANÇAIS DESCRIPTION DE L'APPAREIL 1 2 12 11 10 9 8 1 Bras d'aspersion supérieur 2 Bras d'aspersion intermédiaire 3 Bras d'aspersion inférieur 4 Filtres 5 Plaque signalétique 6 Réservoir de sel régénérant 7 Sélecteur de dureté de l'eau 8 Distributeur de liquide de rinçage 9 Distributeur de produit de lavage 10 Panier à couverts 11 Panier inférieur 12 Panier supérieur POINT LUMINEUX • Lorsqu'un programme démarre, un point lumineux rouge s'illumine sur le sol, sous la porte de l'appareil.
www.aeg.com BANDEAU DE COMMANDE 1 2 3 4 5 6 7 8 9 1 Touche marche/arrêt 6 Touche Extra Hygiène 2 Ecran 7 Touche « Tout en 1 » 3 Touche Départ différé 8 Touche RESET 4 Touche Programme (moins) 9 Voyants 5 Touche Programme (plus) Voyants du cycle Voyant du réservoir de sel régénérant. Ce voyant est éteint pendant le déroulement du programme. Voyant du réservoir de liquide de rinçage. Ce voyant est éteint pendant le déroulement du programme. Voyant de fin.
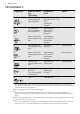
FRANÇAIS 47 PROGRAMMES Programme Degré de salissure Phases du Type de charge programme Options 1 Tous Vaisselle, couverts, plats et casseroles Prélavage Lavage de 45 °C à 70 °C Rinçages Séchage ExtraHygiene Très sale Vaisselle, couverts, plats et casseroles Prélavage Lavage à 70 °C Rinçages Séchage Normalement sale Vaisselle et couverts Prélavage Lavage à 50 °C Rinçages Séchage Vaisselle fraîchement salie Vaisselle et couverts Lavage à 60 °C Rinçage ExtraHygiene Normalement sale Vaisselle et
www.aeg.com N'utilisez pas de produit de lavage avec ce programme. Valeurs de consommation Programme1) Durée (min) Consommation électrique (KWh) Eau (l) 1 40 - 150 0.6 - 1.4 7 - 14 2 140 - 160 1.4 - 1.6 13 - 14 3 200 - 220 1.1 - 1.2 9 - 11 4 30 0.8 9 5 160 - 180 0.8 - 0.9 9 - 10 6 50 - 60 1.0 - 1.1 10 - 11 7 70 - 80 0.8 - 0.9 11 - 12 8 14 0.
FRANÇAIS 49 OPTIONS Activez ou désactivez les options avant de démarrer un programme. Vous ne pouvez pas activer ni désactiver les options pendant le déroulement d'un programme. Si vous avez activé une ou plusieurs options, assurez-vous que les voyants correspondants sont allumés avant le démarrage du programme. 3. Assurez-vous que le réservoir de sel régénérant et le distributeur de liquide de rinçage sont pleins. 4.
www.aeg.com AVANT LA PREMIÈRE UTILISATION 1. Assurez-vous que le niveau réglé pour l'adoucisseur d'eau est compatible avec la dureté de l'eau de votre région. Dans le cas contraire, réglez l'adoucisseur d'eau. Contactez votre compagnie des eaux pour connaître la dureté de l'eau de votre région. 2. Remplissez le réservoir de sel régénérant. 3. Remplissez le distributeur de liquide de rinçage. 4. Ouvrez le robinet d'eau. 5. Des résidus de traitement peuvent subsister dans votre lave-vaisselle.
FRANÇAIS 51 2) Ne pas utiliser de sel à ce niveau. Réglage manuel Tournez le sélecteur de dureté de l'eau sur la position 1 ou 2. Réglage électronique 1. Appuyez sur la touche Marche/Arrêt pour allumer l'appareil. Assurez-vous que l'appareil est en mode Programmation ; reportez-vous au chapitre « RÉGLAGE ET DÉPART D'UN PROGRAMME ». 2. Maintenez enfoncées les touches (4) et (5) simultanément jusqu'à ce que les voyants des touches (3), (4) et (5) clignotent. 3. Appuyez sur la touche (3).
www.aeg.com REMPLISSAGE DU RÉSERVOIR DE SEL RÉGÉNÉRANT ATTENTION Utilisez uniquement du sel régénérant pour lave-vaisselle. D'autres produits peuvent endommager l'appareil. De l'eau et du sel peuvent sortir du réservoir de sel régénérant lorsque vous le remplissez. Risque de corrosion. Afin d'éviter cela, après avoir rempli le réservoir de sel régénérant, démarrez un programme. 1. 2. 3. 4. 5. Tournez le couvercle vers la gauche et ouvrez le réservoir de sel régénérant.
FRANÇAIS 53 REMPLISSAGE DU DISTRIBUTEUR DE LIQUIDE DE RINÇAGE ATTENTION Utilisez uniquement du liquide de rinçage pour lave-vaisselle. D'autres produits peuvent endommager l'appareil. B A M AX 4 3 2 1 + - Lors de la dernière phase de rinçage, le liquide de rinçage permet de sécher la vaisselle sans laisser de traînées ni de taches. C D 1. Appuyez sur le bouton d'ouverture (D) pour ouvrir le couvercle (C). 2.
www.aeg.com UTILISATION QUOTIDIENNE 1. Ouvrez le robinet d'eau. 2. Appuyez sur la touche Marche/Arrêt pour allumer l'appareil. Assurez-vous que l'appareil est en mode Programmation. Reportez-vous au chapitre « RÉGLAGE ET DÉPART D'UN PROGRAMME ». • Si le voyant du réservoir de sel régénérant est allumé, remplissez celuici. • Si le voyant du liquide de rinçage est allumé, remplissez le distributeur de liquide de rinçage. 3. Chargez les paniers. 4. Ajoutez du produit de lavage. 5.
FRANÇAIS Les pastilles de détergent ne se dissolvent pas complètement avec des programmes courts et des résidus de détergent peuvent apparaître sur la vaisselle. Nous recommandons d'utiliser des pastilles de détergent avec des programmes longs. RÉGLAGE ET DÉPART D'UN PROGRAMME Mode Programmation L'appareil doit être en mode Programmation pour effectuer certaines opérations. L'appareil se trouve en mode Programmation lorsque, après sa mise en marche : • Deux lignes horizontales s'affichent.
www.aeg.com de diminuer la consommation d'énergie. • Attendez que la vaisselle refroidisse avant de la retirer du lave-vaisselle. La vaisselle encore chaude est sensible aux chocs. • Déchargez d'abord le panier inférieur, puis le panier supérieur. Les côtés et la porte de l'appareil peuvent être mouillés. L'acier inoxydable refroidit plus rapidement que la vaisselle.
FRANÇAIS 57 ENTRETIEN ET NETTOYAGE AVERTISSEMENT Avant toute opération d'entretien, éteignez l'appareil et débranchez la prise secteur. Les filtres sales et les bras d'aspersion obstrués diminuent les résultats de lavage. Contrôlez-les régulièrement et nettoyez-les si nécessaire. NETTOYAGE DES FILTRES 1. C C 2. 3. 4. A B 5. A1 A2 NETTOYAGE DES BRAS D'ASPERSION Ne retirez pas les bras d’aspersion.
www.aeg.com EN CAS D'ANOMALIE DE FONCTIONNEMENT L'appareil ne démarre pas ou s'arrête en cours de programme. Dans un premier temps, essayez de trouver une solution au problème (reportezvous au tableau). Si vous n'y parvenez pas, contactez le service après-vente. Pour certaines anomalies, l'écran affiche un code d’alarme : • - L'appareil n'est pas approvisionné en eau. • • - L'appareil ne se vidange pas. - Le système de sécurité anti-débordement s'est déclenché.
FRANÇAIS 59 LES RÉSULTATS DE LAVAGE ET DE SÉCHAGE NE SONT PAS SATISFAISANTS Problème Cause possible La vaisselle n'est pas Les filtres sont obstrués. propre. Solution possible Nettoyez les filtres. Les filtres sont mal montés et installés. Assurez-vous que les filtres sont montés et installés correctement. Les bras d'aspersion sont obstrués. Enlevez les résidus à l'aide d'un objet fin et pointu. Le programme n'était pas adapté au type de charge et au degré de salissure.
www.aeg.com Problème Cause possible Solution possible La quantité de produit de lavage était excessive. Vérifiez que vous ajoutez la bonne quantité de produit de lavage dans le distributeur avant de démarrer un programme. La quantité de liquide de rinçage libérée n'était pas suffisante. Augmentez la quantité de liquide de rinçage libérée. Il se peut que la qualité du produit de lavage soit en cause. Utilisez une autre marque de produit de lavage. La vaisselle est mouillée.
FRANÇAIS 61 CARACTERISTIQUES TECHNIQUES Dimensions Largeur / Hauteur / Profondeur (mm) 596 / 818 - 898 / 550 Branchement électrique Reportez-vous à la plaque signalétique. Tension Fréquence 220-240 V 50 Hz Pression de l'arrivée d'eau Min. / max. (bar / MPa) (0.5 / 0.05 ) / (8 / 0.8 ) Arrivée d'eau 1) Eau froide ou eau chaude2) Capacité Couverts Consommation électrique Mode « Veille » 0.10 W Mode « Arrêt » 0.10 W max.
www.aeg.
FRANÇAIS 63
www.aeg.