FAVORIT 99009 EN DISHWASHER USER MANUAL
FOR PERFECT RESULTS Thank you for choosing this AEG product. We have created it to give you impeccable performance for many years, with innovative technologies that help make life simpler – features you might not find on ordinary appliances. Please spend a few minutes reading to get the very best from it. ACCESSORIES AND CONSUMABLES In the AEG webshop, you’ll find everything you need to keep all your AEG appliances looking spotless and working perfectly.
Contents 3 CONTENTS 4 8 8 12 12 14 14 15 16 18 19 21 22 24 25 25 Safety information Product description Control panel Use of the appliance Setting the water softener Use of dishwasher salt Use of detergent and rinse aid Multitab function Loading cutlery and dishes Washing programmes Select and start a washing programme Care and cleaning What to do if… Technical data Environment concerns Installation The following symbols are used in this user manual: Important information concerning your personal safety
Safety information SAFETY INFORMATION Before the installation and use, read this manual carefully: • For your safety and the safety of your property. • To help the environment. • For the correct operation of the appliance. Always keep these instructions with the appliance also if you move or give it to a different person. The manufacturer is not responsible if an incorrect installation and use causes damage.
Safety information 5 • Do not fill the rinse aid dispenser with other products than the rinse aid, (dishwasher cleaning agent, liquid detergent). This can cause damage to the appliance. • Make sure that the spray arms can move freely before you start a washing programme. • The appliance can release hot steam if you open the door while a washing programme operates. There is a risk of skin burns. • Do not remove the dishes from the appliance until the washing programme is completed.
Safety information – Do not put the water inlet hose or the safety valve in water. – If the water inlet hose or the safety valve are damaged, immediately disconnect the mains plug from the mains socket. – Contact the service centre to replace the water inlet hose with safety valve. WARNING! Dangerous voltage. Electrical connection • The appliance must be earthed. • Make sure that the electrical information on the rating plate agrees with the power supply.
Safety information 7 To replace the internal lamp, contact the service centre. Disconnect the mains plug from the mains socket before the replacement of the internal lamp. Service centre • Only a qualified person can repair or work on the appliance. Contact the service centre. • Use only original spare parts. To discard the appliance • To prevent the risk of injury or damage: – Disconnect the mains plug from the mains socket. – Cut off the mains cable and discard it. – Remove the door catch.
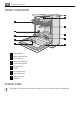
Product description PRODUCT DESCRIPTION 11 10 1 9 2 3 4 5 1 2 3 4 5 6 7 8 9 10 11 8 7 6 Upper basket Water hardness dial Salt container Detergent dispenser Rinse aid dispenser Rating plate Filters Lower spray arm Upper spray arm Top spray arm Worktop CONTROL PANEL Messages in the display and acoustic signals help you to operate with the appliance.
Control panel 9 1 2 4 3 6 5 8 7 1 2 3 4 5 6 7 8 On/off button Menu touchpad (up) Display Return touchpad Start touchpad OK touchpad Menu touchpad (down) Display touchpad On/off button Press this button to activate or deactivate the appliance. After ten minutes from the end of the washing programme, the Auto Off function automatically deactivates the appliance. This helps to decrease energy consumption. Display A B C The display has three areas.
Control panel • Area (A) shows the washing programme and the time of the programme. • Area (B) shows the end time of the washing programme. End Time area (B) You can delay the start of the washing programme from 1 to 24 hours. 1. Press the display touchpad to go to this area. 2. Press one of the menu touchpads to set the number of hours for the delay start. • The upper part of the area shows the delay start. • The lower part of the area shows the end time of the washing programme. 3.
Control panel Menu Submenu Brightness (10 levels are available). Contrast (10 levels are available). Description of the function You can change the intensity of the display. Factory setting: 10. You can change the contrast of the display. Factory setting: 6. Reset settings You can go back to the factory setting of the appliance. Water hardness You can adjust the level of the water softener. Refer to 'Setting the water softener'. Factory setting: 5. (10 levels are available).
Use of the appliance USE OF THE APPLIANCE Activating the appliance for the first time 1. Activate the appliance. 2. The display shows the default language: Language English. • Press the OK touchpad to confirm the default language • Press one of the menu touchpads to set a different language and then press the OK touchpad to confirm. 3. The display shows the time message. 4. Press one of the menu touchpads to set the time. 5. Press the OK touchpad. 6. The display goes to 'Programs' area.
Setting the water softener 13 Water hardness adjustment Water hardness German degrees (°dH) French degrees (TH°) mmol/l Clarke degrees manually electronically 29 - 36 51 - 64 5,1 - 6,4 36 - 45 21) 7 23 - 28 40 - 50 4,0 - 5,0 28 - 35 21) 6 19 - 22 33 - 39 3,3 - 3,9 23 - 27 21) 51) 15 - 18 26 - 32 2,6 - 3,2 18 - 22 1 4 11 - 14 19 - 25 1,9 - 2,5 13 - 17 1 3 4 - 10 7 - 18 0,7 - 1,8 5 - 12 1 2 <4 <7 < 0,7 <5 12) 12) 1) Factory position.
Use of dishwasher salt USE OF DISHWASHER SALT Filling the salt container 1. Turn the cap counterclockwise and open the salt container. 2. Fill the salt container with 1 litre of water (only for the first time you fill with salt). 3. Use the funnel to fill the salt container with salt. 4. Remove the salt around the opening of the salt container. 5. Turn the cap clockwise to close the salt container. When it is necessary to fill the salt container, the display shows a message.
Multitab function 15 2. Put the detergent in the dispenser 1 . 3. If the washing programme has a prewash phase, put a small quantity of detergent on the inner part of the appliance door. 4. If you use the detergent tablets, put the tablet in the detergent dispenser 1 . 5. Close the detergent dispenser. Press the lid until it locks into position. Use long washing programmes when you use the detergent tablets. These cannot fully dissolve with short washing programmes and can decrease the washing results.
Loading cutlery and dishes • When you activate the multitab function, it stays on until you deactivate it. 3. Press the OK touchpad. 4. Press the return touchpad to close the menu option. To deactivate the multitab function and use separately detergent, salt and rinse aid 1. 2. 3. 4. 5. 6. 7. 8. Open the menu option. Go to Multitab and deactivate the multitab function. Press the OK touchpad. Press the return touchpad to close the menu option. Fill the salt container and the rinse aid dispenser.
Loading cutlery and dishes Beer glass holders The beer glass holders prevent beer glasses to move while a washing programme operates. If you do not use the holders, fold them up or remove them. You can also remove the support. WARNING! Be careful when you disengage or engage the support. To remove the holders and the support, do these steps: 1. Disengage the holders from the support and remove them. 2. Push the support to the rear part of the basket to disengage it.
Washing programmes WASHING PROGRAMMES Programme Type of soil Type of load Programme description Automatic 1) All Crockery, cutlery, pots Prewash and pans Wash 45 °C or 70 °C Rinses Dry 70° Pro Heavy soil Crockery, cutlery, pots Prewash and pans Wash 70 °C Rinses Dry Extra silent 2) Normal soil Crockery and cutlery Prewash Wash 50 °C Rinses Dry 60° Quick 3) Fresh soil Crockery and cutlery Wash 60 °C Rinse 50° Energy 4) Normal soil Crockery and cutlery Prewash Wash 50 °C Rinses Dry
Select and start a washing programme 19 Functions Programme Extra hygiene ProBoost Automatic Yes, with effect Yes, without effect 70° Pro Yes, without effect Yes, with effect Extra silent Yes, without effect Yes, without effect 60° quick Yes, with effect Yes, without effect 50° Energy Yes, with effect Yes, without effect 50 Minutes Yes, with effect Yes, without effect ProZone Yes, without effect Yes, without effect 45° Glass Yes, without effect Yes, without effect Prewash Yes,
Select and start a washing programme the start touchpad, the countdown of the delay start or the washing programme starts. • When the countdown of the delay start is completed, the washing programme starts automatically. The opening of the appliance door interrupts the countdown of the delay start. When you close the door, the countdown continues from the point of interruption. Cancelling the delay start 1. Press the start touchpad. 2. Follow the indications in the display to cancel the delay start. 3.
Care and cleaning 21 CARE AND CLEANING To remove and clean the filters Dirty filters decrease the washing results. Although the maintenance is very low with these filters, make a check at intervals and if necessary, clean them. 1. Turn the filter (A) counterclockwise and remove it out from filter (B). B A 2. Filter (A) has two parts. To disassemble the filter, pull them apart. 3. Fully clean the parts with water. 4. Put the two parts of the filter (A) together and push.
What to do if… If the holes in the spray arms become clogged, remove remaining parts of soil with a thin pointed object. To clean the external surfaces Clean the external surfaces of the appliance and control panel with a moist soft cloth. Only use neutral detergents. Do not use abrasive products, abrasive cleaning pads or solvents (acetone). WHAT TO DO IF… The start of the appliance does not occur or it stops during operation. Try to find a solution to the problem.
What to do if… Malfunction Possible cause 23 Possible solution Blow out fuse in the house fuse box. Replace the fuse. The delay start is set. Cancel the delay start. When the countdown is completed, the washing programme starts automatically. After the check, activate the appliance. The programme continues from the point of interruption. If the malfunction occurs again, contact the service centre. If the display shows other malfunction messages, contact the service centre.
Technical data Problem Dry water drop stains on glasses and dishes. Possible cause Possible solution The rinse aid quantity is too low. Increase the rinse aid quantity. The detergent can be the cause. Use a different brand of detergent. The dishes are wet. The washing programme was without a drying phase or with a decreased drying phase. For better drying results, keep the door ajar for some minutes. The dishes are wet and matt. The rinse aid dispenser is empty.
Environment concerns 25 ENVIRONMENT CONCERNS The symbol on the product or on its packaging indicates that this product may not be treated as household waste. Instead it should be taken to the appropriate collection point for the recycling of electrical and electronic equipment. By ensuring this product is disposed of correctly, you will help prevent potential negative consequences for the environment and human health, which could otherwise be caused by inappropriate waste handling of this product.
2. Pull the worktop from the behind of the appliance (2). 3. Lift the worktop and move it from the front slots (3). 4. Use the adjustable feet to adjust the level of the appliance. 5. Install the appliance under the kitchen worktop. Do not squash or bend the water hoses during the installation. To adjust the level of the appliance A correct level of the appliance lets the door to close and seal correctly. With an incorrect appliance level, the door does catches on the sides of the cabinet.
www.aeg-electrolux.