FAVORIT 88060 VI EN DISHWASHER USER MANUAL
FOR PERFECT RESULTS Thank you for choosing this AEG product. We have created it to give you impeccable performance for many years, with innovative technologies that help make life simpler – features you might not find on ordinary appliances. Please spend a few minutes reading to get the very best from it. ACCESSORIES AND CONSUMABLES In the AEG webshop, you’ll find everything you need to keep all your AEG appliances looking spotless and working perfectly.
Contents 3 CONTENTS 4 8 9 11 12 13 14 15 15 16 18 20 21 24 24 Safety information Product description Control panel Use of the appliance Setting the water softener Use of dishwasher salt Use of detergent and rinse aid Multitab function Loading cutlery and dishes Washing programmes Select and start a washing programme Care and cleaning What to do if… Technical data Environment concerns The following symbols are used in this user manual: Important information concerning your personal safety and information
Safety information SAFETY INFORMATION Before the installation and use, read this manual carefully: • For your safety and the safety of your property. • To help the environment. • For the correct operation of the appliance. Always keep these instructions with the appliance also if you move or give it to a different person. The manufacturer is not responsible if an incorrect installation and use causes damage.
Safety information 5 • Fill the appliance with salt before you start a washing programme. Remaining salt in the appliance can cause corrosion or make a hole in the bottom of the appliance. • Do not fill the rinse aid dispenser with other products than the rinse aid, (dishwasher cleaning agent, liquid detergent). This can cause damage to the appliance. • Make sure that the spray arms can move freely before you start a washing programme.
Safety information • Make sure not to squash or cause damage to the water hoses when you install the appliance. • Make sure that the water couplings are tight to prevent a water leakage. • The first time you use the appliance, make sure that the hoses do not have water leaks. • The water inlet hose has a safety valve and a double sheath with an inner mains cable. There is pressure in the water inlet hose only when the water flows.
Safety information 7 WARNING! Visible led radiation, do not look directly into the beam. The LED of the lamp is CLASS 2 and agrees with IEC 60825-1: 1993 + A1:1997 + A2:2001. Emission wave length: 450 nm Maximum emitted power: 548 μW To replace the internal lamp, contact the service centre. Disconnect the mains plug from the mains socket before the replacement of the internal lamp. Service centre • Only a qualified person can repair or work on the appliance. Contact the service centre.
Product description PRODUCT DESCRIPTION 10 1 9 2 3 4 5 1 2 3 4 5 6 7 8 9 10 Upper basket Water hardness dial Salt container Detergent dispenser Rinse aid dispenser Rating plate Filters Lower spray arm Upper spray arm Top spray arm TimeBeam TimeBeam shows, on the kitchen floor, the washing programme time or the countdown of the delay start. With TimeBeam you always know the remaining time of the washing programme and of the delay start.
Control panel 9 • The end of the washing programme, a zero shows on the kitchen floor • The countdown of the delay start with steps of one hour (24h, 23h...). TimeBeam goes off when the appliance is deactivated. CONTROL PANEL The controls are on the top on the control panel. To operate with the controls, keep the appliance door ajar.
Control panel • The activation and deactivation of the rinse aid dispenser (only with the multitab function on) • The number of the washing programme • The remaining time to the end of the washing programme • The end of a washing programme (the display shows a zero) • The time of the delay start • The alarm codes • The activation and deactivation of the acoustic signals. Delay touchpad Press this touchpad again and again to delay the start of the washing programme from 1 to 24 hours.
Use of the appliance 11 Activate the appliance. The appliance is in setting mode when: • The display shows two horizontal status bars. Activate the appliance. The appliance is not in setting mode when: • The display shows the time of the washing programme or of the delay start. – It is necessary to cancel the programme or the delay start to go back to the setting mode. Refer to 'Select and start a washing programme'.
Setting the water softener If you use the combi detergent tablets ('3 in 1', '4 in 1', '5 in 1'), use the multitab function (refer to 'Multitab function'). SETTING THE WATER SOFTENER The water softener removes minerals and salts from the water supply. These minerals and salts can cause damage to the appliance. Adjust the level of the water softener if this does not agree with the water hardness in your area. Contact your local water authority to know the water hardness in your area.
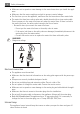
Use of dishwasher salt 13 Electronic adjustment 1. Activate the appliance. Make sure that the appliance is in setting mode. 2. Press and hold touchpad (4) and touchpad (5) at the same time until the indicators of touchpads (3), (4) and (5) flash. 3. Release touchpad (4) and touchpad (5). 4. Press touchpad (3), • The indicators of touchpads (4) and (5) go off. • The indicator of touchpad (3) continues to flash. • The acoustic signals sound.
Use of detergent and rinse aid USE OF DETERGENT AND RINSE AID 1 3 2 4 30 7 4 MA X + 3 2 - 1 20 6 5 Use of detergent To help the environment, do not use more than the correct quantity of detergent. Obey the instructions on the detergent packaging. How to fill the detergent dispenser: 1. Press the release button 2 to open the lid 7 of the detergent dispenser. 2. Put the detergent in the dispenser 1 . 3.
Multitab function 15 You can set the rinse aid dosage between position 1 (lowest dosage) and position 4 (highest dosage). Turn the rinse aid selector 4 to increase or decrease the dosage. MULTITAB FUNCTION The multitab function is for combi detergent tablets. These tablets contain agents as detergent, rinse aid and dishwasher salt. Some types of tablets can contain other agents.
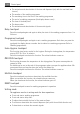
Washing programmes • • • • • Put small items in the cutlery basket. Mix the spoons with other cutlery to prevent them to bond together. When you put the items in the baskets, make sure that the water can touch all surfaces. Put light items in the upper basket. Make sure that the items do not move. Water droplets can collect on plastic items and non-stick pans.
Washing programmes Programme 8 Type of soil Type of load 17 Programme description Use this programme to quickly rinse the dishes. This prevents the remaining food to bond on the dishes and bad odours to come out from the appliance. Do not use detergent with this programme. Rinse 1) The appliance senses the type of soil and the quantity of items in the baskets. It automatically adjusts the temperature and quantity of the water, the energy consumption and the programme time.
Select and start a washing programme Consumption values Programme Programme time (minute) Energy (kWh) Water (litre) 1 90 - 160 0,9 - 1,7 8 - 15 2 140 - 160 1,4 - 1,6 13 - 14 3 200 - 220 1,1 - 1,2 9 - 11 4 30 0.8 9 5 160 - 170 0,9 - 1,0 9 - 11 6 50 - 60 1,0 - 1,1 10 - 11 7 65 - 75 0,8 - 0,9 11 - 12 8 14 0,1 4 The water pressure and temperature, the variations of the mains supply and the quantity of dishes can change the consumption values.
Select and start a washing programme 19 Starting the washing programme with delay start 1. 2. 3. 4. Activate the appliance. Make sure that the appliance is in setting mode. Set the washing programme and functions. Press the delay touchpad again and again until the display shows the time of the delay start. • The time of the delay start flashes in the display. • The delay indicator is on. 5. Close the appliance door, the countdown starts automatically.
Care and cleaning End of the washing programme When the washing programme is completed, an intermittent acoustic signal sounds. 1. Open the appliance door. • The end indicator is on • The display shows a zero. 2. Deactivate the appliance. 3. For better drying results, keep the appliance door ajar for some minutes. Remove the items from the baskets • Let the dishes become cold before you remove them from the appliance. Hot dishes can be easily damaged.
What to do if… 21 2. Filter (A) has two parts. To disassemble the filter, pull them apart. 3. Fully clean the parts with water. 4. Put the two parts of the filter (A) together and push. Make sure that they assemble correctly in each other. 5. Remove the filter (B). 6. Fully clean the filter (B) with water. 7. Put the filter (B) to its initial position. Make sure that it assembles correctly in the two guides (C). 8. Put the filter (A) into position in filter (B).
What to do if… WARNING! Deactivate the appliance before you do the checks. Malfunction The appliance does not fill with water. The appliance does not drain the water. Possible cause The water tap is blocked or there is limescale on it. Clean the water tap. The water pressure is too low. Contact your local water authority. The water tap is closed. Open the water tap. The filter in the water inlet hose is blocked. Clean the filter. The connection of the water inlet hose is not correct.
What to do if… 23 The washing results and drying results are not satisfactory Problem The dishes are not clean. Possible cause Possible solution The washing programme was not applicable for the type of load and soil. Make sure that the washing programme is applicable for the type of load and soil. You did not put the items correctly in the baskets, water did not touch all surfaces. Put the items correctly in the baskets. The spray arms could not turn freely.
Technical data 3. Press and hold touchpad (4) and touchpad (5) at the same time until the indicators of touchpads (3), (4) and (5) flash. 4. Release touchpad (4) and touchpad (5). 5. Press touchpad (4). • The indicators of touchpads (3) and (5) go off . • The indicator of touchpad (4) continues to flash. • The display shows the setting of the rinse aid dispenser. The rinse aid dispenser is off. The rinse aid dispenser is on. 6. Press touchpad (4) to change the setting. 7.
www.aeg.