FAVORIT 99015 VI DISHWASHER USER MANUAL
CONTENTS 4 6 7 8 10 12 16 19 20 22 SAFETY INFORMATION PRODUCT DESCRIPTION CONTROL PANEL PROGRAMMES OPTIONS BEFORE FIRST USE DAILY USE CARE AND CLEANING TROUBLESHOOTING TECHNICAL INFORMATION ENVIRONMENT CONCERNS Recycle the materials with the symbol . Put the packaging in applicable containers to recycle it. Help protect the environment and human health and to recycle waste of electrical and electronic appliances. Do not dispose appliances marked with the symbol with the household waste.
ENGLISH 3 FOR PERFECT RESULTS Thank you for choosing this AEG product. We have created it to give you impeccable performance for many years, with innovative technologies that help make life simpler – features you might not find on ordinary appliances. Please spend a few minutes reading to get the very best from it. ACCESSORIES AND CONSUMABLES In the AEG webshop, you’ll find everything you need to keep all your AEG appliances looking spotless and working perfectly.
SAFETY INFORMATION Before the installation and use of the appliance, carefully read the supplied instructions. The manufacturer is not responsible if an incorrect installation and use causes injuries and damages. Always keep the instructions with the appliance for future reference. CHILDREN AND VULNERABLE PEOPLE SAFETY WARNING! Risk of suffocation, injury or permanent disability.
ENGLISH cian to change a damaged mains cable. • Connect the mains plug to the mains socket only at the end of the installation. Make sure that there is access to the mains plug after the installation. • Do not pull the mains cable to disconnect the appliance. Always pull the mains plug. • Only for UK and Ireland. The appliance has a 13 amp mains plug. If it is necessary to change the fuse in the mains plug, use a 13 amp ASTA (BS 1362) fuse. 5 completed. There can be detergent on the dishes.
PRODUCT DESCRIPTION 1 2 3 12 11 10 9 8 7 6 5 4 1 Top spray arm 10 Cutlery basket 2 Upper spray arm 11 Lower basket 3 Lower spray arm 12 Upper basket 4 5 6 7 8 9 Filters Rating plate Salt container Water hardness dial Rinse aid dispenser Detergent dispenser This appliance has an internal light that comes on when you open the door and goes off when the door is closed. TIME BEAM Time Beam is a light beam that shows, on the kitchen floor: • The programme duration.
ENGLISH 7 CONTROL PANEL The controls are on the top on the control panel. To operate with the controls, keep the appliance door ajar. 2 1 6 Messages in the display and acoustic signals help to operate with the appliance. 3 4 5 1 On/off button 4 OPTION button 2 Menu button (up) 5 OK START button 3 Display 6 Menu button (down) DISPLAY B A) This area shows messages, pro- grammes, options and programme phases. B) This area shows the option symbols.
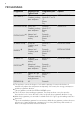
PROGRAMMES Programme Degree of soil Type of load Programme phases AUTOMATIC 1) All Prewash Crockery, cutlery, Wash 45 °C or 70 pots and pans °C Rinses Dry Prewash INTENSIV PRO 2) Heavy soil Crockery, cutlery, Wash 70 °C pots and pans Rinses Dry Options EXTRA HYGIENE PROBOOST EXTRA SILENT 3) Normal soil Crockery and cutlery Prewash Wash 50 °C Rinses Dry 30 MINUTES 4) Fresh soil Crockery and cutlery Wash 60 °C Rinse EXTRA HYGIENE ENERGY 5) Normal soil Crockery and cutlery Prewash Wash 50 °C
ENGLISH 9 6) With this programme you can wash a load with mixed soil. Very heavy soil in the lower basket and normal soil in the upper basket. The water pressure and the water temperature in the lower basket are higher than in the upper basket. 7) Use this programme to quickly rinse the dishes. This prevents the remaining food to bond on the dishes and bad odours to come out from the appliance. Do not use detergent with this programme.
OPTIONS MENU OPTION Menu Submenu DELAY START Description of the function To delay the start of the washing programme from 1 to 24 hours. EXTRA HYGIENE ON OFF This function gives better results for the hygiene. During the rinsing phase, the temperature stays at 70 °C for 10 to 14 minutes. MULTITAB ON OFF Activate this function only when you use the combi detergent tablets. These tablets contain detergent, rinse aid and other added agents.
ENGLISH 4. Press one of the menu buttons to set the number of hours. 5. Press OK START to confirm. 6. Press OPTION to close the menu option. Activating the multitab function Activate or deactivate the multitab function before the start of a programme. You cannot activate or deactivate this function while a programme operates. 1. Press the on/off button to activate the appliance. 2. Press OPTION to open the menu option. 3. Press one of the menu buttons and go to MULTITAB . 4. Press OK START. 5.
BEFORE FIRST USE 1. Press the on/off button to activate the appliance. 2. The display shows the default language: LANGUAGE ENGLISH. • Press OK START to confirm. • Press one of the menu buttons to set a different language and then press OK START to confirm. 3. Press OPTION to close the menu option. 4. Make sure that the current setting of the water softener agrees with the water hardness in your area. If not, adjust the water softener.
ENGLISH 13 Water softener adjustment Water hardness German degrees (°dH) French degrees (°fH) mmol/l Clarke degrees Manual Electronic 15 - 18 26 - 32 2.6 - 3.2 18 - 22 1 4 11 - 14 19 - 25 1.9 - 2.5 13 - 17 1 3 4 - 10 7 - 18 0.7 - 1.8 5 - 12 1 2 <4 <7 < 0.7 <5 12) 12) 1) Factory position. 2) Do not use salt at this level. Manual adjustment Turn the water hardness dial to the position 1 or 2. Electronic adjustment 1. Press the on/off button to activate the appliance. 2.
FILLING THE SALT CONTAINER CAUTION! Only use dishwasher salt. Other products can cause damage to the appliance. Water and salt can come out from the salt container when you fill it. Risk of corrosion. To prevent it, after you fill the salt container, start a programme. 1. 2. 3. 4. 5. When it is necessary to fill the salt container, the display shows the message REFILL SALT . The message is off while a programme operates. Turn the cap counterclockwise and open the salt container.
ENGLISH 15 FILLING THE RINSE AID DISPENSER CAUTION! Only use rinse aid for dishwashers. Other products can cause damage to the appliance. B A M AX 4 3 2 The rinse aid, during the last rinsing phase, helps to dry the dishes without streaks and stains. 1 + - C D 1. 2. 3. 4. Press the release button (D) to open the lid (C). Fill the rinse aid dispenser (A), no more than the mark 'max'. Remove the spilled rinse aid with an absorbent cloth to prevent too much foam. Close the lid.
DAILY USE 1. Open the water tap. 2. Press the on/off button to activate the appliance. • If the display shows the salt message, fill the salt container. • If the display shows the rinse aid message, fill the rinse aid dispenser. 3. Load the baskets. 4. Add the detergent. 5. Set and start the correct programme for the type of load and the degree of soil. LOADING THE BASKETS Refer to the supplied leaflet with examples of the load of the baskets.
ENGLISH 17 WARNING! Be careful when you disengage or engage the support. Removing the holders and the support 1. Disengage the holders from the support and remove them. 2. Push the support to the rear part of the basket to disengage it. Engaging the holders and the support 1. Push the support to the front part of the basket to engage it. 2. Engage the holders from the support. USING THE DETERGENT A CAUTION! Use only detergents for dishwashers. B 30 1. 4 MAX + 32 - 1 20 2. C 3. 4. 5.
SETTING AND STARTING A PROGRAMME Starting a programme 1. Open the water tap. 2. Press the on/off button to activate the appliance. 3. Press one of the menu buttons to go through the programme list and set a programme. 4. If you want, you can set one or more options and/or the delay start. Refer to ‘OPTIONS’. 5. Press OK START to confirm. 6. Close the appliance door, the programme starts. • If the delay start is set, the countdown starts when the appliance door is closed.
ENGLISH 19 CARE AND CLEANING WARNING! Dirty filters and clogged spray arms decrease the washing results. Make a check regularly and, if necessary, clean them. Before maintenance, deactivate the appliance and disconnect the mains plug from the mains socket. CLEANING THE FILTERS 1. C C 2. 3. A B 4. 5. 6. A1 A2 CLEANING THE SPRAY ARMS Do not remove the spray arms. If the holes in the spray arms are clogged, remove remaining parts of soil with a thin pointed object.
TROUBLESHOOTING The appliance does not start or it stops during operation. First try to find a solution to the problem (refer to the table). If not, contact the Service. Display With some problems, the display shows a message and the Time Beam shows an alarm code. Time Beam Problem OPEN THE TAP The appliance does not fill with water. DRAIN BLOCKED The appliance does not drain the water. SERVICE CODE The anti-flood device is on. WARNING! Deactivate the appliance before you make the checks.
ENGLISH 21 Problem Possible cause Possible solution The appliance does not drain the water. The sink spigot is clogged. Clean the sink spigot. The water drain hose has a kink or a bend. Make sure that the position of the hose is correct. After the checks are completed, activate the appliance. The programme continues from the point of interruption. If the problem occurs again, contact the Service. If the display shows other messages, contact the Service.
Problem Whitish streaks and stains or bluish layers on glasses and dishes. Dry water drop stains on glasses and dishes. Possible cause Possible solution The cap of the salt container is loose. Tighten the cap. The released quantity of rinse aid is too much. Decrease the released quantity of rinse aid . The quantity of detergent was too much. Make sure that you add the correct quantity of detergent in the dispenser before you start a programme.
ENGLISH Electrical connection 23 Refer to the rating plate. Voltage 220-240 V Frequency Water supply pressure Min. / max. (bar / MPa) Water supply 1) Cold water or hot water2) Capacity Place settings 50 Hz (0.5 / 0.05 ) / (8 / 0.8 ) max. 60 °C 1) Connect the water inlet hose to a water tap with a 3/4'' thread. 2) If the hot water comes from alternative sources of energy, (e.g. solar panels, aeolian energy), use the hot water supply to decrease energy consumption.
www.aeg.