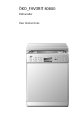
ÖKO_FAVORIT 80800 Dishwasher User Instructions
Dear customer, Please read these user instructions carefully. Above all please observe the safety instructions on the first few pages ofthese user instructions! Please keep these user instructions for later reference. Pass them on to any subsequent owner of the appliance. 1 0 The warning triangle and/or specific words (Warning!, Caution!, Important!) are used to highlight instructions that are important for your safety or for the function of the appliance.
Contents CONTENTS Operating Instructions .................................... 5 Safety Instructions . . . . . . . . . . . . . . . . . . . . . . . . . . . . . . . . . . . . . . . . . . . . 5 Disposal . . . . . . . . . . . . . . . . . . . . . . . . . . . . . . . . . . . . . . . . . . . . . . . . . . . . . . 7 Economical and Ecological Dishwashing . . . . . . . . . . . . . . . . . . . . . . . . . . 8 Appliance Features and Control Panel . . . . . . . . . . . . . . . . . . . . . . . . . . .
Contents What to do, when ... . . . . . . . . . . . . . . . . . . . . . . . . . . . . . . . . . . . . . . . . . . . ...Fault messages are displayed. . . . . . . . . . . . . . . . . . . . . . . . . . . . . . . . . . . . ...there are problems with the operation of the dishwasher. . . . . . . . . . . . ...the wash result is not satisfactory. . . . . . . . . . . . . . . . . . . . . . . . . . . . . . . . 33 33 35 35 Technical Data . . . . . . . . . . . . . . . . . . . . . . . . . . . . . . . . . . . . . . . .
Operating Instructions OPERATING INSTRUCTIONS 1 Safety Instructions The safety aspects of AEG electrical appliances comply with accepted technical standards and the German Appliance Safety Law. Nevertheless, as a manufacturer we consider it our obligation to make you aware of the following safety information: Installation, Connection and Placing into Operation • The dishwasher may only be transported upright. • Check the dishwasher for transport damage.
Operating Instructions General Safety • Repairs to the dishwasher are only to be carried out by qualified service engineers. Improper repairs can give rise to significant hazards for the user. If your appliance needs repairing, please contact customer service or your dealer. • Never place the dishwasher in operation if the mains cable, water inlet or drain hose is damaged; or the control panel, work top or plinth area is damaged such that the inside of the appliance is freely accessible.
Operating Instructions • Do not sit or stand on the open door, the appliance may tip over. • In the event of a fault, first close the tap, then switch off the appliance and unplug it from the mains. If the appliance is permanently wired to the mains: switch off the fuse(s) or unscrew them. 2 Disposal Disposing of the Packaging Material Dispose of the dishwasher packaging material correctly. All the packaging materials used are harmless to the environment and can be recycled.
Operating Instructions 2 Economical and Ecological Dishwashing • Only connect the dishwasher to the hot water supply if your hot water is not electrically heated. • Ensure that the water softener is correctly adjusted. • Do not pre-rinse dishes under running water. • If you wash a small load, the load sensor calculates the amount of water necessary and shortens the programme. It is more economical to always wash with a full load.
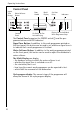
Operating Instructions Appliance Features and Control Panel Top Spray Arm Rubber Seal for Connecting the Water Feed to the Middle Spray Arm Spray Arms Container for Special Salt Container for Rinse Aid Container for Detergent Inlet for Fan Assisted Drying Rating Plate Filters Interior Lighting 9
Operating Instructions Control Panel Signal Tone Button Water Softener Button Control Panel Door Handle MultiDisplay Air Outlet for Fan Assisted Drying Set Start Delay Indicators Display for the Individual Wash Programme Steps The Control Panel comprises the ON/OFF switch M and the programme buttons with LED indicators.
Operating Instructions The indicators have the following significance: J Refill with special salt H Refill with rinse aid ^ Open tap [ Clean the dishwasher's filter system ` O 3 The dishwasher door is open The middle spray arm is jammed The indicator [ is intended to remind you to check the filters in the dishwasher from time to time and, if necessary, to clean it. The indicator illuminates at regular intervals, independent of the amount of soiling of the filters.
Operating Instructions Adjusting the Water Softener To prevent the build up of scale on dishes and in the dishwasher, the dishes must be washed with soft, i.e. low lime content water. For this reason the dishwasher is fitted with a water softener in which tap water from a hardness of 4 °d (German degree) is softened with the aid of special salt. 3 0 Your water supplier will be able to inform you on the hardness and hardness range of the water in your area.
Operating Instructions 6. Once the hardness setting is correctly adjusted, press the ON/OFF switch. The hardness setting is then saved. Filling with Special Salt for the Water Softener 1 Use only special salt for dishwashers. Never fill the salt container with any another type of salt (e.g. culinary salt) or dishwasher detergent. This would irreparably damage the water softener. Prior to filling with salt, please check each time that you really do have a packet of special salt in your hand.
Operating Instructions Depending on the size of the salt grains, it can take several hours for the salt to dissolve in the water and the special salt indicator J to extinguish. The setting of the water softener and thus the consumption of salt are dependent on the hardness of the local water. 3 Filling with Rinse Aid Rinse aid ensures that your dishes gleam and are free from spots, and that you glasses are clear. 1 Use only branded rinse aid for dishwashers.
Operating Instructions 4. Fill with rinse aid exactly up to the level marked “max”; this corresponds to a quantity of approx. 140 ml. 5. Close the lid and press until it locks into place. 6. Wipe up any spilt rinse aid with a cloth. Otherwise too much foam will be formed during the wash. Adjusting Rinse Aid Dosing 3 As the dishes are washed rinse aid is released from the dispenser into the wash water. The dose is factory set at 4, and can be adjusted from 1 to 6.
Operating Instructions Setting the Signal Tone for the End of the Wash Programme You can set whether, in addition to the optical indication of the end of the programme, a signal tone is also to be heard. 0 1. The dishwasher must be switched off. 2. Press the signal tone and water softener buttons simultaneously and keep them pressed. 3. Press the ON/OFF switch. The LED indicators for the signal tone and water softener buttons flash. 4. Press the signal tone button again.
Operating Instructions Loading cutlery and dishes 1 Sponges, household cloths and any object that can absorb water may not be washed in the dishwasher.
Operating Instructions Loading Cutlery 1 Long, pointed items of cutlery are a hazard if placed in the cutlery basket, particularly to children (see Safety Instructions). They should therefore be placed in the upper rack. Place knives, small spoons and small forks in the cutlery tray. Place forks and spoons that do not fit in the cutlery tray in the cutlery basket. To ensure that all items of cutlery in the cutlery basket are properly washed, you should 1. place the grid insert on the cutlery rack 2.
Operating Instructions If you use the grid insert, it is not possible to open the cutlery basket. To ensure that the cutlery basket cannot open on removal from the appliance, you should always hold both parts of the two part handle. 0 1. Place the cutlery basket on a table or work surface 2. open the two part handle 3. remove cutlery 4. close the two part handle. 1 Loading Pans, Frying Pans and Large Plates Load large and heavily soiled dishes in the lower rack.
Operating Instructions Type 2: The right-hand plate inserts in the lower rack can be folded over to the left To ease the loading of large items, the two right-hand plate inserts in the lower rack can be folded over to the left: 0 1. Slightly lift the right plate insert. 3 2. Fold the plate insert to the left.
Operating Instructions Type 4: The two rear plate inserts in the lower rack can be folded across one another 3 To ease the loading of large items, the two rear plate inserts in the lower rack can be folded across one another. Loading Cups, Glasses and Coffee Services Load small, delicate items and long pointed cutlery in the upper rack. • Arrange items of crockery on the folding cups racks so that they are offset from each other and water can reach all items.
Operating Instructions Adjusting the Height of the Upper Basket Maximum Height of the Dishes in the Upper Basket Lower Basketk 3 With upper basket raised 22 cm 31 cm With upper basket lowered 24 cm 29 cm The height of the basket can also be adjusted when it is loaded. Lowering the Upper Basket: 0 1. Pull the upper basket out completely. 2. Holding the upper basket at the rear right, lift it as far as it will go and then lower it vertically. The upper basket will engage in the lower position.
Operating Instructions Filling with Detergent 1 Only use dishwasher detergent. Fill with detergent: – Prior to the start of a wash programme (not for the pre wash programme). The detergent is released into the wash water during the programme. Please observe the manufacturer's dosing and storage recommendations as stated on the detergent packaging. The detergent compartment is on the inside of the dishwasher door. 0 1. If the lid is closed: press release button (1). The lid springs open. 2 2.
Operating Instructions Use of "3 in 1"/ Combi Detergent Tablets General Advice These products are tablets with combined detergent/rinse-aid and salt functions. 0 1. Before using these products you should first check that the water hardness in your supply is compatible with the use of these products as per the detergent manufacturers instructions (on the product packaging). 2. These products should be strictly used according to the detergent manufacturers instructions.
Operating Instructions Bio Wash Programmes and Concentrated Detergents Based on their chemical composition, dishwasher detergents can be split into two basic types: – Conventional, alkaline detergents with caustic components – Weak alkaline concentrated detergents with natural enzymes.
Operating Instructions Selecting the Wash Programme (Programme Table) Choose the most suitable wash programme with the aid of this table: Type of Dishes Dinner Service and Cooking Utensils In Addition - Type of Soiling Suitable Wash Programme: Programme Sequence 2) Consumption Figures: 3) • normally to lightly soiled particularly suited to the use of concentrated detergents.
Operating Instructions Type of Dishes Dinner Service and Cooking Utensils Dessert Dishes and Coffee Service All Types of Dishes with non-temperature resistant dishes with delicate glasses - In Addition Type of Soiling • normally soiled • lightly soiled particularly suited to the use of concentrated detergents.
Operating Instructions Starting the Wash Programme 0 1. Check that the dishes and cutlery are loaded into the dishwasher in such a manner that the spray arms are free to rotate. 2. Open the tap fully. 3. Shut the door. 4. Press the ON/OFF switch The ON/OFF switch indicator illuminates. 5. Press the button for the programme required (see “Programme Table“). The programme indicator and the associated wash programme steps in the programme progress display illuminate.
Operating Instructions Interrupting the wash programme by opening the door of the dishwasher Hot steam can escape when the door is opened. There is a risk of scolding! Open the door carefully. 0 1. Open the door of the dishwasher. The wash programme stops. 2. Shut the door. The wash programme continues. 1 Cancelling the wash programme 0 1. Press the button for the wash programme in progress and keep it pressed.
Operating Instructions Changing the start delay: As long as the wash programme has not started, you can still change the start delay set by pressing the DELAY TIMER button b. Load Sensing – Sensor Logic If a wash programme is started even though there are only a few dishes in the upper and/or lower rack, an intelligent electronic system adjusts the amount of water and the duration of the wash programme to the number of dishes.
Operating Instructions Care and Cleaning 1 Do not under any circumstances use furniture care products or aggressive cleaners. • If necessary, clean the controls only with a soft cloth and pure warm water. • Occasionally check the internal containers, door seal, and water inlet for soiling, clean if necessary. Cleaning the Filter The filters in the base of the washing compartment are to a large extent self-cleaning. Nevertheless the filters should be checked and cleaned from time to time.
Operating Instructions 7. Put the flat filter back in the base of the washing compartment 8. Place the coarse/fine filter in the microfilter and press together. 9. Put the filter combination in place and lock by turning the handle clockwise to the stop. During this process ensure that the flat filter does not protrude above the base of the washing compartment. 1 32 Under no circumstances may the dishwasher be used without filters.
Operating Instructions What to do, when ... Try to rectify minor faults on the dishwasher with the aid of the instructions given here. If you call in customer service to resolve one of the malfunctions listed here, or rectify an error made in the operation of the appliance, the customer service engineer’s visit is not free of charge, even during the period of guarantee. ...Fault messages are displayed.
Operating Instructions Malfunction The multi-display is indicating the fault code (3 and 3 warning tones can be heard that are continually repeated. Possible Cause The anti-flood system has been triggered. During a wash programme the O indicator illuminates at irregular intervals The middle spray arm is and 1 longer warning tone jammed. can be heard at the same time. 34 Remedy Close the tap and contact customer service. Open the door carefully. Hot steam can escape when the door is opened.
Operating Instructions ...there are problems with the operation of the dishwasher. Malfunction Possible Cause Remedy The door of the dishwasher is Shut the door. not closed properly. Mains plug is not plugged in. Insert mains plug. The programme does not start. House fuse in defective. Replace fuse. In the case of dishwasher models with start delay timer: A start delay is selected. If dishes are to be washed immediately cancel delay start timer.
Operating Instructions – The drain hose is incorrectly laid. The dishes are wet and dull. – Rinse aid was not used. – The rinse aid container is empty. There are streaks, milky spots or a bluish coating on glasses and dishes. – Decrease rinse aid dosing. There are dried water drops on the glasses and dishes. – Increase rinse aid dosing. – The detergent may be the cause. Contact the detergent manufacturer's consumer advisor.
Operating Instructions Notes for Test Institutes Testing in accordance with EN 60704 must be carried out with the appliance fully loaded and using the test programme (see Programme Table). Tests in accordance with EN 50242 must be carried out when the salt dispenser and rinse aid container have been filled with salt and rinse aid respectively and using the test programme (see Programme Table). Full Load: 12 place settings incl. serving dishes Half Load: 6 place settings incl.
Installation and Connection Instructions INSTALLATION AND CONNECTION INSTRUCTIONS Installing the Dishwasher • The dishwasher must be installed on a firm floor and adjusted to ensure that it is stable and level. • To compensate for unevenness in the floor and to match the height of the appliance to that of surrounding units extend the threaded feet by unscrewing: – use a screwdriver.
Installation and Connection Instructions • Depending on type, the dishwasher is to be installed as follows: Dishwashers That Can Be Integrated (see installation template supplied) 3 The door of the appliance can be fitted with a wooden furniture door with the following dimensions: Width 587mm 591 – 594 mm Thickness: 16 – 24 mm Height: (variable) dependent on – Recess height – Plinth height – The adjustment so that the unit matches the height of the adjoining units The exact height of the adjoining
Installation and Connection Instructions If the dishwasher is installed underneath a kitchen work surface, the original work surface of the dishwasher is to be removed as follows: 0 1. Unscrew the screws from the positioning plates on the back (1). 2. Slide the appliance's work surface approx. 1 cm to the rear (2). 3. Lift the work surface at the front (3) and remove. 40 1 If the dishwasher is later used as a free-standing appliance, the original work surface must be re-mounted.
Installation and Connection Instructions Connecting the Dishwasher Water Connection The dishwasher is fitted with safety devices that prevent the wash water returning into the drinking water system and comply with the applicable plumbing regulations. • The dishwasher can be connected to cold and hot water supplies up to max. 60 °C. • The dishwasher must not be connected to open hot water appliances or instantaneous water heaters.
Installation and Connection Instructions 3 The following section is only applicable to dishwashers that have a safety valve on the threaded hose fitting for the tap: Water inlet hose with safety valve After connecting the double-walled water inlet hose, the safety valve is next to the tap. Therefore the water inlet hose is only under pressure while the water is running.
Installation and Connection Instructions Water drain Drain hose 1 The drain hose must not be kinked, crushed or entangled. • Connecting the drain hose: – Maximum permitted height: 1 metre. – Minimum required height 40 cm above the lower edge of the machine. Extension hoses • Extension hoses are available from your dealer or customer service. The internal diameter of the extension hoses must be 19 mm to ensure that the function of the appliance is not impeded.
Installation and Connection Instructions Leak Prevention System For protection from damage due to water leaks, the dishwasher is equipped with a leak prevention system, the AQUA CONTROL SYSTEM. In the event of a fault, the safety valve immediately interrupts the supply of water to the appliance and the drain pump switches on. It is thus not possible for water to either leak or overflow. Any water left in the appliance is automatically pumped out.
Installation and Connection Instructions Connections The water inlet and drain hoses, as well as the mains cable must be connected beside the dishwasher as there is insufficient space behind the appliance. The plumbing and electrical installation example given below can only be regarded as a recommendation; the actual situation where the dishwasher is to be installed will define the exact installation (available connections, local electricity and water board regulations for connecting up appliances, etc.).
Service Departments SERVICE DEPARTMENTS 46 U.A.E. Abu Dhabi Universal Trading Company P.O. Box 43 99 Tel.: 335331 Jordan Jordan Household Supply Co. Ltd. P.O. Box 3/68 Amman/Tel.: 69 70 50 Malta ITC International Trading Company White House Building Mountbatte Street Blata L-Bajda/Tel.: 220644 Egypt Middle East Commercial Center P.O. Box 19 Kairo-Heliopolis Tel.: 29917/31634 Kanada EURO-LINE Appliances 2150 Winston PARK Drive 20 Oakville, Ontario L6H 5V1 Tel.
Service Departments Estonia Electrolux Estonia Ltd. Mustamäe tee 24 EE0006 Tallinn Tel.: (372) 6 650 090 Fax: (372) 6 650 092 Latavia Electrolux Latavia Ltd. Terlaton Street 42/44 1011 Riga Tel.: 371 2 297821 Fax: 371 2 821286 Poland Electrolux Poland Sp. zo.o. ul. Domaniewska 41 02-034 Warszawa tel.: 022 874 33 33 fax: 022 874 33 00 Hongkong Wo Kee Services Ltd. 585-609 Castle Peak Road Kwai Chung N.T. Hongkong Tel.: 2494 4000 Lthuania Electrolux Lthuania Verkui 29 2600 Vilnus Tel.
Guarantee Conditions GUARANTEE CONDITIONS Weitere Kundendienststellen im Ausland In diesen Ländern gelten die Garantiebedingungen der örtlichen Partner. Diese können dort eingesehen werden. Further after-sales service agencies overseas In these countries our AEG agents’ own guarantee conditions are applicable. Please obtain further details direct. Autres agences étrangères assurant le service après-vente Dans ces pays, les conditions de garantie des concessionnaires de la région sont valables.
Service SERVICE In the section "What to do, if..." the most important sources of faults that you can rectify yourself are summarised. If, nevertheless, you call in customer service to resolve a problem listed in these instruction, or because of an error made in operating the appliance, the customer service engineer’s visit is not free of charge, even during the warranty period. If you can not find any information on a specific malfunction in these operating instructions, please contact customer service.
From the Electrolux Group. The world´s No.1 choice. The Electrolux Group is the world´s largest producer of powered appliances for kitchen, cleaning and outdoor use. More than 55 million Electrolux Group products (such as refrigerators, cookers, washing machines, vacuum cleaners, chain saws and lawn mowers) are sold each year to a value of approx. USD 14 billion in more than 150 countries around the world. AEG Hausgeräte GmbH Postfach 1036 D-90327 Nürnberg http://www.aeg.hausgeraete.