Dear Customer Before you put your dishwasher to use, please read this Instruction bookie thoroughly. It contains important information for your safety, and on the use, installation and maintenance of the machine. Your dishwasher will repay this effort with excellent performance. If you have a problem with the dishwasher, look at the chapter “Troubleshooting”. In many cases, you can solve the problem yourself and thus avoid service charges. Take care of the Instruction booklet for later use.
IHd GEAR Safety Advice Disposal Disposal of Packaging Disposal of Old Machine General Information Economical and Environmentally Friendly Washing Unsuitable Dishes Suitable Dishes Product Description Interior and back of appliance Control Panel Programmer Guide Operation Before first use Setting the water softening unit Refiling salt Refilling rinse aid dispenser Setting rinse aid dosage Refilling dishwasher detergent BIO programmed and Compact Cleaners Loading the Dishes Lower Basket Cutlery Basket Upper B
e The safety of AEG domestic appliances complies with the recognized technical regulations and laws regarding mechanical safety. Nevertheless, as the manufacturer, we regard ourselves as obliged to give you the following safety advice: Use as directed. 73 Only use the dishwasher for household dishes. If the dishwasher is misused, you will be gable for any resulting damage. ) Alteration or conversions to the dishwashers are not allowed for safety reason S.
SH2(1) GRIEG W Everyday Use I The flood protection system will only operate correctly if: ~ the appliance is plugged into the socket and the electrical supply is maintained the dishwasher has been correctly installed — the water supply is shut off the dishwasher is not in use for prolonged periods. 3 Never use the dishwasher if the mains cable, inlet or drain hose are damaged, or the control panel, worktop or socket area is so damaged that the interior of the machine is exposed.
Disposal of Packaging AEG dishwashers require effective packaging for the rigors of transportation. We limit this fo what is absolutely necessary. Pieces of packaging (e.g. foll or polystyrene} can pose a danger to children. There is danger of suffocation! Keep pieces of packaging away from children. All packaging materials used are environmentally friendly and recyclable. Cardboard pieces are made from used paper and wooden items are untreated. Plastic items are marked as folios. PE = polyethylene, e.g.
ARE BIKO Economical and Environmentally Friendly Washing Connect the dishwasher to hot water if you have a modern, high-efficiency hot water system. Connection to the cold water supply Is recommended for electrically heated water systems. Do not rinse the dishes under running water beforehand. Try to use the dishwasher only when iris full, since this way you wash economically and in an environmentally friendly way.
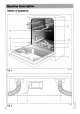
GA4 GE ILK Interior of Appliance 1. Salt Container 2. Rinse Ald Dispenser 3. Detergent Dispenser 4. Rating Plate 5. Filters €. Spray Arm 7. Top Spray 8. Top Spray Arm Connector 9. Water Hardness Adjuster 10. Heating Element Back of Appliance 1. Inlet Hose 2. Drain Hose 3.
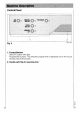
Control Panel m@o msoc@o e emerge Fig. 3 5908 1. Control Buttons ON/OFF button with light. Programmer buttons. The selected programmer is displayed red in the round window next ta the button, 2.
888 GRIEG 2 Fig. 3 3. Programmer control knob and progress indicator — programmer contra knob: for setting programmer start points A and B {see also “Programmer Guide”) progress indicator: while the programmer is running, the programmer control BB G 08 knob tums and shows the stage that the programmer has reached.
Wash programmer | Suitable for: Set programmer: Programmer Programmer Progress Selector indicator Normal 65°C Normally soiled tableware and cooking NORMAL dishes with dried-on food A 85°C Normal BIO Normally dolled tableland cookware, NORMAL 50°C plus heat-sensitive leftmost (e.g. glass, A BIO 50°C plastic). Also for dishes with dried-on food, when compact detergents used. Economy Normal to lightly soiled tableware, cof ECONOMY BIO 50°C fee and dessert dishes, plus delicate B BIO 50¢C glasses.
e Before First Use The dishwasher baskets are protected for transportation by special clamps. Please remove all these clamps before you use the dishwasher. After the dishwasher is installed you must prepare It for operation Before first use, carry aut the following procedure: set up the water softening unit ~ fill the salt container with salt fill the rinse aid dispenser You will find comprehensive information on the individual point in the following chapter.
WHILE) BAKU To ensure minimum salt usage and optimum cleaning results, the water softening unit has six available settings. Range of Hardness ‘Water Hardness | Water Harness Setting in English or Clarke| I meld ¥ egress W 51-70 91-125 8 3650 64-20 5 29-45 51-83 4 22-28 39-50 3 i 15-21 26-38 2% 17 4-14 07-25 1 7 ! under 4 under 0.7 na all rewired Wrangle million per tire, international unit of hardness T factory sifting 1 Open door, take out lower basket.
NOTE: I the water hardness in your home is less than 4°Clarke, you do not need to add dishwasher salt Warning! Only use dishwasher salt. Other types of salt {e.g. cooking salt) often contain water insoluble components which block the softener and make it unusable. The packaging of dishwasher salt and dishwasher detergent often appear very similar.
SABBATH) GEEK SNAKEBITE 5 RS I Remove any excess salt granules from around the opening of the salt container. I Replace the cap and turn in clockwise direction to the locking position. The cap must be tightly closed otherwise salt will get into the wash water. Dull glasses can result 71§ you do not use the dishwasher immediately after refiling the salt, you should run a PRE WASH programmer o that excess salt water and granules are washed away.
Filling the Rinse Aid Dispenser Rinse aid is desired to ensure that the ring water runs off the dishes and glasses leaving them free of water marks and sparkling. The rinse aid is autocratically dispensed during the wash programmer. IMPORTANT! Only use rinse aid designed for use in domestic dishwashers. Other rinsing agents such as vinegar with a acid content greater than 5% could damage the dishwasher and in any case do not give the right results.
RED @) BB Setting the Rinse Aid Dispenser o i The adjuster to alter the quantity of rinse aid being dispensed is located in the opening of the dispenser. The quantity can be set from 1 to 6 (1-8 cm?). The dosage is per-set to 4. At this setting the full dispenser will hold sufficient rinse aid for 40 wash cycles. Do not alter this setting unless an unsatisfactory rinse result makes it necessary (see "Troubleshooting”).
Refilling Dishwasher Detergent important! Do not use washing up liquid in the dishwasher. This causes excessive foaming and does not clean the dishes properly. It can even damage the dishwasher. Only use detergents intended for domestic dishwashers. Store the detergent in a dry and sealed container. Detergent which has become lumpy will no longer ¢lean the dishes. Detergent must be added 1o the dispenser before each wash. Only with the rewash programmer is no detergent necessary.
BIOL) DYBBUK BIO Programmed and Compact Detergents Dishwasher detergents fall into two basic types, depending on their chemical composition: ~ traditional alkaline detergents with corrosive components Compact detergents with natural enzymes. Enzymes in Compact detergents dissolve dirt and are biodegradable. The enzyme's dirt-dissolving power is activated in a water temperature range between 40°C and 65°C.
5 b i 'ifiE Before you load the machine, remove any remaining food debris from plates and soak saucepans with burnt on food, as you would when washing by hand. The easiest way 1o load a basket is from back to front. IMPORTANT! By arranging the dishes correctly, you will entire a satisfactory result. Cups, glasses, efc. should be inverted in the machine Take care that no water can collect in the bottom of any rems. Dishes and cutlery should be arranged so that they do not lie together or cover each either.
VK3 LABIUM W : Lower Basket Heavily soiled large items are best cleaned in the lower basket Warning! High temperatures around the heating relent can deform and melt plastic items. Therefore, put plastic rems in the upper basket ™ Pull out dower basket 3 Place larger, heavier items such as dinner plates, dishes, pots, etc. in the lower basket Fig.
Cutlery Basket Place knives, forks and spoons in the cutlery basket, handle down. Distribute the cutlery loosely and position the soiled surfaces of the spoons and forks apart so that the water can reach each item Important! Long pieces of cutlery can block the upper spray arm. These should be laid in the top basket.
O GRIEG . s Upper Basket Delicate smaller items are best cleaned in the upper basket. [} Suit out the upper basket to its stop position [ Arrange smaller, lighter and mare delicate ferns, such as cups and saucers, glasses, as well as plastic ferns, in the upper basket oK 1) Fig. 15 Arrange terns on and underneath the fold-down cup racks so that water can reach all surfaces. For taller items, the cup racks can be folded upwards, Long stem glasses can then be suspended from the prongs of the cup racks. B Fig.
Setting the wash programmer: {3 Check that the crockery and the cutlery in your dishwasher are arranged so that the spray arm is not obstructed. [ Close the door (3 Open the water tap fully, if closed Important! If 2 wash programmer has started, though the water tap is closed, switch off the machine. Open the water tap and re-set the wash programmer Setting the Programmer: I Press the button for the desired programmer (See "Programmer Guide”). The display next to the depressed bunion shows red.
282 BAKU Switching off/ Removing the Dishes Switching off When the programmer has ended: 3 Press ON/OFF button. The operation light goes off. Warning! When opening the door, directly after the end of the programmer, hot steam can escape. Danger of scalding! Open door carefully. Note: At the end of the programmer, allow the dishes to dry off completely and cool down for approx. 15 minutes in the closed machine.
Care of the machine: The front and the control panel of the dishwasher should be cleaned only with a soft cloth and warm, clean water. Warning! Do not use furniture palish or abrasive cleaning agents. The spray ans do not need 1o be cleaned. The Interior, door seal and top spray arm connection should periodically be inspected for silage and if necessary cleaned. Cleaning the Filters The filter assembly in the bot torn of the dishwasher must be regularly checked for silage and cleaned when necessary.
RS(2) BAKU X Fig. 18 (3 Thoroughly clean all fighters under running water. (1 Take surface mesh (3) out of the bottom of the dishwasher and thoroughly clean both sides. P Fig. 19 R3S (7 Replace the surface mesh in the bottom of the dishwasher, ensuring that iris correctly positioned in the bottom of the dishwasher. Y Reassemble the coarse filter in the micro filter. snap together and replace the complete assembled unit into the surface mesh. Use handle to tum clockwise until locking position is found.
Please check whether you can solve the smaller problems with the machine yourself, by means of the following advice. If the advice does not help, please contact the AEG Customer Service Department. 1 Drainage pump continually running even when the machine is turned off. The flood protection system has activated. First, close the water tap, then pull out the plug. In case of hard-wiring: tum off the electricity supply, remove the fuse and disconnect.
ABS) GRIEG The dishes are not dried and have no sparkier ~ have you used rinse aid? — Is there any rinse aid left in the dispenser? (See section "Refilling Singe Aid Dispenser”} ) There are streaks, stripes, milky flecks or blue-shiny deposit on the glasses and dishes. — there is too much rinse aid.Set the rinse aid dosage at a lower level. {See section “Setting Rinse Aid Dosage”) [ There are dried-on water stains on the glasses and dishes there is too little rinse aid. Set the rinse aid dosage higher.
local AEG Service Force Center, by telephoning: 0990 929929 in guarantee customers should ensure that the suggested checks in the “Troubleshooting" section have been made as the engineer will make a charge if the fruit is not a mechanical or electrical breakdown. Please noel that proof of purchase is required for in-guarantees service calls. Help us to help you Please determine your type of inquiry before telephoning. When you contact us we need to know: 1. Your name, dress and post code. 2.
KD GEIGER Customer Care For general equities regarding your AEG appliance, or for further information on AEG products please contact our Customer Care Department. Cornerstone Care Department AEG Domestic Appliances Limited PO Box 47 New bury Berkshire REORG 5XL Tel.
Test Standard: {E 436-DIN 44990 (neoprene 242} Reference programmer: 65°C Normal (detergent type A} 50°C Special BIO {detergent type B) Detergent dosage (type A} 5g in the tray, 25g in the dispenser Detergent dosage {type B} 35g in the dispenser Capacity 12 place setting including serving dishes, accord ing to IEC publication 4386. Loading Example: Upper Basket Upper Basket T HFF 142 ry Fig. 21 Fig.
O GRUE Capacity: 12 place settings including serving dishes Permitted Water Pressure: 1-10 bar {10-100 Jemmy? = MPa) Electrical Connection: . Electrical connection data is given on the rating plate. This is located on the right hand inner edge of the door. Dimensions: Freestanding 85 x 80X 60 (HxWxDincmy Build-in: please refer to separate installation instructions. Weight of free-standing unit: max. 82 kg Weight of a bully-in unit: max.
Setting Up: The dishwasher must be positioned on a solid horizontal base. The feel of the appliance can be adjusted by approx. & om. This allows: uneven floors to be compensated for the height to be adjusted to match other furniture if you are installing the dishwasher underneath a kitchen work surface please note the following points: sufficient space must be allowed for at the rear of the appliance to accommodate the drain hose, inlet hose and mains cable.
AR AUK e ; . The original worktop of freestanding appliances has a front-to-back adjustment of approx. 2 cm. This allows the worktop to be adjusted to match adjacent appliances or furniture. To do this, proceed as follows: [T Unscrew and remove both screws that holds the worktop in place. These are at the rear of the appliance. [T Move worktop backwards or forwards as required M Replace and tighten both screws.
Information for the Installer Water Supply: The dishwasher is constructed in compliance with the relevant technical regulations and has safety features which prevent a back-flow into the drinking water supply. The dishwasher can be connected to cold water, or to hot water up to a maximum of 60°C. Connection of the dishwasher to single outlet instantaneous electrical/gas heat| ers Is not permitted. Please ensure that you comply with the drinking water regulations of. your local Water Authority.
WAB (2} LABIUM Water Discharge Connection of drain hogs: Maximum permissible height: 1 meter Minimum height required: 30 cm above the making's lowest point . In case of extended pipes, which may be lad out to'a maximum of 3 meters, the maximum permissible height for connection of the drain hose is 88 cm. wAB Fig. 25 Warning! The drain hose should not be kinked or twisted. Take care to install correctly. Sink Trap Connection: The nozzle of the drain hose {dia.
Anti-Flood Device For protection against water damage, the dishwasher is equipped with an anti flood device. As well as an overflow for protection, which prevents the uncontrolled rise of water in the machine, there is a leakages protection (floater switch) in place. This is activated by any water leakage in the machine. In case of leakage, the safety valve in the machine i Immediately interrupts the inflow of water and the drain pump switches on, As a result, no water can ether leak or overflow.
ECLAT GBAIK.AT() LABIUM Dol the colors of the wires in the mains lead of this appliance may not corresponded with the colored markings identifying the terminals in your plug proceed as follows: 1. The wire which is colored GREEN and YELLOW must be connected o the EARTH terminal in your plug, which is marked with the letter E or by the earth symbolism @ or colored GREEN, or GREEN and YELLOW, 2.
AEG Exaggerate Gm Posthaste 1036 D-90327 Nirenberg © Copyright by AEG H 241 206 140 AEG Domestic Appliances Lid Customer Care Department 55-77 High Street Slough Berkshire SL1 1DZ Telephone: 08705 350350