Read this instruction bookie and keep in a safe place The dishwasher must only be instated and connected by a specialist fitter. Our special notes for installation are given on pages 20-22.
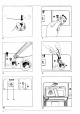
Guide to machine For illustrations see pages 3,4, 5 Control pane Interior Rear without baskets Fig.1 Fig. 2 Fig. 3 | Programmer sculptor A Rawer spray arm a) Water inlet hose I Door handle 8 Salt container &) Drain hose I Programmer stats and C Water hardness selector <) Electrical lead programmer sequence D Detergent dispenser indicator € Rinse aid container £ Fillers G Rating piste {with E & F numbers) Programmer selector (fig.
Guide to machine Programmer sequence indicator (fig.
Guide to machine Crockery baskets The baskets are protected with polystyrene during transportation. Remove all polystyrene parts before using the machine General advice on dish washing # Economical dish washing Collect the dirty dishes and stack them in your dishwasher Ply select a full wash programmer when both baskets are full A tines and half programmer can be selector during e day fo prevent food soil farm drying on before a fut oad has been collected.
Safety information #® This is a domestic dishwasher for domestic use only. It must only be used for washing articles recommended by the manufacturer for dish washing by machine and then following the instructions contained in this booklet. The machine must be installed and cared for and mam tainted as instructed in this instruction booklet, any installation instructions and any supplementary instructions supplied with the machine.
Setting the water hardness —~ adding dishwasher sat Your dishwasher is equipped with a water softener which transforms the “hard” water into “soft” water required tor washing. Te regenerate the water softener the salt container the bottom of the wash tub {fig. 2/8) must canton dishwasher all at all times.
Setting the water hardness ~ adding dishwasher salt The salt you require is special sat suitable for domestic dishwashers. On no account should table sat, cooking stat, road salt or processed sea salt be used, because they contain substances adversely affecting the water softener. Important! Detergents and all are very often available in very similar looking packaging. Take care that you DO NOT fil the salt container with detergent, IT RENDERS THE WATER SOFTENER INEFFECTIVE.
Adjusting the rinse aid dosage The adjuster 1o after the guiltily of rinse aid being dispensed is located in the filer neck {fig. 9). The quantity can be varied from 1-cc and the corresponding numbers are shown on the adjuster. To after the setting, move the arrow 1o another effing using a screwdriver or Cain The machine is set 10 dispense 3cc rinse aid {arrow is set fo “3") automatically during the final rinse.
Loading the machine Before you load the machine remove any remaining food and bones from the plates and soak saucepans with bunt on food as you would when washing up by band. The easiest way to load a basket is from back to front. Lower basket (fig. 12): Large heavily soiled dishes are best cleaned in the lower basket. Pull out the dower basket as far as the stops and stack it with large terns: plates, serving dishes. serving plates and saucepans as frustrated.
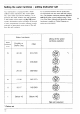
Programmer chart and glasses Programmed | Suitable for: Hefting the programmer: Turn start/ Turn indicator programmer switch selector to: 1o symbol: Rinse and Rinsing heavily A s doth spited items which s are not washed Sy immediately Universal Normally 1o heavily soiled A U 85°C china and saucepans with Nl dried on food deposits SN {particularly vegetables such as spinach, carrots, starch, etc} Universal Normal sliced crockery 509 and temperature sensitive A Xz Rems (e.
Programmer chart rinsing, final rinse, drying Programmer Programmer Energy Water Sequence duration in consumption consumption minutes on {kwh) on cold i liters cold water water supply supply Pr-rinse 11 0.1 6 Pr-wash, wash, 78 17 25 intermediate ringing, final rinse, drying Pr-wash, wash, 62 1.
Switching on (Programmer chart see page 14/15) 1. Fully open the water fap Important: If the dishwasher was stared but the water tap had not been opened, switch off the machine, fully open the water tap, switch on the machine and start the programmer again. 2. Tum the start indicator switch (fig. 17H) clockwise fo symbol Turn the programmer selector {fig. 1) to the required programmer to start the programmer. Programmer sequence indicator (fig.
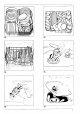
Cleaning the filters Coarse filter {fig. 15} Remove the coarse fighter and brush it clean under running wale. Check the lower half of this fighter also and remove the food residues which may be trapped there. Note that the upper cylindrical section of the coarse fighter can be lighted out {fig. 16) When replacing ensure that the upper section sits straight and tight before re-inserting the coarse fighter. Fine fitter {fig. 17) Clean the fin filter {a) and microfilm (b) as and when necessary.
if you think your machine is not working properly @ I the machine is connected o a hot fill supply {max. 60°C) only economical if hot water is available “nearly free of charge” ~ do not use 50°C programmed to allow detergent sufficient time to work.
Service Use our check list on pages 17/18 to make sure you cannot rectify the fault yourself. # 1t you call out a service engineer in connection with one of the problems listed the cost invoiced will have to be passed o0 to you even during the warranty period. The same applies to wrong usage or misuse of the making. ® Therefore, folio the instructions in this bookie and any other of our recommendations closely.
Information for the installer Installation The appliance must stand level and on a firm floor. The flora should be clean and free from floor polish and grease. The appliance has adjustable feet. If necessary adjust feet, Shouts a freestanding machine be built under a worktop in & built-in kitchen, the table top of the machine can be removed.
Information for the installer Water discharge AL the rear of the machine the drain hose is secured with plastic straps which must be removed. Route the drain hose tong the recess provided al the rear of the dishwasher (fig. 3/b) The outset end of the hose Is 18 mm diameter and should fit any available sink trap connections and is secured by means of the hose clip supplied. Shauna you wish to hook the drain hose note a sink use the plastic hose holder supplied with the machine. See illustration this page.
Information for the installer Anti-flood system The dishwasher is equipped with anti-flood devices. The machine has an overflow protection which prevents excess water from entering the machine and a leakage protection underneath the machine {a float in the base of the machine). The fiat is activated by leakage from the appliance. In both cases the water supply to the machine is shut off and the drain pump is switched on. Flooring from the machine through leakage or overflowing has thus been eliminated.
‘technical data rapacity according to JEC pub. 438: 2 place settings including serving dishes. after pressure un. 1 bar {= 10 Diem 1ax. 10 bar (=100 N/a 01 Pampas, 15 psi. Pampas, 150 psi he dishwasher complies with the radio interference requirements of the EC Directives and the standard N 60585 part VDE 0838 part 1-3. une 1987, he consumption values quoted in the prologue information refer to the universal 65°C programmer.
AEG Tannhauser AG Pontiac 1036 D-8500 Nirenberg 1 © Copyright by AEG H 246 260 540 04811702 AEG Domestic Appliances Ltd Customer Care Department 55-77 High Street Slough Berkshire SL11DZ Telephone: 0B705 350360