FAVORIT 50872 User manual Dishwasher
Contents Thank you for choosing one of our high-quality products. To ensure optimal and regular performance of your appliance please read this instruction manual carefully. It will enable you to navigate all processes perfectly and most efficiently. To refer to this manual any time you need to, we recommend you to keep it in a safe place. And please pass it to any future owner of the appliance. We wish you much joy with your new appliance.
Safety information 3 Operating instructions Safety information Before the installation and use, read this manual carefully: • For your personal safety and the safety of your property. • For the respect of the environment, • For the correct operation of the appliance. Always keep these instructions with the appliance also if you move or sell it. The manufacturer is not responsible if an incorrect installation and use causes damage.
Safety information • Do not fill the rinse aid dispenser with products other than rinse aid, (e.g. dishwasher cleaning agent, liquid detergent). This can cause damage to the appliance. • Make sure that the spray arms can move freely before you start a washing programme. • If you open the door while the appliance is in operation, hot steam can escape. There is a risk of skin burns. • Do not remove the dishes from the appliance before the end of the washing programme.
Safety information 5 – Contact the service centre to replace the water inlet hose with safety valve. WARNING! Dangerous voltage. Electrical connection • The appliance must be earthed. • Make sure that the electrical data on the rating plate agree with your domestic power supply. • Always use a correctly installed shockproof socket. • Do not use multi-way plugs, connectors and extension cables. There is a risk of fire. • Do not replace or change the mains cable. Contact the service centre.
Product description WARNING! The dishwasher detergents are dangerous and can cause corrosion ! • If an accident occurs with these detergents, contact immediately your regional poisons centre and a doctor. • If the detergent gets into the mouth, contact immediately your regional poisons centre and a doctor. • If the detergent gets into the eyes, contact immediately a doctor and wet the eyes with water. • Keep dishwasher detergents in a safe area and out of children touch.
Control panel 7 8 9 10 Filters Lower spray arm Upper spray arm Worktop Control panel 5 1 2 A B C D 3 4 E 6 1 2 3 4 5 6 On/off button Programme selection buttons Delay start button Indicator lights Display Function buttons Indicator lights Programme-in-progress • It comes on when you select a washing programme. • It stays on for all the duration of the washing programme. MULTITAB It comes on when you activate the multitab function. Refer to 'Multitab function'.
Control panel Indicator lights Rinse aid 1) It comes on when it is necessary to fill the rinse aid container. Refer to 'Use of detergent and rinse aid'. 1) When the salt and/or rinse aid containers are empty, the related indicator lights do not come on while a washing programme operates. Programme selection buttons With these buttons you can select the washing programme. Press a programme button, the related indicator light comes on.
Use of the appliance 9 – It is necessary to cancel the programme or the delay start to go back to the setting mode. Refer to 'Select and start a washing programme'. Use of the appliance Refer to the instructions for each step of procedure: 1. Make a check if the adjustment of the water softener agrees with the water hardness in your area. If necessary, adjust the water softener. 2. Fill the salt container with dishwasher salt. 3. Fill the rinse aid dispenser with rinse aid. 4.
Use of dishwasher salt Water hardness Water hardness adjustment °dH °TH mmol/l Clarke manually electronically <4 <7 < 0,7 <5 12) 12) 1) Factory position. 2) No use of salt is necessary. You must adjust the water softener manually and electronically. Manual adjustment Turn the water hardness dial to the position 1 or 2 (refer to the chart). Electronic adjustment 1. Switch on the appliance. 2. Make sure that the appliance is in setting mode. 3.
Use of detergent and rinse aid 11 1. Turn the cap counterclockwise to open the salt container. 2. Fill the salt container with 1 litre of water (only with the first operation). 3. Use the funnel to fill the salt container with salt. 4. Remove the salt around the opening of the salt container. 5. Turn the cap clockwise to close the salt container. It is correct that water comes out from the salt container when you fill it with salt.
Multitab function Use of rinse aid Rinse aid makes it possible to dry the dishes without streaks and stains. The rinse aid dispenser automatically adds rinse aid during the last rinsing phase. Do these steps to fill the rinse aid dispenser: 1. Press the release button 6 to open the lid 5 of the rinse aid dispenser. 2. Fill the rinse aid dispenser 3 with rinse aid. The mark 'max' shows the maximum level. 3.
Loading cutlery and dishes 13 Loading cutlery and dishes Hints and tips Do not use the appliance to clean objects that can absorb water (e.g. sponges, household cloths). • Before you load cutlery and dishes, follow these steps: – Remove remaining food. – Make remaining burnt food in the pans soft. • While you load cutlery and dishes, follow these steps: – Load hollow items (e.g. cups, glasses and pans) with the opening down. – Make sure that water does not collect in the container or in a deep base.
Loading cutlery and dishes The rows of prongs in the lower basket can be flat to load pots, pans and bowls. Cutlery basket • Put the grids on the cutlery basket. • For larger items use only one of the cutlery grids. • Put forks and spoons with the handles down. • Put knives with the handles up. • Mix the spoons with other cutlery to prevent them to bond together.
Loading cutlery and dishes 15 Upper basket The upper basket is for saucers, salad bowls, cups, glasses, pots and lids. Arrange the items to let water touch all surfaces. • For longer items fold the cup racks up. • Put the glasses with long stems in the cup racks with the stems up. Adjustment of the height of the upper basket You can put the upper basket in two positions to increase the load flexibility.
Washing programmes 1. Pull out the upper basket until it stops. 2. Hold the upper basket by the handle, lift it up fully and then let it down vertically. The upper basket latches into the lower position or the higher position.
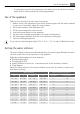
Select and start a washing programme 17 Consumption values Energy (kWh) Programme1) Water (litre) AUTO 45°-70° 1,1 - 1,7 12 - 23 30 MIN 60° 0,9 9 INTENSIV CARE 70° 1,5 - 1,7 16 - 18 ECO 50° 1,0 - 1,1 12 - 13 0,1 4 1) The display shows the programme duration. The pressure and temperature of the water, the variations of power supply and the quantity of dishes can change these values. Select and start a washing programme Select and start a washing programme without delay start 1.
Select and start a washing programme You can select the delay start also with the door closed. When you select a washing programme, you have only 3 seconds to select the delay start. After these 3 seconds, the washing programme starts automatically. Interruption of a washing programme • Open the appliance door. – The washing programme stops. • Close the appliance door. – The washing programme continues from the point of interruption.
Care and cleaning Care and cleaning To remove and clean the filters Dirty filters decrease the washing results. The appliance has three filters: 1. coarse filter (A) 2. microfilter (B) 3. flat filter (C) A B C 1. 2. 3. 4. To unlock the filter system, turn the handle on the microfilter (B) approximately 1/4 counterclockwise. Remove the filter system. Hold the coarse filter (A) by the handle with the hole. Remove the coarse filter (A) from the microfilter (B). 5.
What to do if… If the holes in the spray arms become clogged, remove remaining parts of soil with a cocktail stick. To clean the external surfaces Clean the external surfaces of the appliance and control panel with a damp soft cloth. Only use neutral detergents. Do not use abrasive products, scouring pads or solvents (e.g. acetone). What to do if… The appliance does not start or stops during operation. First try to find a solution to the problem (refer to the chart).
What to do if… Malfunction Fault code Possible cause 21 Possible solution Blow out fuse in the household fuse box. Replace the fuse. The delay start is set. If you want to cancel the delay start, refer to 'Select and start a washing programme'. After the check, switch on the appliance. The programme continues from the point of interruption. If the malfunction shows again, contact the service centre. If the display shows other fault codes, contact the service centre.
Technical data Problem Dry water drop stains on glasses and dishes. Possible cause Rinse aid dosage is too low. Possible solution Increase the rinse aid dosage. The detergent can be the cause. Use a different brand of detergent. The dishes are wet. You have set a washing programme without drying phase or with a decreased drying phase. The dishes are wet and dull. The rinse aid dispenser is emp- Fill the rinse aid dispenser with ty. rinse aid. The multitab function is on.
Environment concerns 23 The rating plate on the inner edge of the appliance door shows the electrical connection data. If the hot water comes from alternative sources of energy, (e.g. solar panels, photovoltaic panels and aeolian), use a hot water supply to decrease energy consumption. Environment concerns The symbol on the product or on its packaging indicates that this product may not be treated as household waste.
Installation How to remove the appliance worktop 1. Remove the rear screws (1). 2. Pull the worktop from the behind of the appliance (2). 3. Lift the worktop and move it from the front slots (3). 4. Use the adjustable feet to adjust the level of the appliance. 5. Install the appliance under the kitchen worktop. Do not squash or bend the water hoses during the installation. To adjust the level of the appliance A correct level of the appliance lets the door to close and seal correctly.
If you connect the water drain hose to a trap spigot under the sink, remove the plastic membrane (A). If you do not remove the membrane, remaining food can cause a blockage in the drain hose spigot A safety device impedes the dirty water to go back into the appliance. If, the spigot of the sink has a 'non-return valve', this can cause the appliance to drain incorrectly. Remove the non-return valve.
www.electrolux.com 117943580 - 00 - 012010 To buy accessories, consumables and spare parts at our online shop please visit: www.aegelectrolux.co.