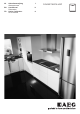
NL EN FR Gebruiksaanwijzing Afwasautomaat User Manual Dishwasher Notice d'utilisation Lave-vaisselle 2 24 44 FAVORIT 66709 VI0P
www.aeg.com INHOUDSOPGAVE 1. VEILIGHEIDSINFORMATIE.......................................................................................3 2. VEILIGHEIDSVOORSCHRIFTEN.............................................................................. 4 3. BESCHRIJVING VAN HET PRODUCT..................................................................... 6 4. BEDIENINGSPANEEL............................................................................................... 7 5. PROGRAMMA’S...........................
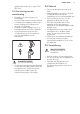
NEDERLANDS 1. 3 VEILIGHEIDSINFORMATIE Lees zorgvuldig de meegeleverde instructies voor installatie en gebruik van het apparaat. De fabrikant is niet verantwoordelijk voor letsel en schade veroorzaakt door een foutieve installatie. Bewaar de instructies van het apparaat voor toekomstig gebruik. 1.
www.aeg.com • • • • • • gekwalificeerd persoon deze vervangen teneinde gevaarlijke situaties te voorkomen. Doe messen en bestek met scherpe punten in het bestekmandje met de punten omlaag in horizontale positie. Laat de deur van het apparaat niet open staan zonder toezicht om te voorkomen dat er iemand over struikelt. Schakel het apparaat uit en trek de stekker uit het stopcontact voordat u onderhoudshandelingen verricht. Gebruik geen waterstralen of stoom om het apparaat te reinigen.
NEDERLANDS gebruik dan zekering: 13 amp ASTA (BS 1362). 2.3 Aansluiting aan de waterleiding • Zorg dat u de waterslangen niet beschadigt. • Laat het water stromen tot het schoon is voordat u het apparaat aansluit op nieuwe leidingen of leidingen die lang niet zijn gebruikt. • Zorg dat er geen lekkages zijn als u het apparaat de eerste keer gebruikt. • De watertoevoerslang heeft een veiligheidsventiel en een omhulsel met een hoofdkabel aan de binnenkant. 2.
www.aeg.com 3. BESCHRIJVING VAN HET PRODUCT 1 2 3 12 11 10 1 2 3 4 5 6 7 9 8 Top sproeiarm Bovenste sproeiarm Onderste sproeiarm Filters Typeplaatje Zoutreservoir Luchtopening 3.1 Beam-on-Floor De Beam-on-Floor is een lichtstraal die op de keukenvloer onder de deur van het apparaat verschijnt. • Wanneer het programma start, gaat de rode lichtstraal aan. De lichtstraal blijft gedurende het volledige programma zichtbaar. • Wanneer het programma is voltooid, gaat het groene lampje branden.
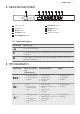
NEDERLANDS 4. BEDIENINGSPANEEL 1 1 2 3 4 5 2 Aan/uit-toets Weergave Delay-toets Program-toets ExtraHygiene-toets 3 4 6 7 8 9 5 6 7 8 9 TimeSaver-toets XtraDry-toets RESET-toets Indicatielampjes 4.1 Indicatielampjes Aanduiding Beschrijving Einde-indicatielampje. Zoutindicatielampje. Dit indicatielampje is altijd uit als het programma in werking is. Glansmiddelindicatielampje. Dit indicatielampje is altijd uit als het programma in werking is. 5.
www.aeg.
NEDERLANDS Water (l) Energie (kWh) Bereidingsduur (min) P5 10 0.9 30 P6 9 - 10 1.0 - 1.2 219 - 229 Programma 1) 9 1) De druk en temperatuur van het water, de variaties in stroomtoevoer, de opties en de hoeveelheid vaat kan de verbruikswaarden veranderen. 5.2 Aanwijzingen voor testinstituten Stuur voor alle benodigde informatie over testprestaties een e-mail naar: info.test@dishwasher-production.com Schrijf het productnummer (PNC) op dat u op het typeplaatje vindt. 6. INSTELLINGEN 6.
www.aeg.com Waterhardheid Duitse graden (°dH) Franse graden (°fH) mmol/l Clarke-graden Wateronthardingsniveau 47 - 50 84 - 90 8.4 - 9.0 58 - 63 10 43 - 46 76 - 83 7.6 - 8.3 53 - 57 9 37 - 42 65 - 75 6.5 - 7.5 46 - 52 8 29 - 36 51 - 64 5.1 - 6.4 36 - 45 7 23 - 28 40 - 50 4.0 - 5.0 28 - 35 6 19 - 22 33 - 39 3.3 - 3.9 23 - 27 5 1) 15 - 18 26 - 32 2.6 - 3.2 18 - 22 4 11 - 14 19 - 25 1.9 - 2.5 13 - 17 3 4 - 10 7 - 18 0.7 - 1.8 5 - 12 2 <4 <7 <0.
NEDERLANDS Het instellen van het glansmiddelniveau 1. Houd om de gebruikersmodus in te voeren tegelijkertijd 2. Druk op en ingedrukt tot de indicatielampjes , , en gaan knipperen en het display blanco is. . • De indicatielampjes , en gaan uit. • Het indicatielampje blijft knipperen. • Het display toont de huidige instelling: bijv. = niveau 4. – De glansmiddelniveaus lopen van 0A tot 6A. – Niveau 0 = er wordt geen glansmiddel gebruikt. om de 3. Druk herhaaldelijk op instelling te wijzigen. 4.
www.aeg.com • Het indicatielampje blijft knipperen. • Het display toont de huidige instelling: uit. 3. Druk op wijzigen. = Geluidssignaal aan. 4. Druk op de knop aan/uit om de instelling te bevestigen. = Geluidssignaal om de instelling te 7. OPTIES De gewenste opties moeten elke keer dat u een programma start worden geactiveerd. De opties kunnen niet worden in- of uitgeschakeld als een programma in werking is. Niet alle opties kunnen met elkaar worden gecombineerd.
NEDERLANDS 13 8. VOORDAT U HET APPARAAT VOOR DE EERSTE KEER GEBRUIKT 1. Controleer of het ingestelde niveau van de waterontharder juist is voor de waterhardheid in uw omgeving. U kunt het niveau van de waterontharder instellen. 2. Vul het zoutreservoir. 3. Vul het glansmiddeldoseerbakje. 4. Draai de waterkraan open. 5. Start een programma om resten te verwijderen die misschien nog in het apparaat zijn achtergebleven. Gebruik geen afwasmiddel en gebruik de mandjes niet.
www.aeg.com 8.2 Het vullen van het glansmiddeldoseerbakje A B 3. Verwijder gemorst glansmiddel met een absorberend doekje om te voorkomen dat er te veel schuim ontstaat. 4. Sluit het deksel. Zorg ervoor dat de deksel op zijn plaats dichtklikt. Vul het glansmiddeldoseerbakje bij wanneer de indicatie (A) helder wordt. Als u multitabletten gebruikt en het droogresultaat is naar tevredenheid, kan de indicatie voor het glansmiddel worden uitgeschakeld.
NEDERLANDS LET OP! Gebruik uitsluitend vaatwasmiddelen die specifiek zijn bedoeld voor gebruik in vaatwassers 1. Druk op de ontgrendelknop (A) om de deksel te openen (C). 2. Doe de vaatwastablet of het poeder in het doseerbakje (B). 3. Plaats een kleine hoeveelheid van het vaatwasmiddel in de binnenkant van de deur van het apparaat als het programma een voorwasfase heeft. 4. Sluit het deksel. Zorg ervoor dat de deksel op zijn plaats dichtklikt. 9.
www.aeg.com 10. AANWIJZINGEN EN TIPS 10.1 Algemeen De volgende tips zorgen voor optimale schoonmaak- en droogresultaten en helpen ook het milieu te beschermen. • Verwijder grotere etensresten van de borden en gooi ze in de vuilnisbak. • Spoel de vaat niet eerst af. Gebruik indien nodig een voorwasprogramma (indien beschikbaar) of selecteer een programma met een voorwasfase. • Gebruik altijd de hele ruimte van de mandjes.
NEDERLANDS • Zorg er voor dat glazen andere glazen niet aanraken • Leg kleine voorwerpen in de bestekmand. • Leg lichte voorwerpen in het bovenrek. Zorg ervoor dat de voorwerpen niet verschuiven. • Zorg er voor dat de sproeiarm vrij kan ronddraaien voordat u een programma start. 10.5 Voor het starten van een programma Controleer of: • De filters schoon zijn en correct zijn geplaatst. • De dop van het zoutreservoir goed dicht zit. • De sproeiarmen niet zijn verstopt.
www.aeg.com 8. Plaats de filter (B) terug in de platte filter (A). Rechtsom draaien tot het vastzit. 2. Verwijder de filter (C) uit de filter (B). 3. Verwijder de platte filter (A). 4. Was de filters. LET OP! Een onjuiste plaatsing van de filters kan leiden tot slechte wasresultaten en het apparaat beschadigen. 11.2 De bovenste sproeiarm schoonmaken We raden u aan om de bovenste sproeiarm regelmatig schoon te maken om te voorkomen dat vuil de gaten verstopt.
NEDERLANDS om de vuildeeltjes uit de gaten te verwijderen. 19 11.3 Buitenkant reinigen • Maak het apparaat schoon met een vochtige, zachte doek. • Gebruik alleen neutrale schoonmaakmiddelen. • Gebruik geen schuurmiddelen, schuursponsjes of oplosmiddelen. 11.4 De binnenkant van de machine reinigen 4.
www.aeg.com Probleem en alarmcode Mogelijke oorzaak en oplossing U kunt het apparaat niet activeren. • Zorg dat de stekker in het stopcontact zit. • Zorg dat er geen zekering in de zekeringenkast is doorgebrand. Het programma begint niet. • Zorg dat de deur van het apparaat is gesloten. • Als de starttijdkeuze start is ingesteld, annuleert u deze functie of wacht u tot het einde van het aftellen. • Het apparaat is begonnen met de oplaadprocedure van de hars in de waterontharder.
NEDERLANDS 21 Probleem en alarmcode Mogelijke oorzaak en oplossing De deur van het apparaat sluit moeilijk. • Het apparaat staat niet waterpas. Draai aan de verstelbare pootjes (indien van toepassing). • Delen van het serviesgoed steken uit de korven. Ratelende / kloppende geluiden vanuit het apparaat. • Het serviesgoed is niet juist in de korven gerangschikt. Raadpleeg de folder voor het laden van de korven. • Zorg ervoor dat de sproeiarmen vrij kunnen ronddraaien. Het apparaat maakt kortsluiting.
www.aeg.com Probleem Mogelijke oorzaak en oplossing Vlekken en opgedroogde watervlekken op glazen en servies. • De vrijgegeven hoeveelheid glansmiddel is te laag. Zet de dosering van het glansmiddel op een hogere stand. • De kwaliteit van het glansmiddel kan de oorzaak zijn. Het serviesgoed is nat. • Activeer voor de beste droogprestatie de optie XtraDry. • Het programma heeft geen droogfase of heeft een droogfase met lage temperatuur. • Het glansmiddeldoseerbakje is leeg.
NEDERLANDS 23 Raadpleeg "Voor het eerste gebruik", "Dagelijks gebruik" of "Aanwijzingen en tips" voor mogelijke andere oorzaken. 13. TECHNISCHE INFORMATIE Afmetingen Breedte / hoogte / diepte (mm) 596 / 818-898 / 550 Elektrische aansluiting 1) Voltage (V) 200 - 240 Frequentie (Hz) 50 / 60 bar (minimaal en maximaal) 0.5 - 8 MPa (minimaal en maximaal) 0.05 - 0.8 Watertoevoer Koud water of warm water2) max. 60 °C Vermogen Couverts 15 Energieverbruik Modus aan laten (W) 0.
www.aeg.com CONTENTS 1. SAFETY INFORMATION.........................................................................................25 2. SAFETY INSTRUCTIONS........................................................................................ 26 3. PRODUCT DESCRIPTION...................................................................................... 27 4. CONTROL PANEL...................................................................................................28 5. PROGRAMMES................
ENGLISH 1. 25 SAFETY INFORMATION Before the installation and use of the appliance, carefully read the supplied instructions. The manufacturer is not responsible if an incorrect installation and use causes injuries and damages. Always keep the instructions with the appliance for future reference. 1.
www.aeg.com • • • • • • Put knives and cutlery with sharp points in the cutlery basket with the points down or in a horizontal position. Do not keep the appliance door open without supervision to prevent to fall on it. Before maintenance, deactivate the appliance and disconnect the mains plug from the mains socket. Do not use water spray and steam to clean the appliance. The ventilation openings in the base (if applicable) must not be obstructed by a carpet.
ENGLISH WARNING! Dangerous voltage. • If the water inlet hose is damaged, immediately disconnect the mains plug from the mains socket. Contact the Authorised Service Centre to replace the water inlet hose. 2.4 Use • Do not sit or stand on the open door. • Dishwasher detergents are dangerous. Obey the safety instructions on the detergent packaging. • Do not drink and play with the water in the appliance. • Do not remove the dishes from the appliance until the programme is completed.
www.aeg.com 5 6 7 8 9 Rating plate Salt container Air vent Rinse aid dispenser Detergent dispenser 10 Lower basket 11 Upper basket 12 Cutlery drawer 3.1 Beam-on-Floor • When the appliance has a malfunction, the red light flashes. The Beam-on-Floor is a light that shows on the kitchen floor below the appliance door. The Beam-on-Floor goes off when the appliance is deactivated. • When the programme starts, a red light comes on and stays on for all the duration of the programme.
ENGLISH 29 5.
www.aeg.com 5.1 Consumption values Water (l) Energy (kWh) Duration (min) P1 11 0.961 225 P2 7 - 14 0.6 - 1.4 40 - 150 P3 14 - 16 1.2 - 1.5 139 - 149 P4 12.5 - 14.5 1.4 - 1.6 154 - 164 P5 10 0.9 30 P6 9 - 10 1.0 - 1.2 219 - 229 Programme 1) 1) The pressure and the temperature of the water, the variations of the mains supply, the options and the quantity of dishes can change the values. 5.
ENGLISH The higher the content of these minerals, the harder your water is. Water hardness is measured in equivalent scales. The water softener should be adjusted according to the hardness of the water in 31 your area. Your local water authority can advise you on the hardness of the water in your area. It is important to set the right level of the water softener to assure good washing results.
www.aeg.com Factory setting: level 4. How to set the rinse aid level The appliance must be in programme selection mode. 1. To enter the user mode, press and hold simultaneously and until , , and the indicators start to flash and the display is blank. 2. Press . • The indicators off. , and go • The indicator continues to flash. • The display shows the current setting: e.g. = level 4. – The levels of rinse aid are from 0A to 6A. – Level 0 = no rinse aid is released. 6.
ENGLISH = Acoustic signal on. 33 4. Press the on/off button to confirm the setting. 7. OPTIONS Desired options must be activated every time before you start a programme. It is not possible to activate or deactivate options while a programme is running. Not all options are compatible with each other. If you have selected non compatible options, the appliance will automatically deactivate one or more of them. Only the indicators of the options still active will stay on. 7.
www.aeg.com hardness of the water supply. If not, adjust the level of the water softener. 2. Fill the salt container. 3. Fill the rinse aid dispenser. 4. Open the water tap. 5. Start a programme to remove any processing residuals that can still be inside the appliance. Do not use detergent and do not load the baskets. When you start a programme, the appliance can take up to 5 minutes to recharge the resin in the water softener. It seems that the appliance is not working.
ENGLISH Fill the rinse aid dispenser when the indicator (A) becomes clear. 35 If you use multi-tablets and the drying performance is satisfactory, the rinse aid refill indication can be disabled. We recommend to always use rinse aid for better drying performance, also in combination with multitablets containing rinsing agent. 9. DAILY USE 1. Open the water tap. 2. Press the on/off button to activate the appliance. Make sure that the appliance is in programme selection mode.
www.aeg.com Starting a programme with delay start Cancelling the delay start while the countdown operates 1. Set a programme. When you cancel the delay start you have to set the programme and options again. 2. Press again and again until the display shows the delay time you want to set (from 1 to 24 hours). The delay indicator comes on. 3. Close the appliance door to start the countdown.
ENGLISH rinse aid and salt must be used in addition to the multi-tablets. However, in areas with hard and very hard water we recommend to use solo-detergent (powder, gel, tablets without additional functions), rinse aid and salt separately for optimal cleaning and drying results. • Detergent tablets do not fully dissolve with short programmes. To prevent detergent residues on the tableware, we recommend that you use the tablets with long programmes. • Do not use more than the correct quantity of detergent.
www.aeg.com 11. CARE AND CLEANING WARNING! Before maintenance, deactivate the appliance and disconnect the mains plug from the main socket. Dirty filters and clogged spray arms decrease the washing results. Make a check regularly and, if necessary, clean them. 3. Remove the flat filter (A). 4. Wash the filters. 11.1 Cleaning the filters The filter system is made of 3 parts. C B A 5. Make sure that there are no residues of food or soil in or around the edge of the sump. 6.
ENGLISH CAUTION! An incorrect position of the filters can cause bad washing results and damage to the appliance. 11.2 Cleaning the upper spray arm 39 4. To engage again the spray arm to the basket, press the spray arm upwards in the direction indicated by the lower arrow and simultaneously turn it counterclockwise until it locks into place. We recommend to clean regularly the upper spray arm to avoid soil to clog the holes. Clogged holes can cause unsatisfactory washing results. 1.
www.aeg.com product for dishwashers. Follow carefully the instructions on the packaging of the product. 12. TROUBLESHOOTING If the appliance does not start or it stops during operation. Before you contact an Authorised Service Centre, check if you can solve the problem by yourself with the help of the information in the table. WARNING! Repairs not properly done may result in serious risk to the safety of the user. Any repairs must be performed by qualified personnel.
ENGLISH 41 Problem and alarm code Possible cause and solution The program lasts too long. • Select the TimeSaver option to shorten the program time. • If the delayed start option is set, cancel the delay setting or wait for the end of the countdown. The remaining time in the • This is not a defect. The appliance is working correctly. display increases and skips nearly to the end of program time. Small leak from the appliance door. • The appliance is not level.
www.aeg.com Problem Possible cause and solution Poor drying results. • Tableware has been left for too long inside a closed appliance. • There is no rinse aid or the dosage of rinse aid is not enough. Set the rinse aid dispenser to a higher level. • Plastic items may need to be towel dried. • For the best drying performance activate the option XtraDry. • We recommend to always use rinse aid, even in combination with multi-tablets. There are whitish streaks or bluish layers on glasses and dishes.
ENGLISH 43 Problem Possible cause and solution Limescale deposits on the tableware, on the tub and on the inside of the door. • Refer to "The water softener". Dull, discoloured or chipped tableware. • Make sure that only dishwasher-safe items are washed in the appliance. • Load and unload the basket carefully. Refer to basket loading leaflet. • Place delicate items in the upper basket. Refer to "Before first use", "Daily use" or "Hints and tips" for other possible causes. 13.
www.aeg.com TABLE DES MATIÈRES 1. CONSIGNES DE SÉCURITÉ................................................................................... 45 2. INSTRUCTIONS DE SÉCURITÉ.............................................................................. 46 3. DESCRIPTION DE L'APPAREIL.............................................................................. 48 4. BANDEAU DE COMMANDE................................................................................. 49 5. PROGRAMMES..........................
FRANÇAIS 1. 45 CONSIGNES DE SÉCURITÉ Avant d'installer et d'utiliser cet appareil, lisez soigneusement les instructions fournies. Le fabricant ne peut être tenu pour responsable des dommages et blessures liés à une mauvaise installation ou utilisation. Conservez toujours cette notice avec votre appareil pour vous y référer ultérieurement. 1.
www.aeg.com • • • • • • • • Respectez le nombre maximum de 15 couverts. Si le câble d'alimentation est endommagé, il doit être remplacé par le fabricant, son service après-vente ou des personnes de qualification similaire afin d'éviter un danger. Placez les couteaux et les couverts avec des bouts pointus dans le panier à couverts avec les pointes tournées vers le bas ou en position horizontale. Ne laissez pas la porte de l'appareil ouverte sans surveillance pour éviter tout risque de chute.
FRANÇAIS • Cet appareil est conforme aux directives CEE. • Uniquement pour le R-U et l'Irlande. L'appareil dispose d'une alimentation secteur de 13 A. S'il est nécessaire de changer le fusible de la fiche électrique, utilisez le fusible : 13 amp ASTA (BS 1362). 2.3 Raccordement à l'arrivée d'eau • Veillez à ne pas endommager les tuyaux de circulation d'eau. • Avant de brancher l'appareil à des tuyaux neufs ou n'ayant pas servi depuis longtemps, laissez couler l'eau jusqu'à ce qu'elle soit propre.
www.aeg.com 3. DESCRIPTION DE L'APPAREIL 1 2 3 12 11 10 1 2 3 4 5 6 7 9 8 Bras d'aspersion supérieur Bras d'aspersion intermédiaire Bras d'aspersion inférieur Filtres Plaque de calibrage Réservoir de sel régénérant Fente d'aération 3.1 Beam-on-Floor Le faisceau Beam-on-Floor est une lumière projetée sur le sol, sous la porte de l'appareil. • Lorsque le programme démarre, le faisceau rouge s'allume et reste allumé pendant toute la durée du programme.
FRANÇAIS 49 4. BANDEAU DE COMMANDE 1 1 2 3 4 5 2 Touche Marche/Arrêt Affichage Touche Delay Touche Program Touche ExtraHygiene 3 4 6 7 8 9 5 6 7 8 9 Touche TimeSaver Touche XtraDry Touche RESET Voyants 4.1 Voyants Indicateur Désignation Voyant de fin. Voyant du réservoir de sel régénérant. Ce voyant est toujours éteint pendant le déroulement du programme. Voyant du réservoir de liquide de rinçage. Ce voyant est toujours éteint pendant le déroulement du programme. 5.
www.aeg.
FRANÇAIS Eau (l) Consommation électrique (kWh) Durée (min) P5 10 0.9 30 P6 9 - 10 1.0 - 1.2 219 - 229 Programme 1) 51 1) Les valeurs de consommation peuvent changer en fonction de la pression et de la température de l'eau, des variations de l'alimentation électrique, de la quantité de vaisselle chargée ainsi que des options sélectionnées. 5.2 Informations pour les instituts de test Pour toute information relative aux performances de test, envoyez un courrier électronique à l'adresse : info.
www.aeg.com Dureté de l'eau Degrés allemands (°dH) Degrés français (°fH) mmol/l Degrés Clarke Réglage du niveau de l'adoucisseur d'eau 47 - 50 84 - 90 8.4 - 9.0 58 - 63 10 43 - 46 76 - 83 7.6 - 8.3 53 - 57 9 37 - 42 65 - 75 6.5 - 7.5 46 - 52 8 29 - 36 51 - 64 5.1 - 6.4 36 - 45 7 23 - 28 40 - 50 4.0 - 5.0 28 - 35 6 19 - 22 33 - 39 3.3 - 3.9 23 - 27 5 1) 15 - 18 26 - 32 2.6 - 3.2 18 - 22 4 11 - 14 19 - 25 1.9 - 2.5 13 - 17 3 4 - 10 7 - 18 0.7 - 1.
FRANÇAIS Comment régler le niveau de liquide de rinçage L'appareil doit être en mode Programmation. 1. Pour entrer en mode utilisateur, maintenez les touches et enfoncées simultanément jusqu'à ce , , et se que les voyants mettent à clignoter et que plus rien ne s'affiche. 2. Appuyez sur • Les voyants s'éteignent. . , et continue à • Le voyant clignoter. • L'affichage indique le réglage actuel : Par ex., = niveau 4. – Les niveaux de liquide de rinçage s'échelonnent de 0A à 6A.
www.aeg.com mettent à clignoter et que plus rien ne s'affiche. 2. Appuyez sur • Les voyants s'éteignent. , et 3. Appuyez sur réglage. pour modifier le = Signal sonore activé. 4. Appuyez sur la touche Marche/Arrêt pour confirmer le réglage. continue à clignoter. • Le voyant • L'affichage indique le réglage actuel : désactivé. = Signal sonore 7. OPTIONS Vous devez activer les options souhaitées à chaque fois avant de lancer un programme.
FRANÇAIS Comment activer l'option ExtraHygiene Appuyez sur ; le voyant correspondant s'allume. Si cette option n'est pas compatible avec le programme, le voyant correspondant 55 ne s'allume pas ou clignote rapidement pendant quelques secondes, puis s'éteint. L'affichage indique la durée du programme réactualisée. 8. AVANT LA PREMIÈRE UTILISATION 1. Assurez-vous que le réglage actuel de l'adoucisseur d'eau est compatible avec la dureté de l'arrivée d'eau.
www.aeg.com 8.2 Comment remplir le distributeur de liquide de rinçage A B 3. Si le liquide de rinçage déborde, épongez-le avec un chiffon absorbant pour éviter tout excès de mousse. 4. Fermez le couvercle. Assurez-vous que le couvercle se verrouille correctement. Remplissez le distributeur de liquide de rinçage lorsque le voyant (A) s'allume.
FRANÇAIS ATTENTION! Utilisez uniquement un produit de lavage spécial pour lave-vaisselle. 1. Appuyez sur la touche de déverrouillage (A) pour ouvrir le couvercle (C). 2. Versez le produit de lavage sous forme de poudre ou tablette dans le compartiment approprié (B). 3. Si le programme comporte une phase de prélavage, versez une petite quantité de produit de lavage à l'intérieur de la porte de l'appareil. 4. Fermez le couvercle. Assurez-vous que le couvercle se verrouille correctement. 9.
www.aeg.com démarrer un nouveau programme de lavage. Fermez le robinet d'eau. Fin de programme Lorsque le programme est terminé et que vous ouvrez la porte, l'appareil s'éteint automatiquement. 10. CONSEILS 10.1 Raccordement Les conseils suivants vous garantissent des résultats de lavage et de séchage optimaux au quotidien, et vous aideront à protéger l'environnement. • Videz les plus gros résidus alimentaires des plats dans une poubelle. • Ne rincez pas vos plats à la main au préalable.
FRANÇAIS 10.3 Que faire si vous ne voulez plus utiliser de pastilles de détergent multifonctions Avant de commencer à utiliser du produit de lavage, du sel régénérant et du liquide de rinçage séparément, effectuez la procédure suivante. 1. Réglez l'adoucisseur d'eau au niveau maximal. 2. Assurez-vous que le réservoir de sel régénérant et le distributeur de liquide de rinçage sont pleins. 3. Lancez le programme le plus court avec une phase de rinçage.
www.aeg.com Les filtres sales et les bras d'aspersion obstrués diminuent les résultats de lavage. Contrôlez-les régulièrement et nettoyezles si nécessaire. 11.1 Nettoyage des filtres Le système de filtrage se compose de trois éléments. 4. Lavez les filtres. C B A 1. Faites pivoter le filtre (B) dans le sens antihoraire puis sortez-le. 2. Retirez le filtre (C) du filtre (B). 3. Retirez le filtre plat (A). 5.
FRANÇAIS ATTENTION! Une position incorrecte des filtres peut donner de mauvais résultats de lavage et endommager l'appareil. 11.2 Nettoyage du bras d'aspersion supérieur 61 4. Pour réinstaller le bras d'aspersion supérieur sur le panier, poussez le bras d'aspersion vers le haut, dans la direction indiquée par la flèche du bas, tout en le tournant vers la gauche jusqu'à ce qu'il se bloque en place.
www.aeg.com • Pour maintenir des performances optimales, nous vous recommandons d'utiliser un produit de nettoyage spécifique pour lave-vaisselle une fois par mois. Reportez-vous aux instructions figurant sur l'emballage de ces produits. 12. EN CAS D'ANOMALIE DE FONCTIONNEMENT Si l'appareil ne démarre pas ou s'arrête en cours de programme. Avant de contacter le service après-vente agréé, vérifiez si vous pouvez résoudre le problème par vous-même à l'aide des informations du tableau.
FRANÇAIS 63 Problème et code d'alarme Cause et solution possibles L'appareil ne vidange pas l'eau. L'affichage indique . Le système de sécurité antidébordement s'est déclenché. L'affichage indique • Assurez-vous que le siphon de l'évier n'est pas obstrué. • Assurez-vous que le filtre du tuyau de vidange de l'eau n'est pas obstrué. • Assurez-vous que le système du filtre intérieur n'est pas obstrué. • Assurez-vous que le tuyau de vidange n'est pas tordu ni plié.
www.aeg.com Reportez-vous aux chapitres « Avant la première utilisation », « Utilisation quotidienne » ou « Conseils » pour connaître les autres causes probables. Après avoir vérifié l'appareil, éteignez puis rallumez-le. Si le problème persiste, contactez le service après-vente agréé. Pour les codes d'alarme ne figurant pas dans le tableau, contactez le service après-vente agréé. 12.
FRANÇAIS Problème 65 Cause et solution possibles L'intérieur de l'appareil est hu- • Ce n'est pas un défaut de l'appareil. Il s'agit de la conmide. densation de l'humidité contenue dans l'air sur les parois. Mousse inhabituelle en cours de lavage. • Utilisez uniquement des produits de lavage pour lavevaisselle. • Il y a une fuite dans le distributeur de liquide de rinçage. Faites appel à un service après vente agréé. Traces de rouille sur les couverts.
www.aeg.com Tension (V) 200 - 240 Fréquence (Hz) 50 / 60 bar (minimum et maximum) 0.5 - 8 MPa (minimum et maximum) 0.05 - 0.8 Arrivée d'eau Eau froide ou eau chaude2) max. 60 °C Capacité Couverts 15 Consommation électrique Mode « Veille » (W) 0.99 Consommation électrique Mode « Éteint » (W) 0.10 Branchement électrique1) Pression de l'arrivée d'eau 1) Reportez-vous à la plaque signalétique pour les autres valeurs.
FRANÇAIS 67
117900283-A-162015 www.aeg.