GS60GV222 DE Benutzerinformation FR Notice d'utilisation IT Istruzioni per l’uso EN User manual 2 19 37 54
www.aeg.com INHALT 1. 2. 3. 4. 5. 6. 7. 8. 9. 10. 11. SICHERHEITSHINWEISE . . . . . . . . . . . . . . . . . . . . . . . . . . . . . . . . . . . . . . . . . . . . . . . . . . . . . . 3 GERÄTEBESCHREIBUNG . . . . . . . . . . . . . . . . . . . . . . . . . . . . . . . . . . . . . . . . . . . . . . . . . . . . . 5 BEDIENFELD . . . . . . . . . . . . . . . . . . . . . . . . . . . . . . . . . . . . . . . . . . . . . . . . . . . . . . . . . . . . . . . 6 PROGRAMME . . . . . . . . . . . . . . . . . . . . . . . .
DEUTSCH 1. 3 SICHERHEITSHINWEISE Lesen Sie vor der Montage und dem Gebrauch des Geräts zuerst die Gebrauchsanleitung. Der Hersteller übernimmt keine Verantwortung für Verletzungen und Beschädigungen durch unsachgemäße Montage. Bewahren Sie die Gebrauchsanleitung griffbereit auf. 1.1 Sicherheit von Kindern und schutzbedürftigen Personen WARNUNG! Es besteht Erstickungsgefahr, Risiko von Verletzungen oder permanenten Behinderungen.
www.aeg.com Ummantelung mit einem innenliegenden Netzkabel. WARNUNG! Gefährliche Spannung. • Ziehen Sie sofort den Netzstecker aus der Steckdose, wenn der Wasserzulaufschlauch beschädigt ist. Wenden Sie sich für den Austausch des Wasserzulaufschlauchs an den Kundendienst. 1.3 Gebrauch • Dieses Gerät ist für die Verwendung im Haushalt und ähnliche Zwecke vorgesehen, wie z. B.
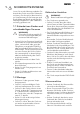
DEUTSCH 5 2. GERÄTEBESCHREIBUNG 1 2 3 12 11 10 9 8 1 Oberer Sprüharm 2 Mittlerer Sprüharm 3 Unterer Sprüharm 4 Filter 5 Typenschild 6 Salzbehälter 7 Wasserhärtestufen-Wähler 8 Klarspülmittel-Dosierer 9 Waschmittelschublade 10 Besteckkorb 11 Unterkorb 12 Oberkorb Die Innenbeleuchtung des Geschirrspülers wird automatisch beim Öffnen der Tür eingeschaltet und beim Schließen der Tür ausgeschaltet. 7 6 5 4 2.
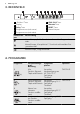
www.aeg.com 3. BEDIENFELD 2 1 3 4 5 6 7 8 9 1 „Ein/Aus“-Taste 6 ÖKO PLUS-Taste 2 Display 3 Delay-Taste 7 Multitab-Taste 4 Programmtaste (nach unten) 9 Kontrolllampen 8 RESET-Taste 5 Programmtaste (nach oben) Kontrolllam- Beschreibung pen Kontrolllampe „Salz“. Sie erlischt während des Programmbetriebs. Kontrolllampe „Klarspülmittel“. Sie erlischt während des Programmbetriebs. Kontrolllampe „Programmende“. 4.
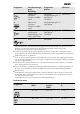
DEUTSCH Programm Verschmutzungsgrad Beladung Programmphasen 5 Normal verschmutzt Geschirr und Besteck Vorspülen ÖKO PLUS Hauptspülgang 50 °C Spülgänge Trocknen 6 Normal verschmutzt Geschirr und Besteck Hauptspülgang 55 °C Spülgänge 7 Normal oder leicht verschmutzt Empfindliches Geschirr und Gläser Hauptspülgang 45 °C ÖKO PLUS Spülgänge Trocknen 8 Alle Vorspülen 5) 7 Optionen 6) 1) Das Gerät erkennt den Verschmutzungsgrad und die Anzahl der Geschirrteile in den Körben.
www.aeg.com Programm1) Dauer (Min.) Energieverbrauch (kWh) Wasser (l) 3 200 - 220 1.1 - 1.2 9 - 10 4 30 0.8 9 5 195 0.92 10.2 6 55 - 65 1.0 - 1.2 10 - 11 7 70 - 80 0.7 - 0.9 11 - 12 8 14 0.1 4 1) Druck und Temperatur des Wassers, Schwankungen in der Stromversorgung, die ausgewählten Optionen und die Geschirrmenge können die Programmdauer und die Verbrauchswerte verändern.
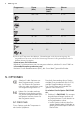
DEUTSCH 5.2 Multitab Schalten Sie diese Option nur ein, wenn Sie Kombi-Reinigungstabletten verwenden. Mit der Option „Multitab“ wird der Gebrauch von Klarspülmittel und Salz ausgeschaltet. Die entsprechenden Kontrolllampen bleiben ausgeschaltet. Die Programmdauer kann sich verlängern. So schalten Sie die Option Multitab ein: 1. Drücken Sie Multitab, die entsprechende Kontrolllampe leuchtet auf.
www.aeg.com gungsmittel und beladen Sie die Körbe nicht. 6.1 Einstellen des Wasserenthärters Wasserenthärtereinstellung Wasserhärte Deutsche Wasserhärtegrade (°dH) Französische Wasserhärtegrade (°fH) mmol/l Clarke Wasserhärtegrade Manuell Elektronisch 47 - 50 84 - 90 8.4. - 9.0 58 - 63 2 1) 10 43 - 46 76 - 83 7.6 - 8.3 53 - 57 2 1) 9 37 - 42 65 - 75 6.5 - 7.5 46 - 52 21) 8 29 - 36 51 - 64 5.1 - 6.4 36 - 45 21) 7 23 - 28 40 - 50 4.0 - 5.
DEUTSCH • Der Signalton läutet (z. B. fünf aufeinander folgende Signaltöne = Wasserhärte 5). • Das Display zeigt die aktuelle Einstellung des Wasserenthärters an, = Wasserhärte 5. z. B. 11 4. “ wieDrücken Sie die Taste „ derholt, um die Einstellung zu ändern. 5. Drücken Sie die Taste „Ein/Aus“, um das Gerät auszuschalten und die Einstellung zu bestätigen. 6.2 Füllen des Salzbehälters 1. 2. 3. 4. 5. Drehen Sie den Deckel gegen den Uhrzeigersinn und öffnen Sie den Salzbehälter.
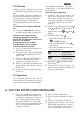
www.aeg.com 7. TÄGLICHER GEBRAUCH 1. Öffnen Sie den Wasserhahn. 2. Drücken Sie die Taste „Ein/Aus“, um das Gerät einzuschalten. Stellen Sie sicher, dass sich das Gerät im Einstellmodus befindet, siehe Abschnitt „Einstellen und Starten eines Programms“. • Füllen Sie den Salzbehälter auf, wenn die Kontrolllampe „Salz“ leuchtet. • Leuchtet die Kontrolllampe „Klarspülmittel“, füllen Sie den Klarspülmittel-Dosierer. 3. Beladen Sie die Körbe. 4. Füllen Sie Reinigungsmittel ein.
DEUTSCH Zeitvorwahl angezeigt wird (zwischen 1 und 24 Stunden). • Die Zeitvorwahl blinkt im Display. • Die Kontrolllampe „Delay“ leuchtet auf. 3. Schließen Sie die Gerätetür. Der Ablauf der Zeitvorwahl beginnt. • Nach Ablauf der Zeitvorwahl wird das Programm gestartet. Öffnen der Tür während eines laufenden Programms Wenn Sie die Tür öffnen, unterbricht das Gerät das Programm. Wenn Sie die Tür wieder schließen, läuft das Programm ab dem Zeitpunkt der Unterbrechung weiter.
www.aeg.com andere Zusätze. Achten Sie darauf, dass die Tabletten der Wasserhärte in Ihrer Region entsprechen. Beachten Sie die Anweisungen auf der Reinigungsmittelverpackung. • Geschirrspüler-Tabs lösen sich bei kurzen Programmen nicht vollständig auf. Wir empfehlen, die Tabletten nur mit langen Programmen zu verwenden, damit keine Reinigungsmittel-Rückstände auf dem Geschirr zurückbleiben. Verwenden Sie nicht mehr als die angegebene Reinigungsmittelmenge.
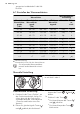
DEUTSCH 15 9.1 Reinigen der Filter C 1. Drehen Sie den Filter (A) nach links und nehmen Sie ihn heraus. 2. Um den Filter (A) auseinanderzubauen, ziehen Sie (A1) und (A2) auseinander. Nehmen Sie den Filter (B) heraus. Reinigen Sie die Filter mit Wasser. Prüfen Sie, bevor Sie den Filter (B) wieder einsetzen, dass sich keine Lebensmittelreste oder Verschmutzungen in oder um den Rand der Wanne befinden. C A B A1 3. 4. 5. A2 6. 7.
www.aeg.com 10. FEHLERSUCHE Das Gerät startet nicht oder bleibt während des Betriebs stehen. Prüfen Sie, ob Sie die Störung mit den folgenden Hinweisen selbst beheben können, bevor Sie den Kundendienst rufen. Bei manchen Störungen zeigt das Display einen Alarmcode an: • - Es läuft kein Wasser in das Gerät. • - Das Gerät pumpt das Wasser nicht ab. • - Die Aquasafe-Einrichtung ist ausgelöst. WARNUNG! Schalten Sie das Gerät aus, bevor Sie die Überprüfungen vornehmen.
DEUTSCH 10.1 Die Spül- und Trocknungsergebnisse sind nicht zufriedenstellend. Weiße Streifen oder blau schimmernder Belag auf Gläsern und Geschirr • Die zugegebene Klarspülmittelmenge ist zu hoch. Stellen Sie den Dosierwähler für Klarspülmittel niedriger ein. • Die Reinigungsmittelmenge ist zu hoch. Wasserflecken und andere Flecken auf Gläsern und Geschirr • Die zugegebene Klarspülmittelmenge ist zu niedrig. Stellen Sie den Dosierwähler für Klarspülmittel höher ein.
www.aeg.com Spannung 220-240 V Frequenz 50 Hz Wasserdruck Min. / max. (bar / MPa) Wasserversorgung 1) Kalt- oder Warmwasser2) (0.5 / 0.05 ) / (8 / 0.8 ) Fassungsvermögen Gedecke Leistungsaufnahme Unausgeschaltet 0.10 W Ausgeschaltet 0.10 W max. 60 °C 12 1) Schließen Sie den Zulaufschlauch an einen Wasserhahn mit einem 3/4"-Außengewinde an. 2) Wenn Sie Heißwasser mit umweltfreundlichen, alternativen Energiequellen (z. B.
FRANÇAIS 19 SOMMAIRE 1. 2. 3. 4. 5. 6. 7. 8. 9. 10. 11. INSTRUCTIONS DE SÉCURITÉ . . . . . . . . . . . . . . . . . . . . . . . . . . . . . . . . . . . . . . . . . . . . . . . . DESCRIPTION DE L'APPAREIL . . . . . . . . . . . . . . . . . . . . . . . . . . . . . . . . . . . . . . . . . . . . . . . . BANDEAU DE COMMANDE . . . . . . . . . . . . . . . . . . . . . . . . . . . . . . . . . . . . . . . . . . . . . . . . . PROGRAMMES . . . . . . . . . . . . . . . . . . . . . . . . . . . . . . . . . . . . . . . . .
www.aeg.com 1. INSTRUCTIONS DE SÉCURITÉ Avant d'installer et d'utiliser cet appareil, lisez soigneusement les instructions fournies. Le fabricant ne peut être tenu pour responsable des dommages et blessures liés à une mauvaise installation ou utilisation. Conservez toujours cette notice avec votre appareil pour vous y référer ultérieurement. 1.1 Sécurité des enfants et des personnes vulnérables AVERTISSEMENT Risque d'asphyxie, de blessure ou d'invalidité permanente.
FRANÇAIS AVERTISSEMENT Tension dangereuse. • Si le tuyau d'arrivée d'eau est endommagé, débranchez immédiatement la fiche de la prise secteur. Contactez le service après-vente pour remplacer le tuyau d'arrivée d'eau. 1.
www.aeg.com 2.
FRANÇAIS 3. BANDEAU DE COMMANDE 2 1 3 4 5 6 7 8 9 1 Touche Marche/Arrêt 6 Touche ÖKO PLUS 2 Affichage 3 Touche Delay 7 Touche Multitab 4 Touche Programme (bas) 9 Voyants 8 Touche RESET 5 Touche Programme (haut) Voyants Description Voyant du réservoir de sel régénérant. Ce voyant est toujours éteint pendant le déroulement du programme. Voyant du réservoir de liquide de rinçage. Ce voyant est toujours éteint pendant le déroulement du programme. Voyant de fin. 4.
www.aeg.com Programme Degré de salissure Type de charge Phases du programme Options 5 Normalement sale Vaisselle et couverts Prélavage Lavage à 50 °C Rinçages Séchage ÖKO PLUS 6 Normalement sale Vaisselle et couverts Lavage à 55 °C Rinçages 7 Normalement ou légèrement sale Vaisselle fragile et verres Lavage à 45 °C Rinçages Séchage 8 Tous Prélavage 5) ÖKO PLUS 6) 1) L'appareil détecte le degré de salissure et la quantité de vaisselle dans les paniers.
FRANÇAIS Programme1) Durée (min) Consommation électrique (kWh) Eau (l) 3 200 - 220 1.1 - 1.2 9 - 10 4 30 0.8 9 5 195 0.92 10.2 6 55 - 65 1.0 - 1.2 10 - 11 7 70 - 80 0.7 - 0.9 11 - 12 8 14 0.1 4 25 1) La durée du programme et les valeurs de consommation peuvent changer en fonction de la pression et de la température de l'eau, des variations de l'alimentation électrique, de la quantité de vaisselle chargée ainsi que des options sélectionnées.
www.aeg.com • Si cette option n'est pas compatible avec le programme, le voyant correspondant clignote rapidement 3 fois puis s'éteint. 5.2 Multitab Activez cette option uniquement si vous utilisez des pastilles de détergent multifonctions. Cette option désactive l'utilisation du liquide de rinçage et du sel régénérant. Les voyants correspondants restent éteints. La durée du programme peut augmenter. Comment activer l'option Multitab 1. Appuyez sur Multitab ; le voyant correspondant s'allume.
FRANÇAIS 4. Ouvrez le robinet d'eau. 5. Des résidus du processus de fabrication peuvent subsister dans l'appareil. Démarrez un programme pour 27 les évacuer. N'utilisez pas de produit de lavage et ne chargez pas les paniers. 6.1 Réglage de l'adoucisseur d'eau Réglage de l'adoucisseur d'eau Dureté de l'eau Degrés allemands (°dH) Degrés français (°fH) mmol/l Degrés Clarke Manuel Électronique 47 - 50 84 - 90 8.4. - 9.0 58 - 63 2 1) 10 43 - 46 76 - 83 7.6 - 8.
www.aeg.com • Les voyants et s'éteignent. • Le voyant de la touche continue à clignoter. • Les signaux sonores retentissent, par exemple cinq signaux sonores intermittents = niveau 5. • L'affichage indique le réglage actuel de l'adoucisseur d'eau, par = niveau 5. exemple 4. à pluAppuyez sur la touche sieurs reprises pour modifier le réglage. 5. Appuyez sur la touche Marche/Arrêt pour éteindre l'appareil et confirmer le réglage. 6.2 Remplissage du réservoir de sel régénérant 1. 2. 3. 4. 5.
FRANÇAIS 29 6.3 Remplissage du distributeur de liquide de rinçage 1. B A M AX 4 3 2 1 + - C D Appuyez sur le bouton d'ouverture (D) pour ouvrir le couvercle (C). 2. Remplissez le distributeur de liquide de rinçage (A), sans dépasser le repère « max ». 3. Si le liquide de rinçage déborde, épongez-le avec un chiffon absorbant pour éviter tout excès de mousse. 4. Fermez le couvercle. Assurez-vous que le bouton d'ouverture se verrouille correctement.
www.aeg.com 7.1 Utilisation du produit de lavage A 1. B 2. 30 3. 4 MAX + 32 - 1 20 C 4. 5. 7.2 Réglage et départ d'un programme Mode Programmation Certains réglages nécessitent que l'appareil soit en mode Programmation. Appuyez sur la touche Marche/Arrêt pour allumer l'appareil. L'appareil est en mode Programmation lorsque 2 barres d'état horizontales sont affichées. Si le bandeau de commande ne montre pas cette condition, appuyez sur la touche RESET.
FRANÇAIS Annulation du programme 1. Appuyez sur la touche RESET. Deux lignes horizontales s'affichent. Assurez-vous que le distributeur de produit de lavage n'est pas vide avant de démarrer un nouveau programme de lavage. À la fin du programme 0:00 s'affiche et le voyant de fin s'allume. 1. Appuyez sur la touche Marche/Arrêt pour éteindre l'appareil. 2. Fermez le robinet d'eau. 31 Important • Attendez que la vaisselle refroidisse avant de la retirer du lave-vaisselle.
www.aeg.com 8.3 Chargement des paniers Reportez-vous à la brochure fournie pour consulter des exemples de charge des paniers. • Utilisez uniquement cet appareil pour laver des articles qui peuvent passer au lave-vaisselle. • Ne mettez pas dans le lave-vaisselle des articles en bois, en corne, en aluminium, en étain et en cuivre. • Ne placez pas dans l'appareil des objets pouvant absorber l'eau (éponges, chiffons de nettoyage). • Enlevez les restes d'aliments sur les articles.
FRANÇAIS 2. A1 3. 4. 5. A2 6. 7. 33 Pour démonter le filtre (A), détachez (A1) et (A2). Retirez le filtre (B). Lavez les filtres à l'eau courante. Avant de remettre le filtre (B) en place, assurez-vous qu'il ne reste aucun résidu alimentaire ni salissure à l'intérieur ou autour du bord du collecteur d'eau. Assurez-vous que le filtre (B) est correctement positionné, sous les 2 guides (C). Assemblez le filtre (A) et remettez-le en place dans le filtre (B). Tournez-le vers la droite jusqu'à la butée.
www.aeg.com Problème Solution possible L'appareil ne se met pas en fonctionnement. Assurez-vous que la fiche du câble d'alimentation est bien insérée dans la prise de courant. Assurez-vous qu'aucun fusible n'a disjoncté dans la boîte à fusibles. Le programme ne démarre pas. Vérifiez que la porte de l'appareil est fermée. Si vous avez sélectionné un départ différé, annulez-le ou attendez la fin du décompte. L'appareil ne se remplit pas d'eau. Assurez-vous que le robinet d'eau est ouvert.
FRANÇAIS • Il se peut que la qualité des pastilles de détergent multifonctions soit en cause. Essayez une marque différente ou activez le distributeur de liquide de rinçage et utilisez du liquide de rinçage avec les pastilles de détergent multifonctions. Pour trouver d'autres causes possibles, reportez-vous au chapitre « CONSEILS ». foncées jusqu'à ce que les voyants , de programme mencent à clignoter. et com- 3. Appuyez sur la touche . • Les voyants et s'éteignent.
www.aeg.com 12. EN MATIÈRE DE PROTECTION DE L'ENVIRONNEMENT Recyclez les matériaux portant le symbole . Déposez les emballages dans les conteneurs prévus à cet effet. Contribuez à la protection de l'environnement et à votre sécurité, recyclez vos produits électriques et électroniques. Ne jetez pas les appareils portant le symbole avec les ordures ménagères. Emmenez un tel produit dans votre centre local de recyclage ou contactez vos services municipaux.
ITALIANO 37 INDICE 1. 2. 3. 4. 5. 6. 7. 8. 9. 10. 11. ISTRUZIONI DI SICUREZZA . . . . . . . . . . . . . . . . . . . . . . . . . . . . . . . . . . . . . . . . . . . . . . . . . . . DESCRIZIONE DEL PRODOTTO . . . . . . . . . . . . . . . . . . . . . . . . . . . . . . . . . . . . . . . . . . . . . . PANNELLO DEI COMANDI . . . . . . . . . . . . . . . . . . . . . . . . . . . . . . . . . . . . . . . . . . . . . . . . . . PROGRAMMI . . . . . . . . . . . . . . . . . . . . . . . . . . . . . . . . . . . . . . . . .
www.aeg.com 1. ISTRUZIONI DI SICUREZZA Leggere attentamente le istruzioni fornite prima di installare e utilizzare l'apparecchiatura. Il produttore non è responsabile se un'installazione ed un uso non corretto dell'apparecchiatura provocano lesioni e danni. Tenere sempre le istruzioni a portata di mano in caso di necessità durante l'utilizzo. 1.1 Sicurezza dei bambini e delle persone vulnerabili AVVERTENZA! Rischio di soffocamento, lesioni o invalidità permanente.
ITALIANO AVVERTENZA! Pericolo di tensione. • Se il tubo di carico è danneggiato, scollegare immediatamente la spina dalla presa elettrica. Contattare il Centro di Assistenza per sostituire il tubo di carico dell’acqua. 1.3 Utilizzo • L'apparecchiatura è destinata all'uso domestico e applicazioni simili, come: – Cucine di negozi, uffici e altri ambienti di lavoro – Fattorie – Clienti di hotel, motel e altri ambienti residenziali – Bed and breakfast.
www.aeg.com 2. DESCRIZIONE DEL PRODOTTO 1 2 3 12 11 10 9 8 1 Mulinello sul cielo vasca 2 Mulinello superiore 3 Mulinello inferiore 4 Filtri 5 Targhetta dati 6 Contenitore del sale 7 Selettore della durezza dell'acqua 8 Contenitore del brillantante 9 Contenitore del detersivo 10 Cestello posate 11 Cestello inferiore 12 Cestello superiore Questa lavastoviglie dispone di una luce interna che si accende e si spegne, rispettivamente, quando si apre e si chiude la porta. 7 6 5 4 2.
ITALIANO 3. PANNELLO DEI COMANDI 2 1 3 4 5 6 7 8 1 Tasto On/Off 6 TastoÖKO PLUS 2 Display 3 TastoDelay 7 TastoMultitab 4 Tasto Programma (giù) 9 Spie 9 8 TastoRESET 5 Tasto Programma (su) Spie Descrizione Spia del sale. La spia è spenta durante l'esecuzione del programma. Spia del brillantante. La spia è spenta durante l'esecuzione del programma. Spia di fine. 4.
www.aeg.com Programma Grado di sporco Tipo di carico Fasi del programma 6 Sporco normale Stoviglie e posate Lavaggio 55 °C Risciacqui 7 Sporco normale o Lavaggio 45 °C leggero Risciacqui Stoviglie e bicchie- Asciugatura ri delicati 8 Tutto Opzioni ÖKO PLUS Prelavaggio 6) 1) L'apparecchiatura rileva il grado di sporco e la quantità di stoviglie presenti nei cestelli. Regola automaticamente la temperatura e la quantità dell'acqua, il consumo di elettricità e la durata del programma.
ITALIANO Programma1) Durata (min) Energia (kWh) Acqua (l) 5 195 0.92 10.2 6 55 - 65 1.0 - 1.2 10 - 11 7 70 - 80 0.7 - 0.9 11 - 12 8 14 0.1 4 43 1) I valori di consumo e di durata possono variare a seconda della pressione e della temperatura dell'acqua, delle variazioni dell'alimentazione elettrica, delle opzioni selezionate e della quantità di stoviglie. Informazioni per gli istituti di prova Per le informazioni necessarie, relative alle prestazioni inviare una mail a: info.
www.aeg.com separatamente, eseguire le seguenti operazioni: 1. Impostare il decalcificatore dell'acqua sul livello più alto. 2. Assicurarsi che i contenitori del sale e del brillantante siano pieni. 3. Avviare il programma più breve con una fase di risciacquo, senza detersivo e senza piatti. 4. Regolare il decalcificatore dell’acqua in base alla durezza dell'acqua locale. 5. Regolare la quantità di brillantante rilasciata. 5.
ITALIANO 45 Regolazione decalcificatore dell’acqua Durezza dell'acqua Gradi tedeschi (°dH) Gradi francesi (°fH) mmol/l Gradi Clarke Manuale Elettronica 43 - 46 76 - 83 7.6 - 8.3 53 - 57 2 1) 9 37 - 42 65 - 75 6.5 - 7.5 46 - 52 21) 8 29 - 36 51 - 64 5.1 - 6.4 36 - 45 21) 7 23 - 28 40 - 50 4.0 - 5.0 28 - 35 21) 6 19 - 22 33 - 39 3.3 - 3.9 23 - 27 21) 51) 15 - 18 26 - 32 2.6 - 3.2 18 - 22 1 4 11 - 14 19 - 25 1.9 - 2.5 13 - 17 1 3 4 - 10 7 - 18 0.7 - 1.
www.aeg.com 5. Premere il tasto On/Off per spegnere l’apparecchiatura e confermare l'impostazione. 6.2 Riempire il contenitore del sale 1. 2. 3. 4. 5. Ruotare il tappo in senso antiorario e aprire il contenitore del sale. Versare 1 litro d’acqua nel contenitore del sale (solo la prima volta). Riempire il contenitore del sale. Togliere l'eventuale sale rimasto attorno all'apertura del contenitore. Riavvitare il tappo in senso orario per chiudere il contenitore del sale.
ITALIANO • Se la spia del sale è accesa, riempire il contenitore del sale. • Se la spia del brillantante è accesa, riempire il contenitore del brillantante. 3. Caricare i cestelli. 4. Aggiungere il detersivo. 47 • Se si utilizza il detersivo in pastiglie multifunzione, attivare l'opzione Multitab . 5. Impostare ed avviare il programma corretto per il tipo di carico ed il grado di sporco. 7.1 Utilizzo del detersivo A 1. B 2. 30 3. 4 MAX + 32 - 1 20 C 4. 5. 7.
www.aeg.com porta, l'apparecchiatura riprende dal punto in cui era stata interrotta. Annullamento della partenza ritardata mentre è in corso il conto alla rovescia Se si annulla la partenza ritardata, viene annullata anche l'impostazione del programma. 1. Premere RESET. Sul display compaiono 2 barre di stato orizzontali. 2. Impostare di nuovo il programma. Annullamento del programma 1. Premere RESET. Sul display compaiono 2 barre di stato orizzontali.
ITALIANO 8.3 Caricare i cestelli Fare riferimento all'opuscolo in dotazione per gli esempi su come caricare i cestelli. • Utilizzare l’apparecchiatura esclusivamente per lavare articoli idonei al lavaggio in lavastoviglie. • Non introdurre nell’apparecchiatura articoli di legno, osso, alluminio, peltro o rame. • Non inserire nell'apparecchiatura oggetti che possano assorbire acqua (spugne, panni). • Eliminare i residui di cibo dalle stoviglie.
www.aeg.com 2. A1 3. 4. 5. A2 6. 7. Per smontare il filtro (A), estrarre (A1) e (A2). Rimuovere il filtro (B). Sciacquare i filtri con acqua. Prima di rimontare il filtro (B), assicurarsi che non vi siano residui di cibo o sporco all'interno o attorno al bordo del pozzetto. Assicurarsi che il filtro (B) sia posizionato in modo corretto al di sotto delle 2 guide (C). Montare il filtro (A) e riposizionarlo all'interno del filtro (B). Ruotarlo in senso orario finché non si blocca in posizione.
ITALIANO 51 Problema Possibile soluzione Non è possibile accendere l'apparecchiatura. Verificare che la spina sia collegata alla presa elettrica. Assicurarsi che il fusibile all'interno del quadro elettrico non sia danneggiato. Il programma non si avvia. Controllare che la porta dell'apparecchiatura sia chiusa. Se è stata impostata la Partenza ritardata, annullare l'impostazione o attendere il termine del conto alla rovescia. L'apparecchiatura non carica acqua.
www.aeg.com ne. Provare un prodotto di una marca diversa o attivare il contenitore del brillantante e utilizzare il brillantante insieme al detersivo in pastiglie multifunzione. Fare riferimento alla sezione "CONSIGLI E SUGGERIMENTI UTILI" per trovare altre possibili cause. 3. Premere il tasto . • Le spie dei tasti e si spengono. • La spia del tasto continua a lampeggiare. • Il display mostra l'impostazione corrente. Contenitore del brillantante disattivo. 10.
ITALIANO 12. CONSIDERAZIONI AMBIENTALI Riciclare i materiali con il simbolo . Buttare l'imballaggio negli appositi contenitori per il riciclaggio. Aiutare a proteggere l’ambiente e la salute umana e a riciclare rifiuti derivanti da apparecchiature elettriche ed elettroniche. Non smaltire le apparecchiature che riportano il simbolo insieme ai normali rifiuti domestici. Portare il prodotto al punto di riciclaggio più vicino o contattare il comune di residenza.
www.aeg.com CONTENTS 1. 2. 3. 4. 5. 6. 7. 8. 9. 10. 11. SAFETY INSTRUCTIONS . . . . . . . . . . . . . . . . . . . . . . . . . . . . . . . . . . . . . . . . . . . . . . . . . . . . . PRODUCT DESCRIPTION . . . . . . . . . . . . . . . . . . . . . . . . . . . . . . . . . . . . . . . . . . . . . . . . . . . . CONTROL PANEL . . . . . . . . . . . . . . . . . . . . . . . . . . . . . . . . . . . . . . . . . . . . . . . . . . . . . . . . . . PROGRAMMES . . . . . . . . . . . . . . . . . . . . . . . . . . . . . .
ENGLISH 1. 55 SAFETY INSTRUCTIONS Before the installation and use of the appliance, carefully read the supplied instructions. The manufacturer is not responsible if an incorrect installation and use causes injuries and damages. Always keep the instructions with the appliance for future reference. 1.1 Children and vulnerable people safety WARNING! Risk of suffocation, injury or permanent disability.
www.aeg.com • If the water inlet hose is damaged, immediately disconnect the mains plug from the mains socket. Contact the Service to replace the water inlet hose. 1.3 Use • This appliance is intended to be used in household and similar applications such as: – Staff kitchen areas in shops, offices and other working environments – Farm houses – By clients in hotels, motels and other residential type environments – Bed and breakfast type environments.
ENGLISH 57 2. PRODUCT DESCRIPTION 1 2 3 12 11 10 9 1 Top spray arm 2 Upper spray arm 3 Lower spray arm 4 Filters 5 Rating plate 6 Salt container 7 Water hardness dial 8 Rinse aid dispenser 9 Detergent dispenser 10 Cutlery basket 11 Lower basket 12 Upper basket This appliance has an internal light that comes on when you open the door and goes off when the door is closed. 8 7 6 5 4 2.1 Beam-on-Floor The Beam-on-Floor is a light that shows on the floor below the appliance door.
www.aeg.com 3. CONTROL PANEL 2 1 3 4 5 6 7 8 9 1 On/off button 6 ÖKO PLUS button 2 Display 3 Delay button 7 Multitab button 4 Programme button (down) 9 Indicators 8 RESET button 5 Programme button (up) Indicators Description Salt indicator. It is always off while the programme operates. Rinse aid indicator. It is always off while the programme operates. End indicator. 4.
ENGLISH Programme Degree of soil Type of load Programme phases 6 Normal soil Crockery and cutlery Wash 55 °C Rinses 7 Normal or light soil Wash 45 °C Delicate crockery Rinses and glassware Dry 8 All 59 Options ÖKO PLUS Prewash 6) 1) The appliance senses the degree of soil and the quantity of items in the baskets. It automatically adjusts the temperature and quantity of the water, the energy consumption and the programme duration.
www.aeg.com Programme1) Duration (min) Energy (kWh) Water (l) 6 55 - 65 1.0 - 1.2 10 - 11 7 70 - 80 0.7 - 0.9 11 - 12 8 14 0.1 4 1) The pressure and the temperature of the water, the variations of the mains supply, the options and the quantity of dishes can change the programme duration and the consumption values. Information for test institutes For all the necessary information for test performance. send an email to: info.test@dishwasher-production.
ENGLISH 5. Adjust the released quantity of rinse aid. 5.3 Acoustic signals The acoustic signals operate when the appliance has a malfunction, when the adjustment of the level of the water softener occurs and when the programme is completed. By default, the acoustic signals are on, but it is possible to deactivate them. How to deactivate the acoustic signals 1. Press the on/off button to activate the appliance. Make sure that the appliance is in setting mode, refer to “Setting and starting a programme”. 2.
www.aeg.com Water softener adjustment Water hardness German degrees (°dH) French degrees (°fH) mmol/l Clarke degrees Manual Electronic 11 - 14 19 - 25 1.9 - 2.5 13 - 17 1 3 4 - 10 7 - 18 0.7 - 1.8 5 - 12 1 2 <4 <7 < 0.7 <5 12) 12) 1) Factory position. 2) Do not use salt at this level. You must adjust the water softener manually and electronically. Manual adjustment Turn the water hardness dial to the position 1 or 2.
ENGLISH 63 6.2 Filling the salt container 1. 2. 3. 4. 5. Turn the cap counterclockwise and open the salt container. Put 1 litre of water in the salt container (only for the first time). Fill the salt container with dishwasher salt. Remove the salt around the opening of the salt container. Turn the cap clockwise to close the salt container. CAUTION! Water and salt can come out from the salt container when you fill it. Risk of corrosion. To prevent it, after you fill the salt container, start a programme.
www.aeg.com 5. Set and start the correct programme for the type of load and the degree of soil. 7.1 Using the detergent A 1. B 2. 30 3. 4 MAX + 32 - 1 20 C 4. 5. 7.2 Setting and starting a programme Setting mode For some settings it is necessary that the appliance is in setting mode. Press the on/off button to activate the appliance. The appliance is in setting mode when the display shows 2 horizontal status bars. If the control panel does not show this condition, press RESET.
ENGLISH Cancelling the programme 1. Press RESET. The display shows 2 horizontal status bars. Make sure that there is detergent in the detergent dispenser before you start a new programme. At the end of the programme The display shows 0:00 and the end indicator comes on. 1. Press the on/off button to deactivate the appliance. 2. Close the water tap. 65 Important • Let the dishes become cold before you remove them from the appliance. Hot dishes can be easily damaged.
www.aeg.com • Remove remaining food from the items. • To remove easily remaining burned food, soak pots and pans in water before you put them in the appliance. • Put hollow items (cups, glasses and pans) with the opening down. • Make sure that cutlery and dishes do not bond together. Mix spoons with other cutlery. • Make sure that glasses do not touch other glasses. • Put the small items in the cutlery basket. • Put the light items in the upper basket. Make sure that they do not move.
ENGLISH 6. 7. 67 Make sure that the filter (B) is correctly positioned under the 2 guides (C). Assemble the filter (A) and put it back in filter (B). Turn it clockwise until it locks. An incorrect position of the filters can cause bad washing results and damage to the appliance. 9.2 Cleaning the spray arms 9.4 Internal cleaning Do not remove the spray arms. If the holes in the spray arms are clogged, remove remaining parts of soil with a thin pointed object.
www.aeg.com Problem Possible solution Make sure that the pressure of the water supply is not too low. For this information, contact your local water authority. Make sure that the water tap is not clogged. Make sure that the filter in the inlet hose is not clogged. Make sure that the inlet hose has no kinks or bends. The appliance does not drain the water. Make sure that the sink spigot is not clogged. Make sure that the drain hose has no kinks or bends. The anti-flood device is on.
ENGLISH 5. Press the on/off button to deactivate the appliance and to confirm the setting. 69 6. Adjust the released quantity of rinse aid. 7. Fill the rinse aid dispenser. 11. TECHNICAL INFORMATION Dimensions Width / Height / Depth (mm) Electrical connection Refer to the rating plate. Voltage 596 / 818 - 898 / 550 220-240 V Frequency 50 Hz Water supply pressure Min. / max. (bar / MPa) Water supply 1) Cold water or hot water2) (0.5 / 0.05 ) / (8 / 0.
www.aeg.
ENGLISH 71
117910370-A-512012 www.aeg.