HC412001 USER MANUAL EN User Manual Hob
www.aeg.com CONTENTS 1. SAFETY INFORMATION............................................................................................. 2 2. SAFETY INSTRUCTIONS.............................................................................................5 3. PRODUCT DESCRIPTION...........................................................................................7 4. DAILY USE.................................................................................................................... 8 5.
ENGLISH 3 usage. Always keep the instructions in a safe and accessible location for future reference. 1.1 Children and vulnerable people safety • • • • • • • This appliance can be used by children aged from 8 years and above and persons with reduced physical, sensory or mental capabilities or lack of experience and knowledge if they have been given supervision or instruction concerning the use of the appliance in a safe way and understand the hazards involved.
www.aeg.com • • • • • • • • • • CAUTION: The cooking process has to be supervised. A short term cooking process has to be supervised continuously. WARNING: Danger of fire: Do not store items on the cooking surfaces. Metallic objects such as knives, forks, spoons and lids should not be placed on the hob surface since they can get hot. Do not use a steam cleaner to clean the appliance.
ENGLISH 5 2. SAFETY INSTRUCTIONS This appliance is suitable for the following markets: GB IE 2.1 Installation WARNING! Only a qualified person must install this appliance. WARNING! Risk of injury or damage to the appliance. • Remove all the packaging. • Do not install or use a damaged appliance. • Follow the installation instruction supplied with the appliance. • Keep the minimum distance from the other appliances and units. • Always take care when moving the appliance as it is heavy.
www.aeg.com • Do not pull the mains cable to disconnect the appliance. Always pull the mains plug. • Use only correct isolation devices: line protecting cut-outs, fuses (screw type fuses removed from the holder), earth leakage trips and contactors. • The electrical installation must have an isolation device which lets you disconnect the appliance from the mains at all poles. The isolation device must have a contact opening width of minimum 3 mm. 2.
ENGLISH • Do not install a flame diffuser on the burner. • The use of a gas cooking appliance results in the production of heat and moisture. Provide good ventilation in the room where the appliance is installed. • Prolonged intensive use of the appliance may call for additional ventilation, for example opening of a window, or more effective ventilation, for example increasing the level of mechanical ventilation where present. • This appliance is for cooking purposes only.
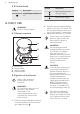
www.aeg.com 3.2 Control knob Symbol Symbol Description no gas supply / off position Description ignition position / maximum gas supply minimum gas supply 4. DAILY USE 2. Keep the control knob pushed for equal or less than 10 seconds. This lets the thermocouple warm up. If not, the gas supply is interrupted. 3. Adjust the flame after it is regular. WARNING! Refer to Safety chapters. 4.1 Burner overview A B C D A. B. C. D. Burner cap Burner crown Ignition candle Thermocouple 4.
ENGLISH The spark generator can start automatically when you switch on the mains, after installation or a power cut. It is normal. 9 4.3 Turning the burner off To put the flame out, turn the knob to the off position . WARNING! Always turn the flame down or switch it off before you remove the pans from the burner. The hob is supplied with the progressive valves. They make the flame regulation more precise. 5.
www.aeg.com • Use a special cleaner applicable for the surface of the hob. WARNING! Do not use knives, scrapers or similar instruments to clean the surface of the glass or between the rims of the burners and the frame (if applicable). • Wash stainless steel parts with water, and then dry them with a soft cloth. 6.2 Pan supports The pan supports are not resistant to washing in a dishwasher. They must be washed by hand. 6.
ENGLISH 11 6.4 Cleaning the hob 6.5 Cleaning the spark plug • Remove immediately: melted plastic, plastic foil, sugar and food with sugar. If not, the dirt can cause damage to the hob. Take care to avoid burns. • Remove when the hob is sufficiently cool: limescale rings, water rings, fat stains, shiny metallic discoloration. Clean the hob with a moist cloth and non-abrasive detergent. After cleaning, wipe the hob dry with a soft cloth.
www.aeg.com conditions of guarantee are in the guarantee booklet. 7.3 Labels supplied with the accessories bag Stick the adhesive labels as indicated below: A B MOD. MOD. PROD.NO. PROD.NO. SER.NO SER.NO DATA DATA C MOD. PROD.NO. SER.NO. 0049 TYPE IP20 03 IT MADE IN ITALY A. Stick it on Guarantee Card and send this part (if applicable). B. Stick it on Guarantee Card and keep this part (if applicable). C. Stick it on instruction booklet. 8.
ENGLISH The hob should not be installed in a bed sitting room with a volume of less than 20 m³. If it is installed in a room of volume less than 5 m³ an air vent of effective area of 100 cm² is required. If it is installed in a room of volume between 5 m³ and 10 m³ an air vent of effective area of 50 cm² is required, while if the volume exceeds 11 m³ no air vent is required.
www.aeg.com CAUTION! Make sure that the gas supply pressure of the appliance obeys the recommended values. A Rigid connection: Carry out connection by using metal rigid pipes (copper with mechanical end). 8.4 Injectors replacement WARNING! The injector kit for gas replacement is not provided. Please call the Authorized Service Center. 1. Remove the pan supports. 2. Remove the caps and crowns of the burner. 3.
ENGLISH The manufacturer refuses to be held responsible, if these safety measures are not abided by. Supply connections This hob has to be connected to 220-240 V (~ 50/60 Hz ) electricity supply. The hob has a terminal block which is marked as follows: • L — Live terminal • N — Neutral terminal or E — Earth terminal • Before carrying out the connection, make sure: 1. The limiter valve and the electrical system can take the appliance load (see the rating plate) 2.
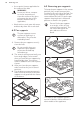
www.aeg.com 8.8 Assembly 5. 1. 6. A 2. B 3. 7. min. 100 mm min. 650 mm 40-50 mm A) supplied seal B) assembled bracket 490 mm 55 mm 30 mm 340 mm 4. CAUTION! Install the appliance only on a worktop with flat surface. 8.9 Installation of more than one hob If several hobs are to be installed side by side in the same cutout use the support side bracket, as per the dedicated installation instructions provided. 8.
ENGLISH in case a technical assistance intervention is necessary. Kitchen unit with door or drawer 40 mm min 20 mm (max 150 mm) A 60 mm 17 A. Removable panel B. Space for connections Kitchen unit with oven The electrical connection of the hob and the oven must be installed separately for safety reasons and to let easy remove oven from the unit. B 9. TECHNICAL DATA 9.1 Hob dimensions Width 360 mm Depth 520 mm 9.2 Bypass diameters BURNER Ø BYPASS 1/100 mm Rapid 45 Auxiliary 30 9.
www.aeg.com 9.4 Gas burners for NATURAL GAS G20 20 mbar BURNER NORMAL POWER kW MINIMUM POWER kW INJECTOR MARK 1/100 mm Rapid 2,4 0,75 108X Auxiliary 1,0 0,45 70 9.5 Gas burners for LPG G30/G31 28-30/37 mbar BURNER NORMAL MINIMUM INJECTOR NOMINAL GAS FLOW g/h POWER kW POWER kW MARK 1/100 G30 28-30 G31 37 mbar mm mbar Rapid 2,4 0,95 79 178 175 Auxiliary 1,0 0,45 50 73 71 10. ENERGY EFFICIENCY 10.
ENGLISH marked with the symbol with the household waste. Return the product to * your local recycling facility or contact your municipal office.
867329082-E-422016 www.aeg.