EN User Manual Hob HG654320 HG65NM
www.aeg.com CONTENTS 1. SAFETY INFORMATION.................................................................................................3 2. SAFETY INSTRUCTIONS................................................................................................ 4 3. PRODUCT DESCRIPTION.............................................................................................. 7 4. DAILY USE...................................................................................................................
ENGLISH 1. 3 SAFETY INFORMATION Before the installation and use of the appliance, carefully read the supplied instructions. The manufacturer is not responsible if an incorrect installation and use causes injuries and damages. Always keep the instructions with the appliance for future reference. 1.
www.aeg.com • • • • • • Do not store items on the cooking surfaces. Metallic objects such as knives, forks, spoons and lids should not be placed on the hob surface since they can get hot. Do not use a steam cleaner to clean the appliance. If the supply cord is damaged, it must be replaced by the manufacturer, an authorized Service or similarly qualified persons in order to avoid a hazard.
ENGLISH • Before carrying out any operation make sure that the appliance is disconnected from the power supply. • Make sure that the electrical information on the rating plate agrees with the power supply. If not, contact an electrician. • Make sure the appliance is installed correctly. Loose and incorrect electricity mains cable or plug (if applicable) can make the terminal become too hot. • Use the correct electricity mains cable. • Do not let the electricity mains cable tangle.
www.aeg.com heated objects away from fats and oils when you cook with them. • The vapours that very hot oil releases can cause spontaneous combustion. • Used oil, that can contain food remnants, can cause fire at a lower temperature than oil used for the first time. • Do not put flammable products or items that are wet with flammable products in, near or on the appliance. WARNING! Risk of damage to the appliance. • Do not keep hot cookware on the control panel. • Do not let cookware to boil dry.
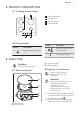
ENGLISH 7 3. PRODUCT DESCRIPTION 3.1 Cooking surface layout 1 2 4 1 2 3 4 3 3.2 Control knob Symbol Semi-rapid burner Rapid burner Auxiliary burner Control knobs Symbol Description no gas supply / off position Description ignition position / maximum gas supply minimum gas supply 4. DAILY USE C) Ignition candle D) Thermocouple WARNING! Refer to Safety chapters. 4.2 Ignition of the burner 4.1 Burner overview Always light the burner before you put on the cookware.
www.aeg.com lets the thermocouple warm up. If not, the gas supply is interrupted. 3. Adjust the flame after it is regular. If after some tries the burner does not light, check if the crown and its cap are in correct positions. WARNING! Do not keep the control knob pushed for more than 15 seconds. If the burner does not light after 15 seconds, release the control knob, turn it into off position and try to light the burner again after minimum 1 minute.
ENGLISH CAUTION! Make sure that the pots are placed centrally on the burner in order to get maximum stability and to get lower gas consumption. 5.2 Diameters of cookware Use cookware with diameters applicable to the size of burners. 9 Burner Diameter of cookware (mm) Rapid 180 - 260 Semi-rapid (front) 120 - 180 Semi-rapid (rear) 120 - 220 Auxiliary 80 - 180 6. CARE AND CLEANING WARNING! Refer to Safety chapters. 6.1 General information • Clean the hob after each use.
www.aeg.com 6.5 Periodic maintenance Speak to your local Authorised Service Centre periodically to check the conditions of the gas supply pipe and the pressure adjuster, if fitted. 7. TROUBLESHOOTING WARNING! Refer to Safety chapters. 7.1 What to do if... Problem Possible cause Remedy There is no spark when you The hob is not connected to try to activate the spark gen- an electrical supply or it is erator. connected incorrectly. Check if the hob is correctly connected to the electrical supply.
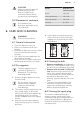
ENGLISH 11 7.3 Labels supplied with the accessories bag Stick the adhesive labels as indicated below: A B MOD. MOD. PROD.NO. PROD.NO. SER.NO SER.NO DATA DATA C MOD. PROD.NO. SER.NO. 0049 TYPE IP20 03 IT MADE IN ITALY A) Stick it on Guarantee Card and send this part (if applicable). B) Stick it on Guarantee Card and keep this part (if applicable). C) Stick it on instruction booklet. 8. INSTALLATION WARNING! Refer to Safety chapters. 8.
www.aeg.com However, if the room has a door which opens directly to the outside no air vent is required even if the volume is between 5 m³ and 11 m³. If there are other fuel burning appliances in the same room, B.S. 5440 Part 2 Current Edition, should be consulted to determine the requisite air vent requirements. For appliances installed in the Republic of Ireland please refer to the NSAIDomestic Gas Installation I.S. 813 Current Editions Table Four.
ENGLISH 8.4 Injectors replacement 1. Remove the pan supports. 2. Remove the caps and crowns of the burner. 3. With a socket spanner 7 remove the injectors and replace them with the ones which are necessary for the type of gas you use (see table in "Technical Information" chapter). 4. Assemble the parts, follow the same procedure backwards. 5. Replace the rating plate (it is near the gas supply pipe) with the one for the new type of gas supply.
www.aeg.com Before carrying out the connection, make sure: 1. The limiter valve and the electrical system can take the appliance load (see the rating plate) 2. The supply system is equipped with an efficient earth connection in compliance with the current standards and regulations 3. The outlet or omnipolar switch used for connection is easily accessible with the appliance installed. The appliance is supplied with a 3 core flexible power cable with a 3 amp plug.
ENGLISH 8.8 Building In 15 B) supplied brackets CAUTION! Install the appliance only on a worktop with flat surface. min. 600 mm min. 150 mm min. 650 mm min. 55 mm The panel installed below the hob must be easy to remove and let an easy access in case a technical assistance intervention is necessary. 30 mm 480 mm 8.
www.aeg.com 9.3 Other technical data Gas original: G20 (2H) 20 mbar = 8 kW TOTAL POWER: Gas replacement: G30 (3+) 28-30 mbar = 567 g/h G31 (3+) 37 mbar = 557 g/h Electric supply: 220-240 V ~ 50/60 Hz 3 core flexible cable with non rewireable plug fitted with a 3 amp cartridge fuse Appliance category: II2H3+ Gas connection: R 1/2" Appliance class: 3 9.
ENGLISH Energy efficiency per gas burner (EE gas burner) Left rear - Semi-rapid 53.5% Right rear - Rapid 53.5% Left front - Semi-rapid 52.0% Right front - Auxiliary not applicable Energy efficiency for the gas hob (EE gas hob) 17 53.0% EN 30-2-1: Domestic cooking appliances burning gas - Part 2-1 : Rational use of energy - General 10.2 Energy saving • • • • • • • Before use, make sure that the burners and pan supports are assembled correctly.
www.aeg.
ENGLISH 19
867305785-C-212015 www.aeg.