HG995440 EN GAS HOB USER MANUAL IE GB
FOR PERFECT RESULTS Thank you for choosing this AEG product. We have created it to give you impeccable performance for many years, with innovative technologies that help make life simpler – features you might not find on ordinary appliances. Please spend a few minutes reading to get the very best from it. ACCESSORIES AND CONSUMABLES In the AEG webshop, you’ll find everything you need to keep all your AEG appliances looking spotless and working perfectly.
Contents 3 CONTENTS 4 6 12 13 15 16 17 19 20 Safety information Installation Product description Operation Helpful hints and tips Care and cleaning What to do if… Technical data Environment concerns The following symbols are used in this user manual: Important information concerning your personal safety and information on how to avoid damaging the appliance.
Safety information SAFETY INFORMATION WARNING! These instructions are only valid in the countries whose symbols appear on this booklet's cover. For your safety and correct operation of the appliance, read this manual carefully before installation and use. Always keep these instructions with the appliance even if you move or sell it. Users must fully know the operation and safety features of the appliance.
Safety information 5 • Pots must not enter the control zone. • Do not use not stable cookware to prevent from tilt and accident. • Do not put flammable products or items that are wet with flammable products, and/or fusible objects (made of plastic or aluminium) and/or fabrics in, near or on the appliance. There is the risk of explosion or fire. • Use only the accessories supplied with appliance. • Be careful when you connect the appliance to the near sockets.
Installation • This appliance is not connected to a combustion products evacuation device. It must be installed and connected in accordance with current installation regulations. Particular attention must be given to the relevant requirements regarding ventilation. • The use of a gas cooking appliance cause heat and moisture in the room in which it is installed.
Installation 7 Important safety requirements This hob must be installed in accordance with the Gas Safety (Installation and Use) Regulations (Current Edition) and the IEE Wiring Regulations (Current Edition). For appliances installed in the Republic of Ireland please refer to NSAI- Domestic Gas Installation I.S. 813 Current Editions and the ETCI Rules for Electrical Installations. Provision for ventilation Detailed recommendations are contained in the following British Standards Codes Of Practice: B.S.
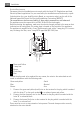
Installation 1 2 3 1 End of shaft with nut 2 Washer 3 Elbow Connection to the gas supply should be with either rigid or semi-rigid pipe, i.e. steel or copper. The connection should be suitable for connecting to R 1/2 (1/2 BSP male thread). When the final connection has been made, it is essential that a thorough leak test is carried out on the hob and installation. Make sure that the main connection pipe does not exert any strain on the hob.
Installation 9 Adjustment of minimum level To adjust the minimum level of the burners: 1. Light the burner. 2. Turn the knob on the minimum position. 3. Remove the knob. 4. With a thin screwdriver, adjust the by-pass screw position. 1 1 The by-pass screw – If you change from natural gas 20 mbar to liquid gas, fully tighten the by-pass screw in. – If you change from liquid gas to natural gas 20 mbar, undo the by-pass screw approximately 1/4 of a turn (1/2 of a turn for Triple Crown burner).
Installation Electrical Requirements Permanent electrical installation must comply with the latest I.E.E. Regulations and local Electricity Board regulations. For your own safety the installation must be done by a qualified electrician (e.g. your local Electricity Board, or a contractor who is on the roll of the National Inspection Council for Electrical Installation Contracting [NICEIC]). The manufacturer declines any liability if these safety measures are not observed.
Installation 11 WARNING! Make sure that the cut off plug is disposed of safely. A cut off plug put into a 13 amp socket is a safety hazard. There is a risk of electrical shock. The replacement of the electrical cable must be done by a qualified electrician or competent person, according to the current regulations. Replacement of the connection cable To replace the connection cable use only H05V2V2-F T90 or equivalent type.
Product description 40 mm min 20 mm (max 150 mm) a 60 mm b a) Removable panel b) Space for connections Kitchen unit with oven The hob recess dimensions must obey the indication and the kitchen unit must be equipped with vents to let a continuous supply of air. The electrical connection of the hob and the oven must be installed separately for safety reasons and to let easy remove oven from the unit.
Operation Symbol 13 Description ignition position / maximum gas supply minimum gas supply OPERATION Ignition of the burner WARNING! Be very careful when you use open fire in kitchen environment. Manufacturer decline any responsibility in case misuse of the flame Always light the burner before you put cookware. To light the burner: ) and push it 1. Turn the control knob counterclockwise to the maximum position ( down. 2.
Operation 1 2 3 4 1 2 3 4 Burner cap Burner crown Ignition candle Thermocouple WARNING! Do not keep the control knob pushed for more than 15 seconds. If the burner does not light after 15 seconds, release the control knob, turn it into off position and try to light the burner again after minimum 1 minute.
Helpful hints and tips 15 When you install the grate of the Triple Crown burner afterwards, align the hollow part of the grate with the reference on the plate attached to the glass. CAUTION! Be very careful when you put the pan supports back on their position. There is a risk of scratching the glass hob top. HELPFUL HINTS AND TIPS Energy savings • If possible, always put the lids on the pans. • When the liquid starts to boil, turn down the flame to barely simmer the liquid.
Care and cleaning WARNING! Make sure pot handles do not protrude over the front edge of the cooktop and that pots are centrally positioned on the rings in order to achieve maximum stability and to obtain lower gas consumption. Do not place unstable or deformed pots on the rings to prevent from spill and injury. WARNING! Flame diffuser are not recommended.
What to do if… 17 • Be very careful when you replace the pan supports to prevent the hob top from damage. After cleaning, dry the appliance with a soft cloth. Removing the dirt: 1. – Remove immediately: melting plastic, plastic foil, and food containing sugar. – Stop the appliance and let it cool down before you clean: limescale rings, water rings, fat stains, shiny metallic discolorations. Use a special cleaner applicable for surface of hob. 2. Clean the appliance with a damp cloth and some detergent. 3.
What to do if… Problem Possible cause Remedy • Burner cap and crown are placed uneven • Make sure that the burner cap and crown are in correct positions. The flame is blow out immediately after ignition • Thermocouple is not heated sufficient • After lightning the flame, keep the knob pushed for approximately 5 seconds. The gas ring burns unevenly • Burner crown is blocked with food residues • Make sure that the injector is not blocked and the burner crown is clear of food particles.
Technical data 19 TECHNICAL DATA Hob dimensions Width: 880 mm Length: 510 mm Hob recess dimensions Width: 830 mm Length: 480 mm Heat input Triple Crown burner: 3.8 kW Semi-rapid burner: 1.9 kW Auxiliary burner: 1.0 kW TOTAL POWER: G20 (2H) 20 mbar = 10.
Environment concerns NORMAL POWER REDUCED POWER NORMAL POWER NATURAL GAS G20 (2H) 20 mbar LPG (Butane/Propane) G30/G31 (3+) 28-30/37 mbar BURNER Triple Crown kW kW inj. 1/100 mm 3.8 1.4 146 m³/h inj. 1/100 mm G30 28-30 mbar g/h g/h 0.362 98 276 271 G31 37 mbar ENVIRONMENT CONCERNS The symbol on the product or on its packaging indicates that this product may not be treated as household waste.
www.aeg.