CD710M KME761000B KME761000M KME761000W KMK761000M KMK761000W KMM761000M KMR761000M KMR761000W KMS761000M USER MANUAL ES Manual de instrucciones Horno microondas combinado
www.aeg.com CONTENIDO 1. INFORMACIÓN SOBRE SEGURIDAD....................................................................... 3 2. INSTRUCCIONES DE SEGURIDAD............................................................................5 3. DESCRIPCIÓN DEL PRODUCTO............................................................................... 8 4. PANEL DE MANDOS.................................................................................................. 9 5. ANTES DEL PRIMER USO........................
ESPAÑOL 1. 3 INFORMACIÓN SOBRE SEGURIDAD Antes de instalar y utilizar el aparato, lea atentamente las instrucciones facilitadas. El fabricante no se hace responsable de lesiones o daños producidos como resultado de una instalación o un uso incorrectos: Conserve siempre estas instrucciones en lugar seguro y accesible para futuras consultas. 1.
www.aeg.com • • • • • • • • • • • • necesario mantener alejados a los niños de menos de 8 años salvo que estén bajo supervisión continua. Utilice siempre guantes de horno cuando introduzca o retire accesorios o utensilios refractarios. Antes de realizar tareas de mantenimiento, desenchufe el aparato de la red eléctrica. Asegúrese de que el aparato está desconectado antes de reemplazar la lámpara con el fin de impedir que se produzca una descarga eléctrica.
ESPAÑOL • • • • • • • • 5 Cuando caliente alimentos en recipientes de papel o plástico, vigile el aparato por la posibilidad de incendio. El aparato está pensado para calentar alimentos y bebidas. Secar alimentos o prendas, o calentar mantas térmicas, zapatillas, esponjas, paños húmedos o similares puede conllevar riesgo de lesiones o incendios. Si se genera humo, apague o desenchufe el horno y deje la puerta cerrada para sofocar las posibles llamas.
www.aeg.com • El aparato dispone de un sistema de enfriamiento eléctrico. Debe utilizarse con alimentación eléctrica. 2.2 Conexión eléctrica ADVERTENCIA! Riesgo de incendios y descargas eléctricas. • Todas las conexiones eléctricas deben realizarlas electricistas cualificados. • El aparato debe conectarse a tierra. • Asegúrese de que los parámetros de la placa de características son compatibles con los valores eléctricos del suministro eléctrico.
ESPAÑOL • Para evitar daños o decoloraciones del esmalte: – no coloque papel de aluminio directamente en la parte inferior del interior del aparato. – No ponga agua directamente en el aparato caliente. – No deje platos húmedos ni comida en el aparato una vez finalizada la cocción. – Preste especial atención al desmontar o instalar los accesorios. • La pérdida de color del esmalte o el acero inoxidable no afecta al rendimiento del aparato. • Utilice una bandeja honda para pasteles húmedos.
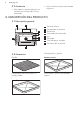
www.aeg.com 2.7 Asistencia • Para reparar el aparato, póngase en contacto con un centro de servicio autorizado. • Utilice solamente piezas de recambio originales. 3. DESCRIPCIÓN DEL PRODUCTO 3.1 Descripción general 1 2 3 4 4 8 5 6 3 2 1 1 2 3 4 5 6 7 8 Panel de control Programador electrónico Resistencia Generador de microondas Luz Ventilador Carril de apoyo, extraíble Posiciones de las parrillas 7 3.2 Accesorios Para bizcochos y galletas.
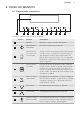
ESPAÑOL 9 4. PANEL DE MANDOS 4.1 Programador electrónico 1 2 3 4 5 6 7 8 9 10 11 Utilice los sensores para accionar el aparato. Sensor 1 2 3 - Función Comentario Pantalla Muestra los ajustes actuales del aparato. ENCENDIDO / APAGADO Para activar y desactivar el aparato. Funciones De Cocción o Cocción Asistida Toque el sensor una vez para seleccionar una función de cocción o el menú: Cocción Asistida.
www.aeg.com Sensor Función Comentario Teclas Atrás Para retroceder un nivel en el menú. Para mostrar el menú principal, toque el sensor durante 3 segundos. 9 Funciones adicio- Programar diferentes funciones. Cuando esté en nales y de tiempo marcha una función de cocción, toque el sensor para ajustar el temporizador o las funciones: Tecla De Bloqueo, Favoritos, Calentar Y Mantener, Ajustar + Empezar. 10 Avisador 11 Para ajustar la función: Avisador. 4.2 Pantalla A B C E D A.
ESPAÑOL Símbolo 11 Función Peso Automático La pantalla indica que el sistema de peso automático está activo o que el peso puede cambiarse. Calentar Y Mantener La función está activada. 5. ANTES DEL PRIMER USO 5.2 Primera conexión ADVERTENCIA! Consulte los capítulos sobre seguridad. 5.1 Limpieza inicial Retire todos los accesorios y carriles de apoyo extraíbles del horno.
www.aeg.com Símbolo Elemento del menú Utilisation Favoritos Contiene una lista de los programas de cocción favoritos creados por el usuario. Platos Especiales Contiene una lista de funciones de cocción adicionales. Submenú para: Ajustes Básicos Símbolo Submenú Descripción Ajustar la hora Pone en hora el reloj. Indicación Tiempo Si está activado, la pantalla indica la hora actual al apagar el aparato. Calentamiento rápido Cuando está activada, la función reduce el tiempo de calentamiento.
ESPAÑOL 13 6.3 Funciones De Cocción Función de cocción Aplicación Turbo Para hornear en hasta dos posiciones de parrilla a la vez y para secar alimentos.Ajuste la temperatura entre 20 y 40 °C menos que para la función: Bóveda/Calor inferior. Pizza Para hornear alimentos en un nivel, con dorado intenso y base crujiente. Ajuste la temperatura entre 20 y 40 °C menos que para la función: Bóveda/ Calor inferior.
www.aeg.com Función de cocción Levantar Masa Aplicación Para levantar de forma controlada la masa antes de hornear. Cocina A Baja Tempera- Para preparar asados tiernos y jugosos. tura Pan Para hornear pan. Descongelar Esta función se puede usar para descongelar alimentos congelados, como frutas y verduras. El tiempo de descongelación depende de la cantidad y tamaño de los alimentos congelados. 6.5 Activación de una función de cocción 6.7 Indicador De Calentamiento Rápido 1. Encienda el aparato.
ESPAÑOL • No cocine en exceso los platos ajustando una potencia y un tiempo demasiado elevados. La comida puede secarse, quemarse o provocar fuego. • No utilice el horno para cocinar huevos o caracoles con la cáscara, ya que pueden estallar. Perfore la yema de los huevos fritos antes de recalentarlos. • Perfore la piel de los alimentos varias veces con un tenedor antes de cocinarlos. • Corte las verduras en trocitos de igual tamaño. • Remueva de vez en cuando los platos líquidos.
www.aeg.com Material / Recipiente Microondas Descongelar Calentar Cocción Función de cocción+Microondas X Película de asado con cierre apto para microondas 3) Fuentes de metal, p. ej., esmalte, hie- X rro fundido X X Moldes, barniz negro o revestimiento X X X de silicona 3) Bandeja X X X 4) Parrilla X X X 5) Utensilios para microondas, p.ej.
ESPAÑOL o cocinar pueden variar. A modo de guía rápida: doble de cantidad: casi el doble de tiempo. • El microondas crea el calor directamente en el alimento. Por este motivo, no se pueden calentar todos los sitios al mismo tiempo. Debe remover o girar los platos calentados, especialmente si prepara grandes cantidades de alimento. • El tiempo de reposo se indica en las tablas. Deje reposar el alimento en el 17 aparato o fuera de él, para que el calor se distribuya más uniformemente.
www.aeg.com Para desactivar la función de microondas, pulse . Si toca o abre la puerta, se detiene la función. Para volver a empezar, toque 2. Toque para activar la función de inicio rápido. Cada vez que se toca se añaden 30 segundos al tiempo de Duración. Puede cambiar la potencia de microondas (consulte “Ajuste de la función del microondas”). . 7.6 Ajuste de la función Combi 1. Active una función de cocción. Consulte “Inicio de una función de cocción”. 2.
ESPAÑOL Ajuste de potencia Uso del aparato • 200 vatios • 100 vatios Descongelar carne, pescado Descongelar queso, nata, mantequilla Descongelar fruta y pasteles Descongelar pan 19 8. FUNCIONES DEL RELOJ 8.1 Tabla de funciones del reloj Función de reloj Aplicación Avisador Para programar una cuenta atrás (máx. 2 h 30 min). Esta función no influye en el funcionamiento del horno. También puede utilizarlo cuando el aparato está apagado. Use para activar la función.
www.aeg.com Al finalizar el tiempo programado sonará una señal. El aparato se apaga. La pantalla mostrará un mensaje. 5. Pulse cualquier símbolo para desactivar la señal. 5. Pulse para confirmar. Cuando la función termine, sonará una señal. La función permanece activa si se cambian las funciones de cocción. 8.3 Calentar Y Mantener 8.4 Añadir Tiempo Condiciones para que la función se active: La función: Añadir Tiempo hace que la función de cocción continúe tras el final de Duración.
ESPAÑOL 9.3 Cocción Asistida con Peso Automático Esta función calcula automáticamente el tiempo de asado. Si se desea hacer uso de esta función, es necesario introducir el peso de los alimentos. 1. Encienda el aparato. 2. Ajuste el menú: Cocción Asistida. Pulse para confirmar. 3. Seleccione la categoría y el plato. Pulse 4. Toque para confirmar. o 21 Comenzará el programa automático. 5. Puede cambiar el peso en cualquier momento. Pulse o para cambiar el peso. 6.
www.aeg.com 11. FUNCIONES ADICIONALES 11.1 Favoritos Puede guardar sus ajustes preferidos, como por ejemplo la duración, la temperatura o la función de cocción. Están disponibles en el menú: Favoritos. Se pueden guardar 20 programas. No se pueden guardar funciones de microondas y de microondas combi como programas favoritos. Guardar un programa 1. Encienda el horno. 2. Ajuste una función de cocción o un programa automático. 11.
ESPAÑOL Pulse un símbolo (excepto ) para iniciar la función: Ajustar + Empezar. Se iniciará la función de cocción programada. Cuando la función de cocción termine, sonará una señal. • Tecla De Bloqueo se encuentra activo mientras la función de cocción está activada. • El menú: Ajustes Básicos permite activar y desactivar la función: Ajustar + Empezar. 11.
www.aeg.com Para calentar platos y alimentos cocinados. Distribuya los platos y los alimentos uniformemente sobre la parrilla. Varíe la posición de los platos en las pilas hacia la mitad del tiempo de calentamiento (pase la mitad superior de la pila a la parte inferior y viceversa). La temperatura automática es de 70 °C. Posición recomendada de la parrilla: 3. Levantar Masa Puede usar esta función automática para cualquier receta de masa de levadura. Proporciona el ambiente adecuado para que suba.
ESPAÑOL 25 Resultado Posible causa Solución La tarta está demasiado seca. El tiempo de horneado es demasiado largo. La próxima vez, seleccione un tiempo de horneado más corto. El pastel se dora irregularmente. La temperatura del horno es demasiado alta y el tiempo de cocción demasiado corto. Seleccione una temperatura más baja y un tiempo de cocción más largo. El pastel se dora irregularmente. La mezcla está distribuida irregularmente. Distribuya la masa uniformemente en la bandeja.
www.aeg.
ESPAÑOL Alimento Función Temperatura (°C) Tiempo (min) Posición de la parrilla Short bread / Mantecados / Masa quebrada Turbo 140 20 - 35 1 Short bread / Manteca- Bóveda/Calor inferior 160 20 - 30 2 Galletas de masa batida de bizcocho Turbo 150 - 160 15 - 20 1 Pasteles con clara de huevo, merengues Turbo 80 - 100 120 - 150 1 Mostachones De Almen- Turbo dra 100 - 120 30 - 50 1 Galletas de masa de levadura Turbo 150 - 160 20 - 40 1 Pastas de hojaldre 1) Turbo 170 - 180 20
www.aeg.com Alimento Función Temperatura (°C) Tiempo (min) Posición de la parrilla Pescado al horno Bóveda/Calor inferior 180 - 200 30 - 60 1 Verduras rellenas Turbo 160 - 170 30 - 60 1 1) Precaliente el horno. 12.6 Horneado en varios niveles Uso de la función: Turbo.
ESPAÑOL 29 2. Coloque la carne junto con la bandeja honda caliente en la parrilla del horno. 3. Seleccione la función: Cocina A Baja Temperatura. horno sigue cocinando a 80 °C. No utilice esta función para las aves. Cocine siempre sin tapar cuando utilice esta función. 1. Dore la carne en una sartén en la placa a una temperatura muy alta durante 1 - 2 minutos por cada lado. Alimento Cantidad (kg) Temperatura (°C) Tiempo (min) Posición de la parrilla Rosbif 1 - 1.
www.aeg.com Alimento Temperatura (°C) Tiempo (min) Posición de la parrilla Piroggen (versión rusa 180 - 200 15 - 25 3 de la pizza calzone) 1) 1) Precaliente el horno. 2) Utilice una bandeja honda. 12.9 Asado • Use utensilios para horno resistentes al calor para asar. Consulte las instrucciones del fabricante del utensilio para horno. • Los asados grandes se pueden preparar directamente en la bandeja honda o en una parrilla colocada sobre la bandeja honda.
ESPAÑOL 31 Ternera Alimento Función Cantidad (kg) Potencia (vatios) Temperatura (°C) Tiempo (min) Posición de la parrilla Ternera asada Grill + Turbo 1 200 160 - 180 50 - 70 1 1.5 - 2 200 160 - 180 75 - 100 1 Codillo de Grill + ternera Turbo Cordero Alimento Función Cantidad (kg) Potencia (vatios) Temperatura (°C) Tiempo (min) Posición de la parrilla Pata de cordero, cordero asado Grill + Turbo 1 - 1.
www.aeg.com Platos Alimento Función Cantidad (kg) Potencia (vatios) Temperatu- Tiempo (min) ra (°C) Posición de la parrilla Recetas dulces Turbo - 200 160 - 180 20 - 35 1 Platos sabrosos con ingredientes cocinados (pasta, verduras) Turbo - 400 - 600 160 - 180 20 - 45 1 Platos sabrosos con ingredientes crudos (patatas, verduras) Turbo - 400 - 600 160 - 180 30 - 45 2 12.11 Grill • Hornee al grill con el ajuste máximo de temperatura.
ESPAÑOL 33 Grill Rápido Alimento Tiempo (min) Posición de la parrilla 1ª cara 2ª cara Burgers / Hamburguesas 9 - 13 8 - 10 3 Solomillo de cerdo 10 - 12 6 - 10 2 Salchichas 10 - 12 6-8 3 Medallones de ternera / bistecs de ternera lechal 7 - 10 6-8 3 Toast/Tostar 1-3 1-3 3 - 2 Tostadas con guarni- 6 - 8 ción 12.12 Congelados • Retire el embalaje del alimento. Coloque el alimento en un plato. • No lo cubra con ningún cuenco ni plato.
www.aeg.
ESPAÑOL Alimento Cantidad Tiempo de Tiempo de descongela- descongelación (min) ción posterior (minutos) Comentarios Nata 2 x 200 g 80 - 100 10 - 15 Monte la nata aunque queden puntos ligeramente congelados. Pasteles 1,4 kg 60 60 - 12.14 Conservar • Utilice únicamente botes de conserva del mismo tamaño disponibles en el mercado. • No utilice botes con cierre hermético (twist-off) o de bayoneta ni latas metálicas. • Utilice el nivel de parrilla más bajo para esta función.
www.aeg.com Alimento Temperatura (°C) Tiempo de cocción Continuar la cochasta que empiecen ción a 100 °C (min) a subir burbujas (min) Pepinos 160 - 170 50 - 60 - Encurtidos variados 160 - 170 50 - 60 5 - 10 Colinabos/Guisantes/Espárragos 160 - 170 50 - 60 15 - 20 1) Deje reposar en el horno después de apagarlo. 12.
ESPAÑOL 12.17 Cocción por microondas Coloque el plato con la comida en la base de la cavidad y dele la vuelta a la mitad del tiempo de cocción. 37 Si no encuentra la receta que necesita, consulte un tipo de alimento similar en las tablas. Tape la comida para cocinar y recalentar. Remueva la comida a la mitad del tiempo de cocción o descongelación. Coloque la cuchara en la botella o el vaso al calentar bebidas para asegurar una mejor distribución del calor.
www.aeg.
ESPAÑOL 39 Alimento Potencia (vatios) Tiempo (min) Tiempo de reposo (min) Leche (200 ml) 1000 1 - 1:30 - Agua (200 ml) 1000 1:30 - 2 - Salsa (200 ml) 600 1-3 - Sopa (300 ml) 600 3-5 - Alimento Potencia (vatios) Tiempo (min) Tiempo de reposo (min) Chocolate / cobertura (0,15 kg) 300 2-4 - Mantequilla (0,1 kg) 400 0:30-1:30 - Alimento Potencia (vatios) Tiempo (min) Tiempo de reposo (min) Pescado entero (0,5 kg) 500 8 - 10 2-5 Filetes de pescado (0,5 kg) 400 4-7 2-5
www.aeg.com Alimento Recipientes PoTempe- Tiemtencia ratura po (va(°C) (min) tios) Posición de la parrilla Tiempo de reposo (min) 2 mitades de Recipiente de cristal re- 300 pollo (2 x 0,55 dondo, Ø 26 cm kg) 220 40 2 5 Patatas gratinadas (1 kg) 300 200 40 2 10 300 200 70 1 10 Molde de gratinar Asado de Recipiente de cristal cuello de cer- con tamiz do (1,1 kg) 12.18 Información para los institutos de pruebas Función de microondas Pruebas conforme a IEC 60705.
ESPAÑOL Alimento Función Poten- Can- Tempecia tidad ratura (va(kg) (°C) tios) Posición de la parrilla Tiempo (min) Comentarios 41 1) Pastel Turbo + Micro 100 0.7 180 2 29 - 31 Gire el recipiente un cuarto de vuelta, a la mitad del tiempo de cocción. Patatas gratinadas Grill + Ven- 300 tilador + Micro 1.1 180 2 40 - 45 Gire el recipiente un cuarto de vuelta, a la mitad del tiempo de cocción. Pollo Grill + Ven- 200 tilador + Micro 1.
www.aeg.com PRECAUCIÓN! Coja siempre la bombilla halógena con un paño para evitar quemar los residuos de grasa. 1 3 2 2. Tire del extremo delantero del carril de apoyo para separarlo de la pared. 3. Extraiga los soportes de la suspensión posterior. Coloque los carriles laterales en el orden inverso. 13.3 Cambio de la bombilla Coloque un paño en el fondo del interior del horno. Así evitará que se dañe la tapa de vidrio de la lámpara y la cavidad. 1. Apague el aparato. 2.
ESPAÑOL 43 Problema Posible causa Solución El horno no calienta. La desconexión automática está activada. Consulte el apartado "Desconexión automática". El horno no calienta. El bloqueo de seguridad pa- Consulte "Uso del bloqueo ra niños está activado. de seguridad". El horno no calienta. La puerta no está bien cerra- Cierre completamente la da. puerta. El horno no calienta. Ha saltado el fusible. Compruebe si el fusible es la causa del fallo de funcionamiento.
www.aeg.com Es conveniente que anote los datos aquí: Número de producto (PNC) ......................................... Número de serie (S.N.) ......................................... 15. DATOS TÉCNICOS 15.1 Datos técnicos Voltaje 220 - 240 V Frecuencia 50 Hz 16. EFICACIA ENERGÉTICA 16.1 Ahorro de energía El horno tiene características que le ayudan a ahorrar energía durante la cocina de cada día.
ESPAÑOL 45 17. ASPECTOS MEDIOAMBIENTALES Recicle los materiales con el símbolo . Coloque el material de embalaje en los contenedores adecuados para su reciclaje. Ayude a proteger el medio ambiente y la salud pública, así como a reciclar residuos de aparatos eléctricos y * electrónicos. No deseche los aparatos marcados con el símbolo junto con los residuos domésticos. Lleve el producto a su centro de reciclaje local o póngase en contacto con su oficina municipal.
www.aeg.
ESPAÑOL 47
867336386-D-322017 www.aeg.