EN User Manual Oven KP8404001
www.aeg.com CONTENTS 1. SAFETY INFORMATION.................................................................................................3 2. CONDITIONS OF USE....................................................................................................4 3. SAFETY INSTRUCTIONS................................................................................................ 4 4. PRODUCT DESCRIPTION.............................................................................................. 7 5.
ENGLISH 1. 3 SAFETY INFORMATION Before the installation and use of the appliance, carefully read the supplied instructions. The manufacturer is not responsible if an incorrect installation and use causes injuries and damages. Always keep the instructions with the appliance for future reference. 1.
www.aeg.com • • • • • • • Ensure that the appliance is switched off before replacing the lamp to avoid the possibility of electric shock. Do not use a steam cleaner to clean the appliance. Do not use harsh abrasive cleaners or sharp metal scrapers to clean the glass door since they can scratch the surface, which may result in shattering of the glass.
ENGLISH • • • • • • • • • • • with the power supply. If not, contact an electrician. Always use a correctly installed shockproof socket. Do not use multi-plug adapters and extension cables. Make sure not to cause damage to the mains plug and to the mains cable. Should the mains cable need to be replaced, this must be carried out by our Authorised Service Centre. Do not let mains cables touch or come near the appliance door, especially when the door is hot.
www.aeg.com 3.4 Care and cleaning WARNING! Risk of injury, fire, or damage to the appliance. • Before maintenance, deactivate the appliance and disconnect the mains plug from the mains socket. • Make sure the appliance is cold. There is the risk that the glass panels can break. • Replace immediately the door glass panels when they are damaged. Contact the Service. • Be careful when you remove the door from the appliance.
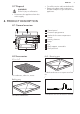
ENGLISH 3.7 Disposal • Cut off the mains cable and discard it. • Remove the door catch to prevent children and pets to get closed in the appliance. WARNING! Risk of injury or suffocation. • Disconnect the appliance from the mains supply. 4. PRODUCT DESCRIPTION 4.1 General overview 1 8 2 3 4 5 6 4 3 2 1 7 4.
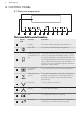
www.aeg.com 5. CONTROL PANEL 5.1 Electronic programmer 1 2 3 4 5 6 7 8 9 10 11 Use the sensor fields to operate the appliance. Sensor field 1 2 - Function Comment Display Shows the current settings of the appliance. ON / OFF To activate and deactivate the appliance. 3 Heating Functions Touch the sensor field once to choose a heating or Assisted Cook- function or the menu: Assisted Cooking.
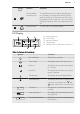
ENGLISH Sensor field Function Comment Time and additional functions To set different functions. When a heating function operates, touch the sensor field to set the timer or the functions: Function Lock, Favourite Programme, Heat + Hold, Set + Go. You can also change the settings of the core temperature sensor. Minute Minder To set the function: Minute Minder. 10 11 9 5.
www.aeg.com Symbol Function Weight Automatic The display shows that the automatic weight system is active or that weight can be changed. Heat + Hold The function is active. 6. BEFORE FIRST USE 6.2 First Connection WARNING! Refer to Safety chapters. When you connect the appliance to the mains or after the power cut, you have to set the language, the display contrast, the display brightness and the time of the day. 6.
ENGLISH Symbol Menu item Application Basic Settings You can use it to set other settings. Favourite Programme Contains a list of favourite cooking programmes created by the user. 11 Submenu for: Basic Settings Symbol Submenu Description Set Time of Day Sets the current time on the clock. Time Indication When ON, the display shows the current time when you deactivate the appliance. Set + Go When ON, in the Select Options window you can choose the function: Set + Go.
www.aeg.com 7.3 Heating Functions Heating function Application True Fan Cooking To bake on up to 2 shelf positions at the same time and to dry food. Set the temperature 20 - 40 °C lower than for the function: Conventional Cooking. Pizza Setting To bake food on 1 shelf position for a more intensive browning and a crispy bottom. Set the temperature 20 - 40 °C lower than for the function: Conventional Cooking. Slow Cooking To prepare tender, succulent roasts.
ENGLISH Heating function Application Au Gratin For dishes such as lasagna or potato gratin. Also to gratinate and brown. Preserving To make vegetable preserves such as pickles. Drying To dry sliced fruit (e.g. apples, plums, peaches) and vegetables (e.g. tomatoes, zucchini, mushrooms). Plate Warming To preheat your plate for serving. ECO Roasting The ECO functions let you optimize the energy consumption during cooking. It is necessary to set the cooking time first.
www.aeg.com Clock function Application Duration To set the length of an operation (max. 23 h 59 min). End Time To set the switch-off time for a heating function (max. 23 h 59 min). If you set the time for a clock function, the time starts to count down after 5 seconds. If you use the clock functions: Duration, End Time, the appliance deactivates the heating elements after 90 % of the set time.
ENGLISH 15 The display shows the message. 2. Press to activate or to cancel. 3. Set the length of the function. 4. Press . 9. AUTOMATIC PROGRAMMES WARNING! Refer to Safety chapters. 9.1 Recipes online You can find the recipes for the automatic programmes specified for this appliance on our website. To find the proper Recipe Book check the PNC number on the rating plate on the front frame of the appliance cavity. 9.
www.aeg.com the meat is at the set temperature, the appliance deactivates. CAUTION! Only use the core temperature sensor supplied or the correct replacement parts. The core temperature sensor must stay in the meat and in the socket during the cooking. 1. Activate the appliance. 2. Put the tip of the core temperature sensor into the centre of the meat. 3. Put the plug of the core temperature sensor into the socket at the front of the appliance.
ENGLISH Push the deep pan between the guide bars of the shelf support and the wire shelf on the guide bars above. 17 • All accessories have small indentations at the top of the right and left side to increase safety. The indentations are also antitip devices. • The high rim around the shelf is a device which prevents cookware from slipping. 11. ADDITIONAL FUNCTIONS 11.1 Favourite Programme Activating the programme You can save your favourite settings, such as duration, temperature or heating function.
www.aeg.com 11.5 Automatic Switch-off activate it only when the appliance operates. 1. Activate the appliance. 2. Set a heating function or setting. 3. Press again and again until the display shows: Function Lock. 4. Press to confirm. If the Pyrolysis function operates, the door is locked and the symbol of a key comes on in the display. To deactivate the function, press . The display shows a message. Press again and then to confirm.
ENGLISH 19 12. HINTS AND TIPS WARNING! Refer to Safety chapters. The temperature and baking times in the tables are guidelines only. They depend on the recipes and the quality and quantity of the ingredients used. 12.1 Inner side of the door In some models, on the inner side of the door you can find: • the numbers of the shelf positions. • information about the heating functions, recommended shelf positions and temperatures for typical dishes. 12.
www.aeg.com Baking results Possible cause Remedy The cake sinks and becomes The oven temperature is too The next time you bake, set soggy, lumpy or streaky. high. a slightly lower oven temperature. The cake sinks and becomes The baking time is too short. Set a longer baking time. soggy, lumpy or streaky. You cannot decrease baking times by setting higher temperatures. The cake sinks and becomes There is too much liquid in soggy, lumpy or streaky. the mixture. Use less liquid.
ENGLISH Food Function Tempera- Time (min) ture (°C) Shelf position Apple pie / Apple pie (2 tins Ø 20 cm, diagonally off set) True Fan Cook- 160 ing 70 - 90 2 Apple pie / Apple pie (2 tins Ø 20 cm, diagonally off set) Conventional Cooking 180 70 - 90 1 Cheesecake, tray2) Conventional Cooking 160 - 170 70 - 90 2 1) Preheat the oven. 2) Use a deep pan.
www.aeg.com Food Function Fruit flans made with short pastry Yeast cakes with delicate toppings (e.g.
ENGLISH 12.
www.aeg.com Cakes / pastries / breads on baking trays Food Temperature (°C) Time (min) Shelf position Cream puffs / Eclairs1) 160 - 180 25 - 45 1/4 Dry streusel cake 150 - 160 30 - 45 1/4 1) Preheat the oven.
ENGLISH Food Quantity Temperature (°C) Time (min) Shelf position Steak 200 - 300 g 120 20 - 40 1 25 12.
www.aeg.com end of the roasting time, and use the residual heat. 12.12 Roasting tables Beef Food Function Quantity Tempera- Time (min) ture (°C) Shelf position Pot roast Conventional Cooking 1 - 1.
ENGLISH 27 Lamb Food Function Quantity Temperature (°C) Time (min) Shelf position Leg of lamb, roast lamb Turbo Grilling 1 - 1.5 kg 150 - 180 100 - 120 1 Saddle of lamb Turbo Grilling 1 - 1.5 kg 160 - 180 40 - 60 1 Food Function Quantity Temperature (°C) Time (min) Shelf position Saddle of hare, leg of hare Conventional Cooking up to 1 kg 230 30 - 40 1 Saddle of ven- Convenison tional Cooking 1.5 - 2 kg 210 - 220 35 - 40 1 Haunch of venison 1.
www.aeg.com 12.13 Grilling • Grill only flat pieces of meat or fish. • Always preheat the empty oven with the grill functions for 5 minutes. • Always grill with the maximum temperature setting. • Set the shelf into the shelf position as recommended in the grilling table. • Always set the pan to collect the fat into the first shelf position. CAUTION! Always grill with the oven door closed.
ENGLISH Food Temperature (°C) Time (min) Shelf position Pizza, frozen 200 - 220 15 - 25 2 Pizza American, frozen 190 - 210 20 - 25 2 Pizza, chilled 210 - 230 13 - 25 2 Pizza Snacks, frozen 180 - 200 15 - 30 2 French Fries, thin 200 - 220 20 - 30 2 French Fries, thick 200 - 220 25 - 35 2 Wedges / Croquettes 220 - 230 20 - 35 2 Hash Browns 210 - 230 20 - 30 2 Lasagne / Cannelloni, fresh 170 - 190 35 - 45 2 Lasagne / Cannelloni, frozen 160 - 180 40 - 60 2 Oven baked
www.aeg.com Food Quantity Defrosting time (min) Further deComments frosting time (min) Chicken 1 kg 100 - 140 20 - 30 Put the chicken on an upturned saucer in a big plate. Turn halfway through. Meat 1 kg 100 - 140 20 - 30 Turn halfway through. Meat 500 g 90 - 120 20 - 30 Turn halfway through.
ENGLISH 31 Vegetables Food Temperature (°C) Cooking time until simmering (min) Continue to cook at 100 °C (min) Carrots1) 160 - 170 50 - 60 5 - 10 Cucumbers 160 - 170 50 - 60 - Mixed pickles 160 - 170 50 - 60 5 - 10 Kohlrabi / Peas / Asparagus 160 - 170 50 - 60 15 - 20 1) Leave standing in the oven after it is deactivated. 12.
www.aeg.com 12.
ENGLISH 33 13. CARE AND CLEANING WARNING! Refer to Safety chapters. 2 13.1 Notes on cleaning • Clean the front of the appliance with a soft cloth with warm water and a cleaning agent. • To clean metal surfaces, use a usual cleaning agent. • Clean the appliance interior after each use. Fat accumulation or other food remains may result in a fire. The risk is higher for the grill pan. • Clean stubborn dirt with a special oven cleaner. • Clean all accessories after each use and let them dry.
www.aeg.com Normal Intense 1 h 30 min for a usual degree of dirt A 2 h 30 min for a high degree of dirt A 4. Touch to confirm. When the pyrolytic cleaning starts, the appliance door is locked. 3. Close the door until it is at an angle of approximately 45°. To stop the pyrolytic cleaning before it is completed, deactivate the appliance. WARNING! After the function is completed, the appliance is very hot. Let it cool down. There is a risk of burns.
ENGLISH 35 The top lamp 1. Turn the lamp glass cover counterclockwise to remove it. 9. Clean the glass panel with water and soap. Dry the glass panel carefully. When the cleaning is completed, install the glass panels and the door. Do the above steps in the opposite sequence. Install the smaller panel first, then the larger. 2. Clean the glass cover. 3. Replace the lamp with a suitable 300 °C heat-resistant lamp. 4. Install the glass cover. 13.
www.aeg.com Problem Possible cause Remedy The oven does not heat up. The door is not closed correctly. Fully close the door. The oven does not heat up. The fuse is released. Make sure that the fuse is the cause of the malfunction. If the fuse releases again and again, contact a qualified electrician. The lamp does not operate. The lamp is defective. Replace the lamp. The display shows F111.
ENGLISH 15.1 Building in The built-in unit must meet the stability requirements of DIN 68930. 450mm min. 20mm min. 560mm 114 mm 548mm 455mm 15mm 450mm 440mm min. 550mm 546mm 594mm 21mm 548mm min. 20mm 114 mm 450mm 15mm 450mm min. 560mm 455mm 450mm 440mm 455mm 450mm min.
www.aeg.com 548mm 114 mm 15mm min. 20mm 450mm 455mm 450mm 440 mm 455mm 450mm 450mm 440mm 450mm min. 560mm min. 550mm 455mm 450mm 440mm 546mm 594mm 21mm 548mm min. 20mm 114 mm 450mm 15mm 590mm min. 550mm 455mm 450mm 440mm min.
ENGLISH H05VV-F H05RR-F min.
www.aeg.com 16. ENERGY EFFICIENCY 16.1 Product Fiche and information according to EU 65-66/2014 Supplier's name AEG Model identification KP8404001M Energy Efficiency Index 80.8 Energy efficiency class A+ Energy consumption with a standard load, conventional mode 0.85 kWh/cycle Energy consumption with a standard load, fan-forced 0.59 kWh/cycle mode Number of cavities 1 Heat source Electricity Volume 43 l Type of oven Built-In Oven Mass 32.
ENGLISH 41 • When you use the Eco functions, the lamp deactivates. You can activate it again according to your preferences. 17. WARRANTY FOR SALES IN AUSTRALIA AND NEW ZEALAND ALL AEG BRANDED APPLIANCES This document sets out the terms and conditions of the product warranties for AEG Appliances. It is an important document. Please keep it with your proof of purchase documents in a safe place for future reference should you require service for your Appliance. 1.
www.aeg.com ASC. If you reside outside of the service area, you will bear the cost of: a) travel of an authorised representative; b) transportation and delivery of the Appliance to and from AEG or its ASC, In all instances, unless the Appliance is transported by AEG or an AEG authorised representative, the Appliance is transported at the owner’s cost and risk while in transit to and from AEG or its ASC. 6. Proof of purchase is required before you can make a claim under this warranty. 7.
ENGLISH 43 you to enable AEG to meet its obligations under this warranty. Important Notice Before calling for service, please ensure that the steps listed in point 13 above have been followed. SERVICE AUSTRALIA www.aeg.com/au FOR SERVICE or to find the address of your nearest state service centre in Australia PLEASE CALL 1300 363 664 OR EMAIL customercare@aegaustralia.com.
867302464-D-312014 www.aeg.