KS7100000 FR FOUR NOTICE D'UTILISATION
www.aeg.com SOMMAIRE 4 7 8 9 11 13 14 15 16 17 36 39 40 45 CONSIGNES DE SÉCURITÉ DESCRIPTION DE L'APPAREIL AVANT LA PREMIÈRE UTILISATION BANDEAU DE COMMANDE UTILISATION QUOTIDIENNE FONCTIONS DE L'HORLOGE PROGRAMMES AUTOMATIQUES UTILISATION DES ACCESSOIRES FONCTIONS SUPPLÉMENTAIRES CONSEILS UTILES ENTRETIEN ET NETTOYAGE EN CAS D'ANOMALIE DE FONCTIONNEMENT INSTALLATION INFORMATION SUR LA GARANTIE EN MATIÈRE DE PROTECTION DE L'ENVIRONNEMENT Recyclez les matériaux portant le symbole .
FRANÇAIS 3 POUR DES RÉSULTATS PARFAITS Merci d'avoir choisi ce produit AEG. Nous l'avons conçu pour qu'il vous offre des performances irréprochables pour longtemps, en intégrant des technologies innovantes qui vous simplifient la vie grâce à des caractéristiques que vous ne trouverez pas forcément sur des appareils ordinaires. Veuillez prendre quelques instants pour lire cette notice afin d'utiliser au mieux votre appareil.
www.aeg.com CONSIGNES DE SÉCURITÉ Avant d'installer et d'utiliser cet appareil, lisez soigneusement les instructions fournies. Le fabricant ne peut être tenu pour responsable des dommages et blessures liés à une mauvaise installation ou utilisation. Conservez toujours cette notice avec votre appareil pour vous y référer ultérieurement. SÉCURITÉ DES ENFANTS ET DES PERSONNES VULNÉRABLES AVERTISSEMENT Risque d'asphyxie, de blessure ou d'invalidité permanente.
FRANÇAIS • • • • que la prise de courant secteur est accessible une fois l'appareil installé. Si la prise de courant secteur est lâche, ne branchez pas la fiche d'alimentation secteur. Ne tirez jamais sur le câble d'alimentation électrique pour débrancher l'appareil. Tirez toujours sur la fiche d'alimentation secteur.
www.aeg.com ENTRETIEN ET NETTOYAGE AVERTISSEMENT Risque de blessure corporelle, d'incendie ou de dommage matériel à l'appareil. • Avant toute opération d'entretien, éteignez l'appareil et débranchez la fiche d'alimentation secteur de la prise d'alimentation secteur. • Vérifiez que l'appareil est froid. Les vitres risquent de se briser. • Remplacez immédiatement les vitres de la porte si elles sont endommagées. Contactez votre service après vente. • Soyez prudent lorsque vous ôtez la porte de l'appareil.
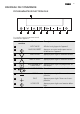
FRANÇAIS 7 DESCRIPTION DE L'APPAREIL 1 2 1 Bandeau de commande 3 2 Bac à eau 3 Programmateur électronique 9 4 4 Gril et élément chauffant 3 5 5 Éclairage du four 2 6 1 7 8 6 Ventilateur et élément chauffant 7 Générateur de vapeur 8 Glissières amovibles 9 Positions des grilles ACCESSOIRES DU FOUR Grille métallique Permet de poser des plats (à rôti, à gratin) et des moules à gâteau/pâtisserie.
www.aeg.com AVANT LA PREMIÈRE UTILISATION AVERTISSEMENT Reportez-vous au chapitre « Consignes de sécurité ». PREMIER NETTOYAGE • Retirez tous les accessoires de l'appareil. • Nettoyez l'appareil avant de l'utiliser pour la première fois. Reportez-vous au chapitre « Entretien et nettoyage ». RÉGLAGE ET MODIFICATION DE L'HEURE DU JOUR Le four ne fonctionne que si l'heure du jour est réglée.
FRANÇAIS BANDEAU DE COMMANDE PROGRAMMATEUR ÉLECTRONIQUE 1 2 3 4 5 6 7 8 9 Les touches sensitives permettent de commander l'appareil. 1 Touche sensitive Fonction - AFFICHAGE Description Affiche les réglages de l'appareil. 2 MARCHE/ARRÊT 3 VERS LE BAS Appuyer pour régler la fonction du four. 4 VERS LE HAUT Appuyer pour régler la fonction du four. 5 PROGRAMME AUTOMATIQUE Appuyer pour régler un programme automatique. 6 CHAUFFE RAPIDE Pour diminuer le temps de chauffe.
www.aeg.com AFFICHAGE A B G C F A) Mémoire : P B) Mode Vapeur C) Affichage de la température/de l'heu- re D) Fonctions de l'horloge/affichage de l'horloge E) Indicateur de chauffe F) Programmes automatiques G) Fonctions du four Informations générales • Lorsque vous réglez une fonction, elle s'affiche à l'écran, la température commence à monter ou le décompte de la durée démarre. • Un signal sonore retentit dès que la température réglée est atteinte.
FRANÇAIS 11 UTILISATION QUOTIDIENNE AVERTISSEMENT Reportez-vous au chapitre « Consignes de sécurité ». Pour faire fonctionner l'appareil, vous pouvez utiliser : • Le mode manuel : pour régler une fonction du four, la température et la durée de cuisson manuellement. • les programmes automatiques : pour préparer un plat que vous ne savez pas cuisiner. SÉLECTION DE LA FONCTION 1. 2. Mettez en fonctionnement l'appareil. Appuyez sur ou pour régler la fonction du four.
www.aeg.com Lorsque l'appareil fonctionne à la température réglée, les segments de l'indicateur de chauffe s'allument. Un signal sonore retentit. Le symbole disparaît de l'écran. Maintenant, le four fonctionne automatiquement et vous pouvez enfourner vos aliments. LES FONCTIONS DE CUISSON À LA VAPEUR • Utilisez toujours les fonctions de cuisson à la vapeur avec les fonctions et Fin (repord'horloge : Durée tez-vous au chapitre « Réglage des fonctions de l'horloge »).
FRANÇAIS 13 FONCTIONS DE L'HORLOGE Fonctions de l'horloge SYMBOLE FONCTION DESCRIPTION MINUTERIE Utiliser pour effectuer un décompte. À la fin du temps de cuisson, un signal sonore retentit. Cette fonction n'a aucune incidence sur le fonctionnement du four. DURÉE Pour régler la durée de fonctionnement de l'appareil. FIN Utiliser pour régler l'heure de fin de fonctionnement du four. HEURE DU JOUR Affiche l'heure. Pour régler, modifier ou vérifier l'heure.
www.aeg.com PROGRAMMES AUTOMATIQUES AVERTISSEMENT Reportez-vous au chapitre « Consignes de sécurité ». PROGRAMMES AUTOMATIQUES Pour une cuisson automatique, consultez les recettes répertoriées dans le chapitre « Programmes automatiques ». Régler un programme 1. Mettez en fonctionnement l'appareil. 2. Utilisez pour accéder au menu des programmes automatiques. 3. Utilisez ou pour régler un programme automatique (P1 à P12). – Le symbole de la fonction s'affiche à l'écran.
FRANÇAIS 15 UTILISATION DES ACCESSOIRES AVERTISSEMENT Reportez-vous au chapitre « Consignes de sécurité ». INSTALLATION DES ACCESSOIRES Plateau de cuisson : Poussez le plateau de cuisson entre les rails du gradin choisi. Grille métallique : Insérez la grille métallique et vérifiez que les pieds soient orientés vers le bas. Faites glisser la grille entre les rails du gradin du four choisi.
www.aeg.com FONCTIONS SUPPLÉMENTAIRES VENTILATEUR DE REFROIDISSEMENT Lorsque le four fonctionne, le ventilateur de refroidissement se met automatiquement en marche pour refroidir les surfaces de l'appareil. Lorsque le four est mis à l'arrêt, le ventilateur de refroidissement continue à fonctionner jusqu'à ce que l'appareil refroidisse. SÉCURITÉ ENFANTS Il n'est pas possible de mettre en fonctionnement l'appareil si le dispositif de sécurité enfants fonctionne.
FRANÇAIS 17 CONSEILS UTILES La température et les temps de cuisson indiqués sont fournis uniquement à titre indicatif. Ils varient en fonction des recettes, de la qualité et de la quantité des ingrédients utilisés. CUISSON À LA VAPEUR Ustensiles de cuisson à la vapeur • N'utilisez qu'un récipient de cuisson résistant à la chaleur et anti-corrosif. • Les récipients en acier chromé sont également adaptés (inclus avec certains modèles).
www.aeg.
FRANÇAIS UTILISATION SUCCESSIVE DE LA CHALEUR TOURNANTE ET DE LA VENTITHERM ® FONCTION DE CUISSON À LA VAPEUR 19 • Mettez les légumes et l'accompagnement au four dans un plat à cuisson résistant à la chaleur. • Démarrer la fonction de cuisson à la vapeur et achever la cuisson de tous les plats ensemble. Commencez à cuire à la vapeur lorsque la température est redescendue à environ 80°C. Vérifiez la température à l'écran. Ouvrez la porte du four pour faire baisser plus rapidement la température.
www.aeg.com Tableau du mode de cuisson alternée Cuisson sur plusieurs gradins Préparations Cuisson alternée (eau ajoutée, max.
FRANÇAIS Lorsque des aliments surgelés sont déposés à même le plateau multi-usages du four, celui-ci peut se déformer en cours de cuisson. Une fois refroidi, le plateau retrouvera sa forme d'origine. Conseils relatifs aux tableaux de cuisson • Nous vous recommandons de régler la valeur de la température la plus basse lors de la première utilisation. • Si vous ne trouvez pas d'informations concrètes pour l'une de vos recettes personnelles, prenez exemple sur un aliment similaire à cuire.
www.aeg.
FRANÇAIS Préparations Fonction du four Position de la grille Température (°C) Durée (min) 23 Petits sablés à la douille Chaleur tournante Ventitherm ® 2 160 10-40 Biscuits de Savoie Chaleur tournante Ventitherm ® 2 160-180 15-20 Pâtisseries à base de blancs d'œufs, meringues Chaleur tournante Ventitherm ® 2 80-100 120-150 Macarons Chaleur tournante Ventitherm ® 2 100-120 30-60 Petits gâteaux briochés Chaleur tournante humide 2 160-180 20-40 Pâtes feuilletées Chaleur tournant
www.aeg.com CONSEILS DE CUISSON Résultats de cuisson Cause probable Solution Le fond du gâteau n'a pas suffisamment bruni. Mauvaise position de la grille. Placez le gâteau sur un gradin inférieur. Le gâteau s'effrite (il est pâteux, plein de grumeaux, juteux). Température de cuisson trop élevée. Réglez une température de cuisson légèrement inférieure la prochaine fois. Le gâteau s'effrite (il est pâteux, plein de grumeaux, juteux). Durée de cuisson trop courte.
FRANÇAIS Préparations Fonction du four Position de la grille Température (°C) Durée (min) Légumes gratinés 1) Chaleur tournante Ventitherm ® 1 160-170 15-30 Baguettes gratinées Chaleur tournante Ventitherm ® 1 160-170 15-30 Gratins sucrés Chaleur tournante humide 1 180-200 40-60 Gratins de poisson Chaleur tournante Ventitherm ® 1 180-200 30-60 Légumes farcis Chaleur tournante Ventitherm ® 1 160-170 30-60 Gratin de pommes de terre Chaleur tournante humide 2 180-200 40-50 1
www.aeg.
FRANÇAIS 27 Poisson (à l’étuvée) Préparations Position de la Température Durée (min) grille (°C) Poissons entiers (1000-1500 g) 1 210-220 45-75 Volaille Préparations Position de la Température Durée (min) grille (°C) Poulet, coquelet, (1000 -1500 g) 1 190-210 45-75 Demi-poulet (de 400-500 g) 1 200-220 35-50 Morceaux de volaille (de 200-250 g) 1 200-220 35-50 Canard (1 500-2 000 g) 1 180-200 75-105 Filet de gibier Préparations Position de la Température Durée (min) grille (°C) Râb
www.aeg.com Tableau de cuisson à basse température Préparations1) Poids (g) Température (°C) Position de la grille Durée (min) Rôti de bœuf 1000-1500 120 1 90-110 Filet de bœuf 1000-1500 120 3 90-110 Rôti de veau 1000-1500 120 1 100-120 Steaks 200 - 300 120 3 20-30 1) Faire rôtir dans la poêle avant de procéder à la cuisson au four GRIL Gril mum avec température réglée au maxiFermez toujours la porte du four lorsque vous grillez un aliment.
FRANÇAIS 29 ATTENTION N'ouvrez pas la porte du four pour éviter que la vapeur brulante ne s'échappe. Préparations Température (°C) Plaque Grille du four Durée (min) retourner au bout de ... minutes Position de la grille Boulettes de viande hachée 230 1 3 14-18 6-8 Filet de porc 230 1 2 16-22 6-10 Saucisses 230 1 3 14-18 6-8 Steaks de filet de porc ou de veau 230 1 3 11-13 5-6 Filet de bœuf, rôti de bœuf (environ 1 kg).
www.aeg.com • Pour obtenir un meilleur résultat, mettez à l'arrêt le four au milieu du temps de séchage, ouvrez la porte et laissez refroidir pendant une nuit pour terminer le séchage. DÉSHYDRATATION Fonction du four : Décongélation/Séchage • Utilisez des plaques recouvertes de papier huilé ou spécial four.
FRANÇAIS Conserve Groseilles à maquereau vertes 31 Température (°C) Cuisson jusqu’à ce que la préparation commence à frémir (min) Temps de cuisson à 100 °C (min) 160-170 35-45 10-15 Tableau de cuisson pour les conserves - Fruits à noyau Conserve Poires, coings, quetsches Température (°C) Cuisson jusqu’à ce que la préparation commence à frémir (min) Temps de cuisson à 100 °C (min) 160-170 35-45 10-15 Tableau de cuisson pour les conserves - Légumes Conserve Température (°C) Cuisson jusqu’à
www.aeg.com P12 CHAUFFE Programme de NETTOYAGE 1. Versez environ 150 ml d'eau et 1 cuillère à soupe de vinaigre dans le générateur de vapeur. 2. Réglez le programme de NETTOYAGE P 1. Démarrez le programme à l'aide de la touche dédiée à la cuisson. Un signal sonore retentit trois fois lorsque le programme est terminé (après 15 minutes). 3. Désactivez le signal sonore et mettez à l'arrêt le four à l'aide de la touche Marche/Arrêt.
FRANÇAIS • 600 ml de lait • 15 g de sel Préparation : Verser la farine et le sel dans un grand récipient. Diluer la levure dans le lait tiède et l'ajouter à la farine. Pétrir les ingrédients pour obtenir une pâte uniforme. Le cas échéant, rajouter du lait. Vérifier la texture de la farine. Laisser lever la pâte. Elle doit doubler de volume.
www.aeg.com Verser de l'eau chaude et du vinaigre sur la truite avant de la acer dans un plat en Réglage acier inoxydable avec panier troué (accessoire spécial). Position de la grille Minuterie Contenance du bac à eau 2 30 min.
FRANÇAIS POULET 1200 g Ingrédients : • 1 Poulet (1 000 - 1 200 g) • 2 cuil. à soupe d'huile d'arachide • Sel, poivre, paprika, curry en poudre Préparation : Laver le poulet et l'essuyer avec du papier absorbant. Mélanger les épices et l'huile. Enduire l'intérieur et l'extérieur du poulet du mélange. Placer ensuite le poulet (poi- Réglage Minuterie Contenance du bac à eau 2 55 min. 200 ml LONGE DE VEAU, (4-6 personnes) Sortez la viande du réfrigérateur 1 heure auparavant.
www.aeg.com ENTRETIEN ET NETTOYAGE AVERTISSEMENT Reportez-vous au chapitre « Consignes de sécurité ». Remarques concernant l'entretien : • Nettoyez la façade du four à l'aide d'une éponge humide additionnée d'eau savonneuse. • Utilisez les produits spécifiques vendus dans le commerce pour l'entretien des surfaces en métal. • Nettoyez l'intérieur de l'appareil après chaque utilisation. Les salissures s'éliminent alors plus facilement et ne risquent pas de brûler.
FRANÇAIS 3. Remontage des supports de grille Installez les supports de grille selon la même procédure, mais dans l'ordre inverse. SYSTÈME DE GÉNÉRATION DE VAPEUR ATTENTION Séchez le générateur de vapeur après chaque utilisation. Épongez l'eau résiduelle. Éliminez les résidus de calcaire à l'aide d'eau et de vinaigre. ATTENTION Les produits détartrants chimiques risquent d'endommager l'émail de l'appareil. Respectez scrupuleusement les instructions du fabricant.
www.aeg.com Retrait de la porte du four 1. 2. 2 3. 4 Ouvrez complètement la porte. Libérez complètement les leviers de serrage sur les charnières. Maintenez la porte des deux côtés et fermez-la environ aux 3/4 jusqu'au point de résistance. 3 AVERTISSEMENT Retirez la porte du four. La porte est lourde. ATTENTION Posez la porte, face extérieure vers le bas, sur un support doux et plat. Remontage de la porte du four 1. 3 4 5 2. 60º 4 3. 4. 5.
FRANÇAIS 39 EN CAS D'ANOMALIE DE FONCTIONNEMENT AVERTISSEMENT Reportez-vous au chapitre « Consignes de sécurité ». Anomalie Cause possible Solution Le four ne chauffe pas. L'appareil est à l'arrêt. Mettez en fonctionnement l'appareil. Le four ne chauffe pas. L'heure du jour n'est pas réglée. Réglez l'heure du jour. Reportez-vous au chapitre « Régler l'heure du jour ». Le four ne chauffe pas. Les réglages souhaités n'ont pas été effectués. Vérifiez que les réglages sont corrects.
www.aeg.com INSTALLATION AVERTISSEMENT Reportez-vous au chapitre « Consignes de sécurité ». 380-383 min. 560 Le niveau de sécurité de l'élément encastré doit être conforme à la norme DIN 68930. 20 13 594 388 375 min.
FRANÇAIS 594 380-383 380 20 13 min. 560 388 375 min.
www.aeg.com 594 20 380-383 13 388 375 380 388 380 min. 550 min.
FRANÇAIS 90° 43
www.aeg.
FRANÇAIS 45 INFORMATION SUR LA GARANTIE EURO-LINE APPLIANCES INC. VALIDITE DE LA GARANTIE : EURO-LINE PREND EN CHARGE : GARANTIE COMPLETE DE DEUX ANS à partir de la date d’achat d’origine, piè-ces et main-d’oeuvre comprises, au pre-mier acquéreur de cet appareil Pièces de rechange et/ou main-d’oeuvre pour la réparation de vices de fabrication ou de matériaux. L’intervention doit être assurée par un atelier agréé Euro-Line (sauf spécifications contraires).
www.aeg.com • Numéro du modèle (figurant sur la plaque signalétique) • Numéro de série (figurant sur la plaque signalétique) • Date d’achat Il est conseillé de conserver le ticket de caisse original pour toute récla-mation concernant un appareil sous garantie. (Nous vous suggérons d’agrafer le ticket à cette page).
FRANÇAIS 47
www.aeg.