KS7100000 EN OVEN USER MANUAL
www.aeg.com CONTENTS 4 7 8 9 11 13 14 15 16 17 36 39 40 45 SAFETY INFORMATION PRODUCT DESCRIPTION BEFORE FIRST USE CONTROL PANEL DAILY USE CLOCK FUNCTIONS AUTOMATIC PROGRAMMES USING THE ACCESSORIES ADDITIONAL FUNCTIONS HELPFUL HINTS AND TIPS CARE AND CLEANING WHAT TO DO IF… INSTALLATION GUARANTEE/CUSTOMER SERVICE CENTRES ENVIRONMENT CONCERNS Recycle the materials with the symbol . Put the packaging in applicable containers to recycle it.
ENGLISH 3 FOR PERFECT RESULTS Thank you for choosing this AEG product. We have created it to give you impeccable performance for many years, with innovative technologies that help make life simpler – features you might not find on ordinary appliances. Please spend a few minutes reading to get the very best from it. ACCESSORIES AND CONSUMABLES In the AEG webshop, you’ll find everything you need to keep all your AEG appliances looking spotless and working perfectly.
www.aeg.com SAFETY INFORMATION Before the installation and use of the appliance, carefully read the supplied instructions. The manufacturer is not responsible if an incorrect installation and use causes injuries and damages. Always keep the instructions with the appliance for future reference. CHILDREN AND VULNERABLE PEOPLE SAFETY WARNING! Risk of suffocation, injury or permanent disability.
ENGLISH USE WARNING! Risk of injury, burns or electric shock or explosion. • Use this appliance in a household environment. • Do not change the specification of this appliance. • Make sure that the ventilation openings are not blocked. • Do not let the appliance stay unattended during operation. • Deactivate the appliance after each use. • Internally the appliance becomes hot when in operation. Do not touch the heating elements that are in the appliance.
www.aeg.com INTERNAL LIGHT • The type of light bulb or halogen lamp used for this appliance, is only for household appliances. Do not use it for house lighting. WARNING! Risk of electrical shock. • Before replacing the lamp, disconnect the appliance from the power supply. • Only use lamps with the same specifications. DISPOSAL WARNING! Risk of injury or suffocation. • Disconnect the appliance from the mains supply. • Cut off the mains cable and discard it.
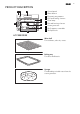
ENGLISH PRODUCT DESCRIPTION 1 2 1 Control panel 3 2 Water drawer 3 Electronic programmer 9 4 4 Grill and heating element 3 5 5 Oven lamp 2 6 1 7 8 6 Fan and heating element 7 Steam generator 8 Shelf support, removable 9 Shelf positions ACCESSORIES Wire shelf For cookware, cake tins, roasts. Baking tray For cakes and biscuits. Sponge For absorbing residual water from the steam generator.
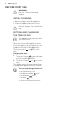
www.aeg.com BEFORE FIRST USE WARNING! Refer to "Safety information" chapter. INITIAL CLEANING • Remove all parts from the appliance. • Clean the appliance before first use. Refer to chapter "Care and Cleaning". SETTING AND CHANGING THE TIME OF DAY The appliance only operates after you set the time. When you connect the appliance to the electrical supply or after a power cut, the flashes. symbol for the time of day Touch the control or to set the time. Changing the time: 1.
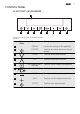
ENGLISH CONTROL PANEL ELECTRONIC PROGRAMMER 1 2 3 4 5 6 7 8 9 Touch the sensor fields to operate the appliance. Sensor Field Function Description - DISPLAY It shows the settings of the appliance. 2 ON/OFF Touch to activate or deactivate the appliance. 3 DOWN Touch to set an oven function. 4 UP Touch to set an oven function. 5 AUTOMATIC PROGRAMME 6 FAST HEAT UP Touch to decrease the heat up time. 7 MINUS Touch to set the temperature or time.
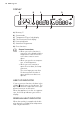
www.aeg.com DISPLAY A B G A) B) C) D) E) F) G) C F Memory: P Steam mode Temperature/Time of day display Clock functions/Clock display Heat up indicator Automatic Programmes Oven functions General instructions • When you set the function, it comes on in the display and the temperature starts to increase or the time starts to count down. • When you get the set temperature, a sound operates. • When you set a function or open the oven door, the lamp comes on.
ENGLISH 11 DAILY USE WARNING! Refer to "Safety information" chapter. To operate the appliance you can use: • The manual mode - to set an oven function, the temperature and the cooking time manually. • automatic programmes - to prepare a dish when you do not have knowledge or experience in cooking. 2. Touch or to set an oven function. The display shows an automatic temperature. If you do not change the temperature in approximately 5 seconds, the appliance starts to operate. SETTING THE OVEN FUNCTION 1.
www.aeg.com When the appliance operates at the set temperature, the bars of the heat up indicator come on. An acoustic signal sounds. The symbol goes out from the display. At this time, the oven function operates automatically and you can put the food in the appliance. THE STEAM COOKING FUNCTIONS • Always use the steam cooking functions together with the clock functions: Duraand End (refer to "Setting tion the clock functions").
ENGLISH 13 CLOCK FUNCTIONS Clock functions SYMBOL FUNCTION DESCRIPTION MINUTE MINDER Use to set a countdown. When the time ends, an acoustic signal sounds. This function has no effect on the operation of the oven. DURATION Use to set how long the oven operates. END Use to set when the oven stops. TIME OF DAY Shows the time. To set, change or check the time. Refer to "Setting and changing the time of day". SETTING THE CLOCK FUNCTIONS 1.
www.aeg.com AUTOMATIC PROGRAMMES WARNING! Refer to "Safety information" chapter. AUTOMATIC PROGRAMMES For an automatic programme, use the recipes from section "Automatic programmes". Setting a programme 1. Activate the appliance. 2. Use to access the automatic programmes menu. 3. Use or to set an automatic programme (P1 to P12). – The symbol for the function comes on in the display. – The cooking time and come on in the display. – Touch the clock control .
ENGLISH 15 USING THE ACCESSORIES WARNING! Refer to "Safety information" chapter. INSTALLING THE ACCESSORIES Baking tray: Push the baking tray between the guide bars of the shelf support. Wire shelf: Put the shelf in and make sure the feet point down. Push the shelf between the guide bars of the shelf support. All accessories have a small indentation at the bottom on the right and left edge to increase the safety. Always make sure that this indentation is at the rear of the appliance.
www.aeg.com ADDITIONAL FUNCTIONS COOLING FAN When the appliance operates, the cooling fan activates automatically to keep the surfaces of the appliance cool. If you deactivate the appliance, the cooling fan can continue to operate until the appliance cools down. CHILD SAFETY You cannot activate the appliance if the child safety device operates. Activating or deactivating the child safety device: 1. Deactivate the appliance set an oven function. 2.
ENGLISH 17 HELPFUL HINTS AND TIPS The temperature and baking times in the tables are guidelines only. They depend on the recipes, quality and quantity of the ingredients used. COOKING WITH STEAM Cookware for steam cooking • Use only heat and corrosion resistant cookware. • Chrome steel food containers are correct too (included with some models). Shelf positions • There correct shelf positions are in the table below. Count the shelf positions from the bottom to the top.
www.aeg.
ENGLISH VENTITHERM ® FAN AND OPERATED COOKING STEAM COOKING IN SUCCESSION 19 • Put vegetables and side dishes in ovenproof dishes and put them in the oven with the roasted food. • Start Steam Cooking and cook all food together. You can cook meat, vegetables and side dishes with the combination of Ventitherm ® Fan Operated Cooking with circular heating elements and Steam Cooking one after the other. You can serve the foods at the same time. • Roast the food with the Ventitherm ® Fan Operated Cooking.
www.aeg.com Cooking on more than one oven level Food Interval Steam Cooking (Max.
ENGLISH BAKING ON ONE OVEN LEVEL Baking in tins Food Oven function Shelf position Temperature (°C) Time (min) Ring cake or brioche Ventitherm® Fan Operated Cooking 1 160-170 50-60 Madeira cake/Fruit cakes Ventitherm® Fan Operated Cooking 1 150-170 60-90 Sponge cake Ventitherm® Fan Operated Cooking 1 160-180 25-40 Flan base - shortcrust pastry Moist Fan Cooking 2 170-190 10-25 Flan base - sponge mixture Moist Fan Cooking 2 150-170 20-25 Apple tart (covered) Ventitherm® Fan Ope
www.aeg.
ENGLISH Food Oven function Shelf position Temperature (°C) Time (min) 23 Biscuits made with sponge mixture Ventitherm® Fan Operated Cooking 2 160-180 15-20 Pastries made with egg white, meringues Ventitherm® Fan Operated Cooking 2 80-100 120-150 Macaroons Ventitherm® Fan Operated Cooking 2 100-120 30-60 Fancy yeast biscuits Moist Fan Cooking 2 160-180 20-40 Puff pastries Ventitherm® Fan Operated Cooking 2 180-200 20-30 Rolls Ventitherm® Fan Operated Cooking 2 210-230 20-3
www.aeg.com Baking results Possible cause Remedy The cake sinks (becomes soggy, lumpy, streaky). The oven temperature is too high. The next time you bake set a slightly lower oven temperature. The cake sinks (becomes soggy, lumpy, streaky). The baking time is too short. Set a longer baking time. Baking times cannot be reduced by setting higher temperatures. The cake sinks (becomes soggy, lumpy, streaky). There is too much liquid in the mixture. Use less liquid.
ENGLISH Food Oven function Shelf position Temperature (°C) Time (min) Fish bakes Ventitherm® Fan Operated Cooking 1 180-200 30-60 Stuffed vegetables Ventitherm® Fan Operated Cooking 1 160-170 30-60 Potato gratin Moist Fan Cooking 2 180-200 40-50 25 1) Pre-heat oven Ready made frozen food table Food Shelf position Temperature (°C) Time Ventitherm® Fan Operated Cooking 3 as per manufacturer's instructions as per manufacturer's instructions Chips 1) (300-600 g) Rotitherm Roastin
www.aeg.
ENGLISH 27 Fish (steamed) Food Shelf position Temperature (°C) Whole fish (1000-1500 g) 1 210-220 Time (min) 45-75 Poultry Food Shelf position Temperature (°C) Time (min) Chicken, spring chicken (1000-1500 g) 1 190-210 45-75 Chicken half (per 400-500 g) 1 200-220 35-50 Poultry pieces (per 200-250 g) 1 200-220 35-50 Duck (1500-2000 g) 1 180-200 75-105 Game Food Shelf position Temperature (°C) Time (min) Saddle of hare, leg of hare (up to 1000 g) 1 220-230 1) 25-40 Saddle of
www.aeg.com 1) Brown in a frying pan before cooking SINGLE ECONOMY GRILL Single Economy Grill temperature setting with maximum • Use both the wire shelf and the tray when you grill. • The grilling time is for guidance only. Use the grill with the closed oven door.
ENGLISH Food Temperature (°C) Tray Oven shelf Time (min) turn after… minutes 20-24 10-12 Shelf position Fillet of beef, roast beef (approx. 1 kg) 230 1 2 29 • Do not cover with anything to decrease the defrosting time. DEFROSTING Oven function: Defrost/Drying (Temperature setting 30°C) • Unpack the food and put it on a plate on the 1st shelf from the bottom.
www.aeg.com Food Temperature (°C) Shelf position Time (h) 1 position 2 position Apricots 75 2 2/3 Apple slices 75 2 2/3 6-9 Pears 75 2 2/3 9-13 MAKING PRESERVES Oven functions: Ventitherm ® Fan Operated Cooking • Use only preserve jars of the same dimensions available on the market. • Do not use jars with twist-off and bayonet type lids, or metal tins. • Use the first shelf from the bottom for this function. • Put no more than six one-litre preserve jars on the baking tray.
ENGLISH 31 AUTOMATIC PROGRAMMES Use to set one of the 12 automatic programmes: P1 CLEANING P2 VEGETABLES 500-1000 (g) P3 POTATO GRATIN P4 WHITE BREAD 500-700 (g) P5 ROLLS, 40 (g) each P6 FISH FILLET (gratinated) P7 TROUT, 250-300 (g) P8 PIZZA P9 QUICHE LORRAINE P10 CHICKEN, 1000 (g) P11 SADDLE OF VEAL, 1000 (g) P12 WARMING UP CLEANING programme 1. Fill approximately 150 ml of water and 1 tablespoon of vinegar into the steam generator. 2. Set P 1 CLEANING programme.
www.aeg.com POTATO GRATIN (4-5 serves) Ingredients: • 1,000 g potatoes • 60 g grated cheese • 200 ml cream • 200 ml milk • Salt, pepper, nutmeg, garlic Setting P 3 POTATO GRATIN Shelf position Time Water in the water drawer 2 50 min. 200 ml WHITE BREAD 500-700 g Ingredients: • 1000 g flour, type 405 • 1 cube of fresh yeast or 2 packets of dried yeast • 600 ml milk • 15 g salt Preparation: Put flour and salt in a large bowl.
ENGLISH 33 Mix the cream, grated cheese, breadcrumbs and the chopped parsley and spread on the fish. Setting Shelf position P 6 FISH FILLET 2 TROUT, 250-300 g Ingredients: • 4 trout à 250 - 300 g • Lemon juice, pepper, salt Preparation: Clean the trout fully inside and outside. Put lemon juice on it. Season and put in a Setting Shelf position P 7 TROUT 2 PIZZA (4 serves, approx.
www.aeg.com • 150 g onions, diced • Pepper, nutmeg Preparation: Fry a little bacon and onions. Whisk the milk, cream, eggs and seasoning fully. Mix in the cheese. Setting P 9 QUICHE LORRAINE Shelf position Time Water in the water drawer 3 35 min. --- CHICKEN 1200 g Ingredients: • 1 chicken (1,000 - 1,200 g) • 2 tbsp peanut oil • Salt, pepper, paprika and curry powder Preparation: Clean the chicken and dry it with kitchen paper. Mix the spices and oil.
ENGLISH lowest temperatures and do not brown food too much.
www.aeg.com CARE AND CLEANING WARNING! Refer to "Safety information" chapter. Notes on cleaning: • Clean the front of the appliance with a soft cloth with warm water and cleaning agent. • To clean metal surfaces use a usual cleaning agent. • Clean the appliance interior after each use. Then you can remove dirt more easily and it does not burn on. • Clean stubborn dirt with a special oven cleaner.
ENGLISH 3. Installing the shelf supports Install the shelf supports in the opposite sequence. CAUTION! Put a cloth on the bottom of the interior of the appliance. It prevents damage to the lamp glass cover and the cavity. CAUTION! Dry the steam generator after each use. Soak up water with the sponge. CAUTION! Chemical de-scaling agents can cause damage to the enamel. Follow the instructions of the manufacturer. Cleaning the water drawer and the steam generator: 1.
www.aeg.com Removing the oven door 1. 2. 2 3. 4 3 WARNING! Pull the door away from the oven. The door it is heavy. Open the door as far as possible. Fully release the clamping levers on the hinges. Hold the door on the two sides and close it approximately 3/4 of the way, going through the point of resistance. CAUTION! Put the door with the outer side down on a soft and level surface. Installing the oven door 1. 3 4 5 2. 60º 4 3. 4. 5.
ENGLISH 39 WHAT TO DO IF… WARNING! Refer to "Safety information" chapter. Problem Possible cause Solution The appliance does not heat up The appliance is deactiva- Activate the appliance ted The appliance does not heat up The time of day is not set Set the time of day.
www.aeg.com INSTALLATION WARNING! Refer to "Safety information" chapter. 380-383 min. 560 The built-in unit must meet the stability requirements of DIN 68930. 20 13 594 388 375 min.
ENGLISH 594 380-383 380 20 13 min. 560 388 375 min.
www.aeg.com 594 20 380-383 13 388 375 380 388 380 min. 550 min.
ENGLISH 90° 43
www.aeg.
ENGLISH 45 GUARANTEE/CUSTOMER SERVICE CENTRES EURO-LINE APPLIANCES INC. LENGTH OF WARRANTY EURO-LINE WILL PAY FOR: TWO YEAR FULL WARRANTY from original date of purchase, including parts and labour, to the first purchaser of this appliance Replacement parts and/or labour to repair defects in materials or workmanship. Service must be provided by an authorized Euro-Line company (unless advised otherwise). THIS GUARANTEE DOES NOT COVER COMMERCIAL USE.
www.aeg.com EURO-PARTS, CANADA EURO-PARTS, USA Tel: 1–800–678–8352 Fax: 1-519-528-5001 Tel: 1-800-561-4614 Fax: 1-519-528-5001 DISTRIBUTED BY: EURO-LINE APPLIANCES INC. 2278 SPEERS ROAD OAKVILLE, ON, CANADA L6L 2X8 1-800-421-6332 Tel: 905-829-3980 Fax: 905-829-3985 www.euro-line-appliances.
ENGLISH 47
www.aeg.