
User manual


5.
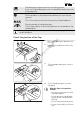
Measure out the detergent and the
fabric conditioner.
6.
Carefully close the detergent dis-
penser. Make sure that the flap
does not cause a blockage when
you close the drawer.
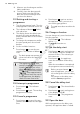
9.3 Setting and starting a
programme
1.
Turn the programme knob. The rela-
ted programme indicator comes on.
2.
The indicator of button
4
flashes
with red colour.
3.
The display shows the default tem-
perature, the spin speed and the
empty indicator bars of the available
functions.
4.
To change the temperature and/or
the spin speed, press the related
buttons.
5.
Set the available functions.
6.
Press button
4
to start the pro-
gramme. The indicator of button
4
is on.
The drain pump can operate for
a short time when the appliance
fills water.
The appliance adjust auto-
matically the cycle time to the
laundry you have put in the
drum to have perfect washing
results in the minimum neces-
sary time. After approximate-
ly 15 minutes from the start of
the programme, the display
shows the new time value.
9.4 Interrupt a programme
1.
Press button
4
. The indicator
flashes.
2.
Press button
4
again. The washing
programme continues.
9.5 Cancel a programme
1.
Press button
1
to cancel the pro-
gramme and to deactivate the appli-
ance.
2.
Press button
1
again to activate
the appliance. Now, you can set a
new washing programme.
The appliance does not drain the
water.
9.6 Change a function
You can change only some functions be-
fore they operate.
1.
Press button
4
. The indicator
flashes.
2.
Change the function set.
9.7 Set the delay start
1.
Press button
5
again and again un-
til the display shows the number of
minutes or hours. The related sym-
bols comes on.
2.
Press button
4
, the appliance
starts the countdown of the delay
start.
When the countdown is completed,
the programme starts automatically.
Before you press button
4
to
start the appliance, you can can-
cel or change the set of the delay
start.
You cannot set the delay start
with the Steam programme.
9.8 Cancel the delay start
1.
Press button
4
. The related indica-
tor flashes.
2.
Press button
5
again and again un-
til the display shows 0’.
3.
Press button
4
. The programme
starts.
9.9 Open the door
While a programme or the delay start
operates, the appliance door is locked.
18
www.aeg.com
www.devicemanuals.eu
www.devicemanuals.eu
The drain pump can operate for
www.devicemanuals.eu
The drain pump can operate for
a short time when the appliance
www.devicemanuals.eu
a short time when the appliance
www.devicemanuals.eu
The appliance adjust auto-
www.devicemanuals.eu
The appliance adjust auto-
matically the cycle time to the
www.devicemanuals.eu
matically the cycle time to the
laundry you have put in the
www.devicemanuals.eu
laundry you have put in the
drum to have perfect washing
www.devicemanuals.eu
drum to have perfect washing
results in the minimum neces-
www.devicemanuals.eu
results in the minimum neces-
sary time. After approximate-
www.devicemanuals.eu
sary time. After approximate-
ly 15 minutes from the start of
www.devicemanuals.eu
ly 15 minutes from the start of
www.devicemanuals.eu
fore they operate.
www.devicemanuals.eu
fore they operate.
Press button
www.devicemanuals.eu
Press button
www.devicemanuals.eu
4
www.devicemanuals.eu
4
flashes.
www.devicemanuals.eu
flashes.
Change the function set.
www.devicemanuals.eu
Change the function set.
9.7
www.devicemanuals.eu
9.7
Set the delay start
www.devicemanuals.eu
Set the delay start
1.
www.devicemanuals.eu
1.