LAVAMAT 61271 BI LAVAMAT 61470 BI EN User manual
www.aeg.com CONTENTS 1. 2. 3. 4. 5. 6. 7. 8. 9. 10. 11. 12. 13. 14. SAFETY INFORMATION . . . . . . . . . . . . . . . . . . . . . . . . . . . . . . . . . . . . . . . . . . . . . . . . . . . . . . 3 SAFETY INSTRUCTIONS . . . . . . . . . . . . . . . . . . . . . . . . . . . . . . . . . . . . . . . . . . . . . . . . . . . . . . 4 TECHNICAL INFORMATION . . . . . . . . . . . . . . . . . . . . . . . . . . . . . . . . . . . . . . . . . . . . . . . . . . 5 PRODUCT DESCRIPTION . . . . . . . . . . . . . . . . . .
ENGLISH 3 1. SAFETY INFORMATION Before the installation and use of the appliance, carefully read the supplied instructions. The manufacturer is not responsible if an incorrect installation and use causes injuries and damages. Always keep the instructions with the appliance for future reference. 1.1 Children and vulnerable people safety WARNING! Risk of suffocation, injury or permanent disability.
www.aeg.com • If the supply cord is damaged, it must be replaced by the manufacturer, its service agent or similarly qualified persons in order to avoid a hazard. • The operating water pressure (minimum and maximum) must be between 0,5 bar (0,05 MPa) and 8 bar (0,8 MPa) • The ventilation openings in the base (if applicable) must not be obstructed by a carpet. • The appliance is to be connected to the water mains using the new supplied hose-sets. Old hose sets must not be reused. 2.
ENGLISH mains plug, use a 13 amp ASTA (BS 1362) fuse. • This appliance complies with the E.E.C. Directives. Water connection • Make sure not to cause damage to the water hoses. • The appliance is to be connected to the water mains using the new supplied hose-sets. Old hose sets must not be reused. • Before you connect the appliance to new pipes or pipes not used for a long time, let the water flow until it is clean. • The first time you use the appliance, make sure that there is no leakage. 2.
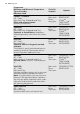
www.aeg.com Level of protection against ingress of solid particles and moisture ensured by the protective cover, except where the low voltage equipment has no protection against moisture Water supply pressure IPX4 Minimum 0,5 bar (0,05 MPa) Maximum 8 bar (0,8 MPa) Cold water Water supply 1) Maximum load Cotton 7 kg Spin speed Maximum 1200 rpm (L 61271 BI) 1400 rpm (L 61470 BI) 1) Connect the water inlet hose to a water tap with a 3/4'' thread. 4.
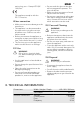
ENGLISH 7 4.2 Accessories 1 1 Spanner 2 To remove the transit bolts. 2 Plastic caps 4 To close the holes on the rear side of the cabinet after the removal of the transit bolts. 3 Anti-flood inlet hose To prevent possible leakage 4 Plastic hose guide To connect the drain hose on the edge of a sink. 3 5.
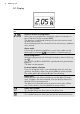
www.aeg.com 5.1 Display The display shows the following information: Duration of the set programme When you set a programme, the display shows the duration in hours and minutes (for example 2.05). The duration is calculated automatically on the maximum load for each type of fabric. After the programme has started, the time remaining is updated every minute. Alarm codes In the event of operating problems, some alarm codes can be (see chapter «Troubleshooting»).
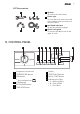
ENGLISH 9 5.2 Indicator pilot lights A B C After you have pressed the button 8, the WASHING light (A) comes on. The machine is operating. The DOOR light (B) indicates when the door can be opened: • light on: the door cannot be opened • light blinking: the door is opening in some minutes • light off: the door can be opened When the appliance is performing additional rinses The EXTRA RINSE light (C) comes on.
www.aeg.com Programme Maximum and Minimum Temperature Type of Laundry Maximum Load Cycle Description Options Cottons + Prewash3) 95° - Cold Max. load 7 kg - Reduced load 3 kg White and coloured cotton (normally soiled items). Prewash Main wash Rinses Long spin SPIN REDUCTION RINSE HOLD STAIN1) TIME SAVE2) EXTRA RINSE Synthetics 60° - Cold Max. load 3 kg - Reduced load 2 kg Synthetic or mixed fabrics: underwear, coloured garments, non-shrink shirts, blouses.
ENGLISH Programme Maximum and Minimum Temperature Type of Laundry Maximum Load Cycle Description Spin Drain Max. load 7 kg Long spin Separate spin for hand washed cotton garments and after programmes with the Rinse hold option set. Turn the programme dial to Off before setting this programme. Reduce the spin speed if needed. 11 Options SPIN REDUCTION Drain Max. load 7 kg For emptying out the water of the last rinse in programmes with the Rinse hold option set. Draining of water Delicate Rinses Max.
www.aeg.com 1) Stain option can be selected only at the temperature of 40°C or higher. 2) If you select the Super Quick option by pressing button 6, we recommend that you reduce the maximum load as indicated. Full loading is possible however with somewhat reduced cleaning results. 3) If using liquid detergents, a programme without PREWASH must be selected. 4) Use a special detergent for very low temperature 5) Standard programmes for the Energy Label consumption values.
ENGLISH Off Mode (W) 13 Left On Mode (W) The information given in the charts above are in compliance with the EU Commision regulation 2015/2010 implementing directive 2009/125/EC. 8. FIRST USE 1. To activate the drain system, put 2 litre of water in the main wash compartment of the detergent dispenser. 2. Put a small quantity of detergent in the main wash compartment of the detergent dispenser. Set and start a programme for cotton at the highest temperature without laundry.
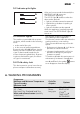
www.aeg.com The detergent compartment for the prewash phase, the soak programme and for the stain function. Add the detergent for prewash, soak and stain remover before the start of the programme. The detergent compartment for the washing phase. If you use a liquid detergent, put it immediately before you start the programme. Liquid additives compartment (fabric conditioner, starch). Put the product in the compartment before you start the programme.
ENGLISH This option is not available with a temperature lower than 40°C. If you wish to perform a programme with the stain option, pour stain remover into compartment . 9.7 Setting the EXTRA RINSE option (button 5) This appliance is designed for saving water. However, for people with a very delicate skin (allergic to detergents) it may be necessary to rinse the laundry using an extra quantity of water (extra rinse). The appliance will perform some additional rinses. 9.
www.aeg.com • Press the button 8 to set the washing machine to PAUSE; • Press the button 9 once until the display shows the symbol ’; • Press the button 8 again to start the programme. a few minutes the door can be opened (pay attention to the water level and temperature !) . After closing the door, it is necessary to set the programme and the options again. Press button 8 to start the programme again. You can change the set delay only after you set the washing programme again. 9.
ENGLISH 17 10. HELPFUL HINTS AND TIPS 10.1 The laundry load 10.3 Detergents and additives • Divide the laundry in: white, coloured, synthetics, delicates and wool. • Obey the washing instructions that are on the laundry care labels. • Do not wash together white and coloured items. • Some coloured items can discolour with the first wash. We recommend that you wash them separately for the first times. • Button up pillowcases, close zippers, hooks and poppers. Tie up belts.
www.aeg.com Water hardness table Level Type Water hardness °dH °T.H. mmol/l Clarke 1 soft 0-7 0-15 0-1.5 0-9 2 medium 8-14 16-25 1.6-2.5 10-16 3 hard 15-21 26-37 2.6-3.7 17-25 4 very hard > 21 > 37 >3.7 >25 11. CARE AND CLEANING WARNING! Disconnect the appliance from the mains supply before you clean it. 11.1 Descaling The water we use contains limescale. If it becomes necessary, use a water softener to remove limescales. Use a special product made for washing machines.
ENGLISH 19 11.5 Detergent dispenser To clean the dispenser: 1 1. 2. Press the lever. Pull the dispenser out. 3. Remove the top part of the liquid additive compartment. Clean all the parts with water. MAX 2 4. MAX 5. 6. WARNING! Before unscrewing the pump cover, switch the appliance off and remove the mains plug from the socket. 11.
www.aeg.com A 3. Place a container close to the pump to collect any spillage. 4. Release the emergency emptying hose (B), place it in the container and remove its cap cover. 5. When no more water comes out, unscrew the pump cover (A) by turning it anti-clockwise and remove the filter. Use pliers, if necessary. Always keep a rag nearby to dry up any water spillages when removing the cover. Clean the filter under a tap, to remove any traces of fluff. 6.
ENGLISH 8. 9. WARNING! When the appliance is in use and depending on the programme selected there can be hot water in the pump. Never remove the pump cover during a wash cycle, always wait until the appliance has finished the cycle, and is empty. When refitting the pump cover, ensure it is securely re-tightened so as to stop leaks and young children being able to remove it. 21 Put the cap back on the emergency emptying hose and place the latter back in its seat.
www.aeg.com 6. 7. 20° Install again the inlet hose. Make sure that the couplings are tight to prevent leakages. Open the water tap. 45° 11.8 Emergency emptying out 11.9 Frost precautions If the water is not discharged, proceed as follows to empty out the appliance: 1. pull out the plug from the power socket; 2. close the water tap; 3. if necessary, wait until the water has cooled down; 4. place a bowl on the floor; 5. place the end of the emergency emptying hose into the bowl; 6. Remove its cap.
ENGLISH 23 Problem Possible cause/Solution The washing machine does not start: The door has not been closed. • Close the door firmly. The plug is not properly inserted in the power socket. • Insert the plug into the power socket. There is no power at the socket. • Please check your domestic electrical installation. The main fuse has blown. • Replace the fuse. The programme dial is not correctly positioned and the button 8 has not been pressed.
www.aeg.com Problem Possible cause/Solution There is water on the floor: Too much detergent or unsuitable detergent (creates too much foam) has been used. • Reduce the detergent quantity or use another one. Check whether there are any leaks from one of the inlet hose fittings. It is not always easy to see this as the water runs down the hose; check to see if it is damp. • Check the water inlet hose connection. The drain or the inlet hose is damaged. • Replace it with a new one.
ENGLISH 25 Problem Possible cause/Solution Spinning starts late or the machine does not spin: The electronic unbalance detection device has cut in because the laundry is not evenly distributed in the drum. The laundry is redistributed by reverse rotation of the drum. This may happen several times before the unbalance disappears and normal spinning can resume. If, after some minutes, the laundry is still not evenly distributed in the drum, the machine will not spin.
www.aeg.com 2. 3. Remove the cardboard top. Remove the polystyrene packaging materials. 4. Remove the internal film. 5. Open the door. Remove the polystyrene piece from the door seal and all the items from the drum. 6. Put one of the polystyrene packaging elements on the floor behind the appliance. Carefully put down the appliance with the rear side on it. Make sure not to damage the hoses.
ENGLISH 7. 8. 27 Remove the polystyrene protection from the bottom. Pull up the appliance in vertical position. 1 2 9. Remove the power supply cable and the drain hose from the hose holders. 10. Remove the three bolts. Use the key supplied with the appliance. 11. Pull out the plastic spacers. 12. Put the plastic caps in the holes. You can find these caps in the user manual bag.
www.aeg.com WARNING! Remove all the packaging and the transit bolts before you install the appliance. We recommend that you keep the packaging and the transit bolts for when you move the appliance. 13.2 Positioning and levelling • Install the machine on a flat hard floor. • Make sure that air circulation around the machine is not impeded by carpets, rugs etc. • Carefully level by screwing the adjustable feet in or out. • After having levelled the appliance, tighten the lock nuts.
ENGLISH 29 13.3 The inlet hose • Connect the hose to the appliance. Turn the inlet hose only left or right. Loose the ring nut to set it in the correct position. 20 O 45 O • Connect the water inlet hose to the cold water tap with 3/4 thread. CAUTION! Make sure that there are no leaks from the couplings. Do not use an extension hose if the inlet hose is too short. Contact the service centre for the replacement of the inlet hose.
www.aeg.com Water-stop device The inlet hose has a water stop device. This device prevents water leaks in the hose because of its natural ageing. The red sector in the window «A» shows this fault . If this occur, close the water tap and contact the service centre to replace the hose. A 13.4 Water drainage There are different procedures to connect the drain hose: With the plastic hose guide. • On the edge of a sink. • Make sure that the plastic guide cannot move when the appliance drains.
ENGLISH 31 • If the end of the drain hose is this (see the drawing), you can push it directly into the stand pipe. Without the plastic hose guide. • To a sink spigot. Refer to the illustration. Put the drain hose in the spigot and tighten it with a clip. Make sure that the drain hose makes a loop to prevent that remaining particles go in the appliance from the sink. • Directly to a built-in drain pipe in the room wall and tighten it with a clip. You can extend the drain hose to maximum 400 cm.
www.aeg.com 13.5 In the interest of the environment • Connect the appliance to the FOUL system for the drain water. The sewage works keeps the drain water for the treatment before to release safely it into a river. Do not connect this appliance to the surface drain system of the water because it releases the drain water directly into a river or stream without a treatment and this can cause of pollution. Contact your local water authority to have more information. 14. BUILDING IN 14.
ENGLISH 33 Preparation and assembly of the door • The machine is originally pre-arranged for the assembly of a door opening from right to left (Fig. 2). Fig. 2 16-22 mm X Ø 35 mm 416 mm • Door The dimensions of the door should be: – width 595-598 mm – thickness 16-22 mm – the height X depends on the height of the adjacent furniture's base (Fig. 3). 22±1,5 mm 14 mm 595-598 mm Fig. 3 1 Fig. 4 2 • Hinges To mount the hinges it is necessary to drill two holes (dia. 35 mm, depth 12.
www.aeg.com • Mounting the door Fix the hinges to the appliance by means of the M5x15 screws . The hinges can be adjusted to compensate for possible uneven thickness of the door. To align the door perfectly it is necessary to loosen the screw , adjust the door and tighten the screw A again (Fig. 5). A B Do not remove the screw B (Fig. 5. Fig. 5 • Counter-magnet The appliance is prearranged for a magnetic closure of the door.
ENGLISH 35
132927081-A-482012 www.aeg.