L61470BI USER MANUAL EN User Manual Washing Machine
www.aeg.com CONTENTS 1. SAFETY INFORMATION............................................................................................. 3 2. SAFETY INSTRUCTIONS.............................................................................................4 3. PRODUCT DESCRIPTION...........................................................................................6 4. CONTROL PANEL....................................................................................................... 7 5. PROGRAMMES ..
ENGLISH 1. 3 SAFETY INFORMATION Before the installation and use of the appliance, carefully read the supplied instructions. The manufacturer is not responsible for any injuries or damages that are the result of incorrect installation or usage. Always keep the instructions in a safe and accessible location for future reference. 1.
www.aeg.com • • • • • • The appliance must be connected to the water mains using the new supplied hose sets, or other new hose sets supplied by the Authorised Service Centre. Old hose sets must not be reused. If the mains power supply cable is damaged, it must be replaced by the manufacturer, its Authorised Service Centre or similarly qualified persons to avoid an electrical hazard. Before any maintenance operation, deactivate the appliance and disconnect the mains plug from the socket.
ENGLISH • • • • • to be replaced, this must be carried out by our Authorised Service Centre. Connect the mains plug to the mains socket only at the end of the installation. Make sure that there is access to the mains plug after the installation. Do not touch the mains cable or the mains plug with wet hands. Do not pull the mains cable to disconnect the appliance. Always pull the mains plug. UK and Ireland only. This appliance is fitted with a 13 A mains plug.
www.aeg.com 3. PRODUCT DESCRIPTION 3.1 Appliance overview 1 2 7 8 9 3 4 5 6 1. Detergent dispenser 2. Control panel 3. Door handle 4. Rating plate 5. Drain pump filter 10 6. Feet for levelling the appliance 7. Water drain hose 8. Mains cable 9. Connection for water inlet hose 10. Feet for levelling the appliance 3.2 Accessories 1 4 2 3 1 Spanner To remove the transit bolts. 2 Plastic caps To close the holes on the rear side of the cabinet after the removal of the transit bolts.
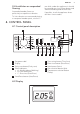
ENGLISH 3.4 Installation on suspended flooring 7 mm thick, under the appliance. It should be screwed to at least 2 floor beams and should extend beyond the front feet. Suspended wooden floors are particularly susceptible to vibration. To limit vibration we recommend placing a waterproof wooden panel, at least 15 If possible, install the appliance where the floor is more stable. 4. CONTROL PANEL 4.
www.aeg.com The display shows the following information: Duration of the selected programme • After setting a programme, the duration is displayed in hours and minutes (for example ). • After the programme has started, the remaining time is updated every minute. Delay Start • When setting a delay start, the display shows the delay time (20 hours max.) for about 3 seconds (for example ), and then it shows the programme duration again.
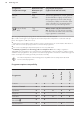
ENGLISH 5. PROGRAMMES 5.1 Programme Chart Programme Temperature range Maximum load Maximum spin speed Programme description (Type of load and soil level) Cottons 95°C - Cold 7 kg 1400 rpm White cotton and coloured cotton. Normal soil and light soil. Cottons + Prewash1) 95°C - Cold 7 kg 1400 rpm White cotton and coloured cotton. Heavy soil and normal soil. Synthetics 60°C - Cold 3 kg 1200 rpm Synthetic items or mixed fabric items. Normal soil. Easy Iron 60°C - Cold 1.
www.aeg.com Programme Temperature range Maximum load Maximum spin speed Programme description (Type of load and soil level) Mix 20° 20°C 3 kg 900 rpm Special programme for cotton, synthetic and mixed fabrics lightly soiled. Select this programme to reduce the energy consumption. Make sure that the detergent is suitable for low temperature in order to have good washing results. Cottons Eco5) 60°C - 40°C 7 kg 1400 rpm White cotton and fast-coloured cotton. Normal soil.
Time Save 2) Stains 1) Spin Programme Extra Rinse ENGLISH ■ Spin Drain Delicate Rinses ■ ■ Jeans ■ ■ Refresh ■ Mix 20° ■ ■ Cottons Eco ■ ■ ■ ■ ■ ■ 1) This option can be selected only at a temperature of 40ºC or higher. 2) If you set the shortest duration, we recommend that you decrease the load size. It is possible to fully load the appliance, however the washing results can be less satisfactory. 6.
www.aeg.com Programmes Load (kg) Energy con- Water consumption sumption (kWh) (litre) Standard 60°C cotton Standard 60°C cotton Standard 40°C cotton ApproxiRemaining mate promoisture gramme du- (%)1) ration (minutes) 7 1.01 52 180 52 3.5 0.78 44 149 52 3.5 0.61 44 140 52 1) At the end of spin phase. 2) Not available for some models. Off Mode (W) Left On Mode (W) 0.10 0.
ENGLISH 7.4 Extra Rinse Set this option to add rinsing phases to a programme. The corresponding indicator illuminates. Useful for people allergic to detergents and in areas where the water is soft. The phase indicator Extra Rinse illuminates. 7.5 Time Save With this option you can decrease the programme duration: • Press this button once to set "Shortened duration" for items with daily soil. 13 • Press this button twice to set "Extra Quick" for slightly soiled items only.
www.aeg.com 10. DAILY USE 10.1 Loading the laundry Open the water tap. Connect the mains plug to the mains socket. 1. Pull the door handle to open the appliance door. 2. Put the laundry in the drum, one item at a time. 3. Shake the items before you put them in the appliance. Make sure not to put too much laundry in the drum. Refer to "Programmes" chapter for the maximum recommended loads. 4. Close the door. Compartment for washing phase. Compartment for liquid treatments (fabric conditioner, starch).
ENGLISH If you have chosen a delayed start with theDelay start button, the appliance will begin the countdown. 15 The set delay can be changed only after you have set the washing programme again. If you set an incorrect option, the yellow indicator of the Start/Pause button flashes 3 times. The display shows the message Err for some seconds. The Delay Start cannot be set with Drain programme. 10.5 Starting a programme with the delay start 10.
www.aeg.com If the Extra Rinse indicator after a few minutes goes off, the door can be opened. WARNING! If you cannot open the door but you need to open it, turn the programme dial to Off to switch the appliance off. After a few minutes the door can be opened (pay attention to the water level and temperature !) . After closing the door, it is necessary to set the programme and the options again. Press the Start/Pause button to start the programme again. 10.
ENGLISH b. manually redistribute the load so that the items are spaced evenly around the tub; c. press the Start/Pause button. The spin phase continues. 11.2 Stubborn stains For some stains, water and detergent is not sufficient. We recommend that you pre-treat these stains before you put the items in the appliance. Special stain removers are available. Use the special stain remover that is applicable to the type of stain and fabric. 11.
www.aeg.com 12.4 Door seal Always follow the instructions that you find on the packaging of the product. 12.3 Maintenance wash With the low temperature programmes it is possible that some detergent stays in the drum. Perform a maintenance wash regularly. To do this: Regularly examine the seal and remove all objects from the inner part. • Remove all laundry from the drum. • Select the cotton programme with the highest temperature with a small quantity of detergent. 12.
ENGLISH WARNING! Before unscrewing the pump cover, switch the appliance off and remove the mains plug from the socket. 19 WARNING! When the appliance is operating and depending on the programme selected there can be hot water in the filter. Never remove the filter cover during a wash cycle. Always wait until the appliance has finished the cycle and it is empty. When refitting the filter cover, ensure it is securely retightened so as to stop leaks and young children being able to remove it.
www.aeg.com 6. Remove foreign bodies and fluff from the filter seat and from the filter impeller. 7. Check carefully whether the pump impeller rotates (rotation is not completely smooth). If it doesn’t rotate, please contact the Authorised Service Centre. 2 8. Put the cap back on the emergency emptying hose and push back into position. Use the guides to push the filter pump back into place. Tighten the filter cover by turning it clockwise. 1 12.7 Cleaning the inlet hose and the valve filter 1. 2.
ENGLISH 3. 21 4. 45° 20° Clean the valve filter on the back of the appliance with a toothbrush. 12.8 Emergency emptying out If the appliance does not drain the water, proceed as follows: 1. Disconnect the mains plug from the mains socket. 2. Close the water tap. 3. If necessary, wait until the water has cooled down. 4. Place a bowl on the floor and put the end of the emergency emptying hose into the bowl. Remove its cap. The water should drain into the bowl. 5.
www.aeg.com 13. TROUBLESHOOTING • - The appliance door is open or not closed correctly. Please check the door! 13.1 Introduction • The appliance does not start or it stops during operation. - The mains supply is unstable. Wait until the mains supply is stable. • - No communication between electronic elements of the appliance. Switch off and switch on again. The programme was not finished properly or the appliance stopped too early.
ENGLISH 23 Problem Possible solution The spin phase does not operate or the washing cycle lasts longer than usually. • Set the spin programme. • Adjust manually the items in the tub and start the spin phase again. This problem may be caused by balance problems. There is water on the floor. • Make sure that the couplings of the water hoses are tight and there is not water leakages. • Make sure that the drain hose have no damages.
www.aeg.com Use the gloves. Remove the external film. If necessary, use a cutter. Remove the cardboard top. Remove the polystyrene packaging materials. Remove the internal film. Open the door. Remove the polystyrene piece from the door seal and all the items from the drum.
ENGLISH 25 Put one of the polystyrene packaging elements on the floor behind the appliance. Carefully put down the appliance with the rear side on it. Make sure not to damage the hoses. Remove the polystyrene protection from the bottom. Pull up the appliance in vertical position. 1 2 Remove the polystyrene block fitted on the door seal (if present). Pull out all items from the drum. Remove the power supply cable and the drain hose from the hose holders.
www.aeg.com Remove the three bolts. Use the key supplied with the appliance. Pull out the plastic spacers. Put the plastic caps in the holes. You can find these caps in the user manual bag. We recommend that you keep the packaging and the transit bolts for any movements of the appliance. 14.2 Positioning and levelling • Install the appliance on a flat hard floor. • Make sure that air circulation around the appliance is not impeded by carpets, rugs etc.
ENGLISH 27 • After having levelled the appliance, tighten the lock nuts. WARNING! Never place cardboard, wood or similar materials under the appliance to compensate for any unevenness in the floor. 14.3 The inlet hose • Connect the hose to the back appliance. Turn the inlet hose only left or right. • Loose the ring nut to set it in the correct position. 45 20 O O • Connect the water inlet hose to the cold water tap with 3/4" thread. CAUTION! Make sure that there are no leaks from the couplings.
www.aeg.com • Make a U shape with the drain hose. On the edge of a sink • Make sure that the plastic guide cannot move when the appliance drains. Attach the guide to the water tap or the wall. To a stand pipe with vent-hole • Directly into a drain pipe at a height of not less than 60 cm (23.6”) and not more than 100 cm (39.3”). Refer to the illustration. • The end of the drain hose must always be ventilated , i.e. the inner diameter of the drain pipe (min. 38 mm - min. 1.
ENGLISH 29 To a sink spigot • Refer to the illustration. Put the drain hose in the spigot and tighten it with a clip. • Make sure that the drain hose makes a loop to prevent particles going into the appliance from the sink. To a wall-pipe • Directly to a built-in drain pipe in the room wall and tighten it with a clip. You can extend the drain hose to maximum 400 cm. Contact the service centre for the other drain hose and the extension. 14.
www.aeg.com Remove the screws of the top cover on the rear of the appliance and install the antitilting device as shown in the drawing. Adjust the anti-tilting device so that the distance from the counter is 10mm. Loosen the nut counterclockwise with a 3mm wrench. Adjust the height and turn the nut clockwise to fix it. ~10mm 14.6 Preparation and assembly of the door The appliance is originally pre set for the assembly of a door opening from right to left.
ENGLISH 1 31 Hinges To mount the hinges it is necessary to drill two holes (dia. 35 mm, depth12.5-14 mm depending on the depth of door furniture) on the inner side of the door. The distance between the hole fixing centres must be 416 mm. The distance from upper edge of the door to the centre of the hole depends on the adjacent furniture's dimensions. The hinges will be fixed to the door by means of screws for wood 1 and 2 supplied with the appliance.
www.aeg.com 15.
ENGLISH 33
www.aeg.
ENGLISH 35
132938002-A-382017 www.aeg.